- Home
- Quilting Tools/Supplies
- Wing Clipper Ruler
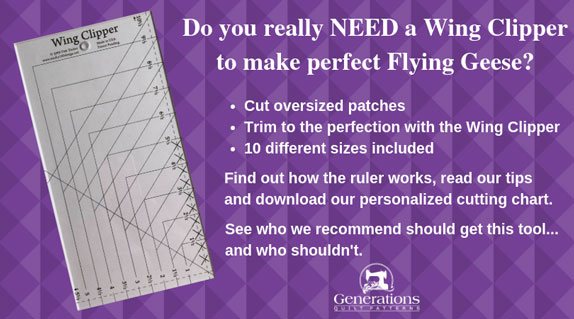
Do you really NEED a Wing Clipper Ruler to make perfect Flying Geese?
All it takes is an accurate 1/4" seam...right???
This post contains affiliate links, for which I receive compensation.
There are many Flying Geese rulers available to quilters.
The Wing Clipper ruler is just one option to make the most basic of units in quilting—Flying Geese that are twice as wide as they are tall.
Unfortunately, these patches aren't the easiest to stitch, especially if you've got a pile to make.
Sewing bias edge to bias edge has its problems.
Even with the most careful stitching, it's easy to pull a bias edge out of shape—making a perfect patch unattainable.
While paper piecing produces reliable, accurate results, a fair number of quilters avoid the technique.
3-D patches are great for some quilts, but not appropriate for others.
What's a quilter to do?
Enter the Wing Clipper Ruler.
On this page you'll find:
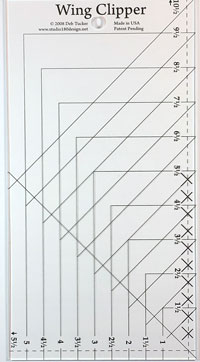
- A description and closeup of the Wing Clipper, what it looks like and what it does
- Tips from my personal bag of tricks when using the ruler
- An assessment of who should and shouldn't add one to their quilting bag of tricks
The Wing Clipper Ruler - what is it?
A specialty ruler that actually does as advertised, the Wing Clipper is used to trim oversized Geese down to perfection (it's referred to as a 'trim-down' ruler).
Patches are cut with your standard, everyday quilting ruler.
You never stitch exposed bias edges. Shapes are cut and trimmed after all the sewing is done.
Finished units are all straight of grain on the outside edges for stability—no crummy tricks played on beginning quilters here.
If you've ever tried making Flying Geese (FG) four-at-a-time the usual way, you know that if you don't sew EVERYTHING EXACTLY, those darned patches NEVER come out right.
There's just no room for error.
How does the Wing Clipper do it different?
It uses the basic construction technique of making FG four-at-a-time, over-sizes all the squares and then trims them to size with guides for each trimming to get it right.
Where most Flying Geese rulers include 2-3 different sizes, the Wing Clipper includes 9-10 depending on the version you choose:
- Wing Clipper 1 is for units from ½"x1" finished to 5"x10" finished, 10 sizes included in ½" and whole inch increments
- Wing Clipper 2 is for units from ¾”x 1½” finished to 4¾” x 9½” finished, 9 sizes included in ¼" and ¾" increments
A complete and detailed instruction sheet is included in its packaging with a cutting chart and directions for both left- and right-handed quilters.
More rulers from Studio 180
Intrigued?
Tucker Trimmer rulers by Studio 180 are all used to trim HSTs, QSTs and Flying Geese.
Click the image below to learn more, read reviews and find pricing/purchasing information.
The Technique
In this tutorial we make four 1½"x3" finished (2"x3½" unfinished) Flying Geese units.
Use the cutting chart that comes with the ruler to cut one 'Goose' and four 'Sky' squares. For our sample those cutting dimensions are:
- Four (4) 2½" squares of 'Sky' fabric
- One (1) 4½ square of Goose fabric
General Instructions
These abbreviations are used in this tutorial:
- RST - right sides together
- SA - seam allowance
- FG - Flying Geese
For the best results, stitched units should be pressed, first flat to set the seam and meld the fibers of the thread with the fibers of the fabric.
Then press the SA away from the Goose making sure there is no tuck in at the seam allowance.
Pressing instructions are highlighted in yellow.
Construction Instructions
What follows is construction of the four identical units as per the instruction sheet that comes with your Wing Clipper ruler.
After working with this ruler for awhile, I've made a couple of modifications to the process to suit the way I prefer to work.
I share those tips lower down on this page.
Step 1: Marking/stitching
With RST layer the larger Goose square with two smaller 'Sky' squares in opposite diagonal corners on top. The smaller squares are placed a scant 1/16" (a smidgen) in from each pair of adjacent outside edges.
With a Quick Quarter ruler (shown here) or a standard quilting ruler, drawn two continuous lines, each a quarter inch away from the center diagonal .
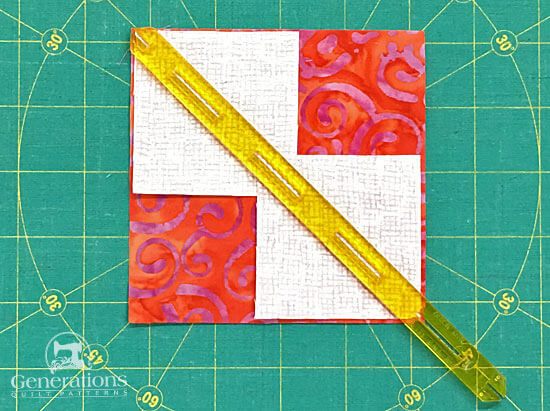 Using a Quick Quarter to mark makes quick work of marking.
The black arrows below point to the marks. They need to be dark enough for you to see as you stitch, but not so dark that they show through any lighter fabric selections.
On the light 'Sky' squares I've lightly marked with a mechanical pencil for a fine line. If it had been a darker fabric, my favorite Bohin Mechanical Chalk pencil would work nicely.
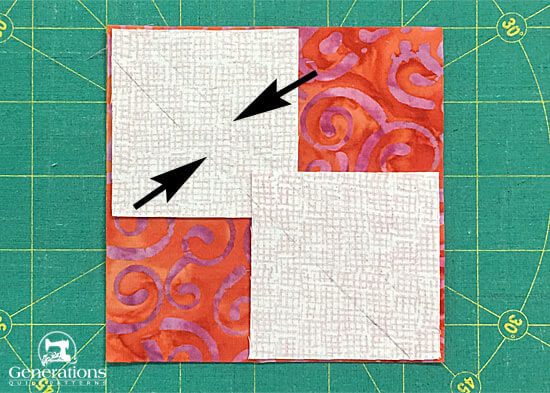
With your stitch length set for piecing, sew on each line from edge to edge. No need to back stitch. Starting your stitches on a scrap of fabric (as shown below behind the presser foot) helps prevent your machine from chewing up the points.
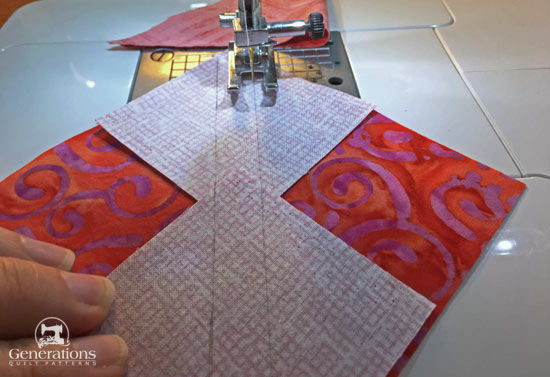 If you need pins to hold everything in place, use them.
Cut the unit in half between the two lines of stitching.
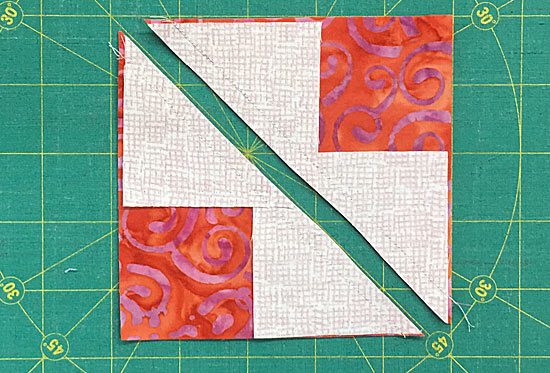
Press, with the SA toward the small triangles forming a sort of heart shape.
NOTE: If you've used a light sky and dark goose fabric like this sample, check to see that the darker fabric doesn't shadow through the lighter one from the front side. If it does, now is the time to trim the darker fabric back just a wee bit (less than 1/8") to remove the problem.
Mark the wrong side of the two remaining small 'Sky' patches, each with a pair of diagonal lines a 1/4" from the center. Again, I used my Quick Quarter ruler.
Position a small 'Sky' square a scant 1/16" in from the corner of the 'goose' HST.
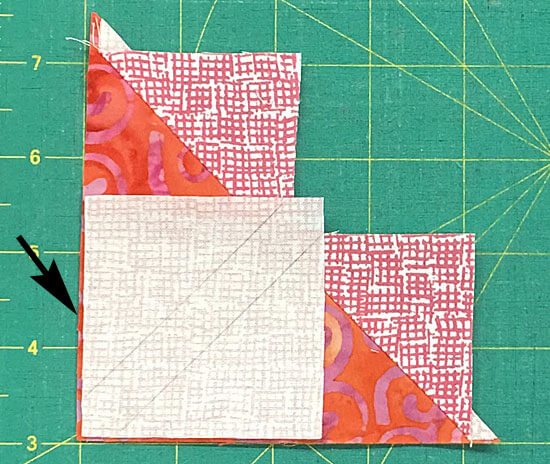 The 'goose' fabric peeks out just a scant 1/16"
Sew on the lines.
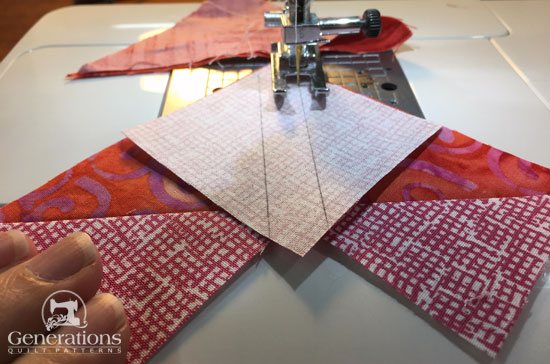 Our stitching should end at the point of the 'V' formed by the heart-shaped patches underneath and the marked square on top...
Give a quick press to meld the fibers of the fabric and thread together.
Cut in half between the two stitching lines.
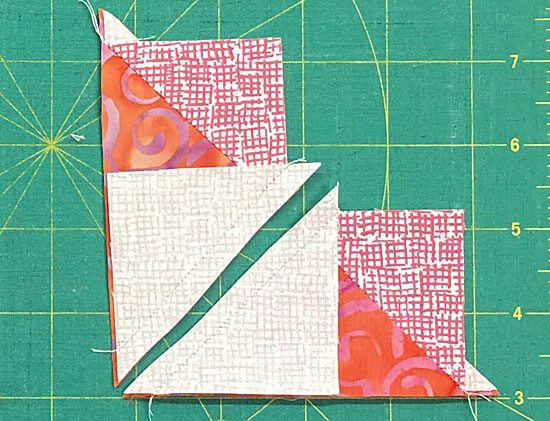 ...and the stitching DID end in the points of the 'V'. Whew!
Repeat for both sets.
Press the FGs with the SA out towards the smaller 'sky' triangle.
After pressing this is what we've got.
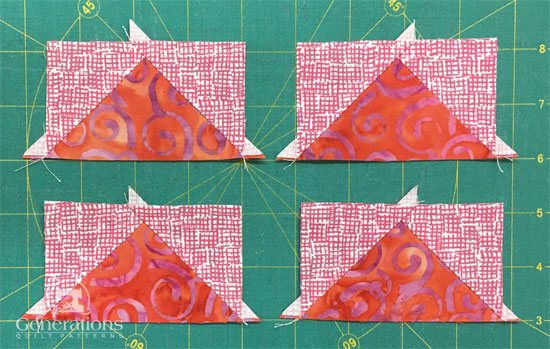 We're ready to trim them to perfection with our Wing Clipper Ruler.
Up to this point, making Flying Geese 4-at-a-time is just like the No Waste Flying Geese method shown on this website. The only difference is the smaller squares about scooched a scant 1/16" in from the edges.
The sewing is the same.
Now it's time to reveal the 'magic' of the Wing Clipper ruler—it's all in the lines.
Step 2: Using the Wing Clipper Ruler
The Wing Clipper Ruler is a trim down ruler—meaning that it's used to trim oversized units to perfection without a lot of futzing around.
And it is a thing of beauty...perfectly engineered.
For right-handers, position a Flying Geese unit on your cutting mat with the point towards your belly. (Remember, complete instructions are included with the ruler for left-handers.)
Place the ruler on top with the 10-1/2" side furthest away from you (wide side of the FG); the 5-1/2" side in on the right.
For our 2" x 3½" unfinished (1½" x 3" finished) sample, the 2" and 3-1/2" lines of the ruler should be just a bit in from the cut edge of the unit on the left and bottom edge.
Now line up the "V" lines with the seam lines of your FG (red arrows below).
With your rotary cutter, trim the right and top sides.
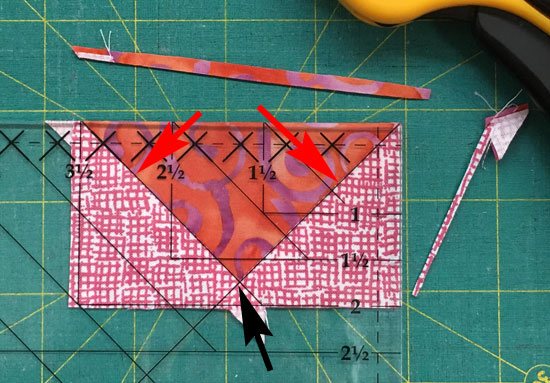 The point of the FGU is directly underneath the lines of the 'V' (black arrow)
Flip the FG 180° so the point is away from you. (I love my spinning rotary cutting mat for this type of work!)
This time, align the freshly cut edges with the 3-1/2" marking on the left and the 2" marking on the bottom.
If our stitching is true and straight, the 'X' marking on the 10-1/2" side of the ruler is exactly on top of the point.
Trim the top and right sides with your rotary cutter.
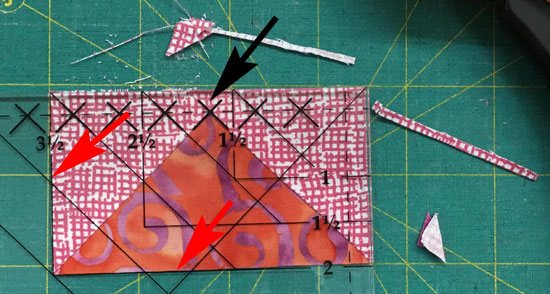 On the second set of trims, the 'X' is now at the point of the Goose
Repeat for the remaining three and this is our prize...
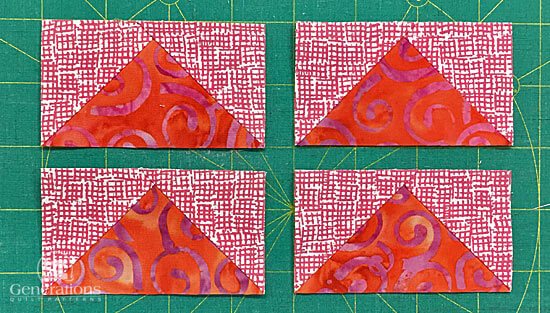 The Wing Clipper Ruler delivers!
...perfect Flying Geese with points 1/4" in from the edge and bottom corners cut exactly in half by the seam lines.
Piecing doesn't get any easier when the units are this accurate!
Truly a thing of beauty.
If you came to this 'Trimming' section from a quilt block tutorial, close this window now. Your tutorial is still open.
My Tips
I encourage you to be confident in knowing what does and doesn't work FOR YOU when quilting. Using a technique that just isn't quite right for how you work sucks the fun out of everything.
Modify techniques so that they suit YOUR needs.
I do!
These are my deviations from the instructions included with the ruler.
See if they make sense to you, too. If so, keep them. If not, ignore them. What works best for YOU is the BEST way
Fabric preparation
I love working with starched quilt fabric.
Because the fibers don't shift while you're cutting and piecing, the final patchwork is just plain more accurate.
My go-to is a mix of 50/50 StaFlo liquid fabric starch concentrate to
water because I can control the stiffness. I make small batches and
keep it in a spray bottle. I do avoid spraying the mixture on my Magic Pressing Mat to take care of it.
Many quilters have good results using Mary Ellen's Best Press (which is a sizing, not a starch), too. It's a bit expensive for how much I use.
Cutting Chart
There is a cutting chart included in the package with the ruler when you get it. It's what I used for cutting my patches in the tutorial above so that you could see how they work.
However, when I cut patches for my own use, I cut the four 'Sky' squares 1/4" larger because I can avoid 'scooching those patches in a smidgen' from the edge.
I'm just not a 'scooch' kind of girl.
A slight variation from the designer's method—but it works better for me.
Visit my No Waste FG tutorial to download your own copy of my personal cutting chart.
Addressing the Bulk - A Quick Trick!
Note: If you've jumped to this page from the 'Perfect No Waste Flying Geese Quilt Blocks tutorial, you'll find a link at the end of this trick to get you right back to where you left off. :)
This little trick isn't mentioned on the Wing Clipper ruler's instruction sheet—but it solves a problem with construction. (To be honest, I've not seen it mentioned in any of the instructions I've ever seen for No Waste or 4-at-a-Time Flying Geese either. 'Tis a puzzlement.)
The first two squares overlap a fair amount—remember they were cut generously.
Unfortunately, when you add the third and fourth squares, two extra layers of fabric are trapped/sewn-into the point of your FG unit.
The photo below is a bit fuzzy due to the closeness of the patch, but I think it's easier for you to see the extra layers.
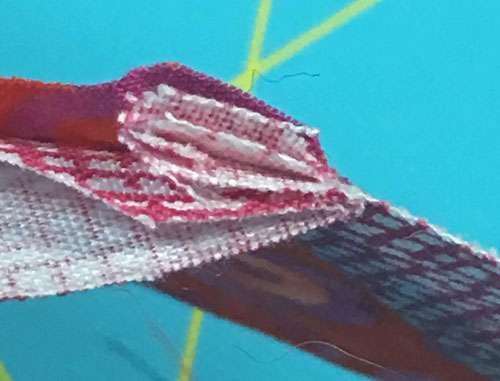 Can you count all seven layers? Two more than needs to be.
Now you could press them into submission, but even so, the extra is still there.
To get rid of it is quite simple.
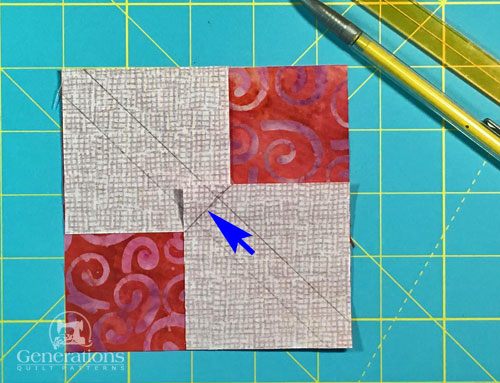
When you mark your first two Sky patches, draw a third line from corner to corner ONLY ON THE TOP SMALL SKY SQUARE and in the opposite direction. It should go right through the center as shown in the photo below (blue arrow).
With a pair of scissors, lift up and clip through both layers of those two small squares on the mark—do not cut through the large Goose square.
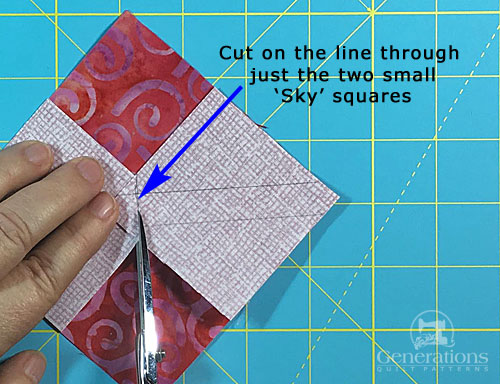
The cut edges butt up against each other but do not overlap.
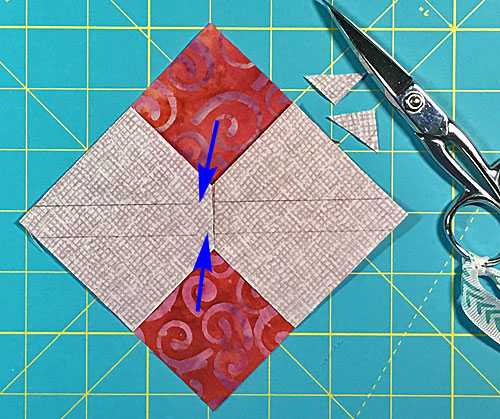 Those two tiny triangles by the scissors created by trimming are scraps
Toss the scraps.
Problem solved quickly, easily and without much hullabaloo!
Sew on the two marked lines...redraw the missing bit (blue arrows above) if needed, there'll be a slight gap.
Voila!
No more extra fabric in the SA at the point of your Goose!
If you came to this page from the 'Perfect No Waste Flying Geese Quilt Blocks' tutorial, click here to return to where you left off.
Otherwise, if you're following the Winger Clipper Ruler tutorial, continue on below.
Do YOU need a Wing Clipper?
It'd be a lie if I said you couldn't make Flying Geese without a Wing Clipper Ruler.
However, using it is a lot easier on the brain when trimming. The extra lines help get everything lined up faster and more accurately than with your standard quilting rulers.
Trimming FG to the perfect size is a more reliable way to make the individual units than using the No Waste Method where everything must be cut and sewn exactly.
That said, personally, if I'm going to be making double (like in the Arrowhead quilt block) or triple FGs, my preferred method is still paper piecing—unless I need to control the direction of their seam allowances—because I can economize on the number of trimming cuts.
But if I'm making singles, or need doubles and triples AND the ability to control the direction the seam allowances are pressed, the Wing Clipper is now my new go-to ruler for FG.
No one is more surprised than me!
Who should stay away from this ruler? (imho)
- If your seam allowance is a perfect quarter inch—ALWAYS—then just use the No Waste Method and cut your patches exactly.
- If your patches always come out perfect with the technique you're currently using. Don't mess with a good thing.
- If you ALWAYS paper piece your FG.
- If you never make FG.
So who IS a candidate for this ruler?
- If your seam allowance isn't always spot on.
- If you'll never-ever-never-ever paper piece a FG.
- If you make lots of Flying Geese in many different sizes. (There are other FG rulers out there. Many include just a couple sizes. Others are more expensive for about the same thing. Others, still, have you trimming each side individually.)
Yes! I'm interested in getting my own Wing Clipper Ruler—Click Here.
Nope—not interested. Show me more ways to make Flying Geese.
