- Home
- Free Quilt Block Patterns
- Whilring Square Quilt Block
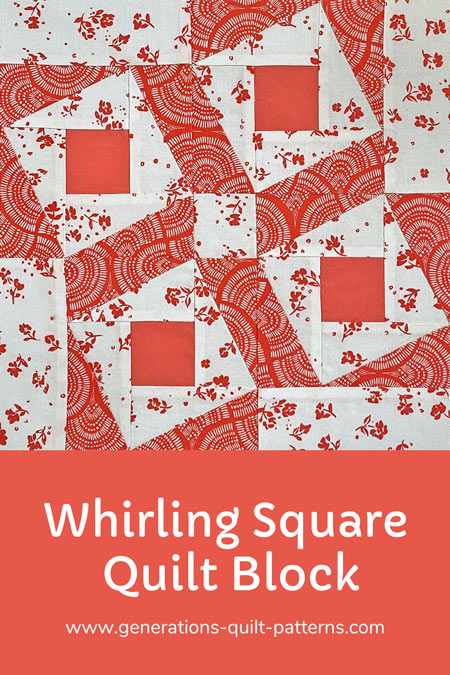
Ignite Your Creativity: Master the Whirling Square Quilt Block 🌪️
From our Free Quilt Block Patterns Library
This post contains affiliate links, for which I receive compensation.
The time has come to revolutionize your craft with the mind-bending Whirling Square quilt block. 🔄This ingenious design is about to catapult your creativity into the stratosphere! 🚀
Don't be fooled by its dynamic appearance—our meticulously crafted, step-by-step tutorial, coupled with free paper piecing patterns and cutting charts, will transform you into a Whirling Square maestro faster than you can thread a needle. 🧵💨

Seize your favorite fabrics and prepare to embark on a quilting odyssey that defies the very laws of geometry! 📐🌈 Who said squares can't dance? Let's tango with tradition! 💃🕺
Need to find something quickly? Use these handy links to navigate the tutorial with ease. 🧭🧵
- A cutting chart in five sizes, with downloads of the chart and block design
Cut. Sew. Press. Piece a patchwork pirouette!
📋General Instructions
Several abbreviations are used on this page. They are:
- SA - seam allowance
- RST - right sides together
- HRT - half rectangle triangles
A 1/4" SA is used in this tutorial.
Highlighted in yellow, pressing instructions are easy to spot.
First press the patches in the closed position as they came off your sewing machine. This sets the seam, melding the fibers of the threads into the fibers of the fabric. Then follow the instructions given.
Download and print paper piecing pattern
To download the pattern, use the most current version of Adobe.
For accurate results, on Adobe's Print Menu page, under 'Page Size and Handling' set 'Custom Scale' to 100%. Then print.
Click here to see what it looks like on the Print Menu page.
Find your finished block size from the chart below. Print the corresponding number of pages for a total of four Corners and four Flying Geese Triplets for each block you want to make.
Download and print paper piecing patterns | ||
|---|---|---|
| Finished Block Size | # of copies to print | PDF Download Link |
| 7" | 2 | 1" x 2" |
| 10½'' | 3 | 1½" x 3" |
| 14" | 4 | 2" x 4" |
| 17½'' | 8 | 2½" x 5" |
| 21" | 8 | 3" x 6" |
After printing, use the 1" square graphic on the printed page(s) to double check that your patterns printed at the correct size.
Then cut out the required number of patterns from your copies. A rough cut is good enough—an 1/8"-1/4"-ish away from the outside dashed square.

Not sure which paper to use?
Take a look at my review of several of the most popular brands available to us quilters on the market.
You want a super-easy paper to tear away—less stress on the stitches.
✂️ Let's Dive In! Cutting Patches for Your Whirling Square Adventure
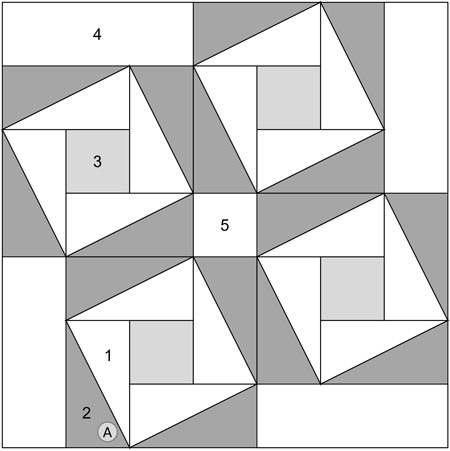
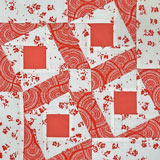
Sample Block Size: 10½" finished /11" unfinished
Grid: 7x7
Design Type: Partial Seams | Log Cabin | Paper piecing | Pinwheel
Pro tip: Label your patches. You'll thank yourself later! 🏷️
Each HRT rectangle below is cut into 2 patches.
 | Cutting Chart for a~ Paper & Traditional Piecing ~ | ||||||
|---|---|---|---|---|---|---|---|
| Patch | Fabric | Qty | Finished Block Size | ||||
| 7'' | 10½'' | 14'' | 17½'' | 21'' | |||
| HRT-1 | Bac | 8 | 2⅞'' x 3¼'' | 3⅜'' x 4¼'' | 3⅞'' x 5¼'' | 4⅜'' x 6¼'' | 4⅞'' x 7¼'' |
| HRT-2 | Dark | 8 | 2⅞'' x 3¼'' | 3⅜'' x 4¼'' | 3⅞'' x 5¼'' | 4⅜'' x 6¼'' | 4⅞'' x 7¼'' |
| 3 | Med | 4 | 1½'' x 1½'' | 2'' x 2'' | 2½'' x 2½'' | 3'' x 3'' | 3½'' x 3½'' |
| 4 | Bac | 4 | 1½'' x 3½'' | 2'' x 5'' | 2½'' x 6½'' | 3'' x 8'' | 3½'' x 9½'' |
| 5 | Bac | 1 | 1½'' x 1½'' | 2'' x 2'' | 2½'' x 2½'' | 3'' x 3'' | 3½'' x 3½'' |
| Unfinished Block Size | 7½'' | 11'' | 14½'' | 18'' | 21½'' | ||
| Grid Size | 1'' | 1½'' | 2'' | 2½'' | 3'' | ||
Subcutting✂️
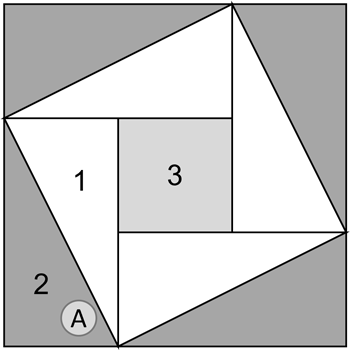
The #A1 and #A2 rectangles are subcut the same way.
- Stack #A1 and #A2 rectangles separately, right side up.
- Align shorter sides at top and bottom.
- Mark 5/8" in from the top-left and bottom-right corners (blue arrows)
- Line up the ruler with the marks and cut the stack in half diagonally.
Tip: Cut only as many layers as you can accurately manage at once.
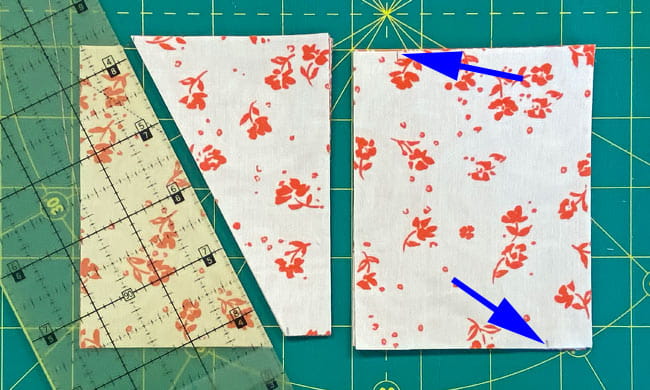
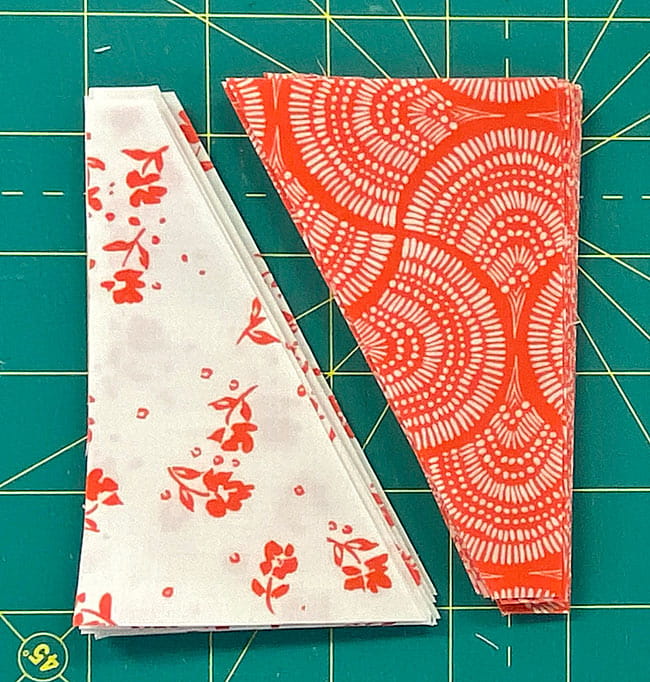
When finished, you will be able to stack them as s
🪡 Piecing the units for your Whirling Square quilt block 🧵
HRT-A
Make 16
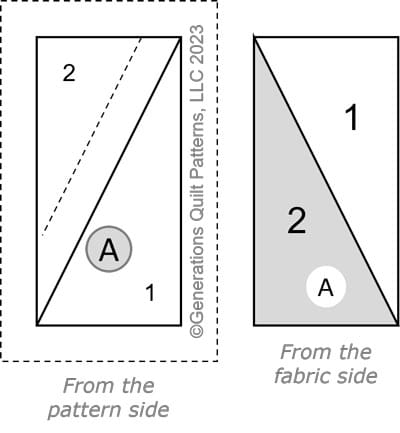
Don't worry if you're new to paper piecing—we'll guide you every step of the way.
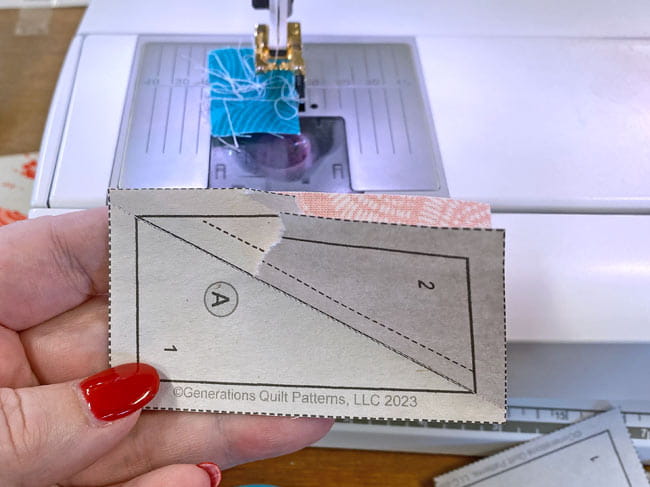
Use a dot of Elmer's Washable Glue Stick to hold the #1 in position. Those dashed lines help you get this job done quickly.
We need to make a few adjustments to our sewing machine settings to paper piece.
- Reduce your stitch length to 16–20 stitches per inch (1.3-1.6 mm). This perforates the paper and stabilizes the seam when you remove the pattern. [Learn more about stitch length here.]
- Reduce your machine's speed or just plain slow down. Sew only as fast as you can AND stay on the solid stitching line.
- Install an open toe appliqué foot (sometimes called an 'embroidery' or 'satin stitch' foot) if you have one (it makes it easier to see where you're stitching).
- Use a larger needle (90/14) IF you have problems removing the pattern. Personally, I use an 80/12 Microtex Sharp for paper piecing without any issues.
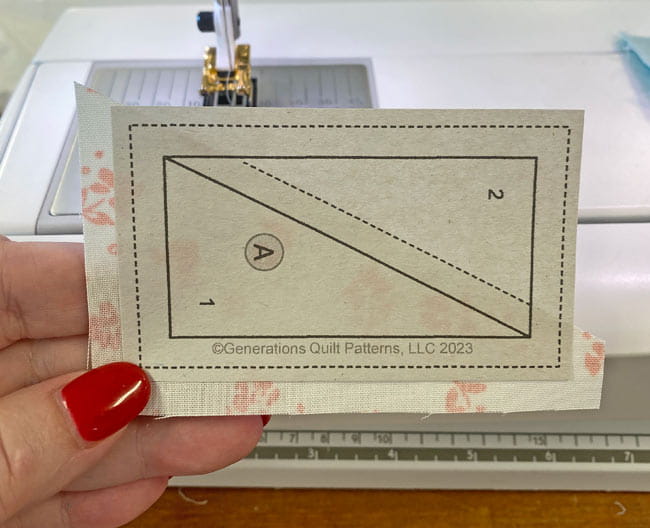
With RST, layer #2 with #1 centering it.
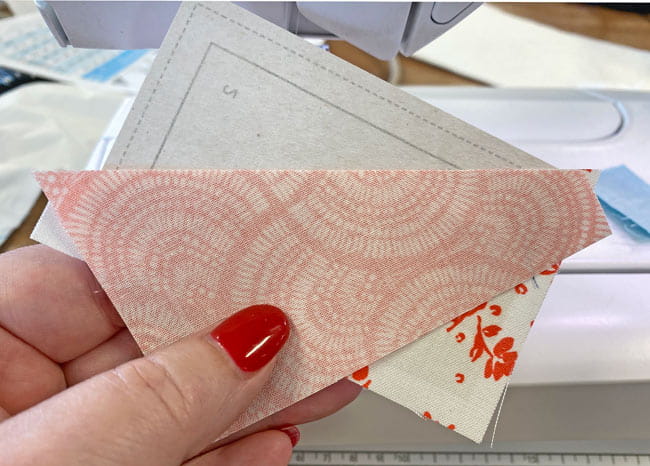
Sew the seam on the solid line, starting and ending past the outside dashed line surrounding the block. (blue arrows)
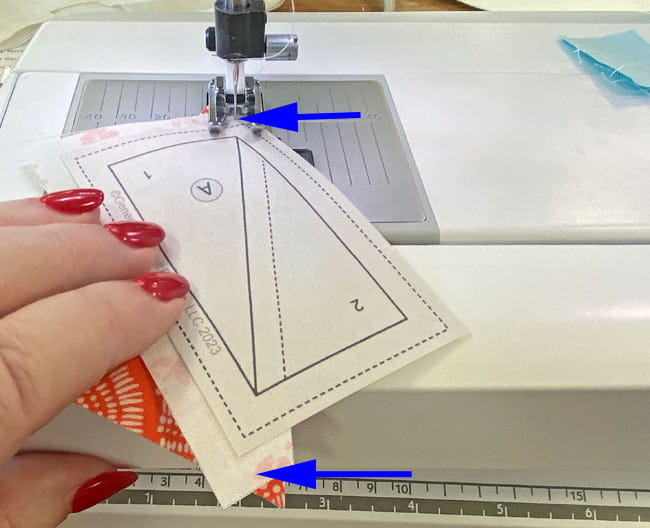
Press.
Trim the block to size at your cutting mat.
Lay the 1/4" mark on the ruler directly over one of the solid lines that surrounds the block. (blue arrow)
Trim away the excess.
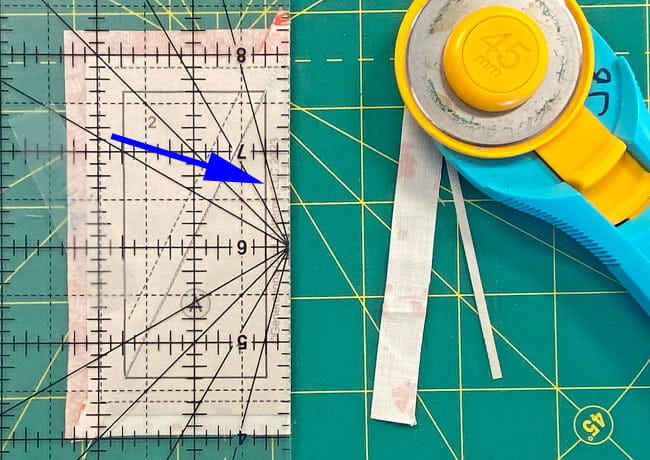
Repeat for the remaining sides.
I like to use my rotating cutting mat (the 17" square one is what you see in the photo) for this job, loading up the mat, cutting and turning the mat until all sides have been trimmed.
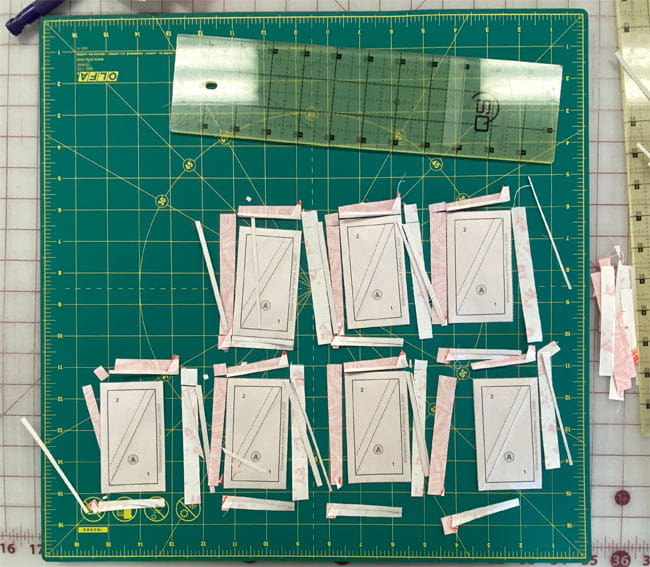 Trimming the last batch of HRT-As for the sample block
Remove the paper now. All your outside edges are on the straight of grain, just like any traditionally pieced block. The paper no longer has a purpose.
I find it much easier to rip—and less stress on the stitches—by ripping the pattern in the middle of a side (shown below). Then removing both parts and the other side as shown below.
OOOH-LA-LA, Quilters!
These HRTs are PERFECT! I've used specialty rulers and templates and a couple of weird techniques (that have less than stellar results) and this method is hands-down the BEST.
Flower
Make 4
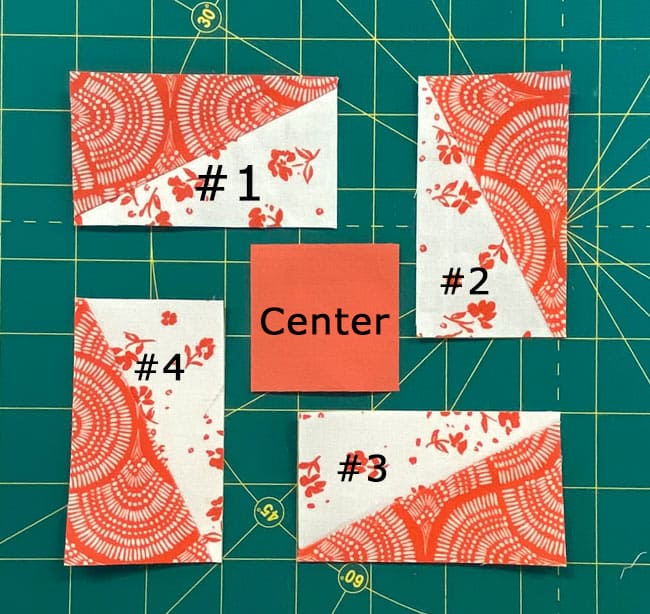
Return your sewing machine to your regular piecing settings: 10-12 stitches per inch, your favorite 1/4" presser foot, and adjust the needle position as needed based on your presser foot.
Arrange 4 HRT-As and a #3 into the 'flower' design—'A' fabric on the outside.
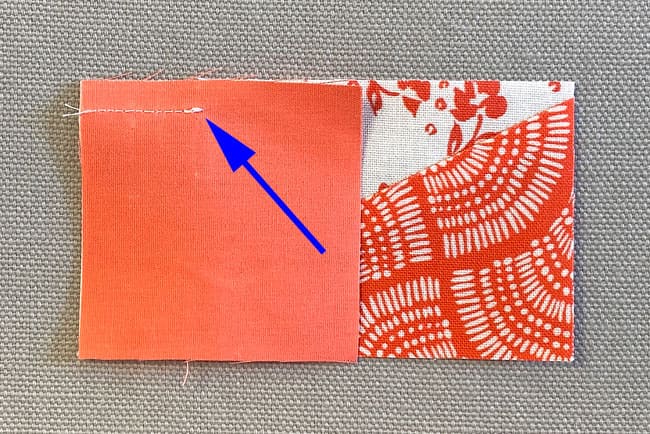
Using the photo above as a guide, with RST, stitch the #3 to the background side of the #1 HRT. Start this stitching roughly in the center of the #3 (I've used a pin to mark where to start my stitched (below). Take a couple of backstitches and then sew out to the edge.

Below you can see a closeup where the stitches stop roughly in the middle of #3 along with the backstitches.
After pressing away from #3, you've created an edge equal in length to the HRT.
Sew the second HRT to the first. The SA is pressed away from #3.
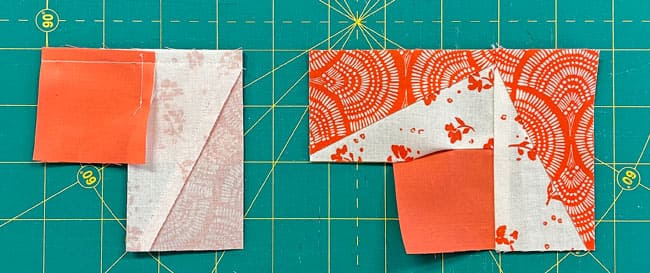 Sewn (left) and pressed (right)
Add the third in the same manner.
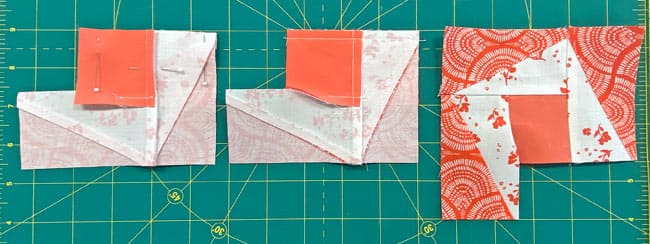 Pinned (left), sewn (center), pressed (right)
Finally, add the 4th HRT.
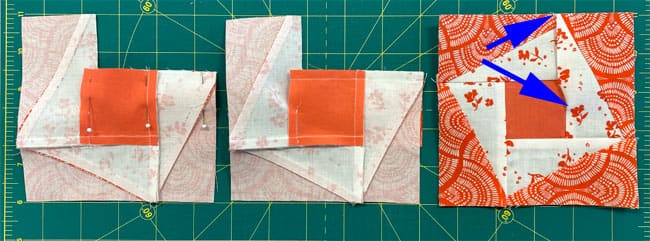 Pinned (left), sewn (center), and pressed (right)
After pressing this SA away from #3, all that's left is to stitch the remaining partial seam from blue arrow to blue arrow.
To complete the original partial seam, I've started my stitching just before those original backstitches. The pin perpendicular to the seam in the photo below helps hold the fabric flat. Sew the seam out to the edge, backstitching as needed.
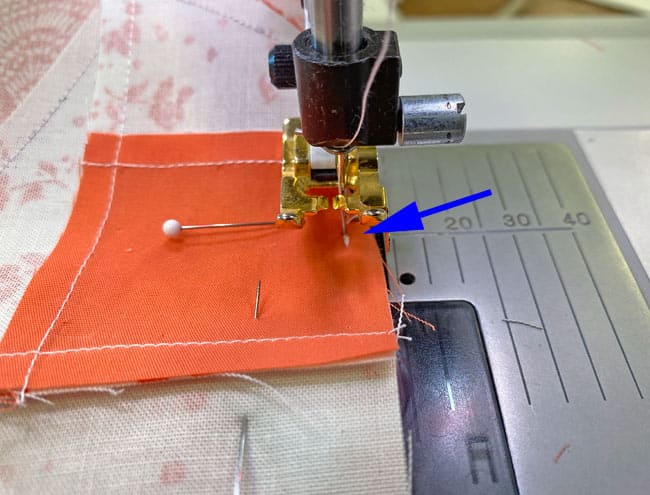
Flower Unit
Make 4
With RST, add a #4 to the left side of each Flower.
This seam is pressed toward #4.
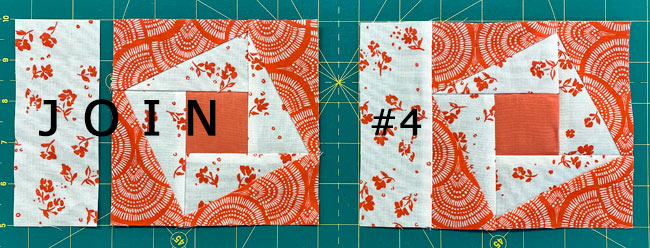
🎉 Fantastic job! You're one step closer to your stunning Whirling Square block.
🧩 Ready for the next step? Let's assemble your Whirling Square units!
Let's put the whole block together. We'll use the same method we used before, but this time with bigger pieces:
- We need four Flower Units and one center square (#5).
- The flower units are numbered to show the order we'll sew them together.
- We'll sew these pieces one at a time.
- After sewing each seam, press it outward, away from the center.
This way, we build the block step by step, just like we did with the smaller parts earlier.
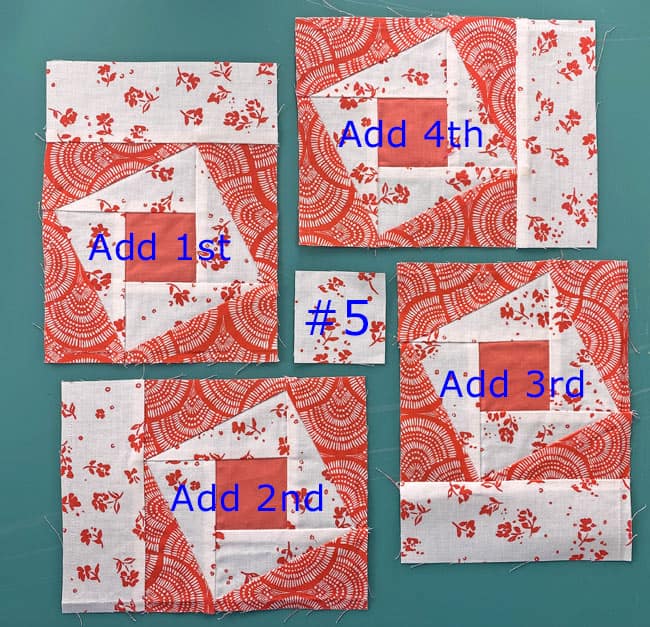
Using the picture below as a guide, layer #5 with the unit, RST. Sew the partial seam starting at the edge of the flower unit and ending at roughly the halfway point of the #5 square. I do take a couple of backstitches here.
Look at the picture below as your guide for this step. Take the #5 square and place it RST on top of the 1st flower unit.
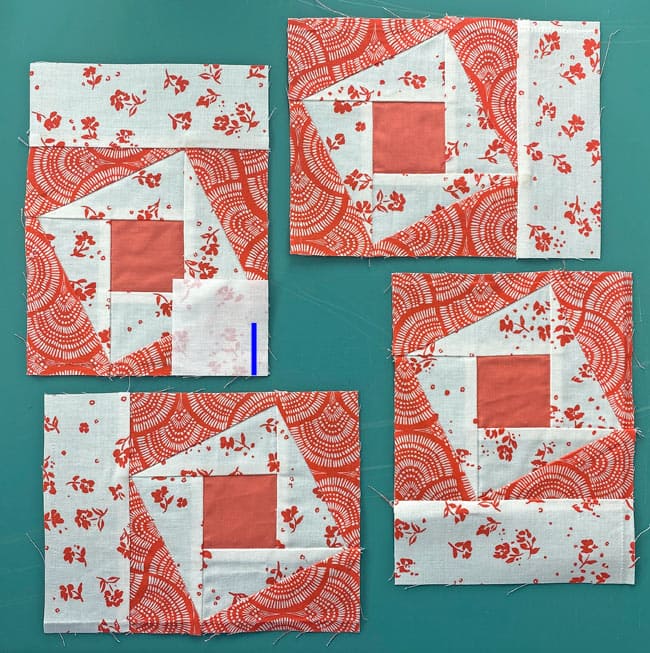 The length of this first partial seam is represented by the blue line
Sew the partial seam starting at the edge of the flower unit and ending at roughly the halfway point of the #5 square. At the end of this partial seam, back stitch a couple of stitches to secure them.
Press this partial seam away from #5. By sewing this partial seam, you've created an edge the same length as that of the next patch you're adding.
With RST, align the edges and pin to hold them even and match the points and stitch.
An exception to the rule…
Look at the seams farthest from the center.
These seams are next to each other, and both sides are pressed outward (you'll see this circled in blue in the next four images).
We do this on purpose. It's better to press all the seams away from the orange #3 squares, rather than pressing some inward and some outward. This way of matching seams is rare, and you won't see it often on this website. However, in this case, it makes sense to do it this way. It's an exception to the usual rule of alternating seam directions.
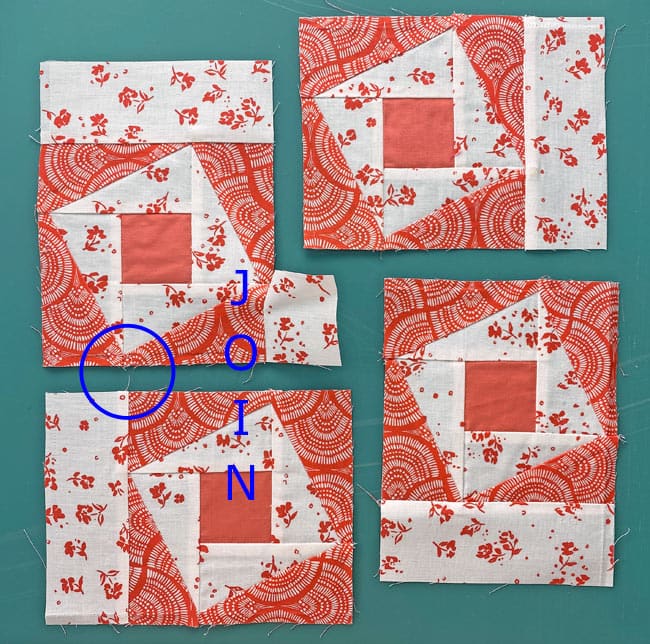
Press.
With RST, add the 3rd flower unit, taking care to match the edges. The bulky SAs to match are circled in blue.
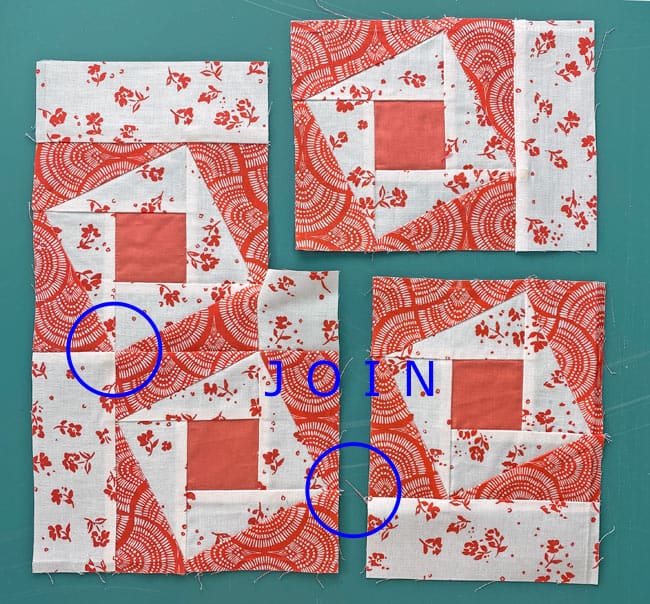 The points to match that have SAs pressed in the same direction are circled in blue
Repeat the process and add the 4th flower unit.
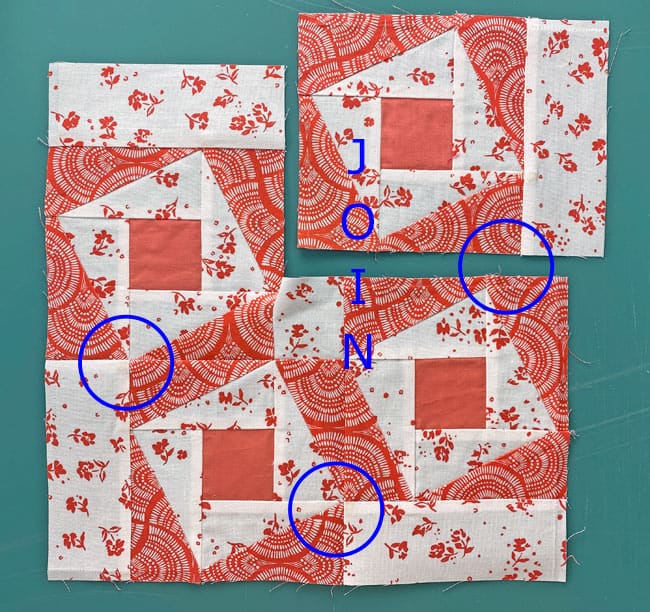 The points to match that have SAs pressed in the same direction are circled in blue
Things get a little fiddly as you add this last unit. Here you can see how I've pinned the actual seam (left side) and then used a single pin to hold the other part of the block out of the way while sewing.
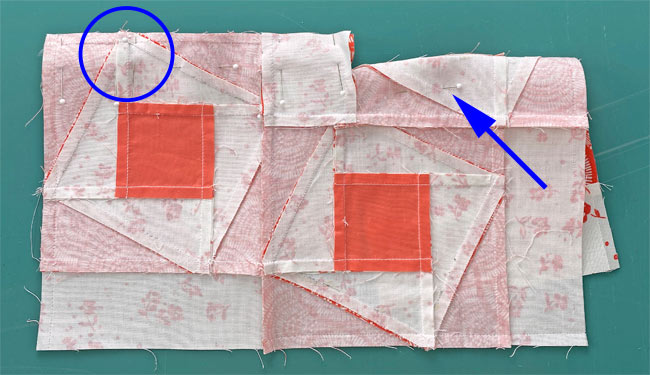
Press.
All that's left to sew in the rest of the partial seam. I find it helpful to pin past the original stitching. These pins help hold the block a bit flatter as you sew.
Just take it slow and you'll have it finished in no time.
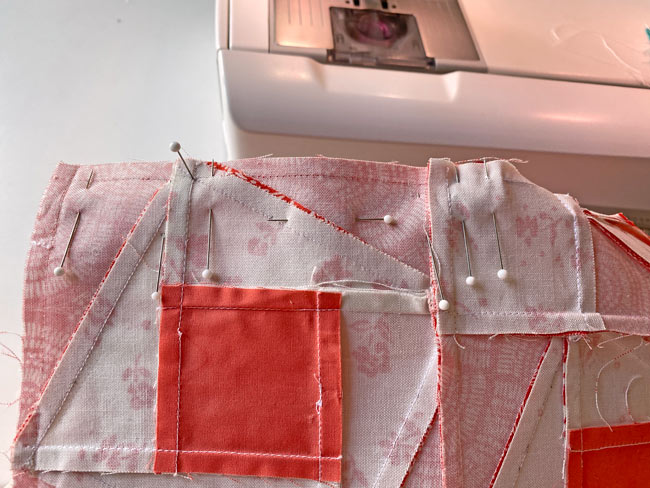
One last trip to the ironing board—check out the 'secret' pressing technique to a truly flat block without any specialty tools to buy.
You did it! Your Whirling Square block is complete. Take a moment to admire your work—you've just added a new skill to your quilting repertoire!
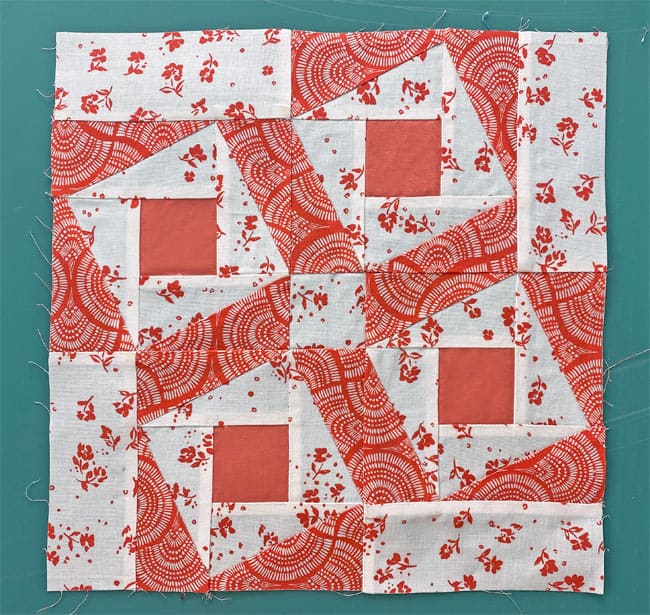
Congratulations, quilting superstar! 🌟
Let's take a peek at the backside of our Whirling Square block—it's like a backstage pass to your own talent show.
Those overlapping stitches in the partial seams? That's your quilting prowess on display! 💪🧵
Notice how the final seam blends in so smoothly? Good.
This view isn't just about admiring your work (though you absolutely should!); it's a powerful reminder of your growth as a quilter.
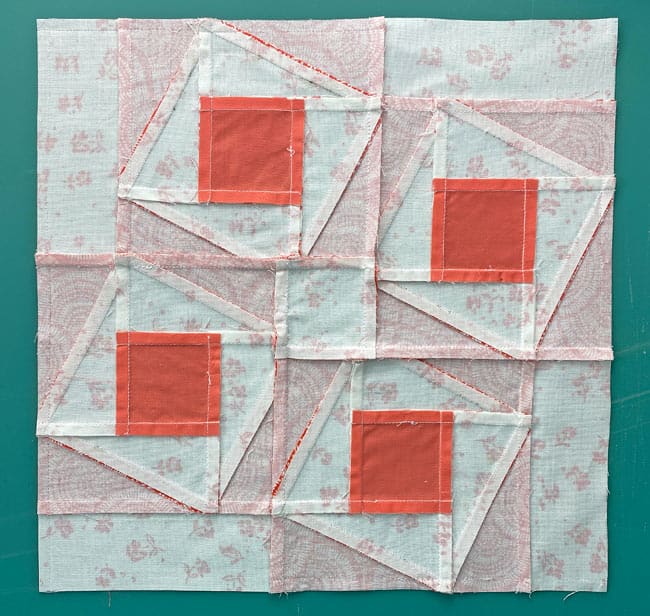
Every stitch tells the story of your journey through this block. So give yourself a well-deserved pat on the back—you've created a Whirling Square that's beautiful inside and out! 🏆
The Great Quilt Block Kerfuffle
When Sample Blocks Go Rogue🙃
Oh boy, buckle up for a tale of quilting chaos and caffeine-fueled confusion! 🎢☕
Picture this: There I was, feeling like the Quilting Queen 👑, whipping up blocks faster than you can say "rotary cutter." ✂️💨 I'd ditched my fancy-schmancy Split Rects ruler (because who needs a $25 gadget for one block, right? 🤷♀️) and was stitching away at my Bee's sew-in at the Quilt Barn—aka Quilter's Paradise. 🐝
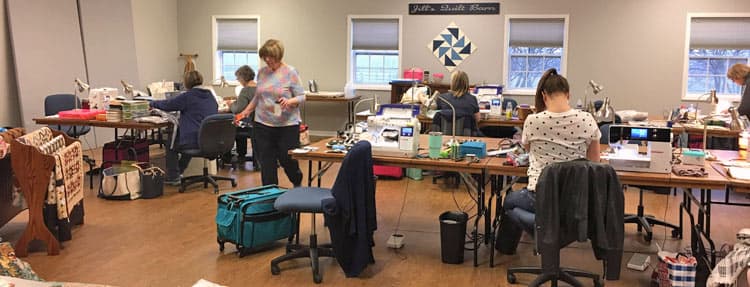
The fabric was practically sewing itself! I was in the zone, riding high on a patchwork cloud…until I wasn't. 🌈➡️☁️
<screechy record scratch 📀😱 >
Hold on to your seam rippers, Quilters! 🛑✋ Yours truly, the supposed Quilting Guru, had a spectacular "oops" moment. 🤦♀️ In my fabric frenzy, I'd managed to turn all the flower units a quarter turn to the left. 🌼↩️ Let me tell you, it made things go wonky faster than you can say "mismatched points." 📐😵
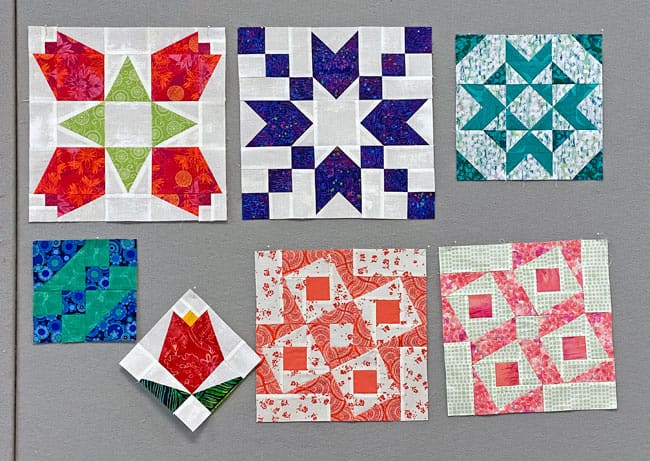 The original Whirling Square bottom right and the offending patchwork just to the left of it!
Was it too much coffee? Not enough? Did the quilting fairies play a trick on me? We may never know! 🧚♀️🎭
But fear not, dear quilters! I embraced my mistake like a true fabric warrior. 🦸♀️ I ripped that sucker apart faster than you can say "frog stitch" 🐸 and put it back together properly.
So, if you had spotted some suspicious "pre-drilled" holes in the edges of some of the pictures in this tutorial, no, your eyes weren't playing tricks on you. 👀
Those are just battle scars from my adventure in "Oops, I Did It Again" land. 🎵🕳️
Remember, quilters: We all make mistakes, it's only fabric, and hey—those little imperfections? They're simply your signature style! 🖌️
Besides, who's going to notice when they're snuggled up under your beautiful quilt? 🛌 Quilt on, and may your seams be ever straight…or at least mostly straight! 📏😉
 Sun sets at the Quilt Barn and all is right with the world...
Pin now, whirl later! 📍📍📍
Save this Whirling Square quilt block tutorial, and you'll always have a dynamic design at your fingertips when your quilts need a little extra pizzazz.
💫 Log Cabin Block Buffet (All You Can Make!)
Feast your eyes on these beauties! 🎯 Each one uses the same "master the method, skip the stress" philosophy you just learned. ✨ Time to put those skills to work on something new! 💪
The blocks below are ones where at least a part of the block uses the Log Cabin piecing technique.
Still have a Log Cabin itch that you can't scratch?
Browse through our curated collection of free or paid Log Cabin quilt patterns. These include traditional and modern blocks, Pineapple and Courthouse Steps designs.
Click here for the inspiration.
For even MORE blocks to make… 🧩🎨

...visit our Free Quilt Block Pattern Library, with over 260+ blocks to choose from in multiple sizes.
Free downloads are included in all sizes for any blocks require paper piecing patterns or templates.
- Home
- Free Quilt Block Patterns
- Whilring Square Quilt Block
