- Home
- Free Quilt Block Patterns
- Weathervane Quilt Block
🌪️ Weather the Storm with the Weathervane Quilt Block
From our Free Quilt Block Patterns Library
This post contains affiliate links, for which I receive compensation.
Skill Level: Confident Beginner
Our Weathervane quilt block is made with half square triangles (with a slick technique that creates 8 at a time), a few connector corners and the rest of the pieces are simply squares.
A great little block for a guild swap because it's easy enough for even your beginning members.
If you're a machine embroiderer, the center of the 12" block is 4" finished which makes it a candidate for showcasing embroidery collections.
For another variation on this Weathervane block, but one that includes some paper piecing for perfectly pointy-points, click here to see our Morning block.
There's nothing but fair weather ahead, let's begin!
🧭 Quickly jump to what you're looking for
Your quilting time is a precious commodity. Use these jump links to return different parts of the tutorial.
📋 General Instructions
Seam allowances (SA) are a 1/4" unless otherwise noted.
I use heavily starched fabric for piecing. I think it makes for more accurate rotary cutting and it allows you to fingerpress seams frequently, instead of hopping up and down to the iron all the time.
You'll see me switch between a standard-looking quarter inch foot (for sewing NEXT TO a line), an open toe applique foot (for stitching ON a line) and my favorite 1/4" foot with a guide for piecing the units together.
If you have these different feet, try them! Having the perfect tool for the job always makes it go faster.
The newest quilt fabrics to tickle your fancy...
Click the images below to see the full collection. We share any commercial and/or free patterns that showcase them, too. (For inspiration, of course!)


✂️ Cut patches for our Weathervane block
 Weathervane block drawing
Sample size: 12" finished / 12½" unfinished
Grid: 6x6
Attributed to: Ruby McKim and Woman's World
Cutting is simple and quick because it's all squares—no triangles. Not.a.single.one!
Since the half square triangles are made 8-at-a-time, you'll only need 2 different squares to make them.
The #1 and #2 squares are oversized. The resulting HST will be trimmed down after stitching.
 | Cutting Chart for an~ Includes Paper Piecing ~ | ||||||
|---|---|---|---|---|---|---|---|
| Patch | Fabric | Qty | Finished Block Size | ||||
| 4½'' | 6'' | 7½'' | 9'' | 12'' | |||
| 1 | Dark | 1 | 3¾'' x 3¾'' | 4¼'' x 4¼'' | 4¾'' x 4¾'' | 5¼'' x 5¼'' | 6¼'' x 6¼'' |
| 2 | Bac | 1 | 3¾'' x 3¾'' | 4¼'' x 4¼'' | 4¾'' x 4¾'' | 5¼'' x 5¼'' | 6¼'' x 6¼'' |
| 3 | Dark | 4 | 1¼'' x 1¼'' | 1½'' x 1½'' | 1¾'' x 1¾'' | 2'' x 2'' | 2½'' x 2½'' |
| 4 | Bac | 4 | 1¼'' x 1¼'' | 1½'' x 1½'' | 1¾'' x 1¾'' | 2'' x 2'' | 2½'' x 2½'' |
| 5 | Medium | 4 | 2'' x 2'' | 2½'' x 2½'' | 3'' x 3'' | 3½'' x 3½'' | 4½'' x 4½'' |
| 6 | Bac | 8 | 1¼'' x 1¼'' | 1½'' x 1½'' | 1¾'' x 1¾'' | 2'' x 2'' | 2½'' x 2½'' |
| 7 | Dark | 1 | 2'' x 2'' | 2½'' x 2½'' | 3'' x 3'' | 3½'' x 3½'' | 4½'' x 4½'' |
| Unfinished Block Size | 5'' | 6½'' | 8'' | 9½'' | 12½'' | ||
| Grid Size | 3/4'' | 1'' | 1¼'' | 1½'' | 2'' | ||

🪡 Create the units for our Weathervane quilt block
Half Square Triangles (HST)
Make 8

We'll use the 8 at a time method for making our HST.
Draw two diagonal lines on the back of either the #1 or #2 patch. It'd be easier to see on the lighter fabric, but for some reason I made the marks on the darker one for this sample block. The marks are rather light in the photos. However, they were dark enough for me to see at my machine. That's what matters!
With right sides together (RST) layer the #1 and #2 together, marked side up.
Stitch a 1/4" away from both sides of both lines.
 If you need to, pin the two squares together to keep them from shifting while sewing.
Give the patches a quick press as they were sewn to flatten them. Sometimes sewing along the bias will make them a bit 'wiggly'.
Refer to the chart below to find the Center measurement that corresponds to your finished Weathervane block size.
| Finished Block Size | Center Measurement | Trim HST to... |
|---|---|---|
| 4½" | 1⅞" | 1¼" | 6” | 2⅛” | 1½" |
| 7½" | 2⅜" | 1¾" | 9” | 2⅝” | 2” |
| 12” | 3⅛” | 2½" |
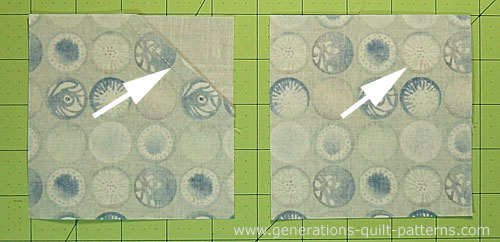
Position this line on your ruler on one of the cut edges of the #1/#2 patch (arrow) and cut with your rotary cutter. You are cutting this patch in half from top to bottom.
 The center/midpoint measurement for my 12" sample block is 3-1/8".
Without moving the fabric, align the same mark on your ruler with the adjacent cut edge (arrow) and cut again.
You've now cut the #1/#2 into four equal quarters.

Cut the squares in half along the drawn chalk line—scissor or rotary cutter is fine. Whichever works best for you!

Press these HSTs with the SA to the darker fabric. Trim them all down to the size that corresponds to the Finished Block Size in the previous chart above.
I've trimmed to 2½" x 2½" for the 12" finished sample block.

Corners
Make 4

Using the photo below as a reference, stitch dark side of an HST to a the right side of a #3 and to the left side of a #4. Note the orientation of each HST.
Press the SA toward the #3 and #4 squares to eliminate bulk.
With RST, stitch the pairs together, pinning if you need to.
I prefer to 'twirl' my seam allowances (circled) as shown in the lower right below.
 You'll need to pick out a couple of stitches to twirl the seam allowance.
Repeat for a total of 4 corners.
Sides
Make 4

To complete the sides, we'll use the Folded Corners technique.
Since we'll be sewing ON the drawn line this time, I prefer to switch to my open toe applique foot—there's nothing between my eyes and the marking.
Mark the backside of each #6 with a diagonal line, just dark enough for you to see it.
Position a #6 in the corner of a larger #5 square, RST, so that the ends of the drawn line touch two adjacent sides.
Stitch on the side of the line closest to the corner. By stitching on the side, we accomodate the turn of the cloth when we fold open the patch on itself,
 Pin the smaller square in place if it helps you. I've changed to my open toe applique foot for stitching on the line.
Now you have a choice to make.
You can either trim away both layers of excess fabric a 1/4" outside your stitching and closest to the corner (below, left) or you can trim away just the excess from the smaller #6 square a quarter inch past the stitching (below, right).

While there's less bulk with the first option (above, left), some quilters prefer the second method (above, right).
I machine quilt my own quilts on my home sewing machine. The extra bulk makes very little difference. If I sew a bit off the line, the #7 square acts as a guide when I stitch the units together in Step 3. [Click here to see what the units look like from the back side.]
Press.
Add the second #6 in an adjacent corner in the same manner. The corner of the second #6 will definitely overlap the first pressed #6. That is exactly how it should be.

Trim and press after stitching. Repeat for the three remaining #5s. When finished, they look like this.

🧩 Assemble your Weathervane quilt block
Arrange the cut and pieced units to create the Weathervane block. All the points point to the outside edge.

Stitch the units in each row together. I've pressed the SA away from all the side units to minimize bulk.

Stitch the rows together, pinning as needed. Press the final seams.
 Our Weathervane is perfect!
If you find the seam allowances a bit bulky, try my favorite pressing technique.
It's simple.
It's fast.
And you won't believe how flat your blocks come out with so little effort.
📌 Remember to pin this for later

Variations on the Weathervane design
The Morning quilt block is a kissin' cousin of our Weathervane.
The piecing, however, is quite different. You can easily switch the fabric of the center square if you'd like to mimic the fabric placement of our Weathervane quilt block on this page.
Click here to go to the pattern I've created for it.

🔭 Looking for something truly stellar?
You've finished your star quilt block, and you're ready for more!
Browse our collection of 70 stellar star quilt block patterns. All have instructions and cutting charts in multiple sizes. If templates or paper piecing is used in the tutorial, there's a free download for you of those materials.

Eeny. Meenie. Miney. Moe.
Which star quilt block will you sew?
For a star-studded quilting experience, choose from 100+ bedazzling star quilt patterns—for beginners and beyond—click here.
For even MORE blocks to make… 🧩🎨

...visit our Free Quilt Block Pattern Library, with over 260+ blocks to choose from in multiple sizes.
Free downloads are included in all sizes for any blocks require paper piecing patterns or templates.
- Home
- Free Quilt Block Patterns
- Weathervane Quilt Block


Yummy fabrics
to drool over
Click any image below to see the full collection and find pricing and ordering information.


By Julie Baird
Copyright © 2008-2026 Generation Quilt Patterns, LLC
All Rights Reserved
Generations-quilt-patterns.com does not sell any personal information. (See Privacy Policy)