- Home
- Free Quilt Block Patterns
- Turkey Tracks Quilt Block
Gobble up the Turkey Tracks Quilt Block:
9", 13½", 18" finished blocks
Waddle you know? Paper piecing makes perfect points! 📐🎯
This post contains affiliate links, for which I receive compensation.
Strut your stuff with our fabulous Turkey Tracks quilt block! 🍂🦃
Want crisp, pointy corners on those half rectangle triangles? Our secret: paper piecing! 📐✨
No specialty rulers needed—just follow our step-by-step photos for precision that'll make your quilting buddies squawk!
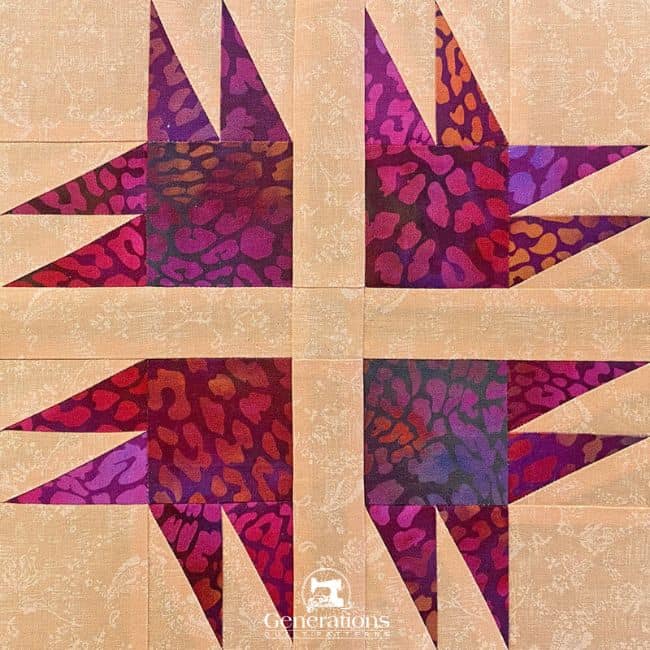 The jaunty little Turkey Tracks quilt pattern in all its pointy glory!
Warning: These HRTs are more addictive than potato chips. Once you start, you can't stop! 😉🥔
So, waddle you waiting for? Get your beak wet and dive into this plucky pattern! 🏊♀️🧵
🧭Ready to dive into the nitty-gritty?🔍
Our handy anchor links are like a GPS for your quilting journey. Navigate through this tutorial faster than a turkey avoiding Thanksgiving dinner!
- If your Autumn plate is piled high, bookmark, or Pin this tutorial for when you've time to sew
It's that time. Flock to fabulous results!
General Instructions
Several abbreviations are used on this page. They are:
- SA - seam allowance
- RST - right sides together
- HRT- Half Rectangle Triangle pairs - A unit
A 1/4" SA is used in this tutorial.
Highlighted in yellow, pressing instructions are easy to spot.
First press the patches in the closed position as they came off your sewing machine. This sets the seam, melding the fibers of the threads into the fibers of the fabric.
Then press the SA to the dark unless otherwise noted.
Paper pieced seams are always pressed towards the last patch added.
While I'm a big proponent of using starch in your piecing, I'm particularly for it for the sharp, super pointy points in this block. Starched fabric cuts more accurately, stitches more accurately and is easier to fingerpress. All things that help you while you sew.
My go-to starch is a 50/50 mix of a liquid Starch Concentrate to water.
Download and print the paper piecing pattern
To download the pattern, use the most current version of Adobe.
For accurate results, on Adobe's Print Menu page, under 'Page Size and Handling' set 'Custom Scale' to 100%. Then print.
Click here to see what it looks like on the Print Menu page.
Find your finished block size from the chart below. Print the corresponding number of pages for a total of 8 HRT units.
Print Paper Piecing Patterns | ||
|---|---|---|
| Finished Block Size | # of copies to print | Link to HRT Pair Finished Size |
| 9" | 2 | 2" |
| 13½" | 2 | 3" |
| 18" | 4 | 4" |
After printing, use the 1" square graphic on the printed page(s) to double check that your patterns printed at the correct size.
Then cut out the required number of patterns from your copies. A rough cut is good enough—an 1/8"-1/4"-ish away from the outside dashed square.

Not sure which paper to use?
Take a look at my review of several of the most popular brands available to us quilters on the market.
You want a super-easy paper to tear away—less stress on the stitches.
The newest quilt fabrics to tickle your fancy...
Click the images below to see the full collection. We share any commercial and/or free patterns that showcase them, too. (For inspiration, of course!)
✂️ Cut the patches for a Turkey Tracks quilt block
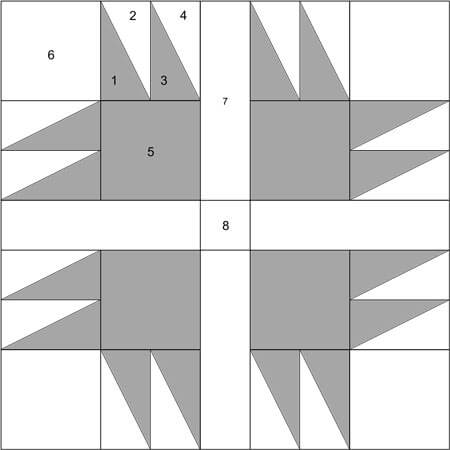
Sample Block Size: 7" finished / 7½" unfinished
Grid: 9×9
Attribution: Ladies Art Company
AKA: Resolutions (Nancy Page), Pigeon Toes
Design Type: Uneven 9-patch, small center | Paper Piecing
Label all your patches. You'll use their numbers throughout this tutorial.
I thought I'd share a selvedge to selvedge view of the dark fabric I used. Without any markings on the selvedge I can't tell you want collection it's from.
While the patterning of the fabric holds the block together, I did choose to fussy cut around the green parts for this block.
 How I wish this 1/4 yard had printing on a selvedge so I could order more!
To print a copy of the block design and cutting chart to use at your cutting table, click here.
 | Cutting Chart for a~ Paper & Traditional Piecing ~ | ||||||
|---|---|---|---|---|---|---|---|
| Patch | Fabric | Qty | Finished Block Size | ||||
| 9'' | 13½'' | 18'' | |||||
| 1, 3 | Dark | 8 | 2⅞'' x 3¼'' | 3⅜'' x 4¼'' | 3⅞'' x 5¼'' | ||
| 2, 4 | Bac | 8 | 2⅞'' x 3¼'' | 3⅜'' x 4¼'' | 3⅞'' x 5¼'' | ||
| 5 | Dark | 4 | 2½'' x 2½'' | 3½'' x 3½'' | 4½'' x 4½'' | ||
| 6 | Bac | 4 | 2½'' x 2½'' | 3½'' x 3½'' | 4½'' x 4½'' | ||
| 7 | Bac | 4 | 1½'' x 4½'' | 2'' x 6½'' | 2½'' x 8½'' | ||
| 8 | Bac | 1 | 1½'' x 1½'' | 2'' x 2'' | 2½'' x 2½'' | ||
| Unfinished Block Size | 9½'' | 14'' | 18½'' | ||||
| Grid Size | 1'' | 1½'' | 2'' | ||||
Subcutting
Since all 8 HRT pairs are the same, layer all your #1, #2, #3, and #4 rectangles wrong side up.
The shorter measurement, the WIDTH, goes across the top and bottom of each rectangle.
Make a tick mark 5/8" in on the top-right side and 5/8" in on the bottom-left side. (red arrows)
Align the edge of your ruler with these marks at the edge and cut the rectangles in half. I did sort mine into a few piles to cut through only 4 layers at a time.
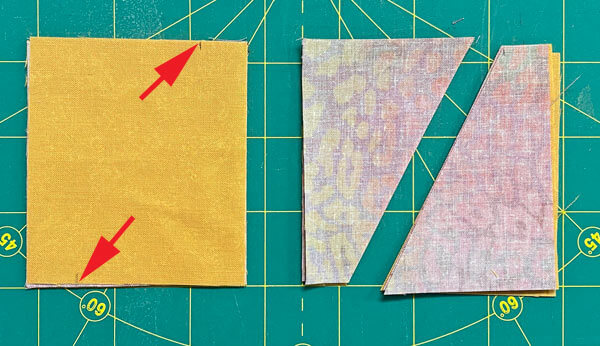 Fabrics are layered all wrong side up with the WIDTH (shorter side) on the top and bottom
When you flip over these triangular fabric pieces, so the right side is facing up, the angle of the freshly cut edge should all be pointing in the same direction on each piece.
Why not cut with the right side up?
When cutting patches for an HRT with all the seam lines running in the same direction as in our A unit here, the direction of the cut makes a HUGE difference in the patch you get.
By ALWAYS cutting with the wrong side up,
- I only have to remember one way to mark and cut
- It's easier to see marks on the wrong side for most fabrics
🪡 Stitch a positively pointy batch of HRTs for your Turkey Tracks quilt block
HRTs
Make 8
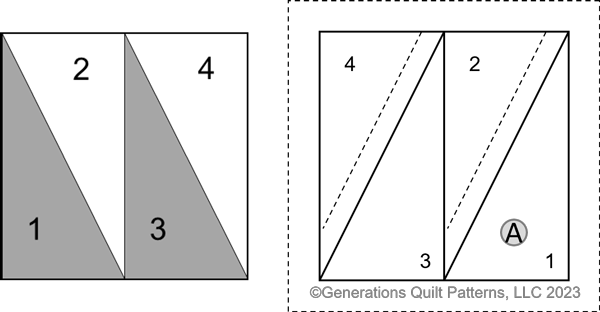 From the fabric side (left) and from the pattern side (right)...They're mirror images.
Our HRT pairs are paper pieced. Set up your sewing machine for this technique.
We need to make a few adjustments to our sewing machine settings to paper piece.
- Reduce your stitch length to 16–20 stitches per inch (1.3-1.6 mm). This perforates the paper and stabilizes the seam when you remove the pattern. [Learn more about stitch length here.]
- Reduce your machine's speed or just plain slow down. Sew only as fast as you can AND stay on the solid stitching line.
- Install an open toe appliqué foot (sometimes called an 'embroidery' or 'satin stitch' foot) if you have one (it makes it easier to see where you're stitching).
- Use a larger needle (90/14) IF you have problems removing the pattern. Personally, I use an 80/12 Microtex Sharp for paper piecing without any issues.
Use a dot of Elmer's Washable Glue Stick to hold the #1 in place on the unprinted side of the pattern. Use the dotted guide for quick accurate positioning.
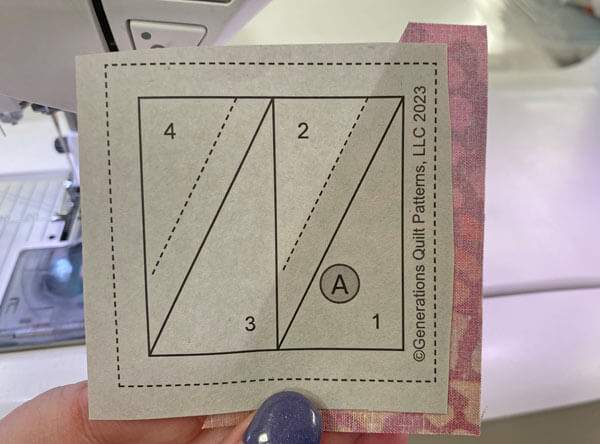 #1 extends well past the dashed lines on the outside edge on purpose. If you're going to trim, it's nice to have something to trim.
With RST layer #2 with #1, lining up the long diagonal edges. There's plenty of patch to get this positioned properly. Remember we cut these oversized just for that purpose.
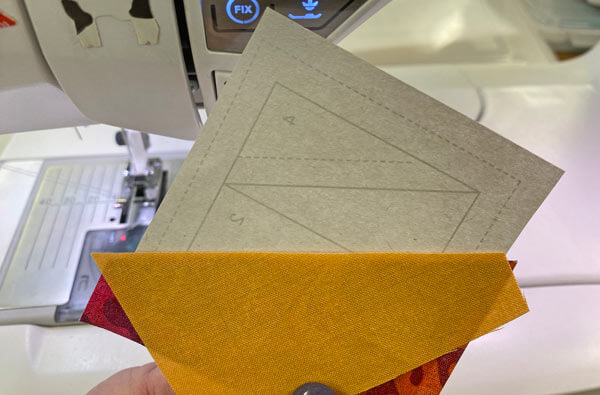
Stitch on the line between #1 and #2, starting and stopping past the outside dashed edge of the HRT.
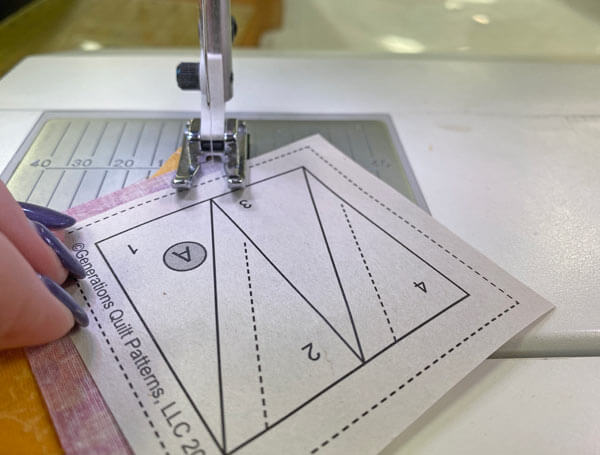
Because this seam, in fact, ALL the seams in the unit run from one outside edge to another, you can chain piece these patches. A real time and thread saver!
Press.
At your cutting mat, with the printed paper side up, fold the paper pattern back on itself at the solid line between #2 and #3.
You WILL have to pull a bit of the paper back away from the stitches. This is normal for paper piecing.
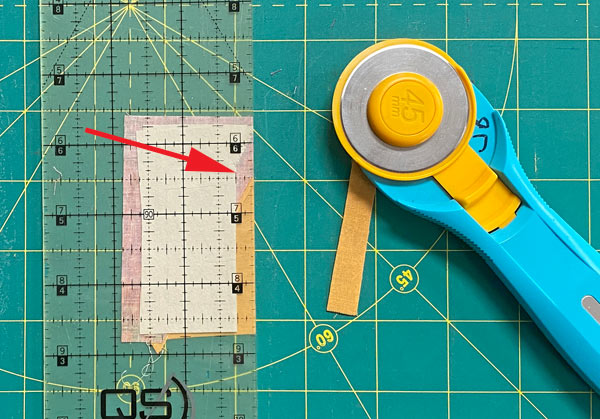
Line up the 1/4" marks on your ruler with the folded edge of the pattern (red arrow) and cut away the excess fabric as shown above.
This establishes the perfect 1/4" seam AND placement for the next patch.
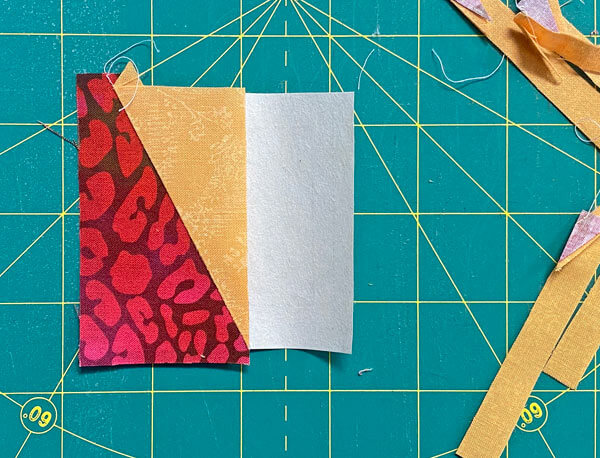 From the fabric side after this first trim
With RST, line up the long straight edge of #3 with the freshly trimmed #2.
If you're new to making this unit, hold the #3 in place at the seam and flip it open to make sure it's positioned properly. So much quicker to make a quick check (and less frustration and swearing) than having to rip out a seam.
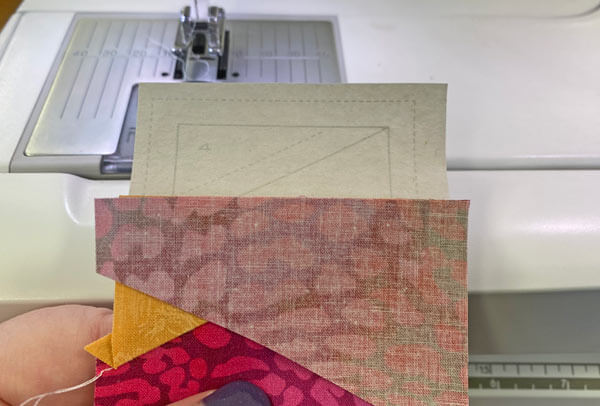
This seam is sewn just like the first one and can also be chain pieced.
Trim it just like we did for #2.
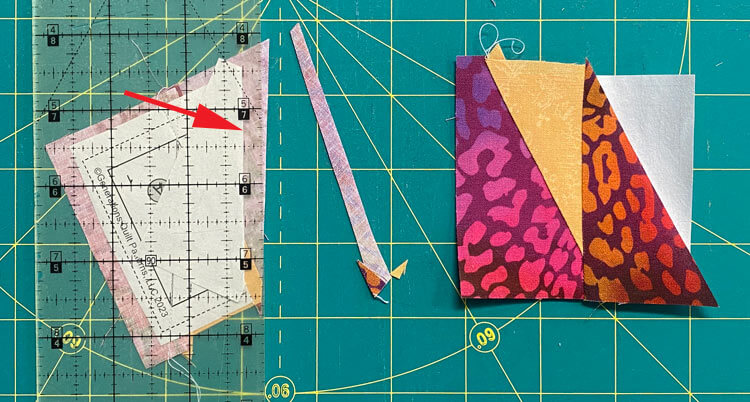 Fold the pattern back on itself, position the ruler and trim (left), and after trimming, right
Press.
Add #4 just like the previous patches.
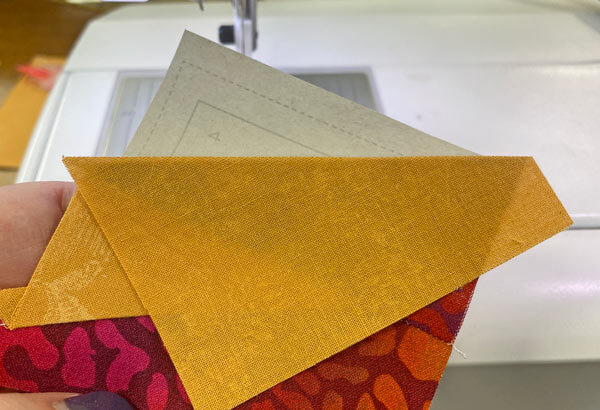
Give your jaunty little HRTs a good press.
Now for the magic.
At your cutting mat, pattern side up, line up the 1/4" markings on your ruler with the solid square that surrounds the unit (red arrow, below center).
Trim away the excess with your rotary cutter.
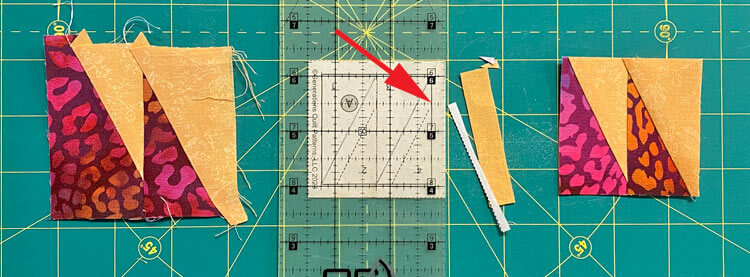 Hot mess (left), trimming the 4th side of 4 (center), and trimmed to perfection (right)
Repeat for all four sides of all the HRTs.
All the paper piecing is finished. Our outside edges are all on the straight of grain—just like they'd be if you'd used traditional piecing methods.
The paper pattern has done it job and should be removed.
The paper piecing is complete. From this point forward, return your stitch length to the one you regularly use for piecing and install your favorite 1/4" presser foot.
Corner Units
Make 4
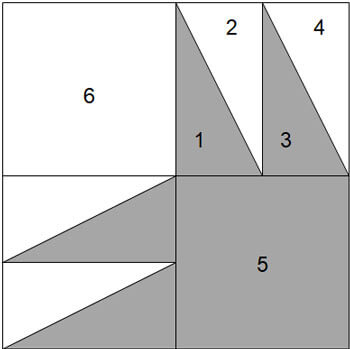 Corner
Arrange a #5, #6 and two HRTs as shown below.
With RST sew a #6 to the #4 side of an HRT, and a #5 to the #1/#3 side of the second HRT.
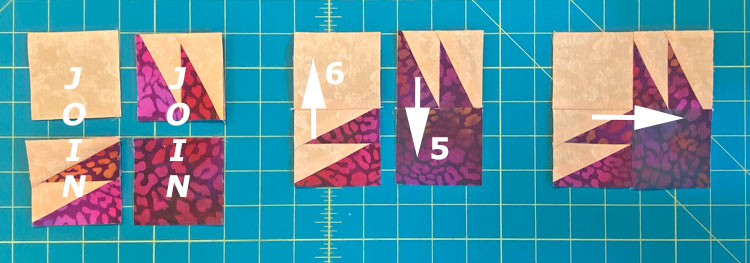
Press the SA towards the #5 or #6 (white arrows, center above), away from the HRTs to avoid creating bulk in the SA.
Join the rows together. Repeat for all four Corners.
Press this SA toward the #5 (white arrow above right).
Use the chart below to check your accuracy. For our 9" finished sample block, the measurement is 4½" x 4½".
After sewing, each Corner Unit measures... | |
|---|---|
| Finished Block Size | Edge-to-edge Measurement |
| 9" | 4½" x 4½" |
| 13½" | 6½" x 6½" |
| 18" | 8½" x 8½" |
🧩 Assemble your Turkey Tracks quilt block
Arrange the sewn Corners and cut #7s and #8 as shown below. The darker #5 patches are toward the center.
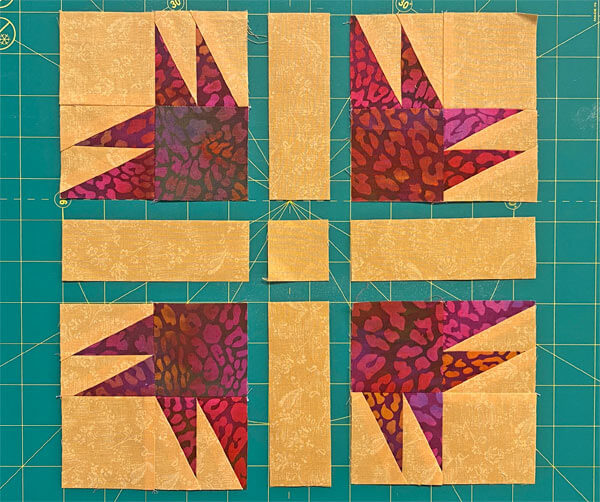
With RST sew the units in each row together.
SAs are pressed toward the #7s in each row.
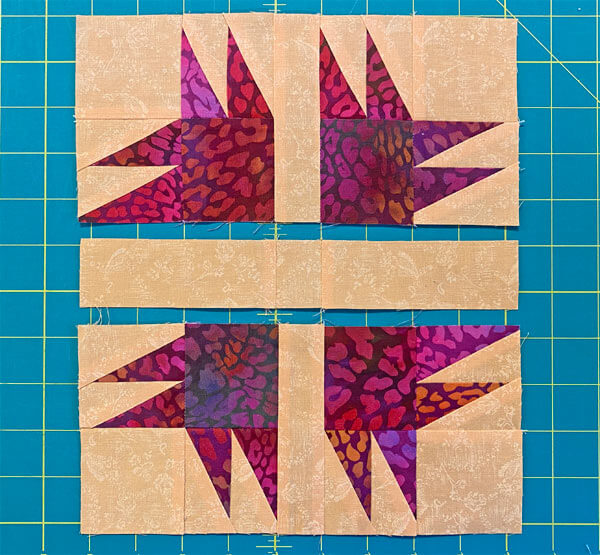
Stitch the rows together. All the SAs nest to make matching them a breeze.
SAs are pressed toward the center.
Gobble! Gobble! Our Turkey Tracks is complete.
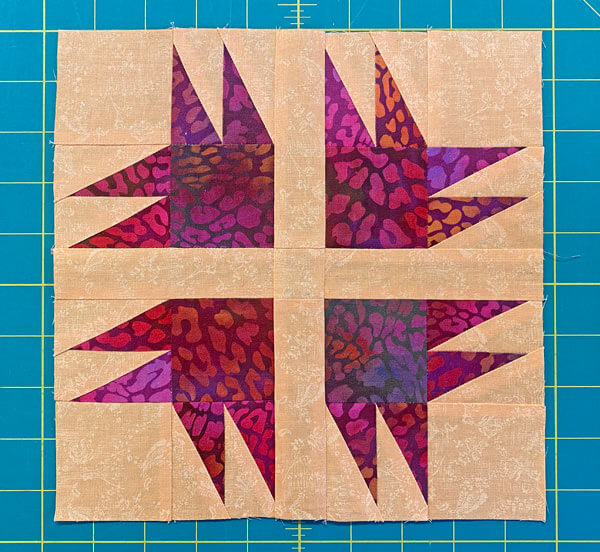
And as always, a quick peek at the backside to see how all the SAs work together.
I have to apologize. I took all these photos at a quilting weekend at the Quilt Barn and forgot to get this last shot. The lighting is entirely different and the reason the background looks so much more yellow than it really is.
I'm a much better quilter than a photographer, you'd have to agree!
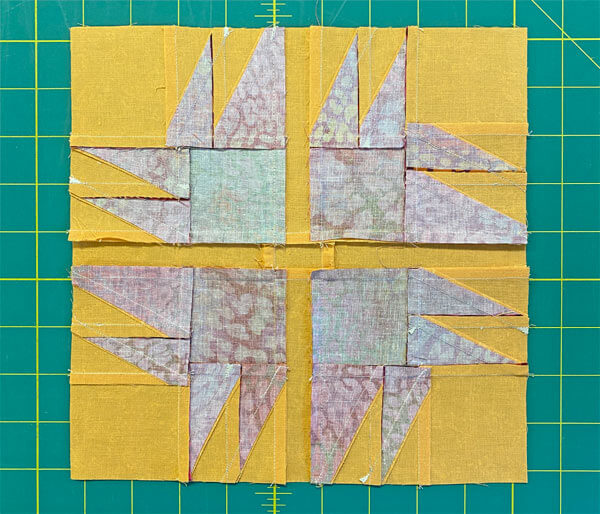 Looks like this quilter's got a tiny bit of the paper piecing pattern to remove from each side at the edge!
Fantabulous!
You stitched up a fab Turkey Tracks quilt pattern for fall. You nailed those pointy HRTs.
Now sit back and bask in your quilting glory.
You're a star!
📌Waddle you waiting for?
Carve out a special place on your Pinterest board for this plucky pattern🍗
For even MORE blocks to make... 🧩🎨

...visit our Free Quilt Block Pattern Library, with over 230+ blocks to choose from in multiple sizes.
Free downloads are included in all sizes for any blocks require paper piecing patterns or templates.
- Home
- Free Quilt Block Patterns
- Turkey Tracks Quilt Block
