- Home
- Free Quilt Block Patterns
- Tulips Quilt Block
Tulips Quilt Block Tutorial for 8", 12", and 16" finished blocks
From our Free Quilt Block Patterns Library
This post contains affiliate links, for which I receive compensation.
Heads up, quilters! Has your next project got you stumped on what to stitch up?
Then check out the point-a-licious world of a Tulips quilt blocks. It brings together Flying Geese, Square in a Square, and Brave World units (with a little twist). This block is the perfect combination of whimsy and challenge for quilters of all levels.
But what makes this block so special?
Well, for a start, it's got plenty of pointy points to make and match seams for. That makes paper piecing the logical choice for stitching this block.
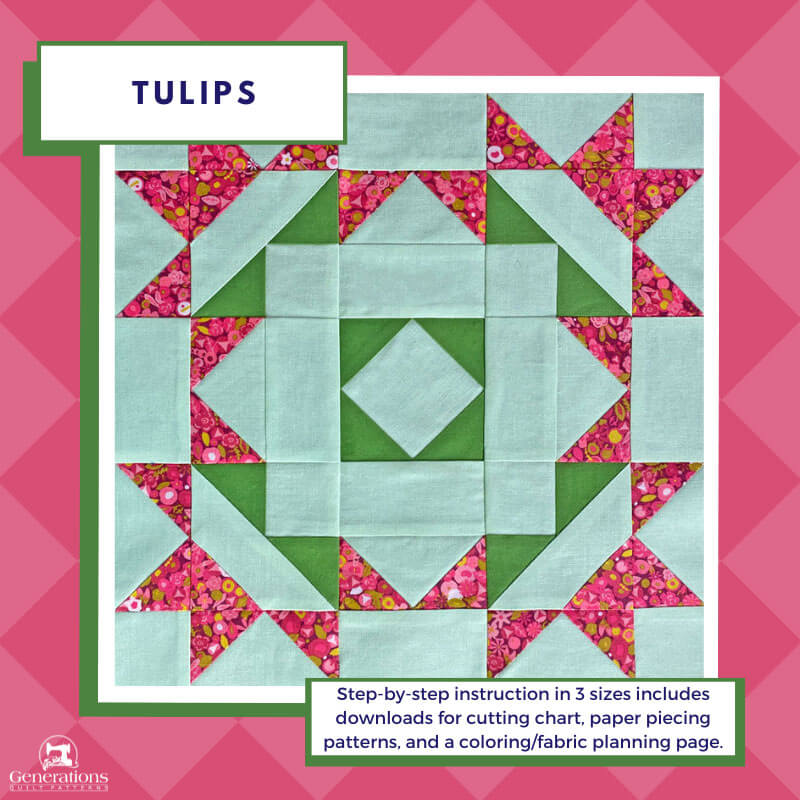
Don't worry if you're not fluent in this technique—we've got you covered with our step-by-step guide, complete with detailed instructions to help you level up your skills. You'll be able to take on even the pointiest points with ease.
Let's dive in and have some quilting fun.
In this tutorial, you'll find:
- A little 'behind the scenes' discussion about how I chose the technique for this set of instructions
- No time for tulips? Pin or bookmark for petal piecing later!
Cut. Sew. Press. Turn fabric into Magic!
General Instructions
Several abbreviations are used on this page. They are:
- SA - seam allowance
- RST - right sides together
- SiaS - square in a square
- BW - Brave World Variation
- FG - Flying Geese
- Bac - background fabric
A 1/4" SA is used in this tutorial.
Highlighted in yellow, pressing instructions are easy to spot.
To press, first press the patches in the closed position as they came off your sewing machine. This sets the seam, melding the fibers of the threads into the fibers of the fabric.
Then press the SA to the dark unless otherwise noted.
Paper pieced SAs are always pressed toward the last patch added.
Download and print paper piecing patterns
To download the pattern, use the most current version of Adobe.
For accurate results, on Adobe's Print Menu page, under 'Page Size and Handling' set 'Custom Scale' to 100%. Then print.
Click here to see what it looks like on the Print Menu page.
Find your finished block size from the chart below. Print the corresponding number of pages for a total of 4 Brave Worlds, 1 Square in a Square and 12 single Flying Geese units.
Print the Paper Piecing Patterns | ||||||
|---|---|---|---|---|---|---|
| Tulips Finished Block Size | Brave World Variation | Square in a Square | Flying Geese | |||
| # of copies | BW Size | # of copies | SiaS Size | # of copies | FG Size | |
| 8" | 1 | 2" | 1 | 2" | 3 | 1" x 2" |
| 12" | 1 | 3" | 1 | 3" | 3 | 1½" x 3" |
| 16" | 2 | 4" | 1 | 4" | 3 | 2" x 4" |
After printing
Use the 1" square graphic on the printed page(s) to double-check the patterns printed at the correct size.
Then cut out the required number of patterns from your copies. A rough cut is good enough—an 1/8"-1/4"-ish away from the outside dashed square.
Not sure which paper piecing paper to use?
Click here for "Does it really matter which paper piecing paper you use?" to help you make the best decision for your needs.
The newest quilt fabrics to tickle your fancy...
Click the images below to see the full collection. We share any commercial and/or free patterns that showcase them, too. (For inspiration, of course!)
Cutting patches for a Tulips quilt block
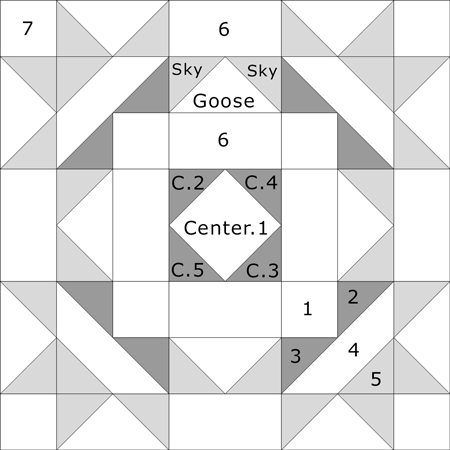 Tulips quilt block design
Sample Block Size: 12" finished | 12½" unfinished
Grid: 8x8
Attribution: Aunt Martha Studios
Design Type: Uneven 9-patch-small center
Please label all your patches. We use their numbers throughout this tutorial.
For the sample block I chose a couple of solid greens—the quilting stitches will show up nicely on them—along with an oldie from an earlier Alison Glass Sunprint line from Andover…2021, I think.
 | Cutting Chart for a~Paper Piecing ~ | |||||
|---|---|---|---|---|---|---|
| Patch | Fabric | Qty | Finished Block Size | Sub Cut | ||
| 8" | 12" | 16" | ||||
| 1 | Bac | 4 | 1¾" x 1¾" | 2¼" x 2¼" | 2¾" x 2¾" | --- |
| 2, 3, C.1-C.4 | Dark | 6 | 2⅜" x 2⅜" | 2⅞" x 2⅞" | 3⅜" x 3⅜" | |
| 4 | Bac | 2 | 3⅜" x 3⅜" | 4⅜" x 4⅜" | 5⅜" x 5⅜" | |
| 5, Sky | Med | 14 | 2⅜" x 2⅜" | 2⅞" x 2⅞" | 3⅜" x 3⅜" | |
| 6 | Bac | 8 | 1½" x 2½" | 2" x 3½" | 2½" x 4½" | --- |
| 7 | Bac | 4 | 1½" x 1½" | 2" x 2" | 2½" x 2½" | --- |
| Goose | Bac | 3 | 3⅝" x 3⅝" | 4⅝" x 4⅝" | 5⅝" x 5⅝" | |
| Center.1 | Bac | 1 | 2⅜" x 2⅜" | 2⅞" x 2⅞" | 3⅜" x 3⅜" | |
| Unfinished Block Size | 8½" | 12½" | 16½" | na | ||
| Grid Size | 1" | 1½" | 2" | na | ||
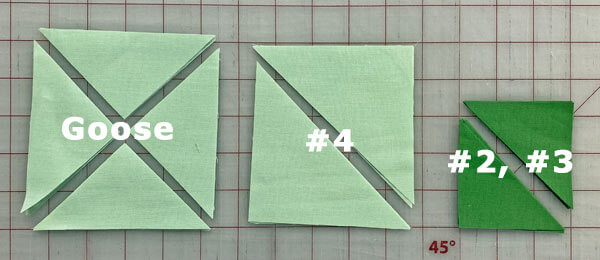
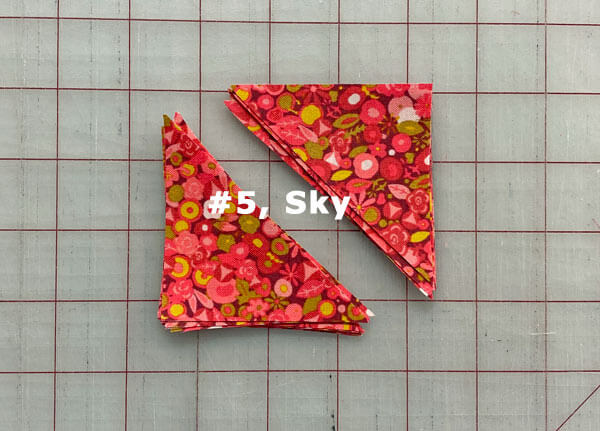
Make the needed subcuts
Subcut your patches according to the instructions in the cutting chart. The patches are all oversized, so we're not looking for absolute perfection in this step.
Assemble the units for a Tulips Quilt Block
All the units in the Tulip block include paper piecing. Each begins by positioning the first patch (#1 or Goose.1 or Center.1) in place on the unprinted side of the pattern. The dashed guidelines make positioning foolproof.
I prefer to use a tiny dab of Elmer's Washable Glue Stick to hold this first patch in place instead of pins—there's a smaller distortion of the paper pattern that way.
Let's get all that gluing out of the way first, so we can put that glue stick away.
 The dashed guidelines make quick work of this!
Paper piecing requires some adjustment to our typical sewing machine setup.
General Sewing Machine Setup for Paperpiecing
- Reduce your stitch length to 16–20 stitches per inch (1.3-1.6 mm). This perforates the paper and stabilizes the seam when you remove the pattern. [Learn more about stitch length here.]
- Reduce your machine's speed or just plain slow down. Sew only as fast as you can stay on the stitching lines.
- Install an open toe appliqué foot (sometimes called an 'embroidery' or 'satin stitch' foot) if you have one (it's easier to see where you're stitching with one installed).
- Use a larger needle (90/14) if you have problems removing the pattern.
- If your machine has a needle stop up, use it. The stitching goes faster when you don't have to lift the presser foot with every seam.
- As you stitch each seam, start and stop a generous 1/4” before and after the solid stitching lines. ALWAYS. Future lines of stitching secure the ends.
After adding each patch, press the unit as it was sewn to set the seam and then open. The SA is automatically pressed towards the last patch added.
Before adding the next patch, take a look to make sure the one you just added covers the space plus seam allowance that it is supposed to.
Steam is optional and usually curls the pattern.
If that bothers you, don't use steam. Sometimes I do. Sometimes I don't.
It truly depends on my mood.
Remember, as you follow this paper piecing tutorial, the printed and the fabric sides of this block are mirror-images of each other.
At last!
Let's sew!
Square in a Square (SiaS)
Make 1
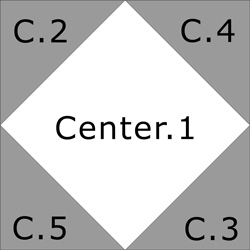 Square in a Square
With RST, match the bias edge of #C.2 to #1.
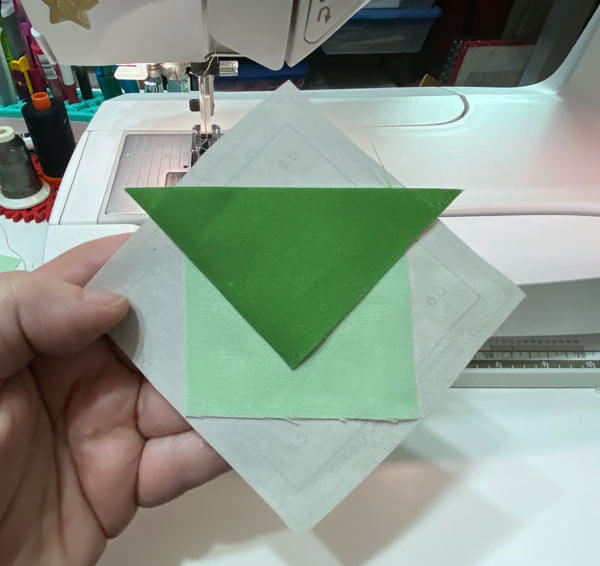
Sew on the solid line, starting and stopping past the outside dashed outline of the SiaS.
The 3" SiaS for our 12" sample block is big enough so that we don't need to jump to the iron just yet. For an 8" finished block, you may need to press between adding C.2 and C.3.
Rather, we can add C.3 to the opposite side of #1, sewing on the line and starting and ending past the outside dashed lines.
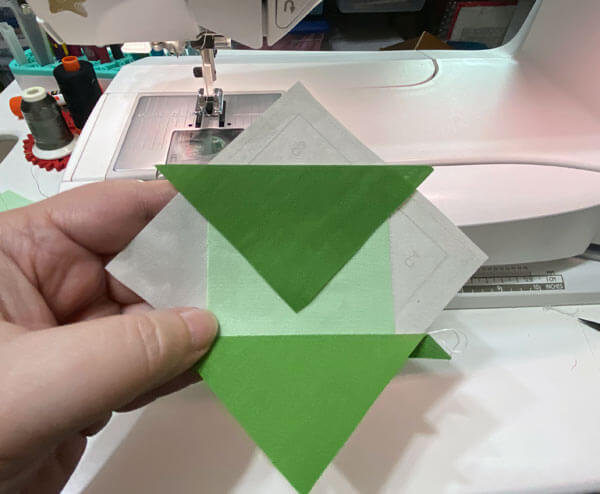
Press.
Add C.4 and C.5 in the same manner.
After pressing, at your cutting mat, align the 1/4" marking on your ruler with the solid line surrounding the block.
Trim away the excess (Fig. 1). Rotate a quarter turn.
Repeat for the three other sides. (Figs. 2-4)
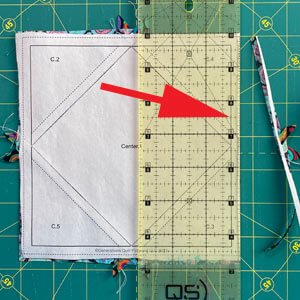 Fig 1
Fig 1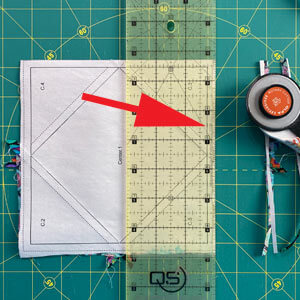 Fig 2
Fig 2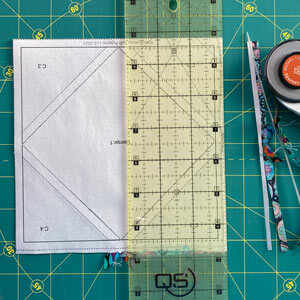 Fig 3
Fig 3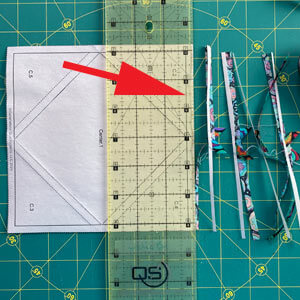 Fig 4
Fig 4NOTE: We'll use this same trimming method for all the paper pieced patches in this tutorial.
Your SiaS is complete.
Brave World Variation units (BW)
Make 4
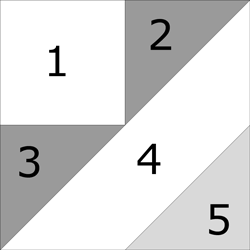 Brave World
With RST, match a short edge of #2 (dk green) to #1 (lt green). The outside edges should be even.
If you're new to the BW unit, flip open the #2 to make sure it's positioned properly. (always a good thing to do when you're making a new block).
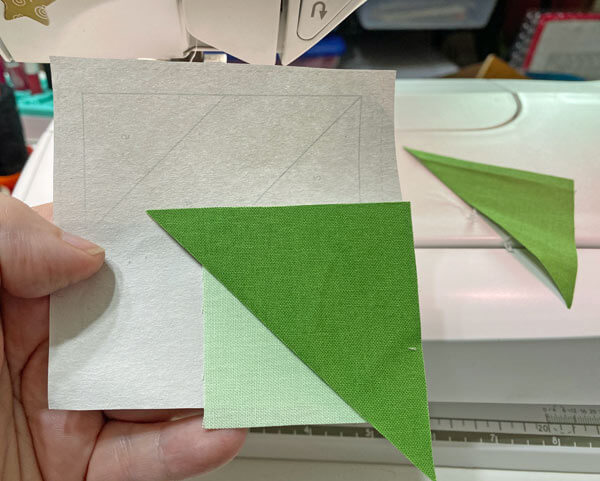
Sew on the solid line between #1 and #2, starting and stopping a generous 1/4" before and after the line. Later lines of stitching secure these seams—just like in traditional piecing techniques.
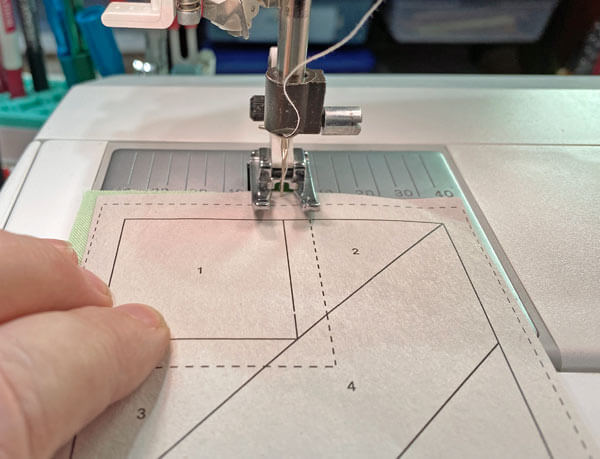
Press.
Match the short edge of #3 to the adjacent #1 side, outside edges again even.
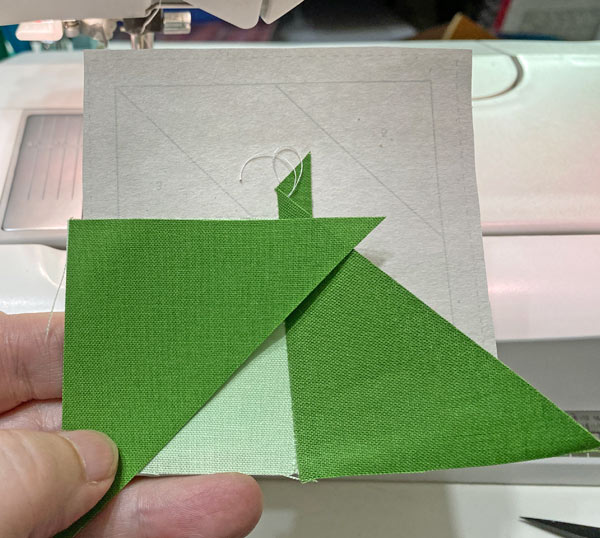
Sew on the line between #2 and #3, again starting and stopping a good 1/4" before and after the line. This is how you'll stitch all the paper pieced seams in this tutorial.
Press.
Notice, I didn't bother to trim away the thread tails in the above photo. We'll get those automatically in this next step. No need to make extra work for ourselves here.
Gently pull the pattern away from the stitches in just the center of the BW.
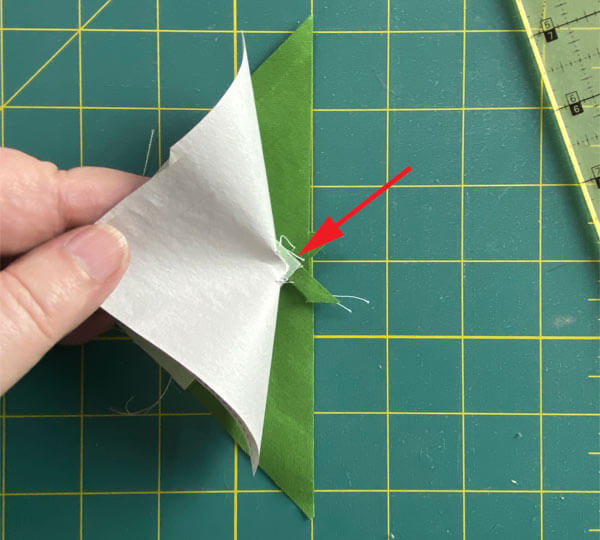
Use a ruler to fold the paper pattern back on itself on the line.
Align the 1/4" marking on the ruler with the folded edge and trim away the excess with your rotary cutter.
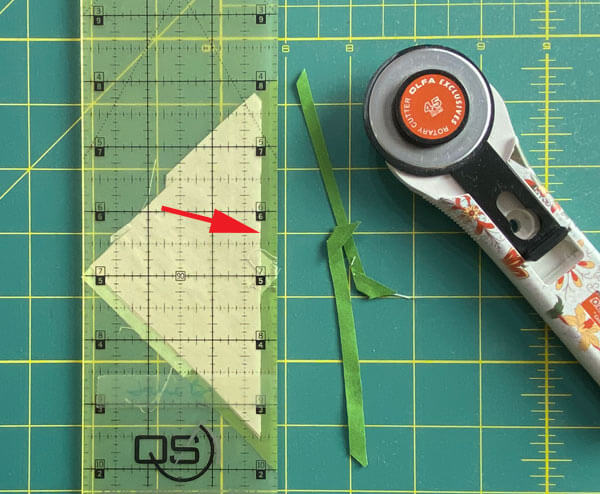
Below you can see how the paper tore. As long as it's a small rip, it doesn't affect the pattern. If it's a larger tear, repair it with some Magic Tape from the printed side.
Just remember not to press directly on the tape...it will melt and crap up your iron.
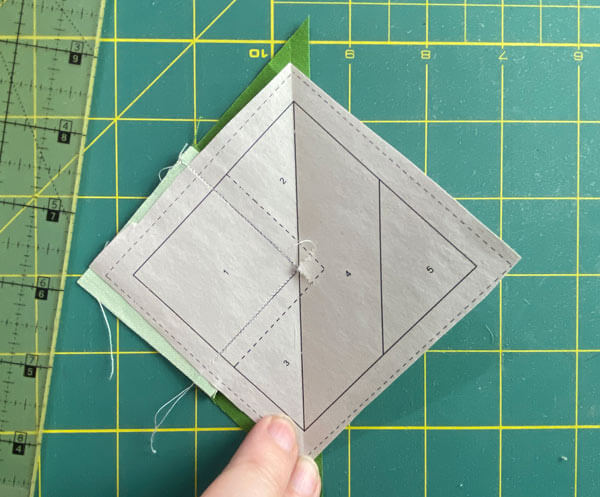
Match the long bias edge of #4 (lt green) with the freshly cut #2/#3. Since our #4 is significantly lighter than the fabric underneath it, nudge it a few threads past the dark fabrics. This prevents that dark line from shadowing through to the top of our finished quilt.
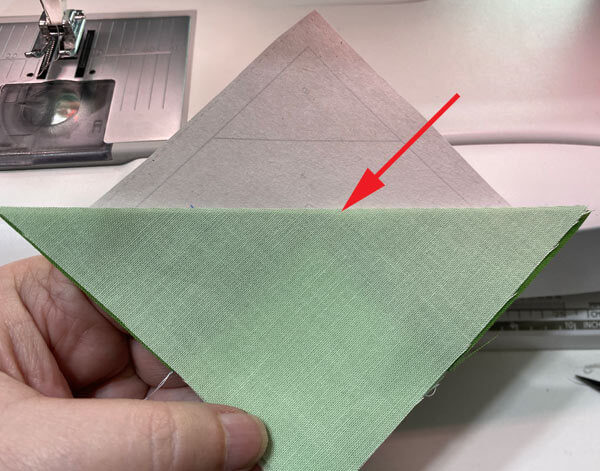
The seam is a candidate for chain piecing because it runs from one side of the pattern to the other. Start and stop your stitches past the outside dashed edges of the BW.
Press.
Use your ruler to fold the pattern back on the line between #4 and #5. Position your ruler, 1`/4" on the fold, and cut away the extra fabric in #4.
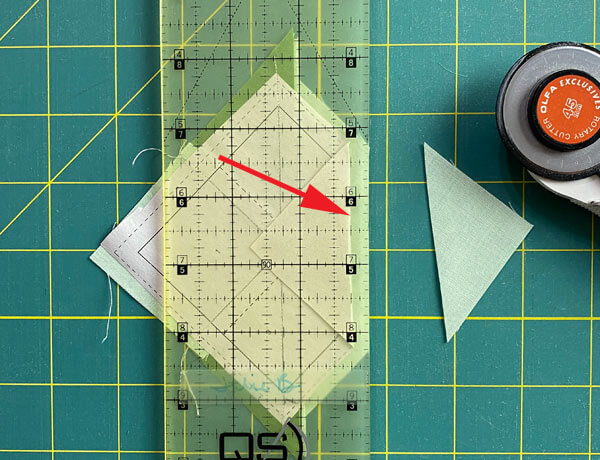
With RST, add the #5—again a candidate for chain piecing.
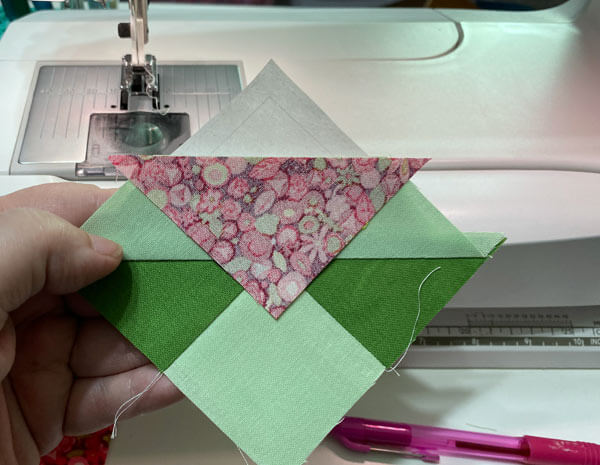
Press.
Trim away the excess, just like you did for your SiaS.
Repeat for all 4 units.
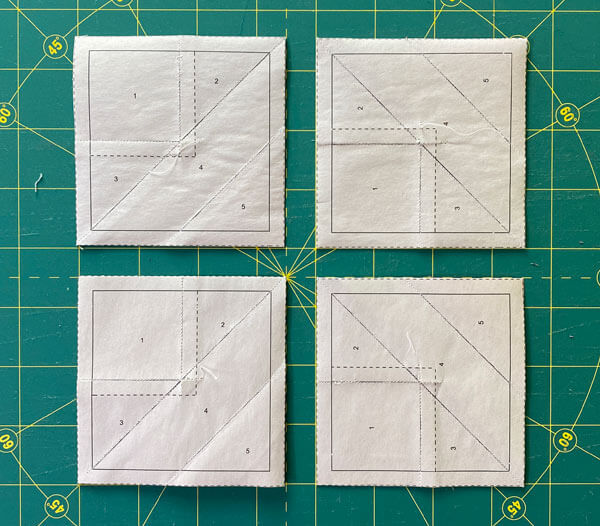 I find it more accurate and easier to match the 1/4" line with the solid line, instead of the edge of the ruler to the outside dashed line.
Flying Geese (FG)
Make 12
 Single Flying Geese
With RST, align the bias edge of a Sky to the Goose, with the bottoms even. The point at the bottom of the Sky is opposite of the point of the corner of the solid square outline on the pattern. You can just see it through the pattern here.
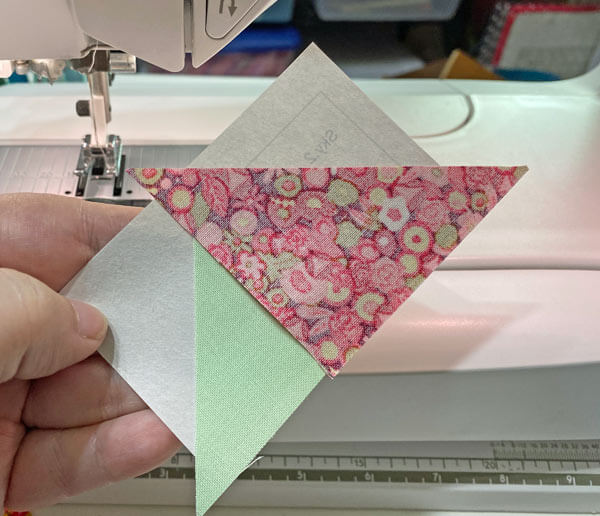
Stitch on the line, starting and stopping past the outside dashed edges of the pattern.
Remember, because these seams cross the entire width of the pattern, you can chain piece them. Saving a bit of time adds up.
Remember, there's more quilts in your head that you can ever make.
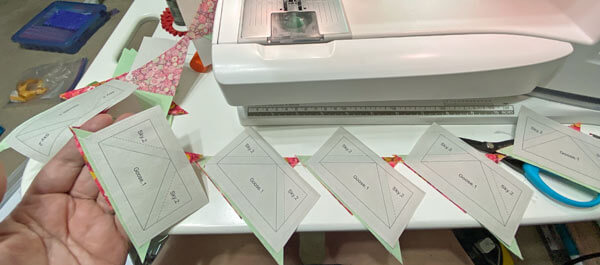 Chain piecing all the FG in one string
Repeat the process for the second Sky.
Press.
Trim all your FGs just as you did the BWs and SiaS before.
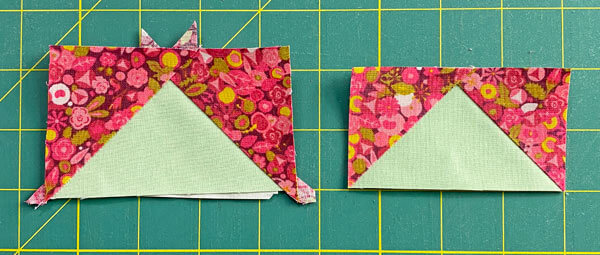
Below is an untrimmed versus a trimmed FG with its point perfectly 1/4" in from the top and bottom corners and cut exactly in half by the SA.
Taking the time to sew on a line never looked so good!

The paper piecing is complete. From this point forward, return your stitch length to the one you regularly use for piecing and install your favorite 1/4" presser foot.
After trimming all of our units, most of the thread tails are gone. If there's any left in the centers of your BWs, clip those away now.
Remove the paper pattern from all your patches.
We took care in cutting our patches so that the straight of grain is on all the outside edges. Because of this, these blocks act like any other traditionally pieced block. The paper is no longer needed.
Time to say 'Hasta la Vista' to it...in our best Arnold voice! :)
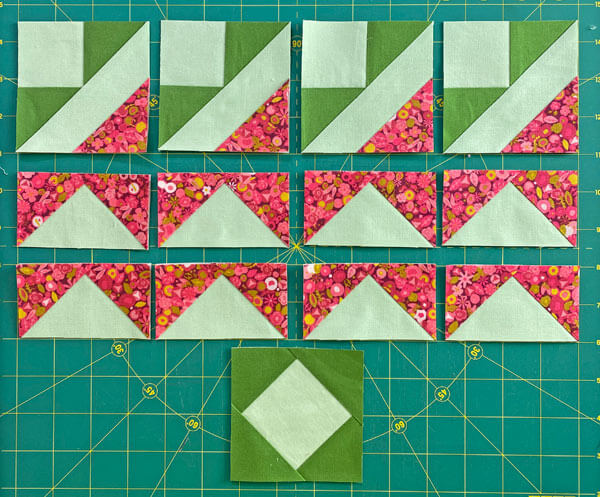 There's nothing better than foundation piecing for accuracy, IMHO!
Assemble the Sides
Make 4
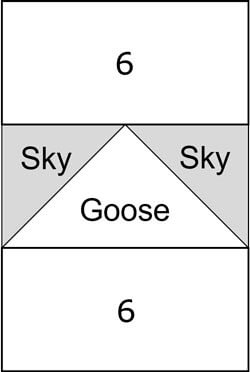
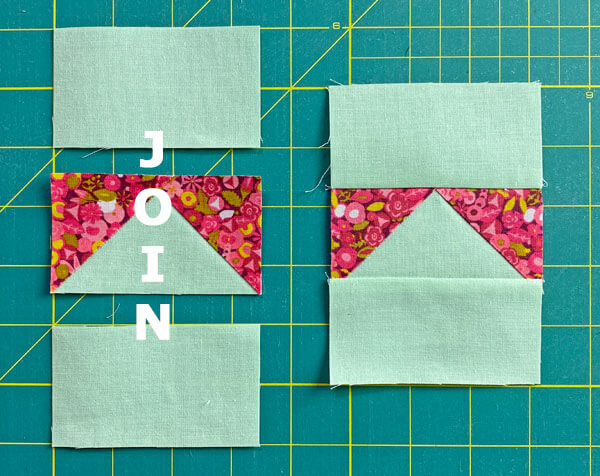
With RST, stitch a #6 rectangle to the top and bottom long edge of each FG, pressing towards the #6s (to reduce bulk) after adding each one.
Assemble the Corners
Make 4
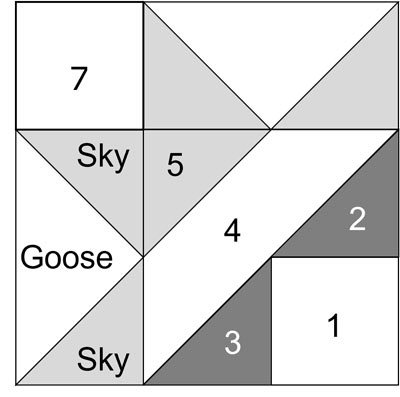 Corner Unit
Arrange a #7 square, 2 FG, and 1 Brave World as shown below (upper left)
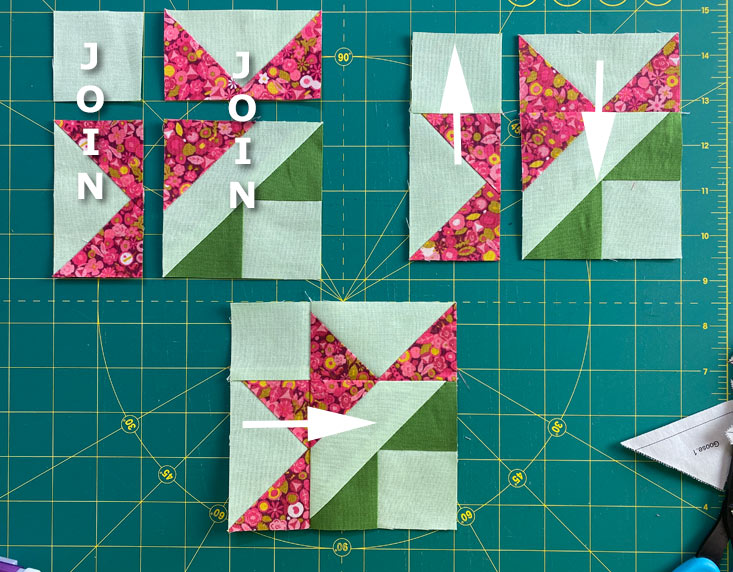
With RST, sew the units in each row together. SAs are pressed towards the BWs and the small #7 square. (upper right)
Stitch the rows together. (bottom center) This last seam is pressed towards the BW.
Assemble the Tulips quilt block
Arrange all your pieced patches into the Tulips quilt block design.
SiaS in the center (of course!), The 'tulip flower' print points are on the outside edges of the Corners, and the FG pointing outwards on the Sides.
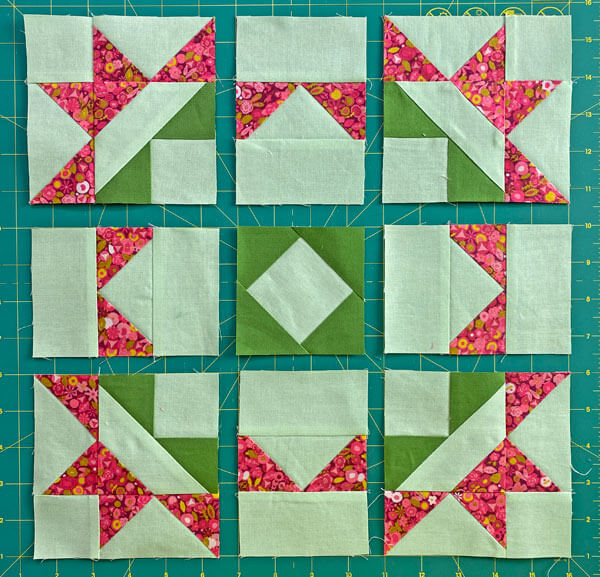
Since we pressed all our SAs away from the FGs, the seams between the rows nest. Piecing is so, so much easier with nested SAs.
With RST, stitch the units in each row together.
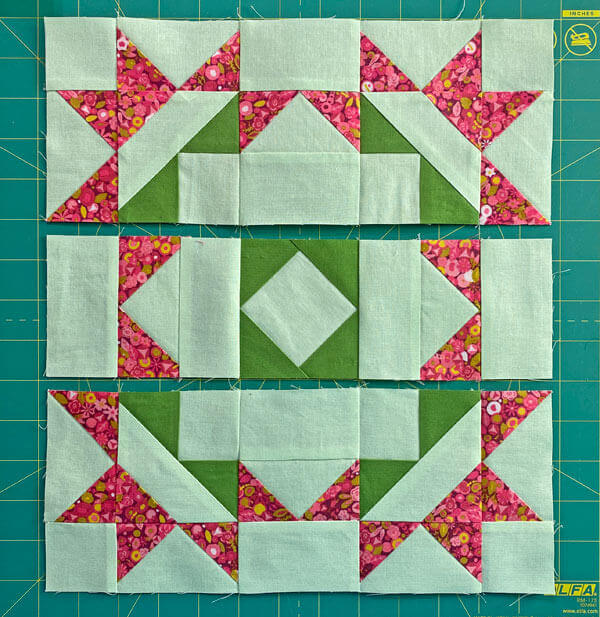
Press, with the SAs toward the Side units in each row.
With RST, sew the rows together, pinning as needed to hold all the matching points together.
A final press—try out my favorite 'secret' pressing technique for a super flat block— and our Tulips quilt block is complete.
Now for a look-see at the backside.
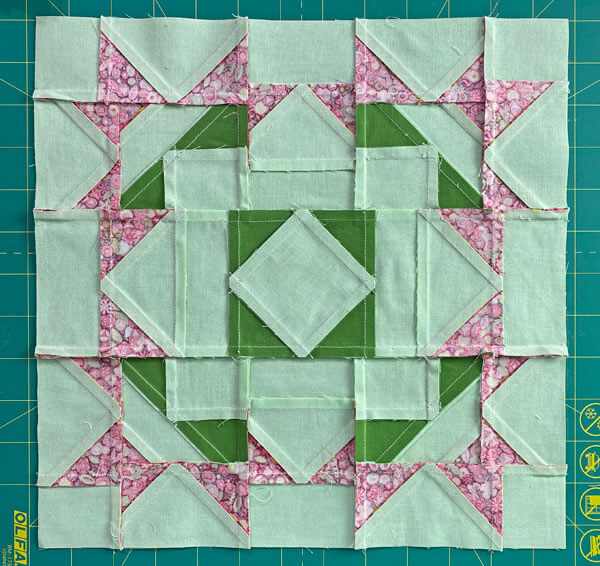
BTS block instruction writing
When deciding how to piece a block, I'm looking for ease, accuracy, and the ability to efficiently produce those results. Not using a specialty, i.e., costly ruler, is a good thing, too.
Take a look at the design again. Everything single triangle shape in this design has at least one point that needs matching.
 Tulips quilt block design
That's why I chose foundation pieced FG for this block.
The best alternate technique, IMHO, would be the 4-at-a-time method of making Flying Geese using patches cut oversized. However, there's a lot of extra measuring to do.
Continuing with the same technique as the other units was the best use of time, yielding the best results.
As long as you sew only fast enough to consistently hit the stitching line…you've got this one in the bag.
Raise your head to the sun!
Look at you, piecing those perfect petals and leaves! With your gorgeous Tulips block complete, you've earned your budding paper-piecer badge.
Let your quilting confidence bloom, knowing that with a bit of patience, you absolutely can master techniques that first seemed intimidating.
And remember, you're growing better with every block! Now quilt yourself a huge floral bouquet because you deserve to show off your skills. Be proud of how your fabric flowers are flowering.
What about a different quilt block?
For a list of all the 220+ quilt block patterns on this site, start here.
If you know the name of the block, shorten your search by using these links:
Click here if you're looking for blocks with at least some paper piecing.
Click here if you're looking for the basic building blocks of quilting, i.e., Flying Geese, half square triangles, quarter square triangles, etc., along with several techniques to make each.
And finally, use these links to find blocks in these finished sizes:
- Home
- Free Quilt Block Patterns
- Tulips Quilt Block

