Tips for Cutting with Rotary Cutter Blades
by Judy Cozon
(Charlotte NC)
Do you have any tips for ACCURATE cutting?
Is it better to cut all on the same day...I am assuming that if the pieces don't line up exactly the problem is in the cutting.
I have also discovered that cotton vs cotton blends vs polyester don't necessarily cut exactly equal.
Lesson #1...use fabric from the same line fabric content!
Check and check again.
If there are any good suggestions, would love to learn!
Reply
I do not believe that fabrics of different content (i.e. poly/cotton blends vs. 100% cotton) would behave differently when cut with the same rotary cutter and rulers as long as they were of the same weight. If one was significantly thicker than the other, there may be a difference, depending on how you hold your rotary cutter. I don't stack more than eight layers when I'm using the 60mm blade. Usually only 4 to 6 at a time. The more layers the more chance for shifting as you cut.
Here are several tips for more accurate cutting:
- Use clean, sharp rotary cutting blades. Change to a new blade at the slightest hint of dullness on your current blade. Replace a nicked blade immediately. I can't tell you how many times at a bee retreat we've remarked how much difference a new blade makes AND how cheap and stupid we were not to change blades sooner. (Sorry to my Loose Threads Bee for giving away our secrets!) Use your Joann's or Hancock's coupons to buy rotary blade in multi-packs to reduce the cost.
- Use the right size blade for the job. Your 45mm blade is a good, all-purpose rotary blade. If you are cutting many layers of fabric move to the 60mm rotary cutter. If you are cutting around curved templates, move to the 28mm or 18mm blade and cut fewer layers at a time.
- Attach your rotary blade properly. Hold your cutter with just two fingers and push it along your mat without fabric. The wheel should roll easily with little effort and no wobble. If you have to exert more force for the blade to turn, it's too tight. Loosen the screw that holds the blade a tiny bit.
Make sure you've installed just one blade. Once I couldn't figure out why my cuts were so ragged. After looking at my blade closely, I realized I'd installed TWO blades instead of one. The lubrication on the blades in the packaging can make it hard to slide the blades apart, and that's exactly what happened. Now I double check!
- Cut away from your body in a standing position. You lose some perspective and control when sitting to cut.
- Apply an even pressure when cutting Not too hard, not too light. Again, this is a control issue.
- Place your blade right next to the ruler. Some like the blade completely perpendicular to the ruler, I prefer at a slight angle into the ruler as Sally Collins, an award winning miniature quilter, recommends. Just make sure if you angle your blade, you aren't cutting underneath the ruler.
- Use the same brand of rulers for cutting. This is not always possible if you are switching to templates, but make the effort to use the same brand. The measurements on different brands can be slightly off creating problems during piecing. And do cut with the printed lines of the ruler next to the fabric. Cutting with your ruler upside down distorts the lines. Think of it like looking through a glass of water.
- Fabric grips help to hold the ruler in place. These can be made of vinyl like "Clear Grip" or even sand paper dots.
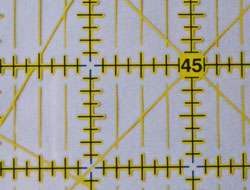
 Good rulers have breaks in the measuring lines
called "sight" lines.
- Use rulers with "sight" lines These spaces within the lines, themselves, help you to line up your fabric consistently.
- Cut on a rotary mat you can turn. Turn your mat, not the fabric. Every time you pick up the fabric to position it for another cut, there's a chance for pieces to shift and cutting to be off.
- Stop to move your hands. When you are cutting a long strip and you need to move the hand holding the ruler, stop with the blade in the fabric and walk your hands up the ruler into better position. Then continue cutting. Your hold on the ruler will be more stable if you are "up" on your fingertips. Placing your palm flat on the rotary ruler can cause it to shift from the pressure.
- Clean up your edges often. Before you started to cut, you cleaned up the edge by making a cut at a 90 degree angle to the edge. As you cut strips, the fabric moves the tiniest of bits. After several cuts, the angle has probably shifted and is no longer a perfect 90 degrees. Double check often and clean up this edge as necessary.
- Cut on your dominant side. If you are right-handed, hold the rotary cutter in your right hand and ruler in your left. Cut on the right side of the ruler. Do not cut down the left edge towards you or across the top or bottom of the ruler. For cuts like these, the blade has a tendency to stray from the edge of the ruler, resulting in inaccurate shapes. Turn your mat instead of your body.
And finally, though not a cutting tip, do remember to close your blade for safety after each cut.
I hope this information has been helpful to you. If I haven't been clear enough, please do let me know and I'll fix it.
Readers, if you've got tips to offer for cutting more accurate shapes, please join in with a comment below.
Piecefully,
Julie Baird
Editor


