- Home
- Sewing Machine Needles
Choose your
Sewing Machine Needles for Quilting
This post contains affiliate links, for which I receive compensation.
Sharp or ball, universal or metallic...sewing machine needles come in a wide range of point types and sizes for an even wider range of uses.
But what we quilters are really interested in is which one to choose for our next project.
No matter how much you paid for your sewing machine, it's the needles you choose that determine the quality of each stitch.
They are the most critical part in the formation of a stitch.
The purpose of your sewing machine needles are to slide effortlessly through all the layers of your quilt. They should not damage the fabric or create too big a hole. Finally, the needle should carry the thread through to the stitch without damaging it.
We'll first discuss some tips for purchasing your needles and when and why to change needles. We'll look at the anatomy of needles, and then continue with needle sizes and types, paying special attention to which one to choose for which fabric and quilting activity.
Tips for Purchasing Sewing Needles
The #1 tip is to buy plenty of them in a variety of sizes and types when they are on sale. Use the big box store coupons like you get from Joann's and Hancock's, and watch the sale fliers, too.
There are many reasons to change a needle. Have a large and varied supply on hand so that you're more willing to change it when problems crop up.
Don't buy cheap, no-name-brands of needles. It just isn't worth the hassle.
Schmetz brand is my preference.
Your sewing machine instruction manual will tell you what kind to use if you aren't sure—i.e. Singer sewing machines use Singer needles only.
Joann's, Hancock's, etc., don't usually carry the smaller sizes in the store, though you can find them online.
I like to use a 60/8 or 70/10 Schmetz Microtex Sharp for silk and monofilament threads.
Locally, your neighborhood quilt store or sewing machine dealer is the place to shop for these.
If you don't see them, make sure the shop owner knows you're looking.
Keep Track of All Those Needles
Sometimes during a project, you'll switch to a different thread and need to use a different needle. Use this handy trick to keep these "used but still good" needles separated from the brand spanking new ones still in the package.
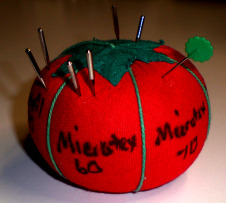 Use a tomato pin cushion to store
'used but still good' needles
Take a good old tomato pin cushion. With a Sharpie pen, write in each section the size and type of the various sewing machine needles that you frequently use.
Need to change to a different one?
Remove the "used but still good" needle from your machine and insert it into its proper place in the pin cushion.
When you remove one from the pin cushion to use in your sewing machine, put a decorative pin—here I'm using a Flower Head Pin—in its place. That way with quick look, you can tell what kind of needle is in your sewing machine.
Needle Anatomy
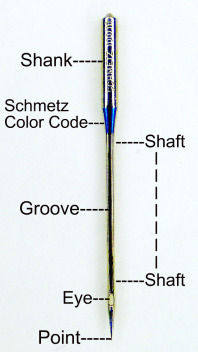 Parts of a Needle
The scarf is on the backside
just above the eye.
- Shank
- The top part of the needle. It is flat on back and rounded in front to help position it perfectly in the needle bar on your sewing machine. It is the thickest and heaviest part of the needle.
- Shaft
- The narrow long portion of the needle.
- Groove
- The groove is to guide and protect the needle thread down to the eye. The groove is on the front of your sewing machine needle. You can feel it with your fingernail.
- Scarf
- This is the flat part or indentation on the back side of your needle just above the eye that supports the hook as it picks up the sewing thread loop to form your stitch.
- Eye
- That's where the thread feeds through to form a stitch.
- Point
- Points are either sharp or ball or a combination of both. These should be matched to your thread and fabric choices.
Do You Know the Signs of a Needle Gone Bad?
Sewing machine needle have visible signs when they've been damaged or bent. Change to a new one when you...
- Notice that your stitches look "crooked" and not straight.
- Hear a popping sound while you're quilting. Dull needles make a this popping sound.
- Hit a pin. (Hey, we're not supposed to be sewing over pins anyway, right?) You have probably damaged the point and possibly bent the needle. While you won't always be able to see the damage with your naked eye, you will see the change in stitch quality.
- Start a new project. It's just plain easy to remember...new project, new needle.
- Have been sewing for 6 to 8 hours. Needles dull with use.
And one last, but important, fact to be aware of. Just because the needle is new from the package, doesn't mean it's perfect.
Now let's learn just What Sewing Machine Needle Sizes Mean.


