- Home
- Free Quilt Block Patterns
- San Diego Quilt Block
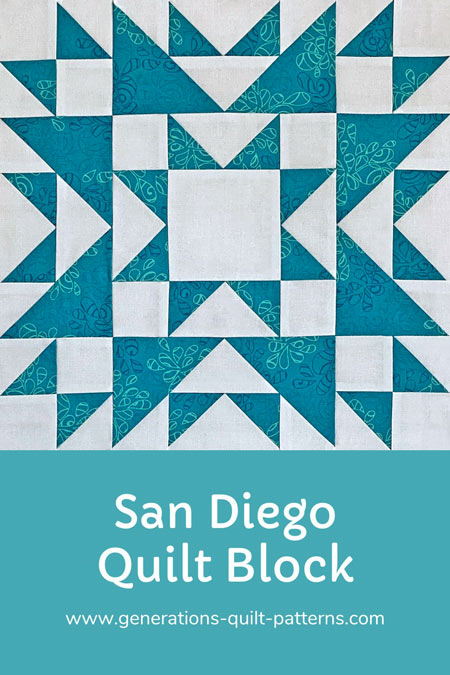
San Diego Quilt Block Tutorial: Simple Steps to Sophisticated Style
Create with confidence, piece with precision 💫✂️
This post contains affiliate links, for which I receive compensation.
The San Diego quilt block looks like it might be a whole 'pile of difficult', but don't let its sophisticated appearance fool you. By breaking it down into familiar units—Flying Geese, Half Square Triangles, and a basic Sawtooth Star—we'll navigate our way to a stunning finished block that showcases your growing skills.
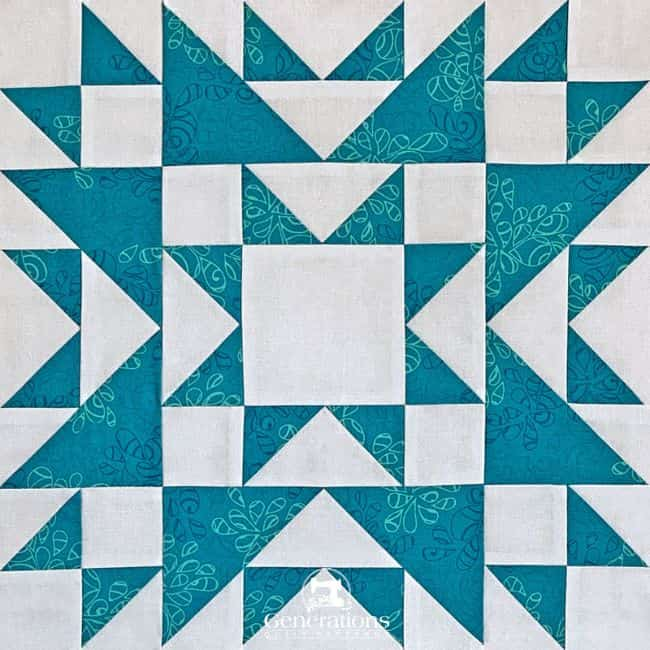
Even better, as you stitch the units together, there are no seams to match between units. All you need to look out for are points, and well, paper piecing helps you get those precisely placed without breaking a sweat.
Whether you're new to paper piecing or ready to expand your quilting horizons, this tutorial will guide you through each step with confidence-building precision.
🧭 Welcome to your San Diego quilt block journey!
We've organized this tutorial into easy-to-navigate sections, complete with helpful downloads and clear instruction points. Each section builds naturally on the last, but feel free to jump to specific techniques or return to review steps anytime.
- A cutting chart in four sizes, with downloads of the chart and block design
📋 General Instructions
Several abbreviations are used on this page. They are:
- SA - seam allowance
- RST - right sides together
- HST - Half Square Triangle
- QST - Quarter Square Triangle
- FG - Flying Geese
- FGVar - Flying Geese Variation #2
A 1/4" SA is used in this tutorial.
Highlighted in yellow, pressing instructions are easy to spot.
To press, patches are first pressed in the closed position as they came off your sewing machine. This sets the seam, melding the fibers of the threads into the fibers of the fabric.
Then press the SA to the dark unless otherwise noted.
📥 Download and print the paper piecing pattern
To download the pattern, use the most current version of Adobe.
For accurate results, on Adobe's Print Menu page, under 'Page Size and Handling' set 'Custom Scale' to 100%. Then print.
Click here to see what it looks like on the Print Menu page.
Find your finished block size from the chart below. For each block you want to make, print the corresponding number of copies for a total of:
- Four FG singles
- Four FG Variation 2
Download and print paper piecing patterns | ||||
|---|---|---|---|---|
| Finished Block Size | FG Variation 2 | FG Singles | ||
| Copies to print | PDF Download Link | Copies to print | PDF Download Link | |
| 8" | 1 | 2" x 4" | 1 | 1" x 2" |
| 10" | 2 | 2½" x 5" | 1 | 1¼" x 2½" |
| 12" | 2 | 3" x 6" | 1 | 1½" x 3" |
| 16" | 4 | 4" x 8" | 1 | 2" x 4" |
After printing, use the 1" square graphic on the printed page(s) to double check that your patterns printed at the correct size.
Then cut out the required number of patterns from your copies. A rough cut is good enough—an 1/8"-1/4"-ish away from the outside dashed square.

Not sure which paper to use?
Take a look at my review of several of the most popular brands available to us quilters on the market.
You want a super-easy paper to tear away—less stress on the stitches.
The newest quilt fabrics to tickle your fancy...
Click the images below to see the full collection. We share any commercial and/or free patterns that showcase them, too. (For inspiration, of course!)
✂️ Cut patches for a San Diego quilt block
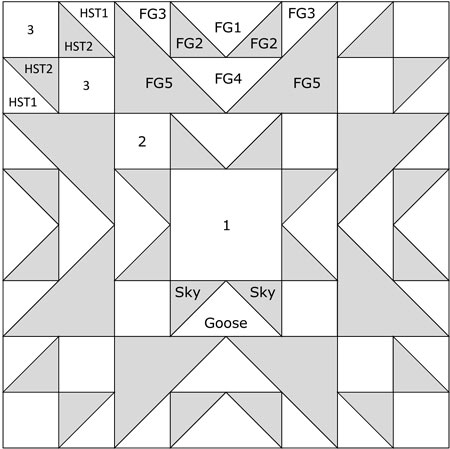 San Diego quilt block
Sample Block Size: 12" finished / 12½" unfinished
Grid: 8x8
Design Type: Star | Paper piecing | Unequal 9 Patch Large Center
Let's start with a quilter's best friend: organization. Take a moment to label each patch with its number—these will be our reliable guides as we navigate through the tutorial.
 | Cutting Chart for a~ Paper Piecing ~ | ||||||
|---|---|---|---|---|---|---|---|
| Patch | Fabric | Qty | Finished Block Size | Sub Cut | |||
| 8'' | 10'' | 12'' | 16'' | ||||
| 1 | Bac | 1 | 2½'' x 2½'' | 3'' x 3'' | 3½'' x 3½'' | 4½'' x 4½'' | --- |
| 2, 3 | Bac | 12 | 1½'' x 1½'' | 1¾'' x 1¾'' | 2'' x 2'' | 2½'' x 2½'' | --- |
| Goose | Bac | 1 | 3⅝'' x 3⅝'' | 4⅛'' x 4⅛'' | 4⅝'' x 4⅝'' | 5⅝'' x 5⅝'' | |
| Sky, FG2 | A | 8 | 2⅜'' x 2⅜'' | 2⅝'' x 2⅝'' | 2⅞'' x 2⅞'' | 3⅜'' x 3⅜'' | |
| HST1 | Bac | 1 | 4¼'' x 4¼'' | 4¾'' x 4¾'' | 5¼'' x 5¼'' | 6¼'' x 6¼'' | --- |
| HST2 | A | 1 | 4¼'' x 4¼'' | 4¾'' x 4¾'' | 5¼'' x 5¼'' | 6¼'' x 6¼'' | --- |
| FG1, FG4 | Bac | 2 | 3⅝'' x 3⅝'' | 4⅛'' x 4⅛'' | 4⅝'' x 4⅝'' | 5⅝'' x 5⅝'' | |
| FG3 | Bac | 4 | 2⅜'' x 2⅜'' | 2⅝'' x 2⅝'' | 2⅞'' x 2⅞'' | 3⅜'' 3⅜'' | |
| FG5 | A | 4 | 3⅜'' x 3⅜'' | 3⅞'' x 3⅞'' | 4⅜'' x 4⅜'' | 5⅜'' 5⅜'' | |
| Unfinished Block Size | 8½'' | 10½'' | 12½'' | 16½'' | na | ||
| Grid Size | 1'' | 1¼'' | 1½'' | 2'' | na | ||
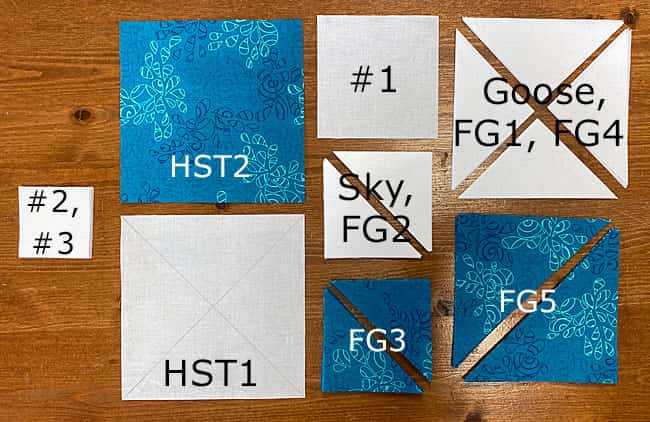
Subcut and mark
Subcut these patches once on the diagonal to create HSTs:
- Sky and FG2
- FG3, and
- FG5
Subcut Goose, FG1, and FG4 twice on the diagonal to create QSTs.
Draw two diagonal lines on the backside of the lighter of HST1 and HST2. For our sample, our HST1 is lighter. These lines need to be just dark enough for you to follow while sewing.
🧵 Stitch the patches for your San Diego quilt block
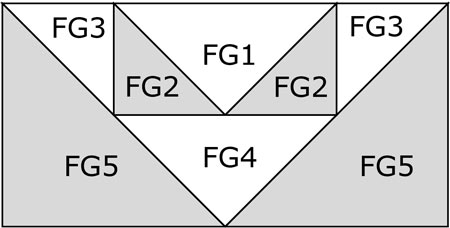
The FG and FGVar units̵ are paper pieced for accuracy.
To start, use a tiny bit of Elmer's Washable Glue Stick® to hold the FG1 and Goose triangles in position on the unprinted side of each pattern.
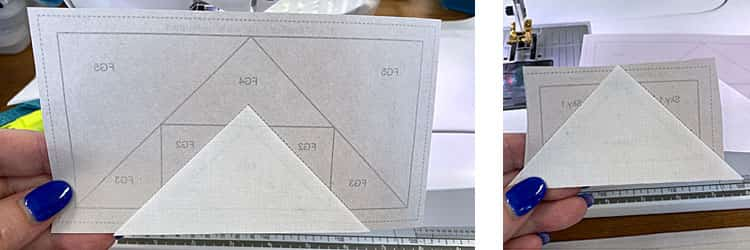 Flying Geese Variation #2, left, and a single, right
We need to make a few adjustments to our sewing machine settings to paper piece.
- Reduce your stitch length to 16–20 stitches per inch (1.3-1.6 mm). This perforates the paper and stabilizes the seam when you remove the pattern. [Learn more about stitch length here.]
- Reduce your machine's speed or just plain slow down. Sew only as fast as you can AND stay on the solid stitching line.
- Install an open toe appliqué foot (sometimes called an 'embroidery' or 'satin stitch' foot) if you have one (it makes it easier to see where you're stitching).
- Use a larger needle (90/14) IF you have problems removing the pattern. Personally, I use an 80/12 Microtex Sharp for paper piecing without any issues.
💡 Helpful Hint: After sewing EACH patch for all the paper pieced Flying Geese, press the seam first as it was sewn, and then open the patch, pressing from the fabric side. Check to make sure there are no tucks at the seam line.
Flying Geese Variation 2 units (FGVar)
Make 4
With RST, position the long bias edge of an FG2 with one side of the FG1 triangle.
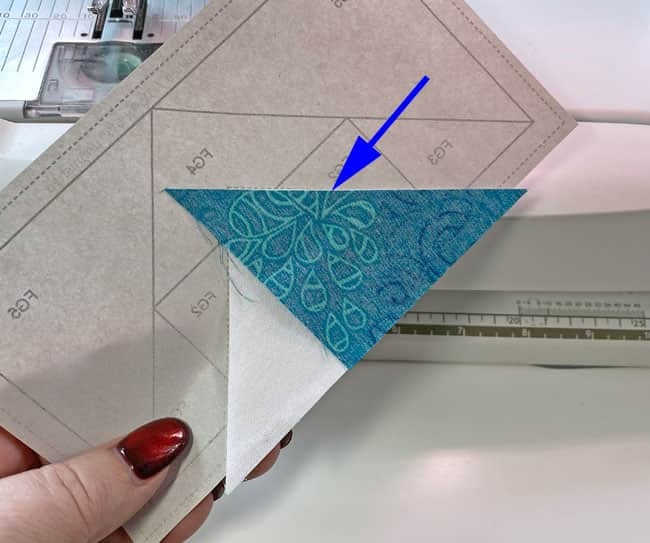
From the printed side, stitch starting a good 1/4" before the solid line between FG1 and FG2 and ending a good 1/4" past the end of it. As lines of stitching cross these stitches, these ends are automatically secured. I do not backstitch. All your paper pieced seams are sewn this way.
Repeat for the second FG2.
You can see these seams from the pattern side of our unit.
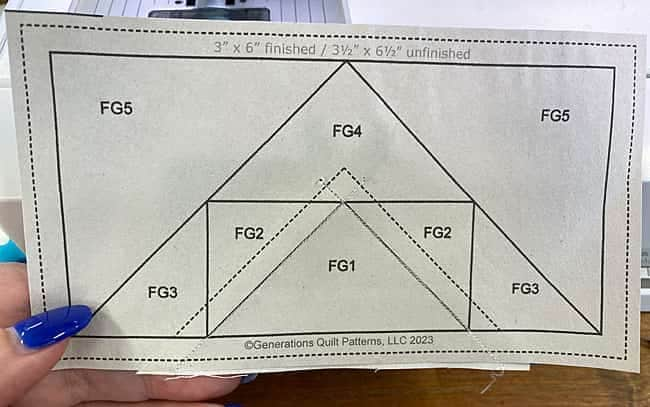
At your cutting mat, pattern side up, match the edge of your ruler to the black line between FG2 and FG3. (blue arrow)
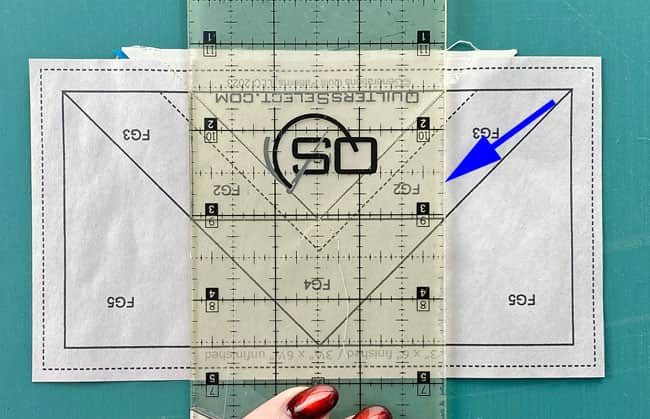
Use your thumbnail to crease the paper on the line. Fold the pattern back on itself on this fold.
Position the 1/4" marks on your ruler on the folded edge (blue arrow). Trim off the excess with your rotary cutter.
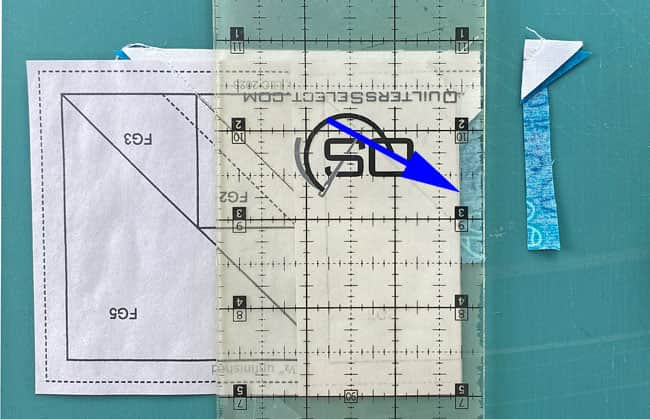
Repeat for the other FG3/FG2 seam line.
Our trimmed FG-Var looks like this. This trimming gives us the perfect placement guides for the FG3 patches.
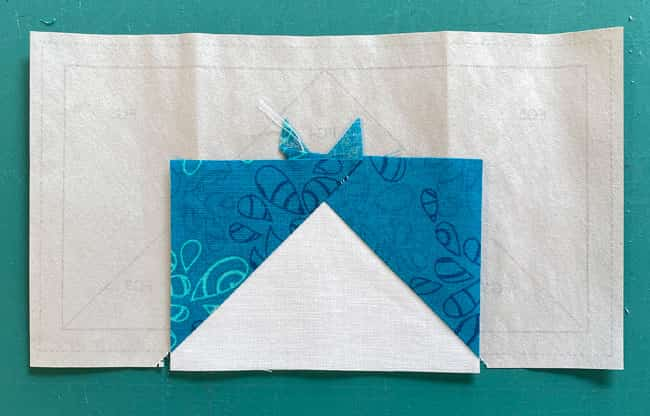
So why not trim the top edge of the FG2s now?
The next patches create more excess fabric to be cut away. There's no good reason to do the same step twice.
With RST, position a short side of the FG3 with a freshly trimmed FG2.
Notice how I've nudged the lighter patch a couple of threads past the edge of the darker FG2? That keeps the darker fabric from shadowing through the quilt top once our piecing is finished.
A simple step that can save a lot of headache later.
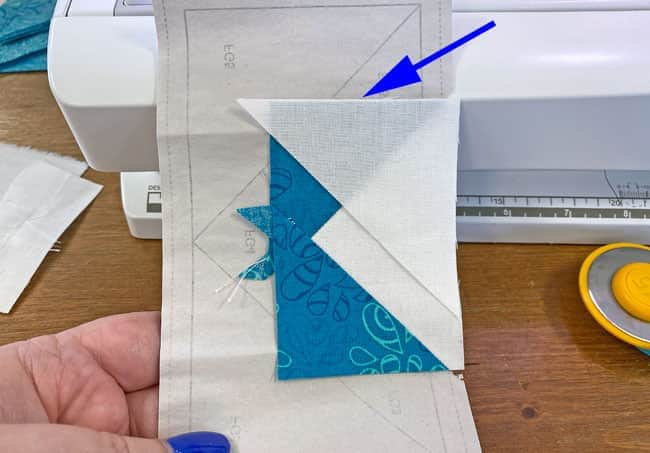 I've also aligned the other short edge of the FG3 with the bottom of the first FG1 triangle
Sew with the same generous seam.
Repeat for the second FG3.
Here you see why we didn't bother to trim that top edge earlier. But it's time has come.
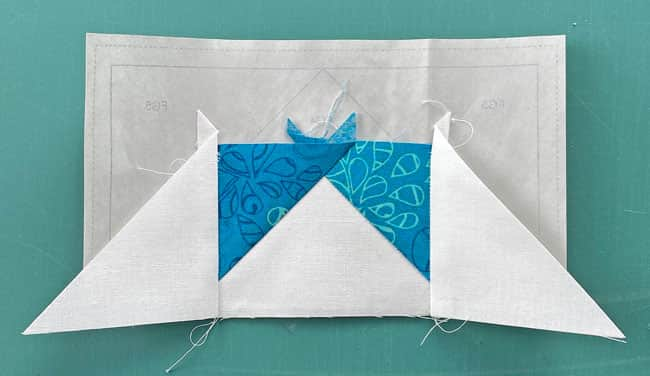
To fold the pattern on the solid line, we must pull the paper away from some stitches. (blue arrows)
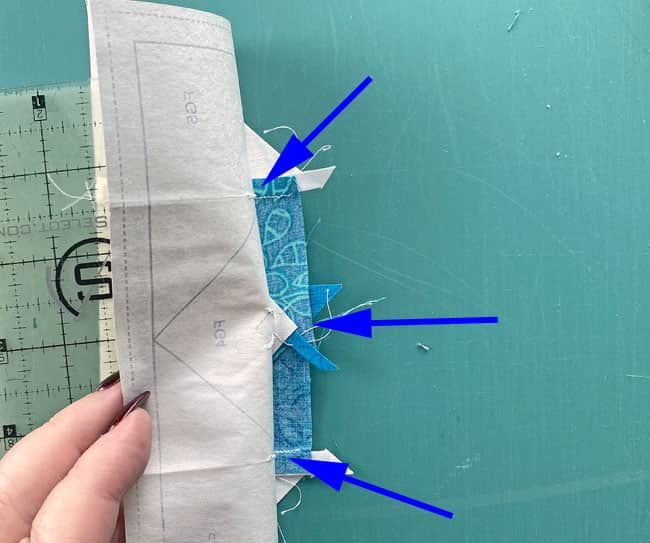
Then trim following the same procedure used for the FG2/FG3 seams.
With RST, position the FG4, scooching the long bias edge a bit past the edge of the darker fabric.
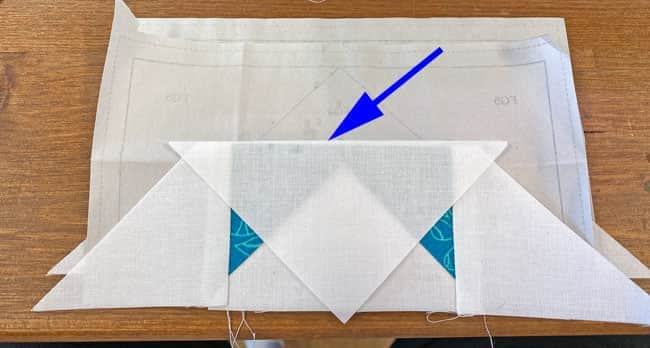 That last cut provided us the perfect placement line for the FG4. You can see where we folded the pattern on the middle left and right sides.
Sew a generous seam and press.
Trim both sides of the FG4/FG3 patches to the perfect 1/4" SA.
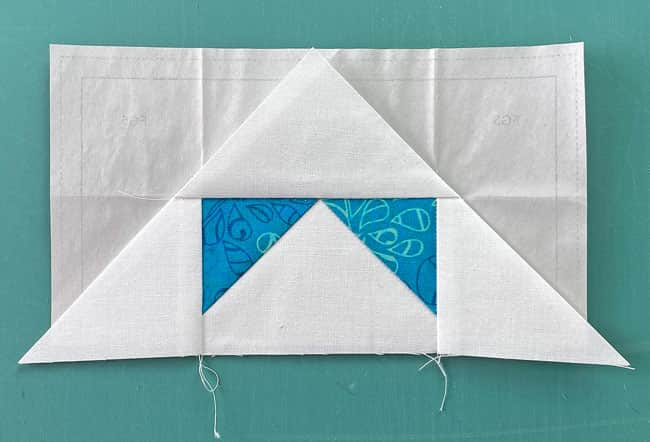 We're ready to add the final FG5s. The folded lines are leftover from all our trimming.
Match the long biased edge of FG5 with a freshly trimmed edge. Sew the seam
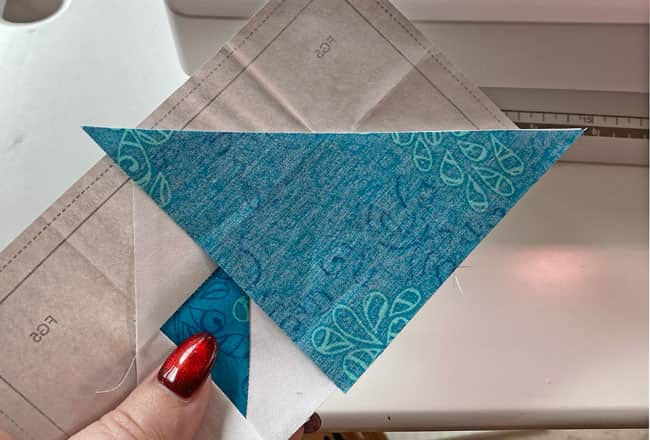
Repeat for the last FG5.
Give your FGVars a good pressing and set aside for now.
Flying Geese Singles
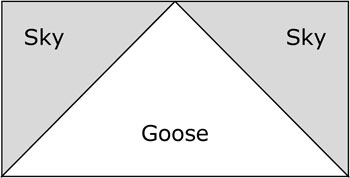
Make 4
The single FG is pieced/pressed just like the first three patches of the previous Goose.
Trim the FGVar and FG
Time to get all our FG ready for 'prime time'.
Starting with a FGVar, at the cutting mat, pattern side up, position the 1/4" marks on your ruler with one side of the solid rectangle (blue arrow). Trim away the excess.
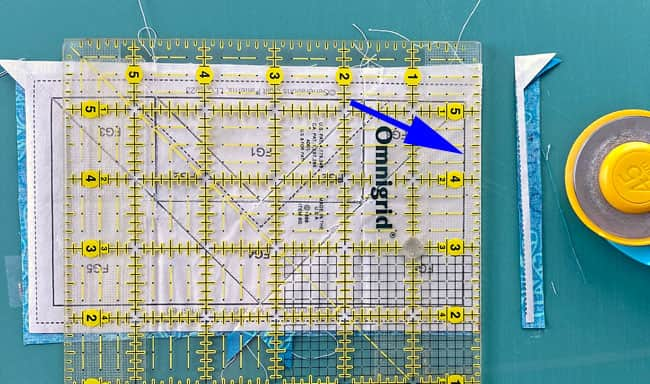
Turn the patch a 1/4" (or better yet, use a rotating rotary cutting mat for this job—my favorite!) and repeat.
Turning and cutting until all every side of every FG is done.
The FGVars are ready for our San Diego block...
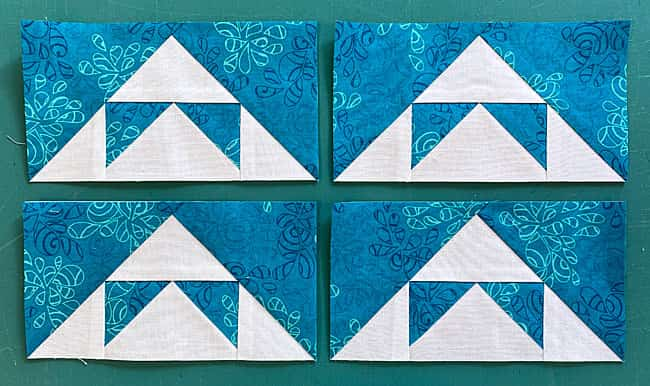
You can see how a bit of cutting turns a hot-mess of a Goose into the thing of beauty!
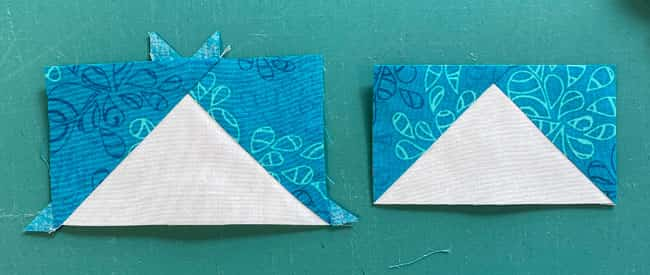
Remove the paper from all the FG units. We purposefully cut patches that gave us edges on the straight of grain—just like it'd be if we'd used traditional piecing methods for these units.
The papers' work is done and no longer needed.
The paper piecing is complete. From this point forward, return your stitch length to the one you regularly use for piecing and install your favorite 1/4" presser foot.
Half Square Triangle
Make 8
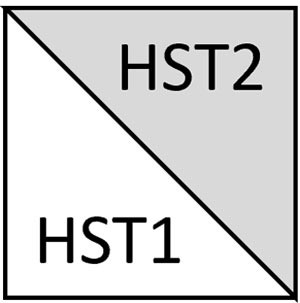
With RST, layer HST1 and HST1 matching all the edges. For the larger block sizes, you may want to pin these squares together.
With your favorite 1/4" presser foot installed, stitched 1/4" away from both sides of both lines.
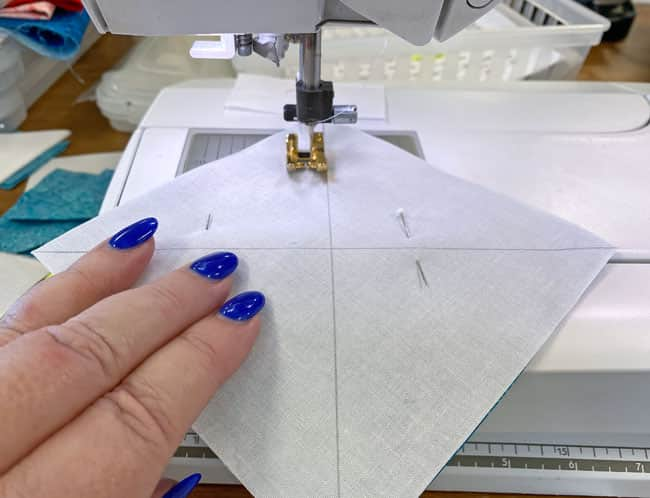 Pins help keep the edges lined up as you stitch
Give the pair a quick hit with the iron to flatten it.
Use the chart below to find the Center that corresponds to your Finished Block Size. For our sample, it's 2⅝".
HST Measurements | ||||
|---|---|---|---|---|
| Finished Block Size | Center | Trim HSTs to… | ||
| 8" | 2⅛" | 1½" x 1½" | ||
| 10" | 2⅜" | 1¾" x 1¾" | ||
| 12" | 2⅝" | 2" x 2" | ||
| 16" | 3⅛" | 2½" x 2½" | ||
Match the Center measurement on your ruler with one side of the squares (blue arrow). The opposite edge should fall in the center of the squares. (red arrow)
Cut along this edge with your rotary cutter.
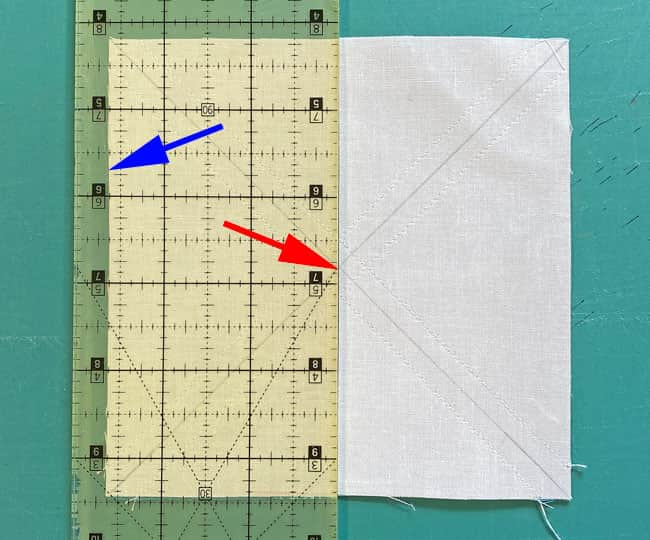
Turn the mat a quarter turn (either a rotating cutting mat or a small 12" x 18" one is good for this job)
Position your ruler with the Center measurement on the edge (blue arrow) and the opposite side through the center (red arrow). Cut forming 4 equal pairs of sewn squares.
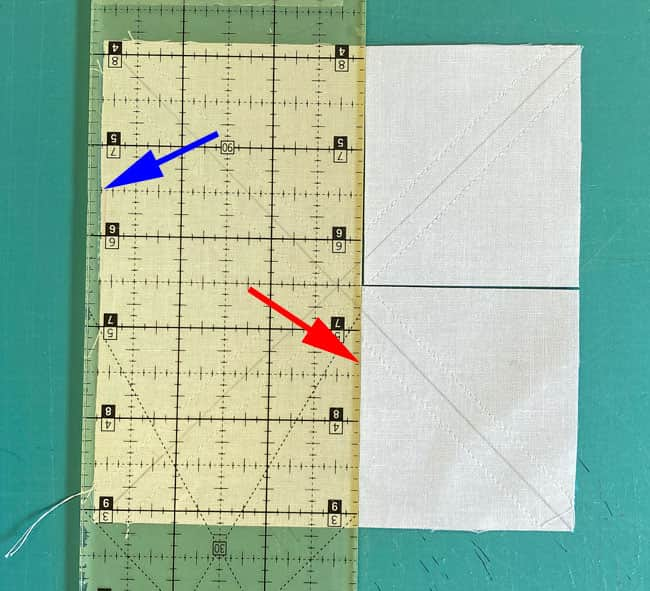 You can see a bit of the first cut. Do try to keep your patches aligned for an accurate cut.
Finally, cut each pair in half on the drawn line.
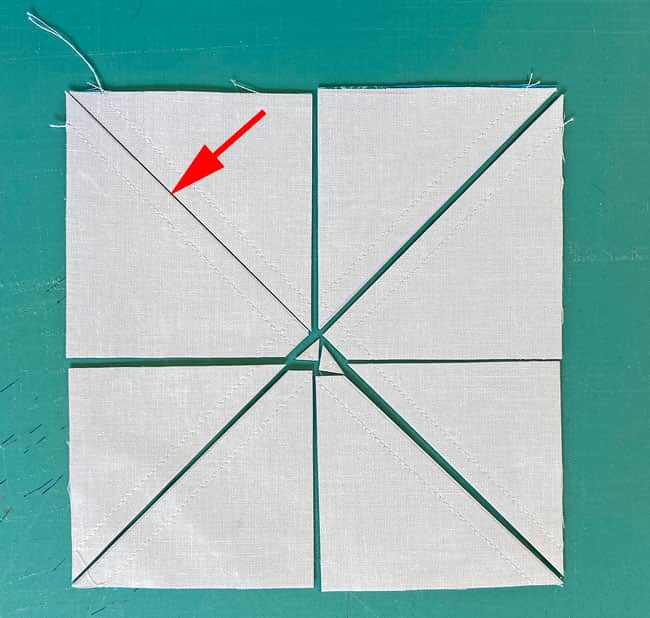
You now have 8 HSTs to press with the SA toward the dark.
Referring to the chart, find the size to 'Trim HSTs to…'
To trim to size, position the diagonal line on your square ruler with the seam line of your HST (blue arrow). The edge of the ruler and the 'Trim HSTs to…' size should all fall within the edges of the oversized HST.
For our 12" sample San Diego, we need to cut 2" HSTs.
Trim away the excess along the two exposed edges.
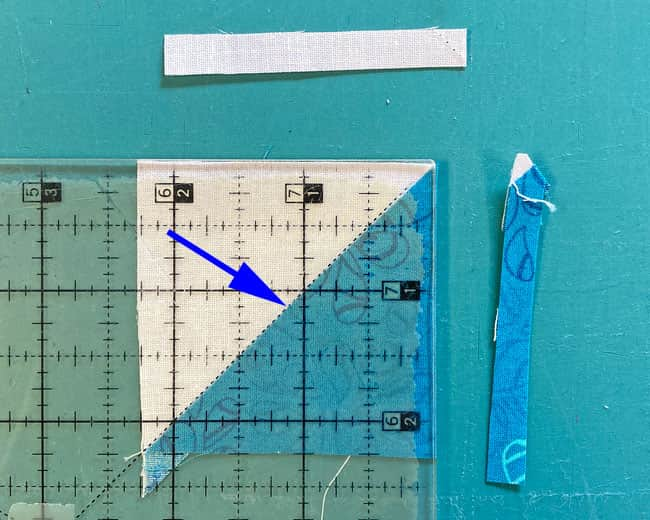
Turn the half-trimmed HST 180°, line up the diagonal line as before, and this time match the 'Trim HSTs to…' marks on your ruler with the freshly cut edges.
Again, trim away the excess from the two exposed edges.
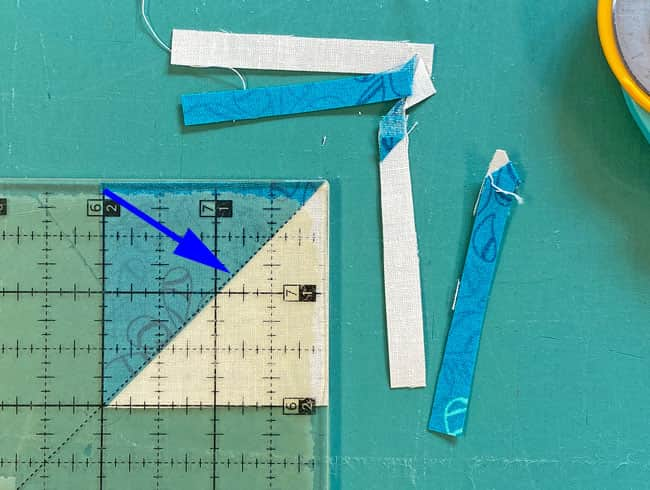
Repeat for all 8.
Corner Units
Make 4
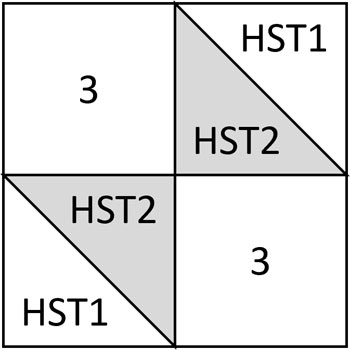
Arrange two #3 and two HSTs as shown. (below left)
With RST, stitch the patches together into rows. (below center) Press these seams away from the HST to reduce bulk.
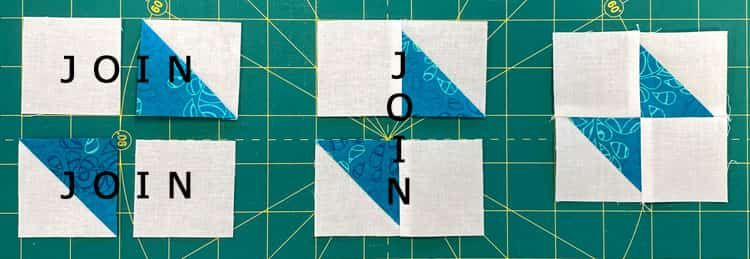
Real Talk 💪: Take a moment to check your HST orientation before stitching. It's much easier to rotate a unit now than to bring out the seam ripper later!
Stitch the rows together. This seam can be pressed in either direction—it has nothing to match to—just be consistent.
📏Check for Accuracy
Corner Unit Dimensions | |
|---|---|
| Finished Block Size | Edge-to-edge Measurement |
| 8" | 2½" x 2½" |
| 10" | 3" x 3" |
| 12" | 3½" x 3½" |
| 16" | 4½" x 4½" |
Sawtooth Star Center
Make 1
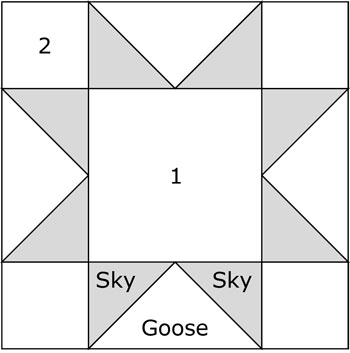
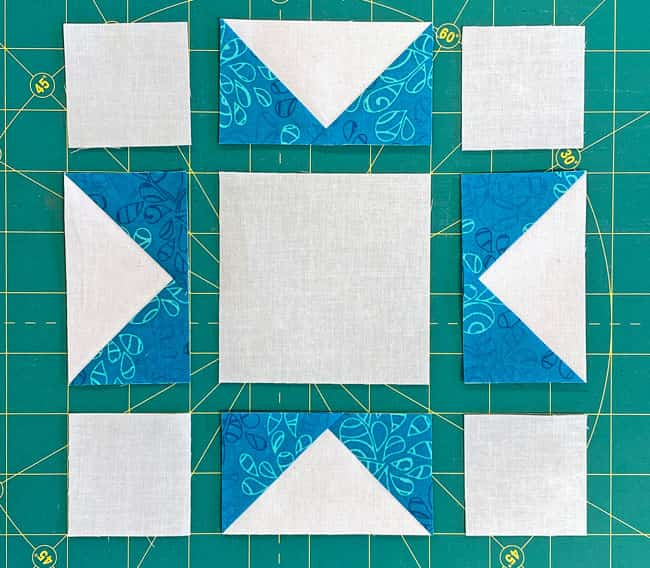
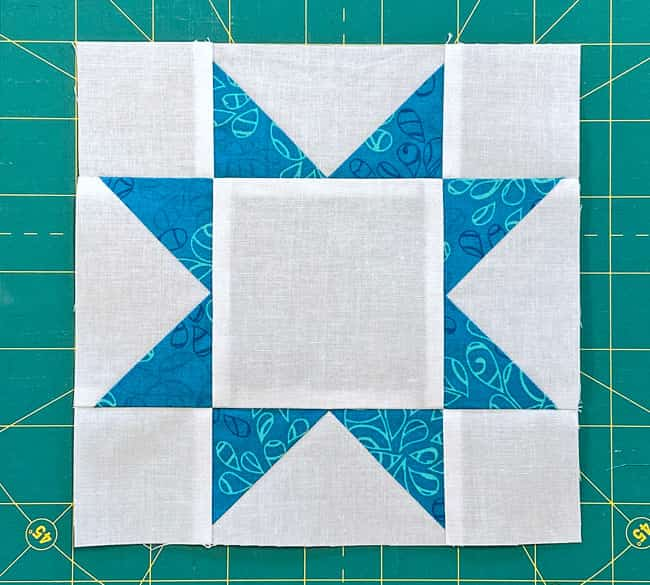
Arrange the #1, #2 and stitched FG singles into the Sawtooth Star design.
Sew the units in each row together and press these seams away from the FG.
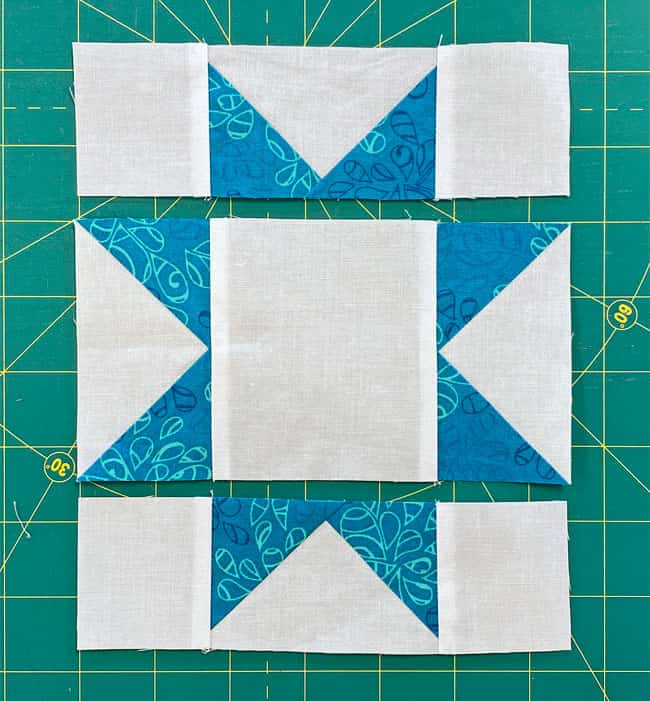
Sew the rows together. Pin as you need to keep the edges of the rows aligned and nested seams matched. These final two SAs are pressed toward the center.
📏Check for Accuracy
Sawtooth Star Dimensions | |
|---|---|
| Finished Block Size | Edge-to-edge Measurement |
| 8" | 4½" x 4½" |
| 10" | 5½" x 5½" |
| 12" | 6½" x 6½" |
| 16" | 8½" x 8½" |
🎯 Bringing it All Together: Where Paths Converge
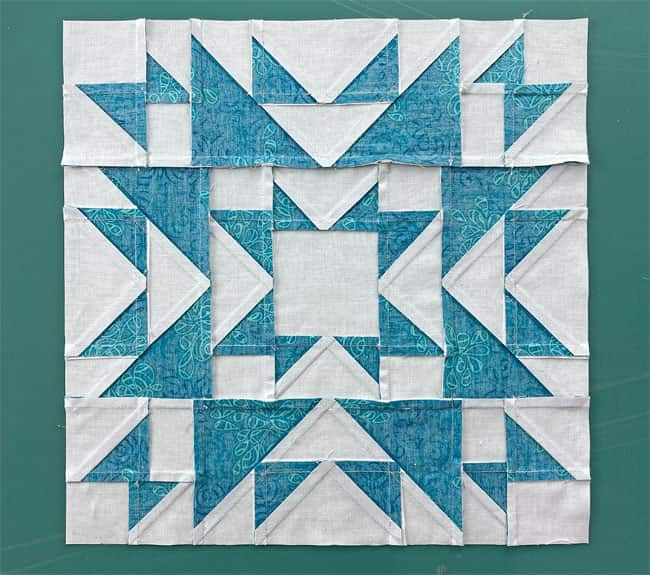
Each unit we've created—our Flying Geese (both kinds), corner units, and Sawtooth Star center—comes together to form our completed San Diego block.
The beauty of this design is that there are no seams to match between units—just clean lines and crisp points to align.
Take a moment to arrange your units as shown below, noting the Flying Geese units point inward.
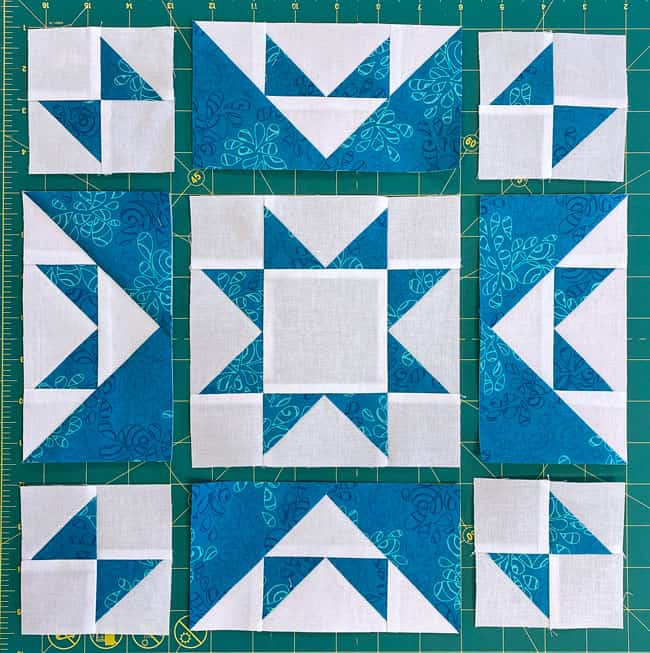
Stitch the units in each row together. It's a real treat for final assembly be so straightforward and simple.
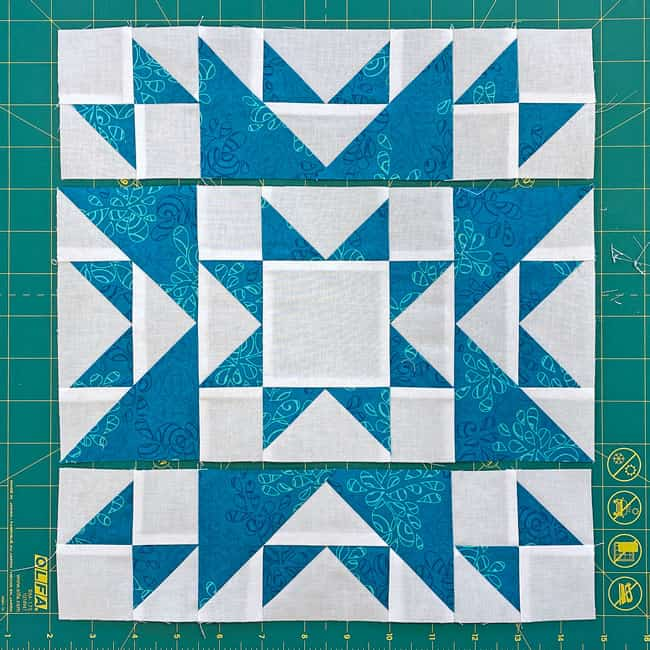
Sew the rows together. You've only got the seams to match.
After pressing these final seams towards the center, our San Diego quilt block is finished.
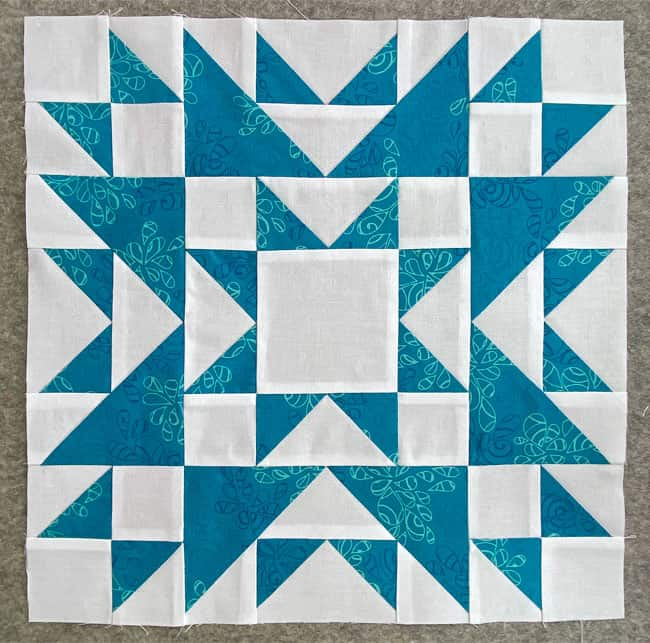
The backside reveals how all those pressed seams work together.
🎯 Your destination achieved: Skills to carry forward 💫
Congratulations on navigating the San Diego quilt block!
You've successfully charted a course through both traditional and paper piecing waters, creating something truly beautiful along the way. The skills you've mastered here—from precise paper piecing to perfect points—are your new tools for exploring even more exciting quilting horizons.
Until we meet again, may your cutting be straight and your creativity be wild!
📌 Drop a Pin on your next quilting adventure! 📍
You know how it goes—so many quilts to make, so little time!
Pin this tutorial for your next creative journey. Your future self will thank you when you're ready to navigate these perfect points! 🧭
🔭 Looking for something truly stellar?
You've finished your star quilt block, and you're ready for more!
Browse our collection of 60 stellar star quilt block patterns. All have instructions and cutting charts in multiple sizes. If templates or paper piecing is used in the tutorial, there's a free download for you of those materials.

Eeny. Meenie. Miney. Moe.
Which star quilt block will you sew?
For a star-studded quilting experience, choose from 100+ bedazzling star quilt patterns—for beginners and beyond—click here.
For even MORE blocks to make... 🧩🎨

...visit our Free Quilt Block Pattern Library, with over 230+ blocks to choose from in multiple sizes.
Free downloads are included in all sizes for any blocks require paper piecing patterns or templates.
- Home
- Free Quilt Block Patterns
- San Diego Quilt Block
