- Home
- Free Quilt Block Patterns
- Ribbon Star Quilt Block
Discover the Ribbon Star Quilt Block: Your No-Drama, No-Strings Star-ter Success Story
Because every quilting star needs a beginning 🎬
This post contains affiliate links, for which I receive compensation.
Skill Level: Beginner
The Ribbon Star quilt block is made quickly and easily using the Folded Corners technique—there's not a triangle to cut nor a bias edge to sew.

That makes this is an awesome little block for the beginning quilter.
All the WOW! factor without any complicated cutting or tricky triangles. No strings attached, no drama, just pure quilting satisfaction!
🧭 Ready for your star turn?
Jump to exactly what you need below—because like any good star, you should be able to make a grand entrance exactly where you want! No strings attached. ⭐
- A cutting chart in four sizes with a download of the chart and block design
- A coloring/fabric planning page to download and print
Cut. Sew. Press. Watch your star power unfold!
📋 General Instructions
Seam allowances (SA) are all pressed toward the darker fabric and are all 1/4".
These abbreviations are used in this tutorial:
- SA - seam allowance
- RST - right sides together
✂️ Cut the patches for a Ribbon Star
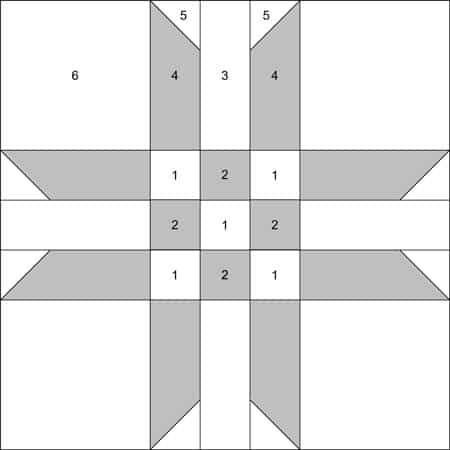
Sample Size: 9" finished / 9½" unfinished
Grid: 9x9
Brackman ID: None
Design Type: Even 9-patch | Star
Two fabrics.
That's all it takes!
The only thing to be concerned with is that there is enough contrast between your fabric choices so that all your pieced points show.
A piece of cake!
Remember to label those patches! It's your roadmap to quilting success.
 | Cutting Chart for a~ Traditional Piecing ~ | |||||
|---|---|---|---|---|---|---|
| Patch | Fabric | Qty | Finished Block Size | |||
| 4½'' | 9'' | 13½'' | 18'' | |||
| 1 | Bac | 5 | 1'' x 1'' | 1½'' x 1½'' | 2'' x 2'' | 2½'' x 2½'' |
| 2 | A | 4 | 1'' x 1'' | 1½'' x 1½'' | 2'' x 2'' | 2½'' x 2½'' |
| 3 | Bac | 4 | 1'' x 2'' | 1½'' x 3½'' | 2'' x 5'' | 2½'' x 6½'' |
| 4 | A | 8 | 1'' x 2'' | 1½'' x 3½'' | 2'' x 5'' | 2½'' x 6½'' |
| 5 | Bac | 8 | 1'' x 1'' | 1½'' x 1½'' | 2'' x 2'' | 2½'' x 2½'' |
| 6 | Bac | 4 | 2'' x 2'' | 3½'' x 3½'' | 5'' x 5'' | 6½'' x 6½'' |
| Unfinished Block Size | 5'' | 9½'' | 14 '' | 18½'' | ||
| Grid Size | ½" | 1'' | 1½'' | 2'' | ||
🪡 Piece the units for a Ribbon Star
Nine Patch
Make 1

With right sides together (RST), sew a #1 to a #2. Press. Create three pairs just like this. (below, bottom).
Add a #1 to two of your pairs and a #2 to the remaining pair. This gives you two #1/#2/#1 units (below left) and one #2/#1/#2. (below, right).
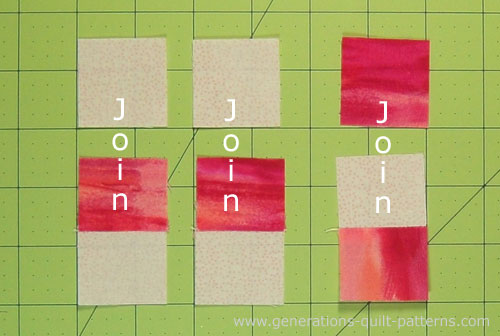
Sew these units together, placing those light #1s in the center and outside corners. Press and set aside.
Sides
Make 4
Grab your mechanical pencil (it's perfect for this!) and draw diagonal lines on the back of all eight #5s.
💡 Pro Tip: An open toe appliqué foot makes stitching these lines a breeze - you can see exactly where you're going! ✨
Position each marked #5 RST with a #4 and stitch on your drawn line.
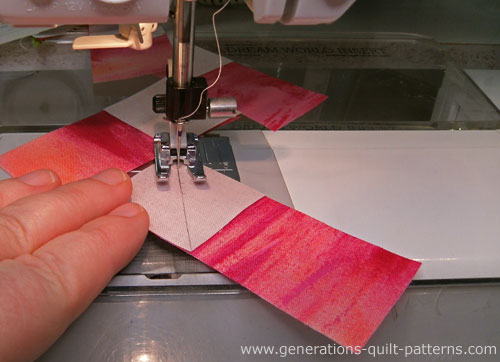 I prefer an open toe applique foot for this step. There's nothing between my eyes and the drawn line.
Trim the excess fabric with scissors, leaving a quarter inch SA, then press toward either fabric.
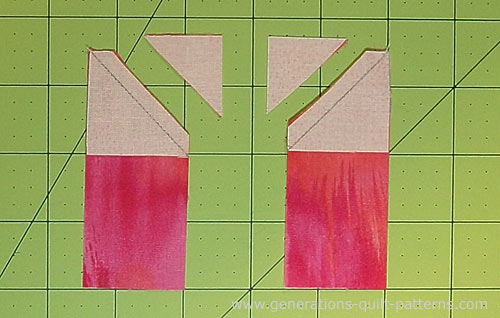
Here comes the fun part! We're going to create some mirror images:
- Make 4 units with stitching from lower left to upper right
- Make 4 units with stitching from upper left to lower right
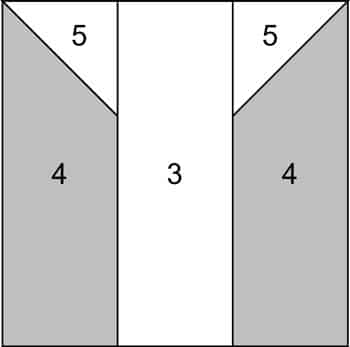
Quick Check: Take a peek at your units—all your diagonal lines should match the diagram below. It's surprisingly easy to flip one around (we've all been there!)
These are the finished #4/#5s.
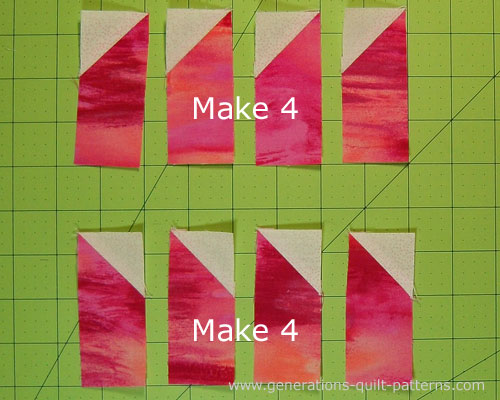 The finished #4/#5 after the SA are trimmed and pressed.
Arrange two #4/#5s with a #3, angling down toward the middle #3 (below left).
With RST, stitch one #4/#5 to the #3 (below, right). Press.
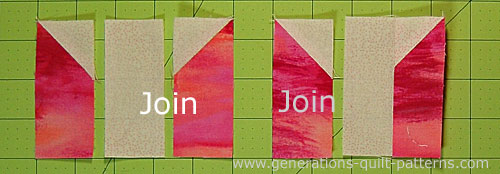
Add the second #4/#5 to the opposite side. Press.
💫 Success Check
Before we move on to the final assembly, let's make sure your beautiful units will play nicely together! Taking a moment to check now means your star points will align perfectly later! ⭐
Here's a handy size guide:
After sewing, the Sides and 9-Patch both measure... | |
|---|---|
| Finished Block Size | Edge-to-edge Measurement |
| 4½'' | 2" x 2" |
| 9'' | 3½" x 3½" |
| 13½'' | 5" x 5" |
| 18'' | 6½" x 6½" |
🧩 Assemble the Ribbon Star quilt block
Let's bring all your beautiful units together! Arrange them with those pretty points radiating out from the center.
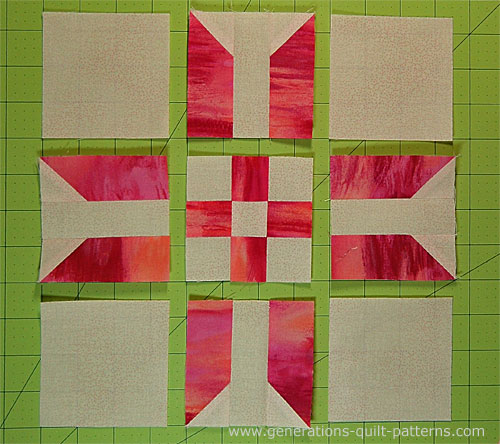
First, let's tackle the rows. The magic of nested seams means everything wants to fit together perfectly. Those SAs naturally snuggle right into place. If you're like me and love a perfect match, pop in a few pins to keep everything lined up just right.
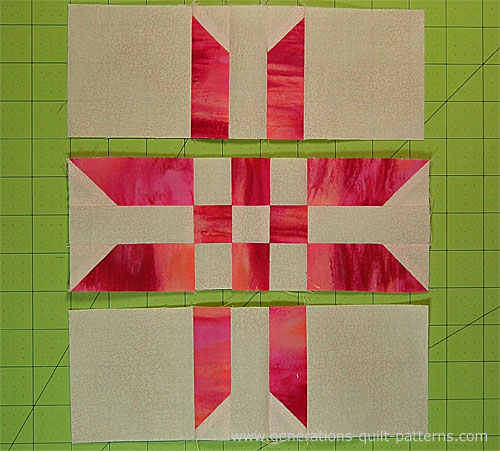
Now for the grand finale. Stitch those rows together to complete your Ribbon Star. Again, those nested seams are your best friends here—they'll help guide everything into place. Don't hesitate to use pins if they make you feel more confident. Remember, there's no rush—taking your time here means your star will sparkle! ✨
To complete our Ribbon Star, sew the rows together.
💡 Pro Tip: Give your seams a final press, and watch how your star points align beautifully! 🌟
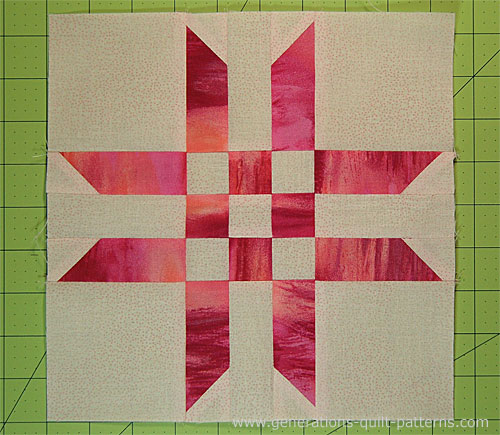 Our Ribbon Star quilt block is complete!
Free Pattern Alert
If you liked this quilt block, take a look at the free quilt pattern that uses it called (surprisingly!) 'Ribbons' by Elise Lea for Robert Kaufman Fabrics.
A Star Is Born 🎯 ⭐
Your Ribbon Star is proof that beautiful things don't need strings attached. Keep shining bright and come back whenever you're ready for an encore! ✨
Until next time, may your corners match and your stars sparkle. 🌟
📌 Pin now, shine later!
Your quilting destiny awaits! ✨
🔭 Looking for something truly stellar?
You've finished your star quilt block, and you're ready for more!
Browse our collection of 60 stellar star quilt block patterns. All have instructions and cutting charts in multiple sizes. If templates or paper piecing is used in the tutorial, there's a free download for you of those materials.

Eeny. Meenie. Miney. Moe.
Which star quilt block will you sew?
For a star-studded quilting experience, choose from 100+ bedazzling star quilt patterns—for beginners and beyond—click here.
For even MORE blocks to make... 🧩🎨

...visit our Free Quilt Block Pattern Library, with over 230+ blocks to choose from in multiple sizes.
Free downloads are included in all sizes for any blocks require paper piecing patterns or templates.
- Home
- Free Quilt Block Patterns
- Ribbon Star Quilt Block
