This post contains affiliate links for which I receive compensation
Quilting Techniques for Accurate Piecing
by Anna
(VT)

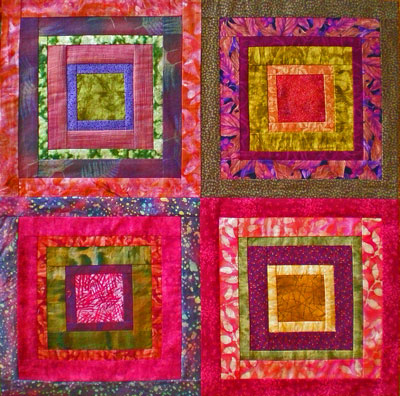
A set of 'Court House Steps' quilt blocks
How do you get log cabin blocks to come out nicely. I take care but mine are never square.
Reply:
I use several quilting techniques to get accurate piecing results.I am rather persnickety when it comes to piecing so my response is biased a bit.
I believe that if I've cut the individual pieces accurately, sewn with just the right seam allowance and pressed religiously, then my blocks should come out exact.
Are they really?
No, not always, but my quilt blocks are pretty darn close!
These are the quilting techniques I suggest...
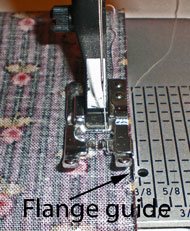
- Take a sewing test. This really sounds pretty boring, but I do it every time I piece a quilt, making sure to use fabrics from the quilt for the test. (For instructions on how to do a sewing test, please see "Find YOUR Quarter Inch Seam Allowance: Check Your Accuracy with a Sewing Test".)I prefer to use an edge stitching foot instead of the usual quarter inch presser foot. It has a built in flange to 'guide' the edges of my patches against.

My sewing machine also has an adjustable needle position so I can fine tune my scant quarter inch seam allowance to the exact fabrics and threads in the quilt. For instance, for flannel fabrics my needle is set in the 5.0 position. For batiks, it's at 4.0 and for most other quilt store fabric it's set at 4.5. But I do check every time.
Furthermore, I use a fine thread for quilting. Aurifil 50 wt cotton or Superior Threads' Bottom Line, a 60 wt polyester are my current favorites. (A fine thread takes up less room in the seam allowance.) - Cut your logs to length. For the center square and first log, many books instruct you to sew two cross grain strips together and then sub-cut into the individual units. Then sew these units to a strip for the next log and sub-cut into units. And so on.
Quick quilting...chain piecing...strip quilting...call it what you like, but I'm not a big fan of this method. It works, gets the job done, but if you're looking for precision, I recommend cutting the strips into the individual logs and then stitching them to the previously sewn unit.
Why?
Most machines do not have a built in walking foot (Pfaff does, Bernina's new 820 and 830 do, too). When sewers stitch two pieces together, those feed dogs on the bottom are used to ease in extra fabric. If one bias edge is sewn to a straight grain edge, the bias goes on the bottom to help ease in any fullness.
It stands to reason that if you are sewing two strips together for quilting units, that a bit of extra fabric will be eased in on the bottom strip. Over short lengths, it won't matter that much, but over longer lengths, it doesn't take much to become noticeable.
For that very reason, I do cut my pieces to size and then piece. It's not sexy, but it gets the job done and I'm happy with the results.
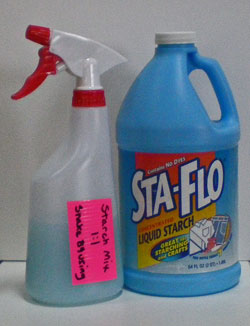
Furthermore, if the pieces are cut to length, I find myself taking more care when sewing them together. I want those ends to meet! - Starch quilt fabric. Yep! It's extra work, I agree. However, using starched fabric with my edge stitching foot and the adjustable needle position is my dream combination. Piecing is more accurate because your seam allowance is more accurate. Pressing is easier, too. There's less distortion and the seams lay flatter.It's not hard to do.

Just remember not to store starched fabric because of the critter issue. You'll end up only starching what you need.
And because you'll have to wash out the starch when the quilt is finished, it'll push you to at least test for bleeding fabric before you begin your project.
For more information, visit our "Starch Quilt Fabric" page. - Pressing for perfection. Okay, perfection is over-rated, I agree! But a finished quilt is so much better than a perfect quilt (especially if perfection is keeping you from finishing).
Here's a little quilting technique for accurate piecing I learned in a Sally Collins lecture. (Sally is a real pro at accurate piecing and has written several books on the subject.)
First, a little background...
When pressing during garment construction, first press with the seam closed to, in effect, set the seam. Then press the seam allowances to one side or open. Let the piece cool before removing it from the ironing board.
Why not use the same idea for quilting? Sally takes this idea a step further. She suggests to lay your ruler on top of the 'just pressed' piece. Then let it cool. The ruler adds just a bit of weight to truly tame those seam allowances.
It does take some extra time, but I can't argue with the results. The seams really are flatter doing this. Try it for yourself.
One final thought about pressing. I press to reduce bulk in my quilts and find that I am pressing seams open more and more. In addition to reducing bulk, pressing them open also removes any 'shadowing' of seam allowances and eliminates any trimming.
I use these techniques regularly in my piecing and am happy with the results. Here is one final suggestion to ensure that your blocks come out just so...
Measure as you go.
If the individual units that make up your block aren't the right size, your quilt block won't end up the right size either.
It's that simple.
You'll just be compounding the error. It's so much easier to fix a unit than take apart a whole block.
Hopefully these quilting tips will help you to achieve the piecing results you are after!
Readers, do you have other quilting techniques for accurate piecing results to suggest? Please add them via the 'Add a Comment' link below. Thank you!
Piecefully,
Julie Baird
Editor


