- Home
- Free Quilt Block Patterns
- Philadelphia Pavement Quilt Block
🧵 Philadelphia Pavement Quilt Block: Pave Your Way to Quilting Success! 🏙️
Concrete Dreams with Cotton Seams
This post contains affiliate links, for which I receive compensation.
Ready to lay the foundation for your next quilting masterpiece? 🏗️ It's time to break ground on the Philadelphia Pavement quilt block! 🧵🏙️ This urban-inspired design will have you constructing fabric skyscrapers and stitching up streetscapes faster than you can say "Liberty Bell." 🔔
No need to call in the heavy machinery—our tutorial is your one-stop construction crew. 🚧
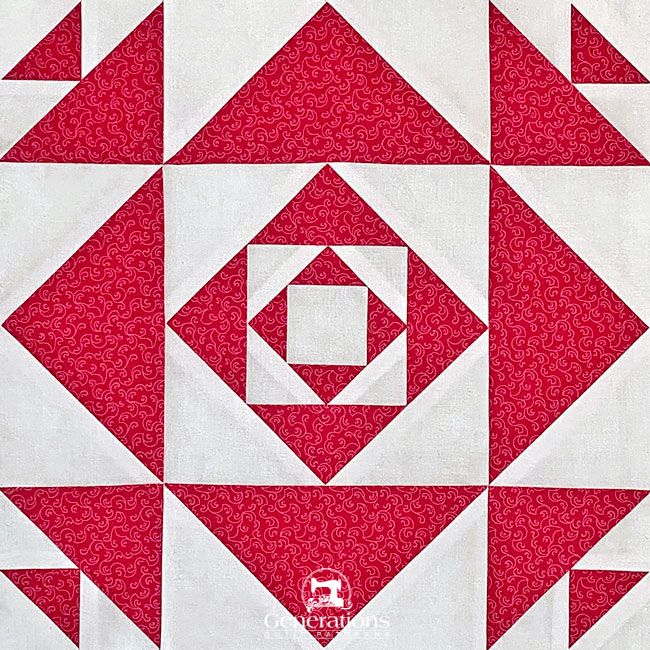
So grab your hardhat (ahem, thimble) and let's hit the ground running. 🏃♀️💨 With our step-by-step guide, you'll be the forewoman of precision piecing in no time. No jackhammers required—just your trusty rotary cutter and a can-do attitude! 🛠️✂️
🧭Navigate this tutorial like a pro!🔍
Use these quick links to zip through our quilting streets and find exactly what you need. No traffic jams here—just smooth sailing to your next quilting adventure!
- A cutting chart in four sizes, with downloads of the chart and block design
- Paper piecing patterns to download and print
Cut. Sew. Press. Transform your stash into a concrete jungle of creativity!
General Instructions
Several abbreviations are used on this page. They are:
- SA - seam allowance
- RST - right sides together
- BitA - Birds in the Air
- FG - Flying Geese
A 1/4" SA is used in this tutorial.
Highlighted in yellow, pressing instructions are easy to spot.
To press, first press the patches in the closed position as they came off your sewing machine. This sets the seam, melding the fibers of the threads into the fibers of the fabric.
Then press the SA to the dark unless otherwise noted.
Paper Pieced Seams
For strong, secure seams:
- Start stitching a full 1/4" before the solid sewing line
- Sew along the line
- End a full 1/4" past the line
- If the seam reaches the block edge, sew beyond the dashed edges
Apply this to every paper pieced seam. The extra stitches help prevent seams from coming undone when removing the paper.
Download and print the paper piecing patterns
To download the pattern, use the most current version of Adobe.
For accurate results, on Adobe's Print Menu page, under 'Page Size and Handling' set 'Custom Scale' to 100%. Then print.
Click here to see what it looks like on the Print Menu page.
Find your finished block size from the chart below. For each block you want to make, print the corresponding number of copies for a total of:
- Four BitA units
- One Center
Download and Print Paper Piecing Patterns | ||||||
|---|---|---|---|---|---|---|
| Finished Block Size | BitA | FG | Center | |||
| Copies to Print | Download | Copies to Print | Download | Copies to Print | Download | |
| 8" | 1 | 2" | 1 | 2" x 4" | 1 | 4" |
| 10" | 1 | 2½" | 2 | 2½" x 5" | 1 | 5" |
| 12" | 1 | 3" | 2 | 3" x 6" | 1 | 6" |
| 16" | 2 | 4" | 2 | 4" x 8" | 1 | 8" |
After printing, use the 1" square graphic on the printed page(s) to double check that your patterns printed at the correct size.
Then cut out the required number of patterns from your copies. A rough cut is good enough—an 1/8"-1/4"-ish away from the outside dashed square.

Not sure which paper to use?
Take a look at my review of several of the most popular brands available to us quilters on the market.
You want a super-easy paper to tear away—less stress on the stitches.
The newest quilt fabrics to tickle your fancy...
Click the images below to see the full collection. We share any commercial and/or free patterns that showcase them, too. (For inspiration, of course!)
✂️Cutting patches for a Philadelphia Pavement quilt block
Sample Block Size: 12" finished / 12½" unfinished
Grid: 8×8
Attribution: Old Chelsea Station Needlecraft Service
Barbara Brackman: #2175.5
Design Type: Paper piecing | Unequal 9 Patch Large Center
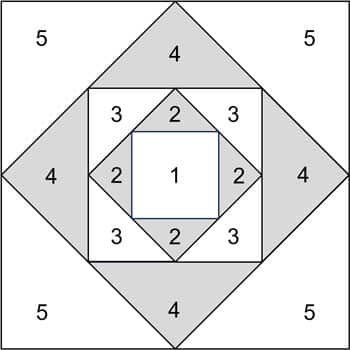
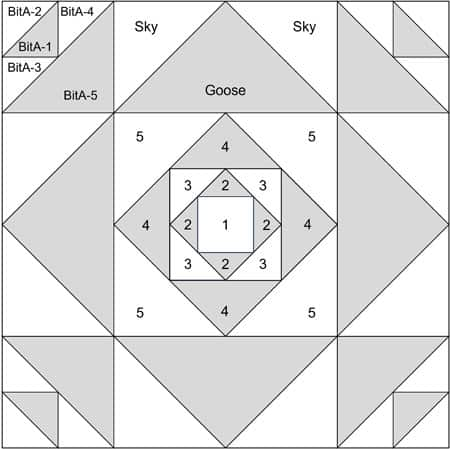 Philadelphia Pavement quilt block
Label all patches with their corresponding numbers. These numbers are referenced throughout the tutorial.
BitA-1 and #2 are super close in size and easy to get mixed up.
To print a copy of the block design and cutting chart to use at your cutting table, click here.
Stuck on color choices? Our free coloring page doubles as a fabric planning tool. Print it out and audition colors before cutting into your precious fabric!
 | Cutting Chart for a~ Paper Piecing ~ | ||||||
|---|---|---|---|---|---|---|---|
| Patch | Fabric | Qty | Finished Block Size | Sub Cut | |||
| 8'' | 10'' | 12'' | 16'' | ||||
| 1 | Bac | 1 | 1½'' x 1½'' | 1¾'' x 1¾'' | 2" x 2" | 2½'' x 2½'' | --- |
| 2 | A | 2 | 2" x 2" | 2¼'' x 2¼'' | 2½'' x 2½'' | 2¾'' x 2¾'' | |
| 3, BitA-2, BitA-3, BitA-4 | Bac | 8 | 2⅜'' x 2⅜'' | 2⅝'' x 2⅝'' | 2⅞'' x 2⅞'' | 3⅜'' x 3⅜'' | |
| 4 | A | 2 | 2¾'' x 2¾'' | 3⅛'' x 3⅛'' | 3½'' x 3½'' | 4⅛'' x 4⅛'' | |
| 5, Sky | Bac | 6 | 3⅜'' x 3⅜'' | 3⅞'' x 3⅞'' | 4⅜'' x 4⅜'' | 5⅜'' x 5⅜'' | |
| Goose | A | 1 | 5⅝'' x 5⅝'' | 6⅝'' x 6⅝'' | 7⅝'' x 7⅝'' | 9⅝'' x 9⅝'' | |
| BitA-1 | A | 2 | 1⅞'' x 1⅞'' | 2⅛'' x 2⅛'' | 2⅜'' x 2⅜'' | 2⅞'' x 2⅞'' | |
| BitA-5 | A | 2 | 3⅜'' x 3⅜'' | 3⅞'' x 3⅞'' | 4⅜'' x 4⅜'' | 5⅜'' 5⅜'' | |
| Unfinished Block Size | 8½'' | 10½'' | 12½'' | 16½'' | na | ||
| Grid Size | 1'' | 1¼'' | 1½'' | 2'' | na | ||
Subcutting Instructions
- Patch #1: Leave as is
- Goose: Subcut twice on the diagonal
- All other patches: Subcut once on the diagonal
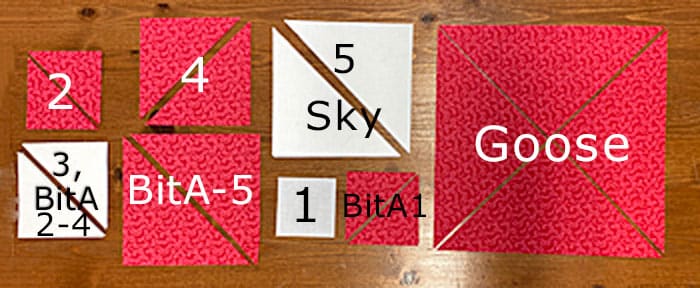
🧵Create the patches for your Philadelphia Pavement quilt block
Let's get the gluing out of the way.
Use just a dab of Elmer's Washable Glue Stick to hold the first patch in each unit in position on the pattern—wrong side of the patch to the unprinted side of the pattern. Use the dashed guidelines for foolproof placement.
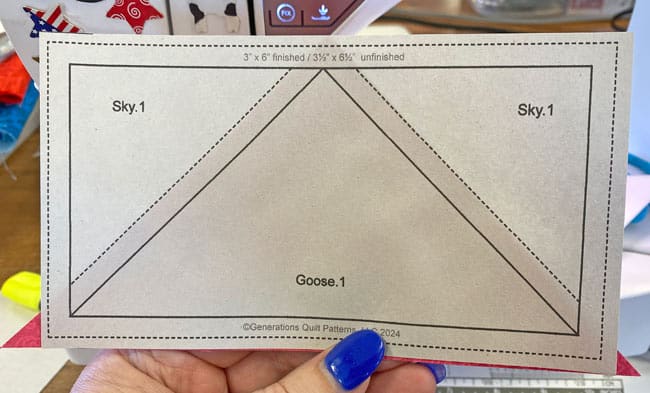 Goose.1 in position
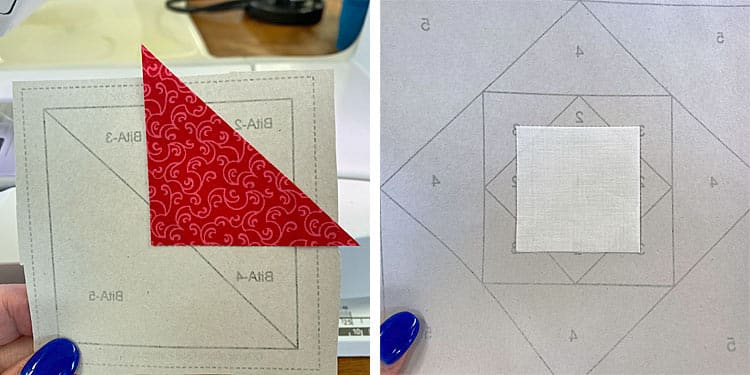 BitA-1 (left) and #1 (right) in position on their respective patterns
We need to make a few adjustments to our sewing machine settings to paper piece.
- Reduce your stitch length to 16–20 stitches per inch (1.3-1.6 mm). This perforates the paper and stabilizes the seam when you remove the pattern. [Learn more about stitch length here.]
- Reduce your machine's speed or just plain slow down. Sew only as fast as you can AND stay on the solid stitching line.
- Install an open toe appliqué foot (sometimes called an 'embroidery' or 'satin stitch' foot) if you have one (it makes it easier to see where you're stitching).
- Use a larger needle (90/14) IF you have problems removing the pattern. Personally, I use an 80/12 Microtex Sharp for paper piecing without any issues.
Birds in the Air (BitA)
Make 4
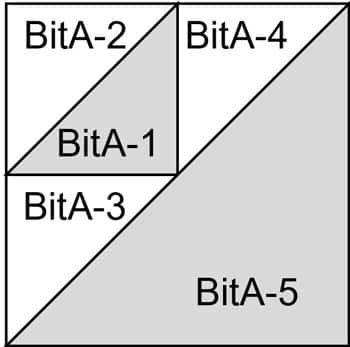 Birds in the Air unit
With RST, match the long edge of BitA-2 to that of BitA-1.
With such a light background, I want to make sure that the darker pink doesn't shadow through the white once the block is finished. For extra insurance, nudge the lighter BitA-2 a few threads past the edge of the darker pink patch. (blue arrow)
If you're using a darker background fabric, you needn't do this.
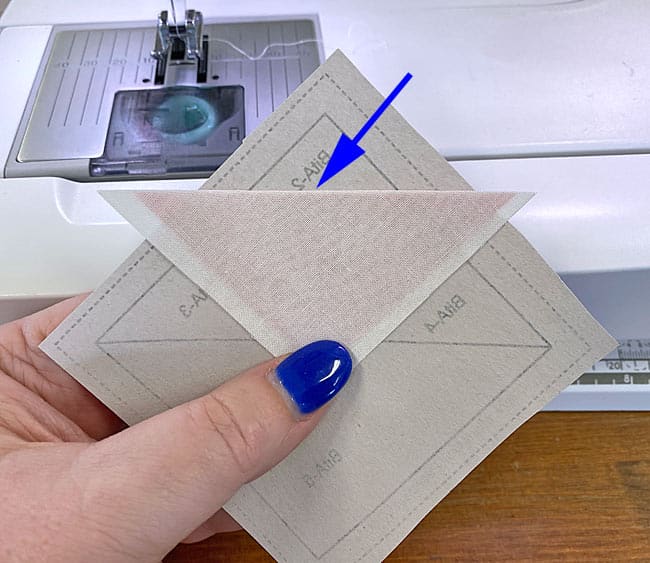
Sew the seam starting and ending past the outside edges of the BitA.
Press.
With RST, match the short edge of BitA-3 to BitA-1. (The lighter BitA-4 is offset again, blue arrow).
Stitch.
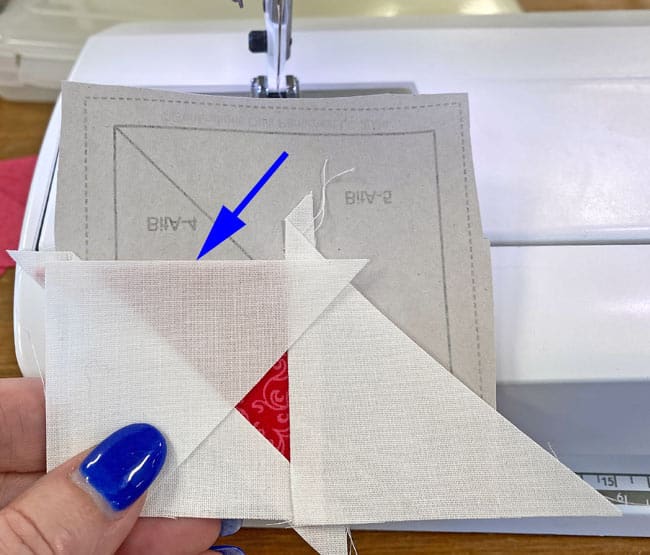
Press.
Time for a quick trim to create the exact placement for BitA-5.
At the cutting mat, pattern side up, match the edge of the ruler with the solid line between BitA-3/4 and BitA-5. Use your thumbnail to crease the pattern along the line.
Fold the pattern over on the line. Position the 1/4" ruler mark over the folded edge. (blue arrow)
Use your rotary cutter to trim away the excess.
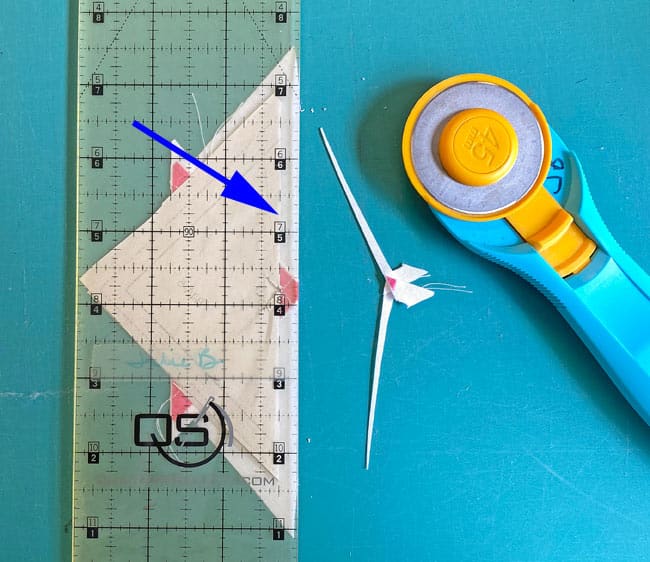
Back at your trusty sewing machine, match the long bias edge of BitA-5 to BitA-3/4.
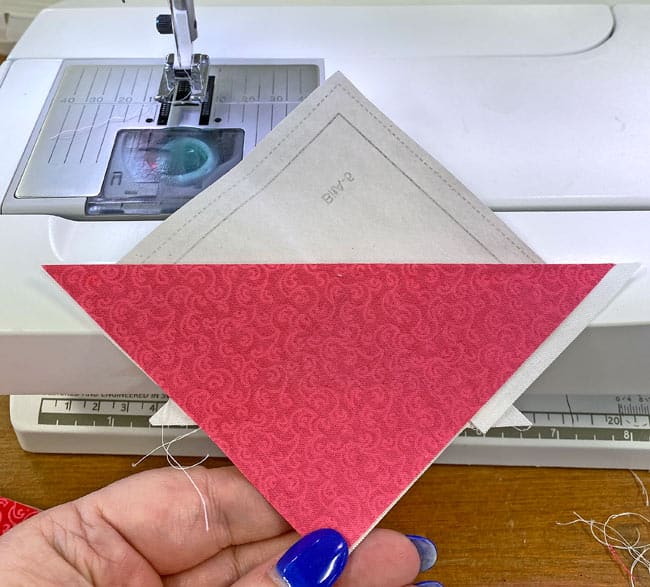
Sew the seam. Since it runs from outside edge to outside edge, this seam is a candidate for chain piecing.
Chain piecing? In paper piecing?
Yep! There sure is!
Set the BitAs aside. We'll trim all the units right before removing the paper pattern.
FG
Make 4
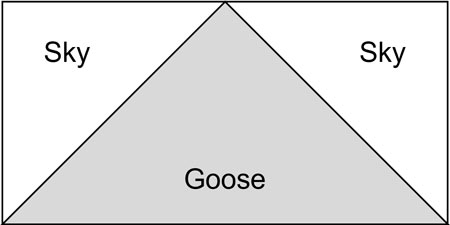
With RST, match the long bias edge of a Sky to one for the short sides of the Goose.
Here is the seam after sewing.
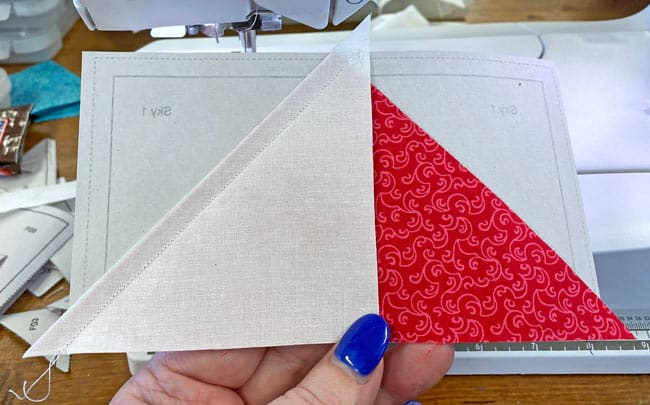 The light Sky extends a few threads past the edge of the Goose to prevent the darker pink from showing through the lighter background.
Press.
With RST, add the second Sky.
Press.
Add these to the four BitAs already set aside.
Center
Make 1
Paper piecing this unit tames all the bias edges it contains and leaves you with a unit just the right size. It's the only way I recommend making this patch.
With RST, match the long edge of #2 with one side of #1.
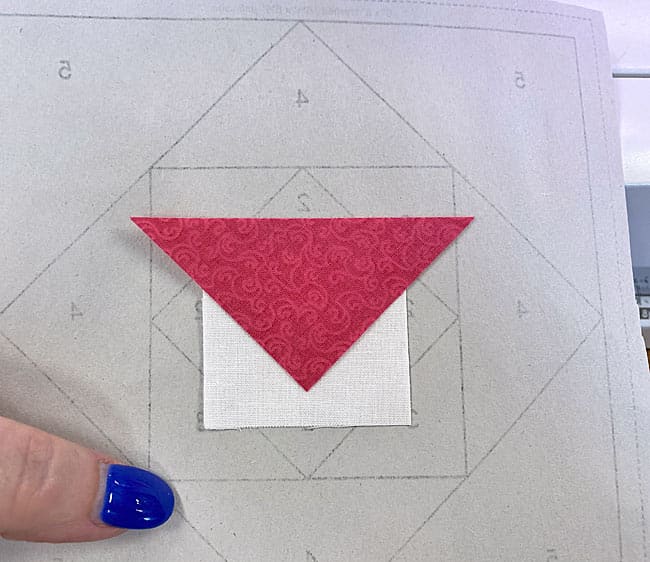
Remember: Sew a generous 1/4" seam (see General Instructions for details).
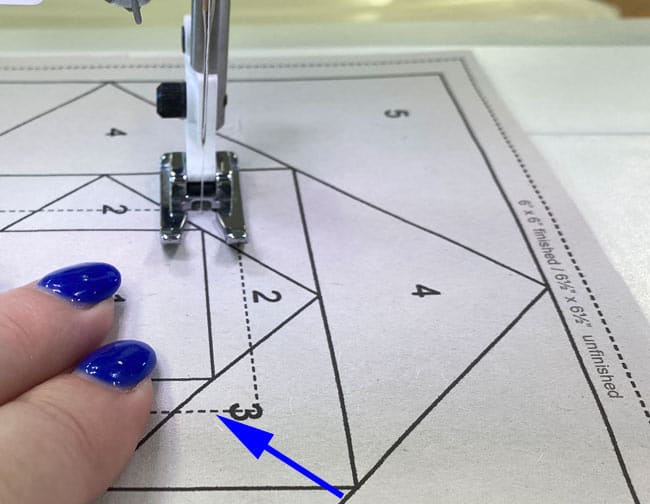 This seam stops at the point of the blue arrow.
Press.
Fingerpress the #2 open and out of the way and add the second #2 to the opposite side in the same manner.
Give the unit a good pressing at the iron.
Repeat for the second pair of #2s. With scissors, trim away the dog ears.
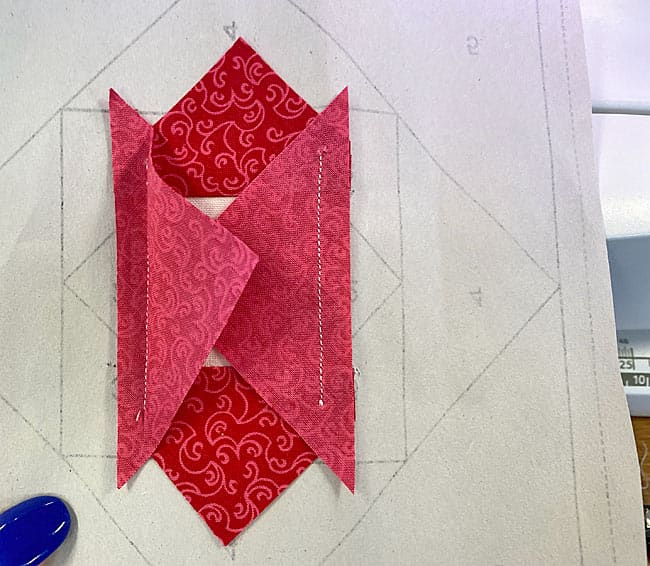
Press.
To create the perfect placement for the #3 patches, place your Center unit on the cutting mat, paper side up. Pull the paper away from the stitches enough so that you can fold the pattern back on the solid line.
Line up the edge of your ruler with the solid line between #2 and #3 and crease the pattern with your fingernail.
Fold the pattern back on itself on the line. Position the 1/4" mark with the folded edge (blue arrow) and trim away the excess, leaving behind a 1/4" seam allowance. Repeat for each side of the #2 patches.
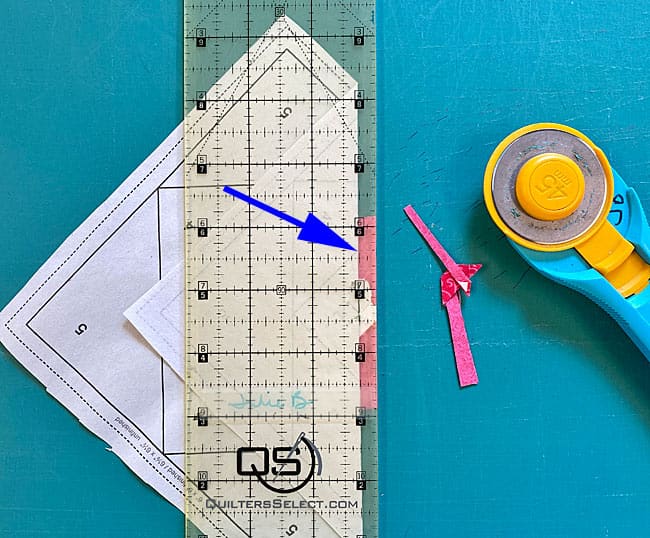
After trimming, your unit looks something like this:
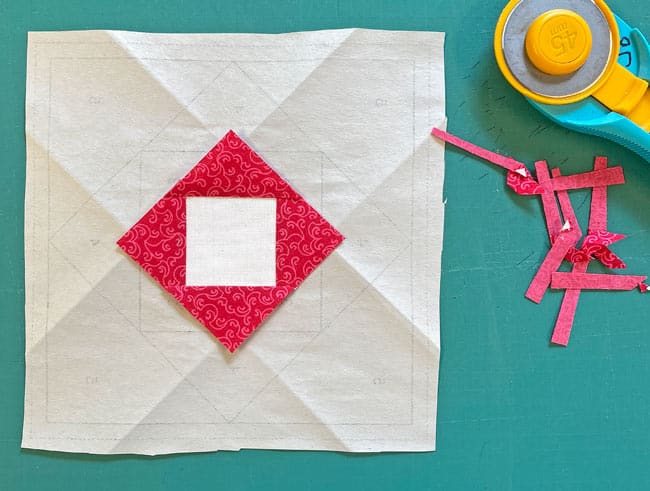 You can see where I folded the pattern before trimming each side.
Let's start the round of #3 triangles.
With RST, align the long edge of a #3 with the trimmed edge.
This #3 is much lighter than the #2, so it's nudged a few threads past #2 (blue arrow) to prevent shadowing of the darker fabric through the lighter one.
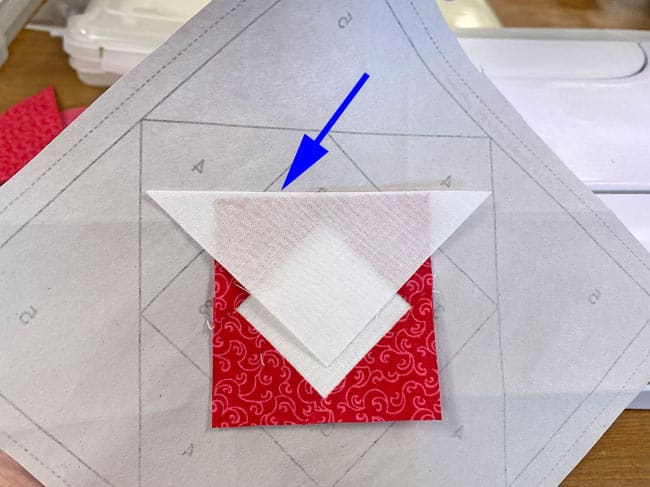 Use the center #1 patch to help position the #3
Sew the seam. Repeat for the opposite #3, pressing afterward.
Repeat the process for the second pair of #3s.
Here you can see those dog ears after the third #3 is added.
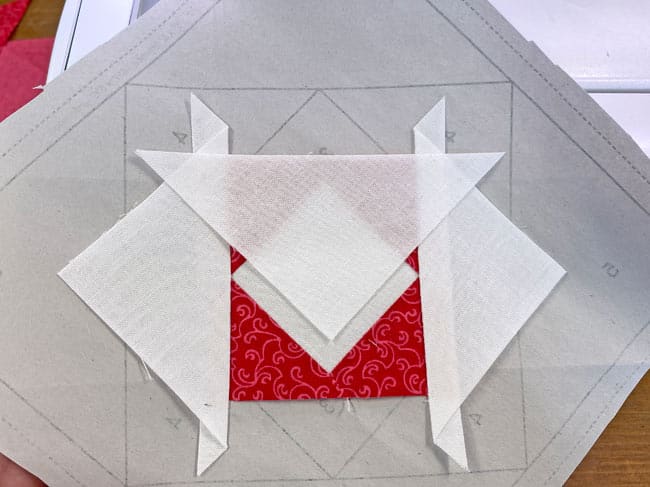 Don't forget to trim the dog ears away with scissors.
Trim away the excess fabric, leaving behind a perfect 1/4" seam, just like we did after all the #2s were stitched.
Continue on in this same manner for the #4s and #5s.
The paper piecing is complete. From this point forward, return your stitch length to the one you regularly use for piecing and install your favorite 1/4" presser foot.
Trim the paper pieced units to size
This process is the same no matter which unit it is. With the unit on the cutting mat, paper side up, position the 1/4" mark on your ruler with one of the solid outside lines.
Trim away the excess.
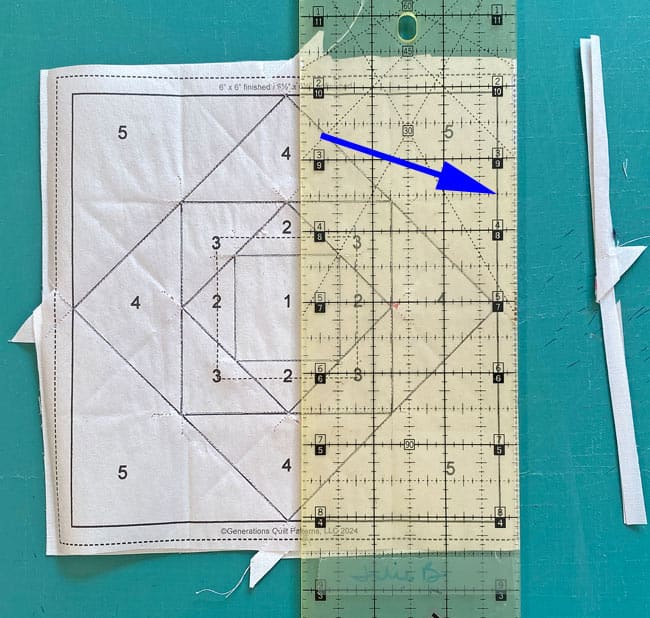 Trimming the first side of the Center unit
Turn the unit a quarter turn and repeat the process. Again, and again, until all sides of all the pieced units are trimmed.
It takes our patches from looking like a hot mess to perfection.
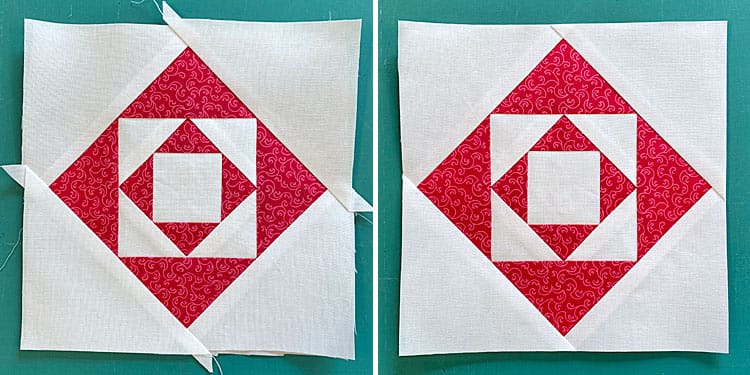 The Center unit before (left) and after (right) trimming.
Remove all the paper from your Center, BitAs and FG. Patches are calculated to create units with straight of grain on the outside edges. The paper no longer serves a purpose, and…
…it's a pain to pull paper out of a 1/4" seam allowance.
Don't make extra work for yourself. Remove it now.
🧩 Final Assembly of our Philadelphia Pavement quilt block
Time to lay out our pieced units into the Philadelphia Pavement block design. The FG point outward from each side of the block. BitAs are in the corners with the background patches on the outside edges.
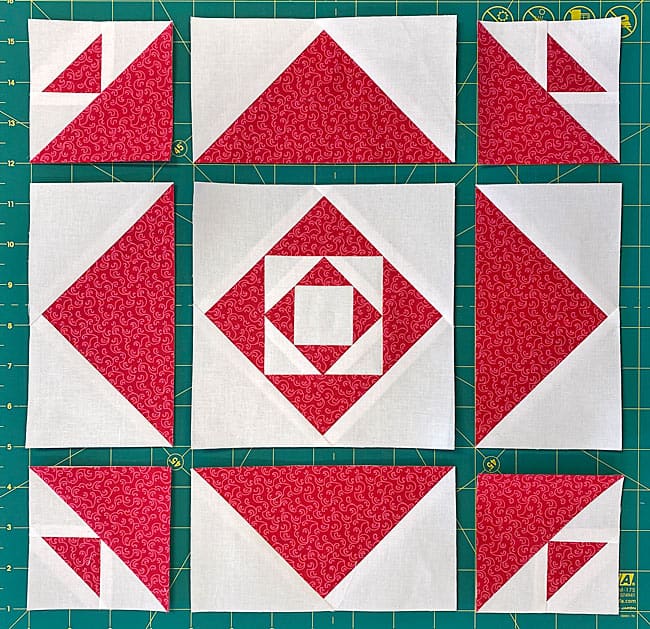
Stitch the units into rows. The only thing to worry about matching at this point are the edges of the units.
SAs are pressed toward the FG.
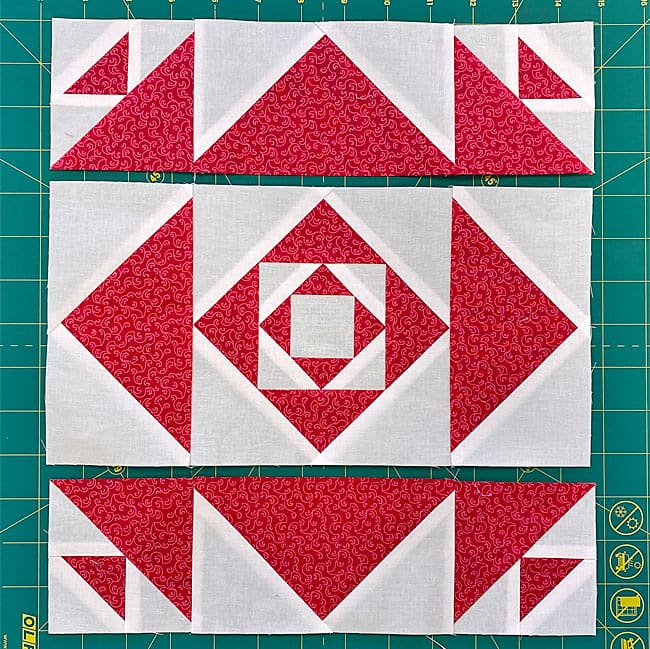
Sew the rows together. I did use pins to help match and hold the points of the FG around the Center unit.
IBC's super fine pins are my tool of choice for matching points.
For tips on pinning to achieve perfect points, click here.
These last two SAs are pressed out from the center.
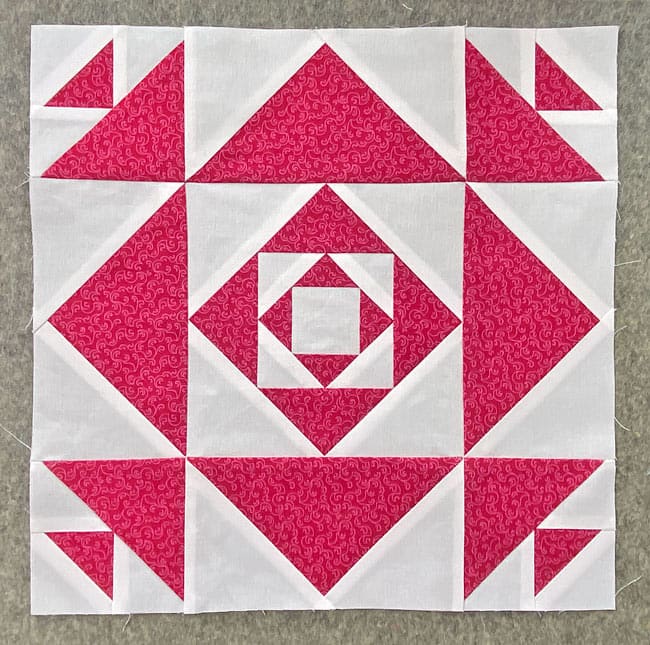
Remember, you've got this! Take it one step at a time, and soon you'll be walking on your very own Philadelphia Pavement! 🏙️
Congratulations on completing your Philadelphia Pavement quilt block! 🎉
We've covered cutting, paper piecing, and assembly techniques for this classic design. Remember, practice makes a confident quilter—each block you make will improve your skills.
Happy quilting, and may your seams always be straight! 🧵✂️
Are your quilting plans crumbling like old pavement? 🏚️💔
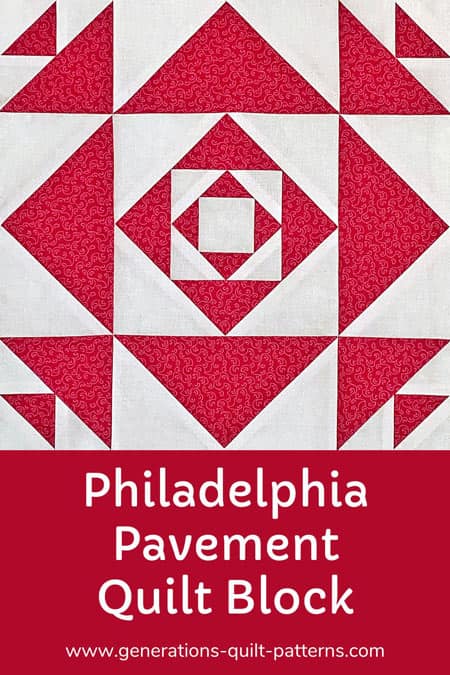
Lay a new foundation for success by pinning this Philadelphia Pavement tutorial! 📌🏗️
Our step-by-step guide and free patterns will be here to cement your quilting legacy 🧱🏆 whenever you're ready to break ground. 🚧
For even MORE blocks to make... 🧩🎨

...visit our Free Quilt Block Pattern Library, with over 230+ blocks to choose from in multiple sizes.
Free downloads are included in all sizes for any blocks require paper piecing patterns or templates.
- Home
- Free Quilt Block Patterns
- Philadelphia Pavement Quilt Block
