- Home
- Free Quilt Block Patterns
- Mrs Bryans Choice Quilt Block
Mrs. Bryan's Choice Quilt Block Tutorial
From our Free Quilt Block Patterns Library
This post contains affiliate links, for which I receive compensation.
Skill Level: Confident beginner
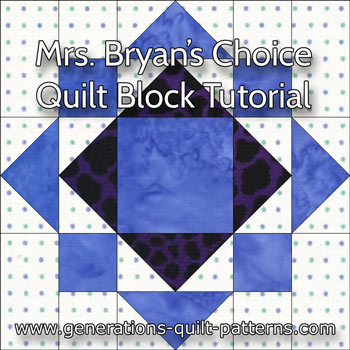
Our Mrs. Bryan's Choice quilt block is quite easy to make—even with its illusion of Square in a Square on point in the center—by using a simple paper pieced pattern for the Flying Geese pairs.
Traditional piecing is used for the simple corner patches.
The hardest part is choosing the fabric.
Let's get started!
Hate paper piecing?
Click here for alternative methods for constructing Flying Geese pairs.
📋 General Instructions
All seam allowances (SA) are 1/4".
When pressing, first press the pieced unit flat to set the seam. Then open it, pressing from the front to minimize the formation of tucks. SAs are pressed to the dark fabric unless otherwise noted.
You may want to reduce or eliminate the use of steam for pressing the paper pieced portion of the Mrs. Bryan's Choice block—it tends to curl the paper.
Step 1: Download and print paper piecing patterns
To open and print the Flying Geese pairs (FGP) pattern, you need the Adobe Reader installed
on your computer. You can get it here (a new window opens
so you can download without leaving this page). Follow their download instructions.
Choose a Finished Block Size from the chart below.
To print the pattern, locate the row called 'Flying Geese pairs'.
Find the underlined number at the intersection of this row and column . For our 6" finished Mrs. Bryan's Choice quilt block, it's 2". Click here if you're having trouble finding it.
Select the underlined number at the intersection and open it in Adobe.
To print the patterns at the correct dimension, under 'Page Sizing and Handling' in the Adobe print menu, you MUST set 'Custom Scale' to 100%. (Here you can see what it looks like on the Print Menu page).
Print a total of four FGPs.
After printing measure the 1" square to confirm the page printed at the correct size.

Not sure which paper to use?
Take a look at my review of several of the most popular brands available to us quilters on the market.
You want a super-easy paper to tear away—less stress on the stitches.
The newest quilt fabrics to tickle your fancy...
Click the images below to see the full collection. We share any commercial and/or free patterns that showcase them, too. (For inspiration, of course!)
Step 2: Cut the patches for Mrs. Bryan's Choice
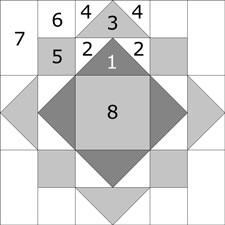 Mrs Bryan's Choice design
Sample Size: 6" finished / 6½" unfinished
Grid: 6x6
Design Type: Even 9-patch
Select a light, a medium and a dark fabric, choosing ones with enough contrast between them so that the points don't get lost.
Cut the patches listed in the column under your Finished Block Size. Then subcut the #1, #2, #3 and #4 patches as indicated.
Pay particular attention to the #1 and #3 patches. Their dimensions are the same and easily confused. Dark goes first for this design.
 |
Cutting Chart for a~ Paper Piecing ~ | |||||
|---|---|---|---|---|---|---|
| Patch | Fabric | Qty | Finished Block Size | Sub Cut | ||
| 6” | 9” | 12” | ||||
| 1 | D | 1 | 3-5/8”x3-5/8” | 4-5/8”x4-5/8” | 5-5/8”x5-5/8” | |
| 2, 4 | L | 8 | 2-3/8”x2-3/8” | 2-7/8”x2-7/8” | 3-3/8”x3-3/8” | |
| 3 | M | 1 | 3-5/8”x3-5/8” | 4-5/8”x4-5/8” | 5-5/8”x5-5/8” | |
| 5 | M | 1 | 1-1/2”x6-1/2” | 2”x8-1/2” | 2-1/2”x10-1/2” | -- |
| 6 | L | 1 | 1-1/2”x6-1/2” | 2”x8-1/2” | 2-1/2”x10-1/2” | -- |
| 7 | L | 4 | 1-1/2”x2-1/2” | 2”x3-1/2” | 2-1/2”x4-1/2” | -- |
| 8 | M | 1 | 2-1/2”x2-1/2” | 3-1/2”x3-1/2” | 4-1/2”x4-1/2” | -- |
| Unfinished Block Size | 6-1/2” | 9-1/2” | 12-1/2” | -- | ||
| Flying Geese Pairs | 2” | 3” | 4” | -- | ||
| Trim FGP to... | 2-1/2”x2-1/2” | 3-1/2”x3-1/2” | 4-1/2”x4-1/2” | = | ||
| Subcut StripSet #5/#6 | 1-1/2” wide | 2” wide | 2-1/2” wide | -- | ||
| Grid Size | 1” | 1-1/2” | 2” | -- | ||
Step 3: Assemble the Mrs. Bryan's Choice subunits
Flying Geese Pairs (FGP)
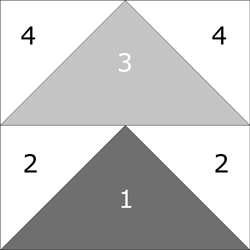
Make 4
Reduce your stitch length to 15-20 stitches per inch. Install your open toe applique foot if you have one. It makes it easier to see the stitching lines.
These FGP are also known as the Arrowhead quilt block. For more detailed instructions to make this unit, click here.
Cut the 4 units from the page(s) you downloaded in Step 1. A rough cut will do, just cut outside the dotted line that marks the unfinished side of each block. You will trim in the last step.
With a just a dab of Elmer's Glue Stick—the one that goes on purple and dries clear—position #1 on the unprinted side of your paper pattern as shown below. Use the dashed lines to help position it.
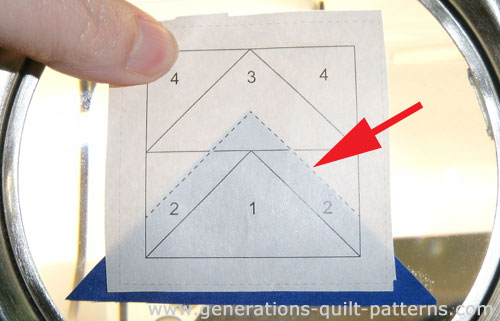 Postion patch #1 using the dashed placement lines as guides
With right sides together (RST) position a #2, matching its long bias side to either the left or right short side of #1. While it doesn't matter which goes first, try to be consistent. It's much easier to get a comfortable piecing rhythm going when you do.
Stitch starting before and ending after the solid line between #1 and #2.
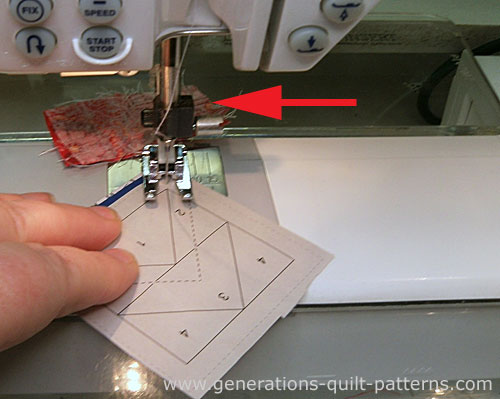 I start my stitching on a piece of scrap fabric—finding there's less chance of my sewing machine 'eating' the corners. My open toe applique foot is installed.
Press.
Add the second #2 in the same manner to the other side. Press.
With RST position the #3 triangle so that it's long edge is a 1/4" away from the stitching line between it and the #2 patches. (You can also trim this seam allowance to a quarter inch first and then position #3 as is shown on the Arrowhead quilt block instructions page.)
Stitch starting and stopping several stitches before and after the line.
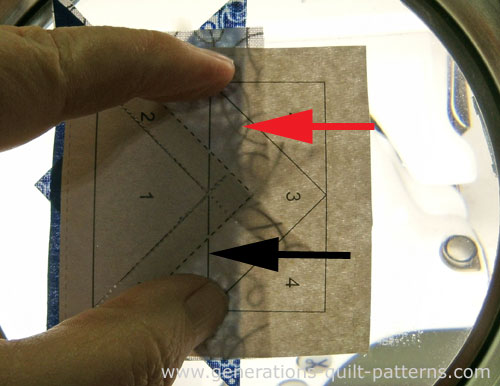 The red arrow points to the edge of #3; the black arrow to the stitching line between #3 and #1/#2.
Press. Add the final #4 triangles and trim the block to size using the 'Trim FGP to...' measurement from the cutting chart. For our 6" sample, trim to 2-1/2" square. Click here to see where it is on the chart.
After trimming, the four FGU look like this.
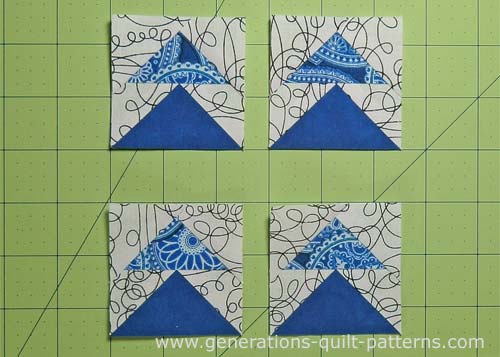

The paper piecing is complete. From this point forward, return your stitch length to the one you regularly use for piecing and install your favorite 1/4" presser foot.
Corner Units
Make 4 in total
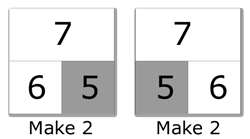
With RST, stitch the long edge of the #5 and #6 strip.
Press.
Straighten the short edge of the strip-set. From the cutting chart locate the 'Subcut StripSet #5/#6' row and find its intersection with the Finished Size column. For our 6" sample it's 1-1/2". Click here to see it.
Using this measurement, subcut the strip-set into four units.
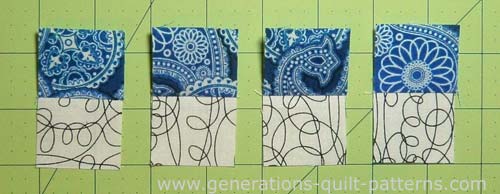
For symmetrical corners, stitch two with the dark square on the bottom right, and two on the bottom left. SA are pressed toward the light #7 rectangle.
Step 4: Assemble the Mrs. Bryan's Choice quilt block
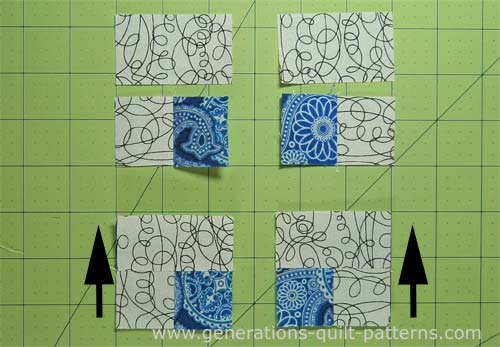
Lay out the pieced units and center square to create the Mrs. Bryan's Choice design.
The FGPs point to the outside edge. The long edge of the #7 patches is on top and bottom in this picture. Just be consistent in their layout. (i.e. In the finished block further down they are shown on the left and right sides.)
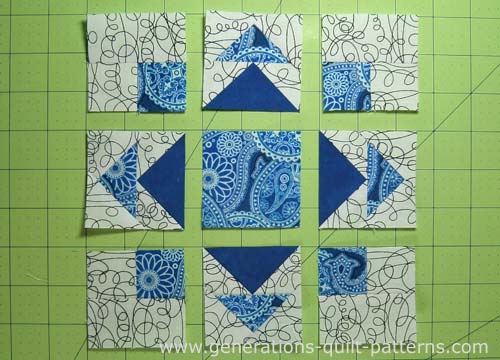
Stitch the units into rows.
Press with the SA in the direction of the arrows.
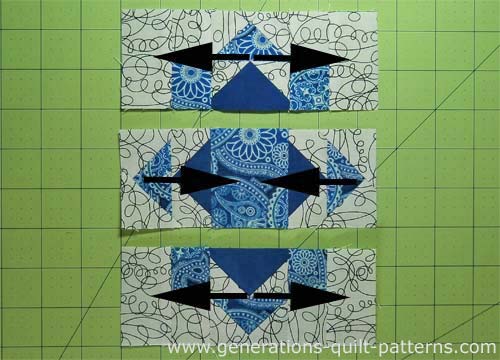 Seam allowances are pressed away from the FGPs
Stitch the rows together. The seam allowance nests to make matching easier. Use pins if needed.
Press. For a truly flat block, try our Best Pressing Technique for Pieced Blocks.
This is our finished Mrs. Bryan's Choice quilt block.
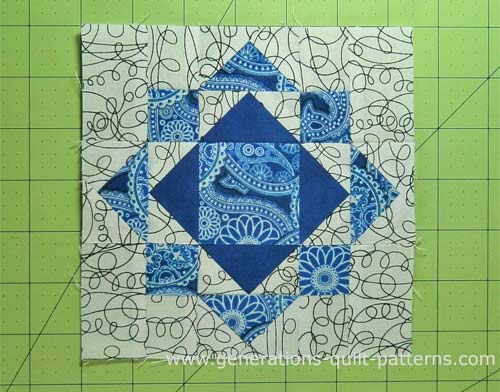 In this picture the long edge of the #7s is on the left and the right of the block. What matters is that they are placed consistently.
What about a different quilt block?
For a list of all the 220+ quilt block patterns on this site, start here.
If you know the name of the block, shorten your search by using these links:
Click here if you're looking for blocks with at least some paper piecing.
Click here if you're looking for the basic building blocks of quilting, i.e., Flying Geese, half square triangles, quarter square triangles, etc., along with several techniques to make each.
And finally, use these links to find blocks in these finished sizes:
