- Home
- Free Quilt Block Patterns
- Memory Quilt Block
Memory Quilt Block Tutorial: Weave Your Stellar Tapestry 🕸️
Stellar seams for seam-ingly endless memories! 🪡
This post contains affiliate links, for which I receive compensation.
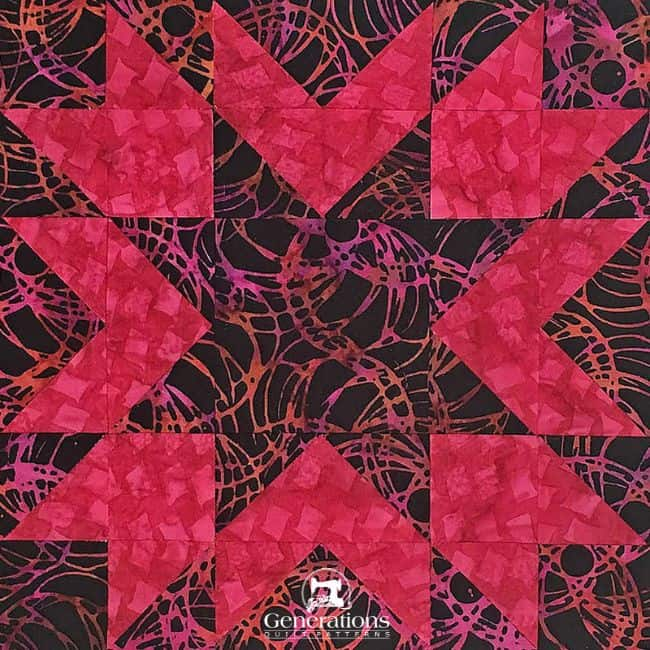
Our Memory quilt block stitches up in a flash.
Quick-pieced half square triangles.
Paper pieced Flying Geese.
Both make all this pointy goodness doable...quickly.
 Remember to Pin It for later
🧭 Navigate the Memory quilt block cosmos with these links 🚀
🌠 Whether you're looking for cutting charts 📊, piecing techniques 🧵, or free downloads 🆓, your perfect patch of quilting space is just a click away! 🚀👆
- A downloadable paper piecing pattern for Flying Geese
- A downloadable design scheme and cutting chart for a 3-fabric Memory block
- More Star quilt block tutorials if this design isn't quite to your liking
It's time to cut up and sew!
📋 General Instructions
Several abbreviations are used on this page. They are:
- SA - seam allowance
- RST - right sides together
- HST - half square triangles
- FG - Flying Geese
1/4" SA are used through this tutorial.
Pressing instructions are highlighted in yellow to make them easy to find.
Each time you press, the first time is with the patches 'closed', just as they were sewn. This sets the seam. Then open the patches and press again with SAs towards the darker fabric unless otherwise noted.
Paperpieced SA are always pressed toward the last added patch.
The block can be a little lumpy between the units. Check out my favorite (super simple) pressing technique to squash them into submission.
I've recently acquired a Magic Pressing Mat—2 actually—and it's really upped my pressing game. Read my review here to see if one might make it into YOUR bag of tricks.
Download and print paper piecing pattern
You'll need the most current version of Adobe installed on your computer to download the pattern.
On the Adobe Print Menu page, under 'Page Size and Handling' set 'Custom Scale' to 100% before printing for accurate results.
Click here to see what it looks like on the Print Menu page.
Choose your finished block size from the chart below and print the corresponding number of copies for a total of four units.
Print the Flying Geese Pair Units | ||
|---|---|---|
| Finished Block Size | # of copies | Link to PDF Download |
| 6" | 1 | 2" |
| 9" | 1 | 3" |
| 12" | 2 | 4" |
| 18" | 4 | 6" |
After printing, use the 1" square graphic on the printed page(s) the patterns printed at the correct size.
The newest quilt fabrics to tickle your fancy...
Click the images below to see the full collection. We share any commercial and/or free patterns that showcase them, too. (For inspiration, of course!)
Step 1: Cutting for a Memory quilt block
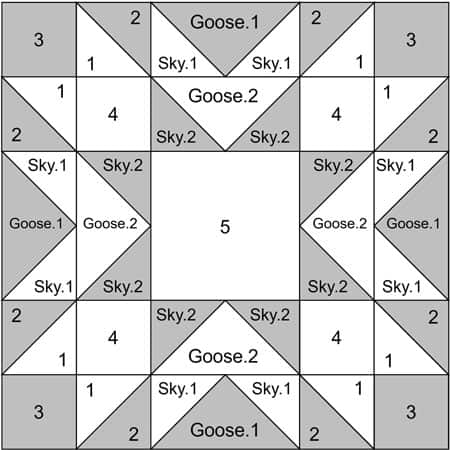 Memory quilt block design
Block Size: 9" finished / 9-1/2" unfinished
Grid: 6×6
Design Type: Even 9-patch | Star | Paper Piecing
Attributed to: Clara Stone
This is a dramatic block. To up the wow factor, use fabrics with high contrast.
If at all possible, make the dark fabric duller (grayer) than your light choice. That makes the lighter fabric really glow.
Label all your patches. Their numbers are used throughout the tutorial.
Click here to print a copy of the block design and cutting chart to use at your cutting table.
 | Cutting Chart for a~ Includes Paper Piecing ~ | ||||||
|---|---|---|---|---|---|---|---|
| Patch | Fabric | Qty | Finished Block Size | Sub Cut | |||
| 6" | 9" | 12" | 18" | ||||
| 1 | Light | 1 | 4¼'' x 4¼'' | 5¼'' x 5¼'' | 6¼'' x 6¼'' | 8¼'' x 8¼'' | --- |
| 2 | Dark | 1 | 4¼'' x 4¼'' | 5¼'' x 5¼'' | 6¼'' x 6¼'' | 8¼'' x 8¼'' | --- |
| 3 | Dark | 4 | 1½'' x 1½'' | 2 '' x 2'' | 2½'' x 2½'' | 3½'' x 3½'' | --- |
| 4 | Light | 4 | 1½'' x 1½'' | 2 '' x 2'' | 2½'' x 2½'' | 3½'' x 3½'' | --- |
| 5 | Light | 1 | 2½'' x 2½'' | 3½'' x 3½'' | 4½'' x 4½'' | 6½'' x 6½'' | --- |
| Goose.1 | Dark | 1 | 3⅝'' x 3⅝'' | 4⅝'' x 4⅝'' | 5⅝'' x 5⅝'' | 7⅝'' x 7⅝'' | |
| Sky.1 | Light | 4 | 2⅜'' x 2⅜'' | 2⅞'' x 2⅞'' | 3⅜'' x 3⅜'' | 4⅜'' x 4⅜'' | |
| Goose.2 | Light | 1 | 3⅝'' x 3⅝'' | 4⅝'' x 4⅝'' | 5⅝'' x 5⅝'' | 7⅝'' 7⅝'' | |
| Sky.2 | Dark | 4 | 2⅜'' x 2⅜'' | 2⅞'' x 2⅞'' | 3⅜'' x 3⅜'' | 4⅜'' 4⅜'' | |
| Unfinished Block Size | 6½'' | 9½'' | 12½'' | 18½'' | na | ||
| Grid Size | 1" | 1½" | 2" | 3" | na | ||
Step 2: Assemble the units for your Memory quilt block
Flying Geese Pairs (FG)
Make 4
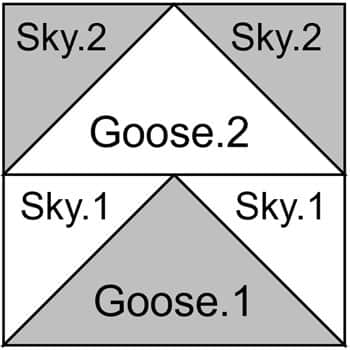
📢Updated Tutorial Note:
Since the initial release, I've made the following improvements to the Flying Geese Pairs patterns:
- Numbering System: Old: #1 - #4 New: Goose.1, Sky.1, Goose.2, Sky.2 (Note: The photos in this tutorial still show the old numbering.)
- Added Information: Included Finished and Unfinished sizes in the seam allowance area.
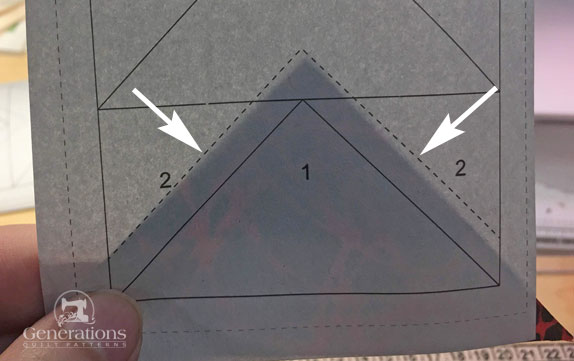
Use a tiny swipe of Elmer's Washable glue stick to position Goose,1. Use the dashed placement lines (white arrows) for perfect positioning.
We need to make a few adjustments to our sewing machine settings to paper piece.
- Reduce your stitch length to 16–20 stitches per inch (1.3-1.6 mm). This perforates the paper and stabilizes the seam when you remove the pattern. [Learn more about stitch length here.]
- Reduce your machine's speed or just plain slow down. Sew only as fast as you can AND stay on the solid stitching line.
- Install an open toe appliqué foot (sometimes called an 'embroidery' or 'satin stitch' foot) if you have one (it makes it easier to see where you're stitching).
- Use a larger needle (90/14) IF you have problems removing the pattern. Personally, I use an 80/12 Microtex Sharp for paper piecing without any issues.
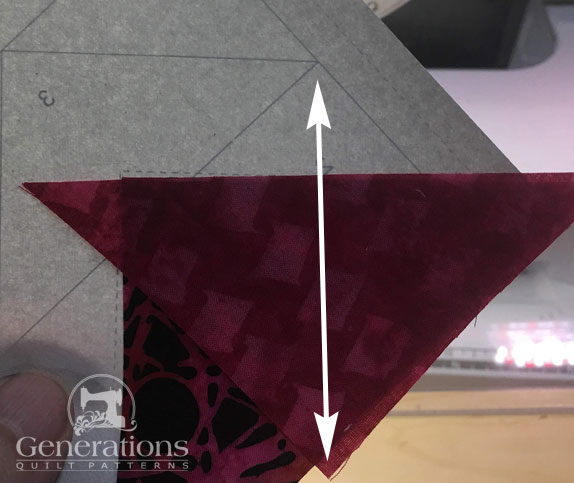
With RST, align the long, bias edge of a Sky.1 with one short side of Goose,1. The point of the patch should be lined up with the corner (white arrow).
Stitch starting and ending a good 1/4" before and after the solid line between Goose.1 and Sky.1.
I do not backstitch at either end.
However, if you are a back stitcher, only the outside edge is a good candidate. No future line of stitching crosses these stitches until after the paper is removed and the FG is sewn to other patches in Step 3.
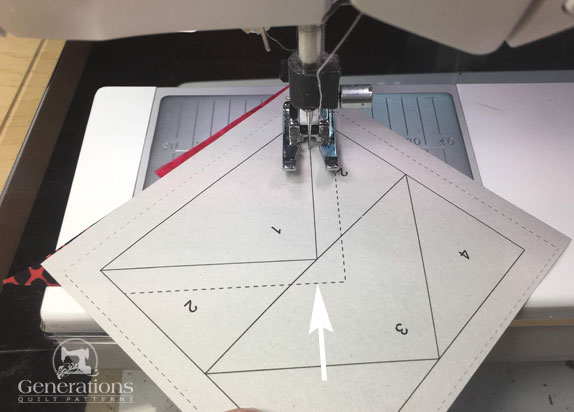 The stitches should end at approximately the tip of the white arrow at the dashed line.
Press this Sky.1.
Add the second Sky.1 in the same manner and press.
Next we trim to establish the placement line for Goose.2.
At your cutting mat, place the stitched pattern printed side up. Tear the stitches away from the paper a bit at the solid line between the Sky.1s and Goose.2 so that you can fold the paper pattern back along this solid line.
I position my ruler on that line, creasing the fold with my thumbnail.
Fold the pattern back along the line.
Position the 1/4" mark on your ruler along the fold line (white arrow) to identify the 1/4" SA. Trim with your rotary cutter.
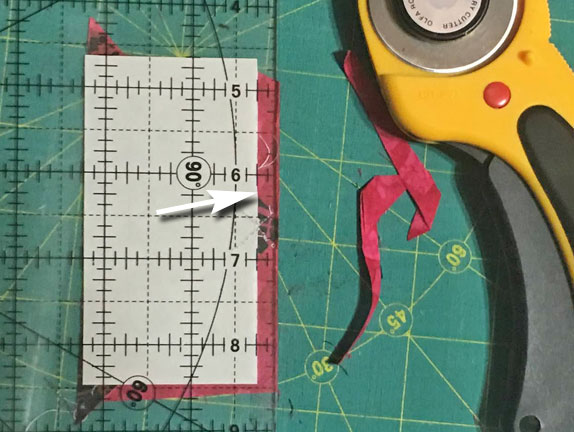
Align the long edge of Goose.2 with this cut edge for perfect placement!
The point on this patch should be opposite the point at the top of the Goose (white arrow).
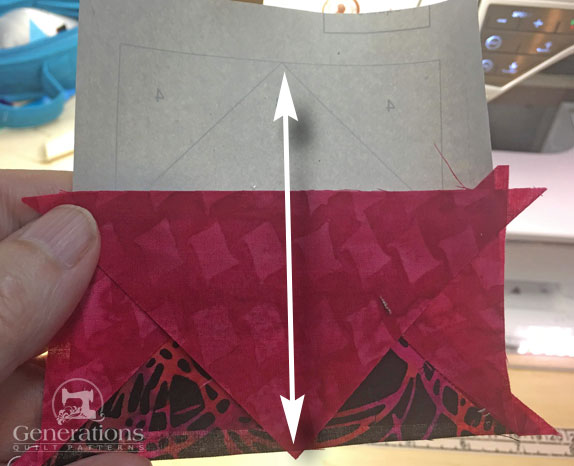
Stitch starting and ending a generous 1/4" outside the solid line between Sky.1 and Goose.2.
Since we're stitching from edge to edge, you can chain piece this part of the unit
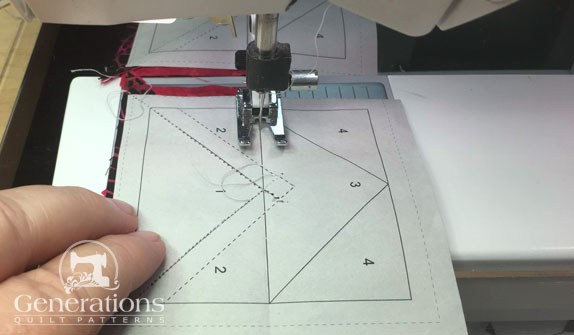
See that pesky thread tail in the center of the unit?
Since it doesn't bother me, I don't trim threads from the printed side of the paper until the unit it completely stitched.
However, I ALWAYS trim to remember to trim the thread from the fabric side of the unit as I go. Much easier that way.
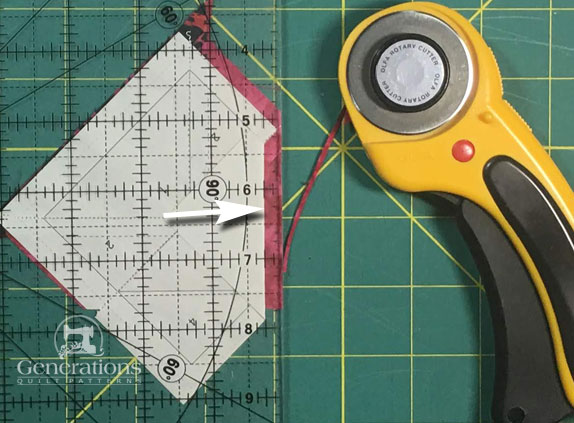
Time to trim again. Again to establish the placement lines for the Sky.2s.
Fold the pattern back on itself along the solid line between Goose.2 and Sky.2.
Position the 1/4" mark on your ruler on the fold line and trim. Repeat for the other side.
With RST, position a Sky.2 with one side of the Goose.2.
Stitch.
Just as with Goose.2, we're stitching from one edge to the other so we can chain piece these units from here on out.
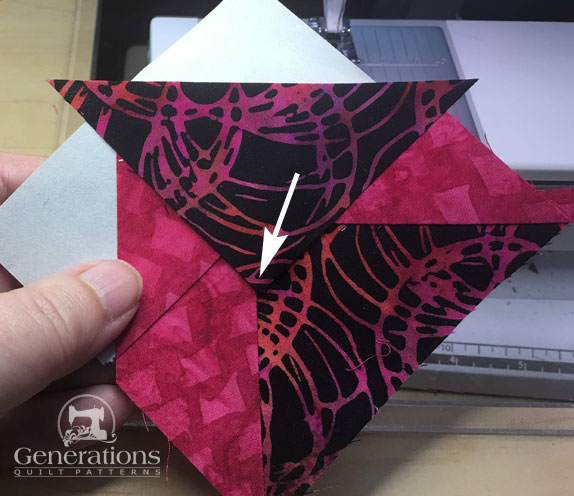 The point of the triangle #4 patch is opposition the corner of the unit.
After stitching the unit looks like a hot mess (left).
But after trimming, it's perfect.
Trim by aligning the quarter inch on your ruler with the solid outline of the unit and trim, repeating for all four sides of all four units.
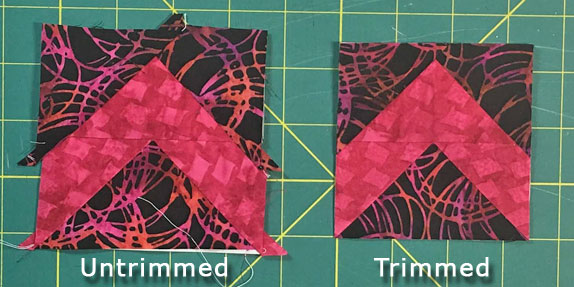
Give the units a final pressing.

The paper piecing is complete. From this point forward, return your stitch length to the one you regularly use for piecing and install your favorite 1/4" presser foot.
HSTs
Make 8
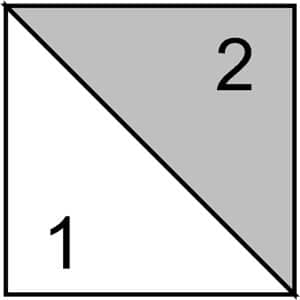
On the back side of either the #1 or #2 patch (whichever one is easier to see your marks on) drawn two diagonal lines. My (favorite) Bohin Mechanical chalk pencil is easy to see on the darker fabric.
With RST, stitch a 1/4" away from both sides of both lines.
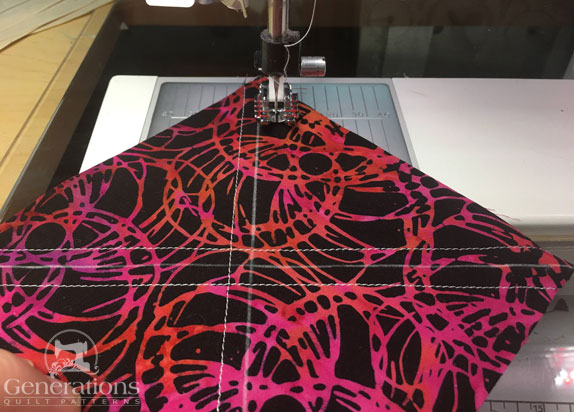 Finishing up the last of four lines of stitching for our HSTs
Press flat to set the seams.
Find your Finished Block size in the chart below.
HST Dimensions | ||
|---|---|---|
| Finished Block Size | Center Measurement | Trim HST to… |
| 6" | 2⅛" | 1½" x 1½" |
| 9" | 2⅝" | 2" x 2" |
| 12" | 3⅛" | 2½" x 2½" |
| 18" | 4⅛" | 3½" x 3½" |
Using the Center Measurement (2⅝" for our 9" sample) cut your sewn #1/#2 into four equal squares. Then cut each in half along the drawn line.
You now have eight HSTs ready to trim.
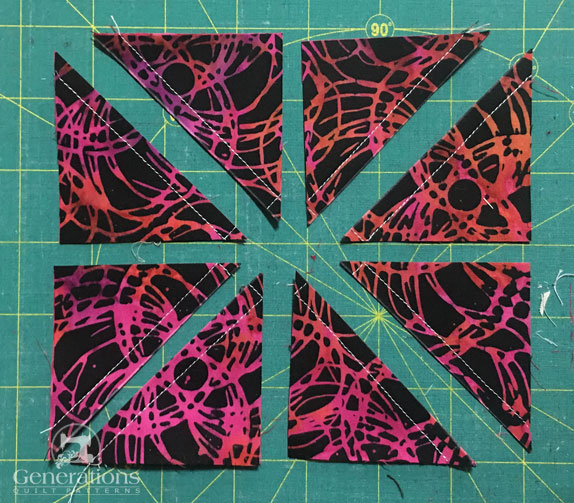
Referring again to the chart, trim your HSTs to the 'Trim to...' dimensions. For our 9" sample, it's 2".
Below is a HST after cutting in eight patches (left), pressed with the SA towards the dark (middle) and after trimming to the perfect size (right).
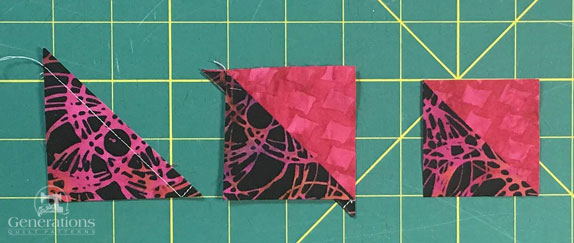
Repeat for all eight HSTs.
Corners
Make 4
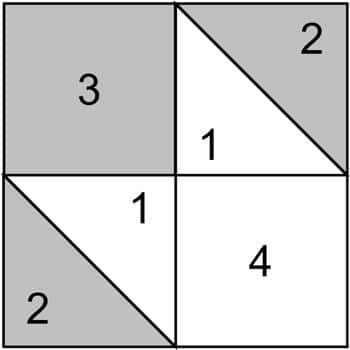
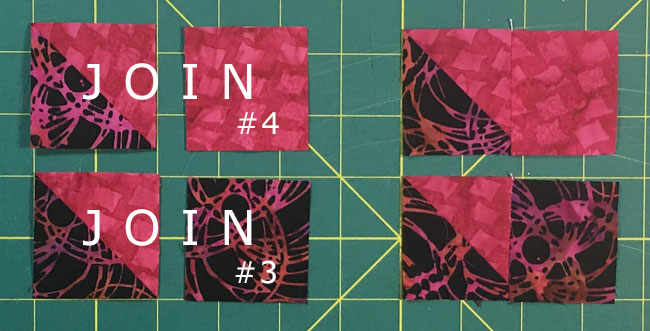
Use the images below to create four each of a #3 plus a HST and four of a #4 plus a HST.
SA are pressed in the direction of the white arrow towards the HST for both.
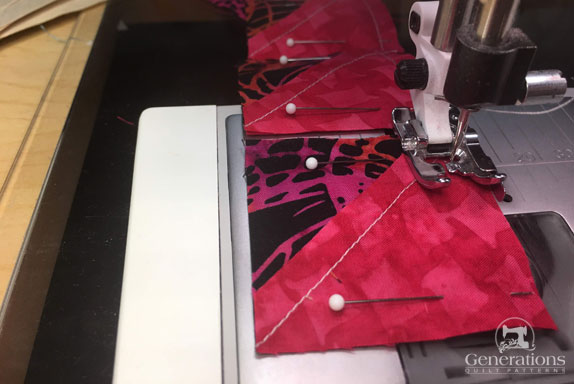
Pinning helps if you have trouble keeping all the edges even...you can chain piece to speed things up.
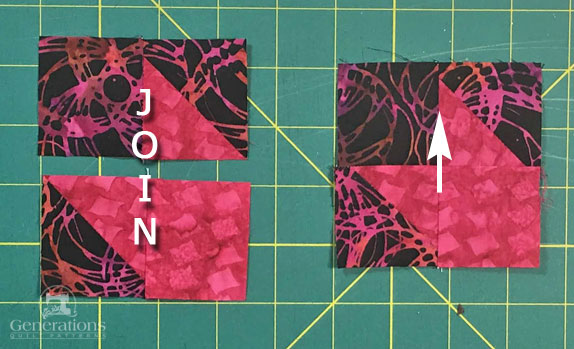
With RST and nesting the SA join one of each unit together, pressing SA in the direction of the white arrow.
Step 3: Assemble your Memory quilt block
Lay out all your sewn and one cut patch to form the Memory quilt block design. Solid dark squares are in the outside corners. Flying Geese point out from the center.
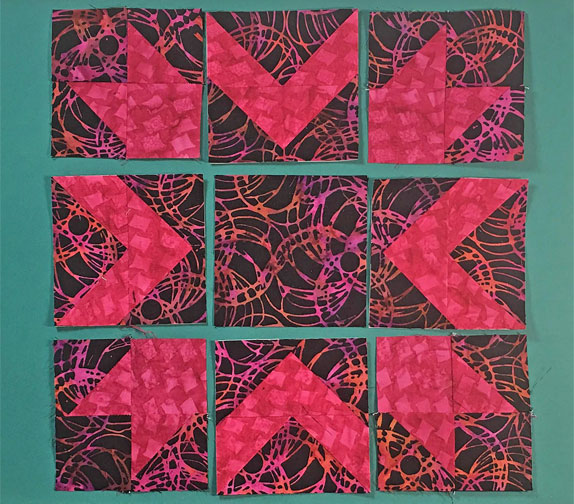
Sew the units into rows. If you've followed the pressing directions, the seams of the HST and Flying Geese all nest to make matching the points pretty easy.
I did pin to hold things in position as I stitched. Click here for 'pointers' (no pun intended!) on pinning for perfect points.
My favorite pins for this type of picky matching are IBC Super Fine .50mm shown here.
After stitching the SA are pressed AWAY from the Flying Geese units.
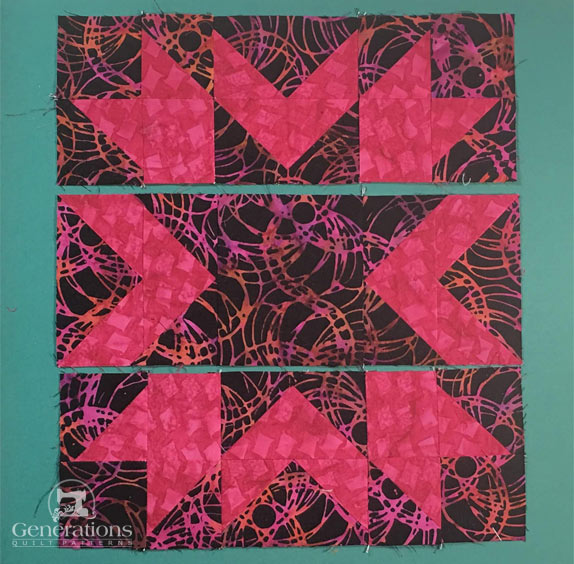
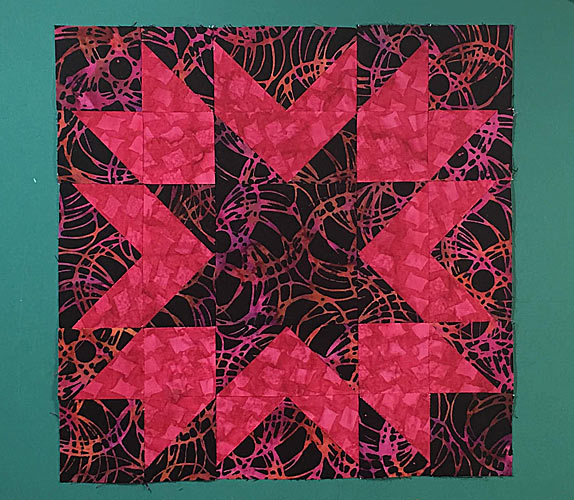
Stitch the rows together to create your Memory quilt block. Again, pinning as needed to help you hold the patches in position.
These last two seams are pressed away from the center.
Here is our finished 'Memory' in all its pointy goodness.
📌Wish upon a star, then pin this pattern!
Your future quilting self will thank you from the moon and back. 🌙
3-fabric Memory Quilt Block
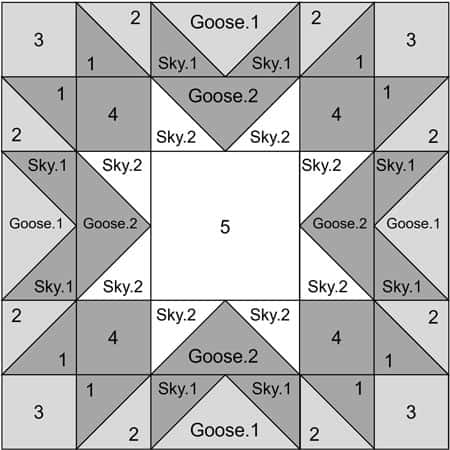
Though our sample is made with just two fabrics, there's no reason that you couldn't use three.
Here is that Memory block variation and its cutting chart.
 | Cutting Chart for a~ Includes Paper Piecing ~ | ||||||
|---|---|---|---|---|---|---|---|
| Patch | Fabric | Qty | Finished Block Size | Sub Cut | |||
| 6'' | 9 '' | 12'' | 18 '' | ||||
| 1 | Dark | 1 | 4¼'' x 4¼'' | 5¼'' x 5¼'' | 6¼'' x 6¼'' | 8¼'' x 8¼'' | --- |
| 2 | Med | 1 | 4¼'' x 4¼'' | 5¼'' x 5¼'' | 6¼'' x 6¼'' | 8¼'' x 8¼'' | --- |
| 3 | Med | 4 | 1½'' x 1½'' | 2 '' x 2'' | 2½'' x 2½'' | 3½'' x 3½'' | --- |
| 4 | Dark | 4 | 1½'' x 1½'' | 2 '' x 2'' | 2½'' x 2½'' | 3½'' x 3½'' | --- |
| 5 | Light | 1 | 2½'' x 2½'' | 3½'' x 3½'' | 4½'' x 4½'' | 6½'' x 6½'' | --- |
| Goose.1 | Med | 1 | 3⅝'' x 3⅝'' | 4⅝'' x 4⅝'' | 5⅝'' x 5⅝'' | 7⅝'' x 7⅝'' | |
| Sky.1 | Dark | 4 | 2⅜'' x 2⅜'' | 2⅞'' x 2⅞'' | 3⅜'' x 3⅜'' | 4⅜'' x 4⅜'' | |
| Goose.2 | Dark | 1 | 3⅝'' x 3⅝'' | 4⅝'' x 4⅝'' | 5⅝'' x 5⅝'' | 7⅝'' 7⅝'' | |
| Sky.2 | Light | 4 | 2⅜'' x 2⅜'' | 2⅞'' x 2⅞'' | 3⅜'' x 3⅜'' | 4⅜'' 4⅜'' | |
| Unfinished Block Size | 6½'' | 9½'' | 12½'' | 18½'' | na | ||
| Grid Size | 1 '' | 1½'' | 2'' | 3 '' | na | ||
Click here to print a copy of the block design and the cutting chart for a 3-fabric Memory quilt block.
You need to download and print the same paper piecing patterns to complete this version of the Memory block.
🔭 Looking for something truly stellar?
You've finished your star quilt block, and you're ready for more!
Browse our collection of 70 stellar star quilt block patterns. All have instructions and cutting charts in multiple sizes. If templates or paper piecing is used in the tutorial, there's a free download for you of those materials.

Eeny. Meenie. Miney. Moe.
Which star quilt block will you sew?
For a star-studded quilting experience, choose from 100+ bedazzling star quilt patterns—for beginners and beyond—click here.
For even MORE blocks to make… 🧩🎨

...visit our Free Quilt Block Pattern Library, with over 260+ blocks to choose from in multiple sizes.
Free downloads are included in all sizes for any blocks require paper piecing patterns or templates.
- Home
- Free Quilt Block Patterns
- Memory Quilt Block
