- Home
- Free Quilt Block Patterns
- Medieval Walls, Pt 1
Conquer the Medieval Walls Quilt Block. Delight in its simplicity!
From our Free Quilt Block Patterns Library
This post contains affiliate links for which I receive compensation.
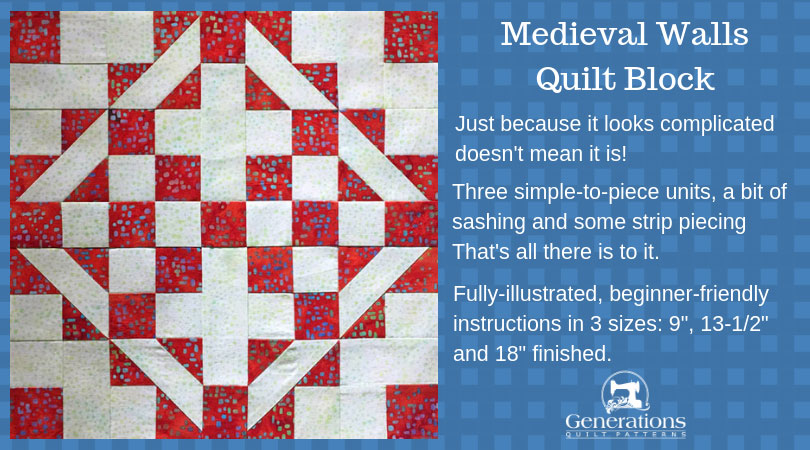
Looks can be deceiving—and the Medieval Walls quilt block certainly proves it!
At first glance, it seems like a whole lotta complicated.
In reality, there are just three simple subunits stitched together and then separated with sashing.
In this tutorial, you'll find:
If you dislike paperpiecing with a purple passion, have no fear!
There's an alternate cutting chart and instructions for traditional piecing methods. I've got your back! :D
And finally. Not quite sure what you'd do with this block?
Check out 10 different quilt designs using Medieval Walls blocks to get your creative juices flowing.
Without further ado, it's time to cut up and sew!
General Instructions

Please read the instructions all the way through before beginning.
There are two different piecing/cutting options to choose from for one of the units.
Several abbreviations are used on this page:
- SA - seam allowance
- RST - right sides together
- BW - Brave World variation units
1/4" SA are used through this tutorial.
Pressing instructions are highlighted in yellow to make them easy to find.
When instructed to press, first press the patches in the closed position just as they came off your sewing machine. This sets the seam, melding the fibers of the threads into the fibers of the fabric.
For truly flat patchwork, try this wickedly-simple pressing technique. No special tools required!
Download and print paperpiecing patterns
To construct our Medieval Walls block, we'll paperpiece a unit that we've made before called 'Brave World' with a slight variation.
NOTE: If you wish to use traditional piecing methods and skip the paperpiecing, click here to go straight to cutting.
You need the most current version of Adobe installed on your computer to download the pattern.
On the Adobe Print Menu page, under 'Page Size and Handling' set 'Custom Scale' to 100% before printing for accurate results. Click here to see what it looks like on the Print Menu page.
Choose your finished block size from the chart below and print the corresponding number of copies for a total of 8 units.
Print the Brave World Variation Units | ||
|---|---|---|
| Finished Medieval Walls Block Size | # of copies | Link to PDF Download |
| 9" | 2 | 2" |
| 13½" | 2 | 3" |
| 18" | 4 | 4" |
After printing, use the 1" square graphic on the printed page(s) to check that the patterns are printed at the correct size.
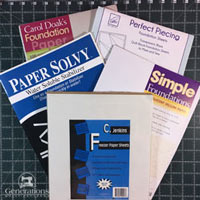
Not sure which paper to use?
Take a look at my review of several of the most popular brands available to us quilters on the market.
You want a super-easy paper to tear away—less stress on the stitches.
New quilt fabrics to tickle your fancy...
Click the images below to see the full collection. We share any commercial and/or free patterns that showcase them, too. (For inspiration, of course!)
Step 1: Cutting your Medieval Walls block
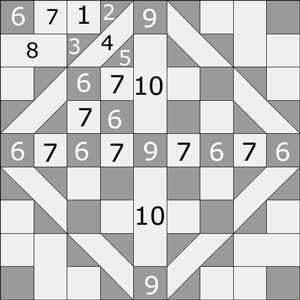 Medieval Walls design
Sample Size: 13½" finished / 14" unfinished
Grid: 9x9
Design Type: Uneven 9-patch, small center
Attributed to: Nancy Cabot
AKA: Medieval Mosaic (Nancy Cabot)
The important thing to remember when choosing the two fabrics for your Medieval Walls is contrast.
Although the piecing is simple—and all the seams nest if you follow the pressing instructions—there's still a bunch of it.
So that your efforts don't go to waste, you want patches with enough contrast to show off all your work. Right?
The fabrics in the sample block that follows—while pretty together—are cutting it pretty close as far as contrast is concerned. I like the second version (the red and pale green one at the top of this page) much better.
As always, label your patches; the numbers are used for identification throughout the tutorial.
If you'd like, click here to download and print the cutting charts and Medieval walls block design to use at your cutting table.
Choose your preferred method of piecing and the corresponding cutting chart below.
Includes some paperpiecing
 | Cutting Chart for a~Paper Piecing PLUS Traditional Piecing ~ | |||||
|---|---|---|---|---|---|---|
| Patch | Fabric | Qty | Finished Block Size | Sub Cut | ||
| 9" | 13½" | 18'' | ||||
| 1 | Light | 8 | 1¾" x 1¾" | 2¼" x 2¼" | 2¾" x 2¾" | --- |
| 2, 3, 5 | Dark | 12 | 2⅜" x 2⅜" | 2⅞" x 2⅞" | 3⅜" x 3⅜" | |
| 4 | Light | 4 | 3⅜" x 3⅜" | 4⅜" x 4⅜" | 5⅜" x 5⅜" | |
| 6 | Dark | 1 | 1½" x 25'' | 2'' x 33'' | 2½" x 41'' | --- |
| 7 | Light | 1 | 1½" x 25'' | 2'' x 33'' | 2½" x 41'' | --- |
| 8 | Light | 4 | 1½" x 2½" | 2'' x 3½" | 2½" x 4½" | --- |
| 9 | Dark | 3 | 1½" x 1½" | 2'' x 2'' | 2½" x 2½" | --- |
| 10 | Light | 2 | 1½" x 3½" | 2'' x 5'' | 2½" x 6½" | --- |
| Unfinished Block Size | 9½" | 14'' | 18½" | na | ||
| Grid Size | 1" | 1½" | 2" | na | ||
Traditional with Connector Corners
 | Cutting Chart for a~Traditional Piecing w/Connector Corners ~ | |||||
|---|---|---|---|---|---|---|
| Patch | Fabric | Qty | Finished Block Size | Sub Cut | ||
| 9" | 13½" | 18'' | ||||
| 1 | Light | 8 | 1½" x 1½" | 2'' x 2'' | 2½" x 2½" | --- |
| 2, 3 | Dark | 8 | 1⅞" x 1⅞" | 2⅜" x 2⅜" | 2⅞" x 2⅞" | |
| 4 | Light | 4 | 2⅞" x 2⅞" | 3⅞" x 3⅞" | 4⅞" x 4⅞" | |
| 5, 9 | Dark | 11 | 1½" x 1½" | 2'' x 2'' | 2½" x 2½" | --- |
| 6 | Dark | 1 | 1½" x 25'' | 2'' x 33'' | 2½" x 41'' | --- |
| 7 | Light | 1 | 1½" x 25'' | 2'' x 33'' | 2½" x 41'' | --- |
| 8 | Light | 4 | 1½" x 2½" | 2'' x 3½" | 2½" x 4½" | --- |
| 10 | Light | 2 | 1½" x 3½" | 2'' x 5'' | 2½" x 6½" | --- |
| Unfinished Block Size | 9½" | 14'' | 18½" | na | ||
| Grid Size | 1" | 1½" 1½" 1½" | 2'' | na | ||
Step 2: Stitch the units for your Medieval Walls
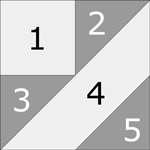 Brave World Variation unit
Brave World Unit Variation
Make 8
For this tutorial, this unit is paperpieced.
However, if you cut from the green 'Traditional Only' chart, click here to skip to those instructions. Otherwise, continue on here.
Cut out 8 units from the pages you printed—leaving a rough 1/8" of past the outside light line around each block.
There's no points for neatness. These get trimmed in the last step.
On to our Brave World units.
Use a light dab of Elmer's Washable glue stick to stick the wrong side of #1 to the unprinted side of the pattern. Use the dashed guides for quick and accurate placement.
With RST, align a short side of a #2 with the edge of the #1 as shown below.
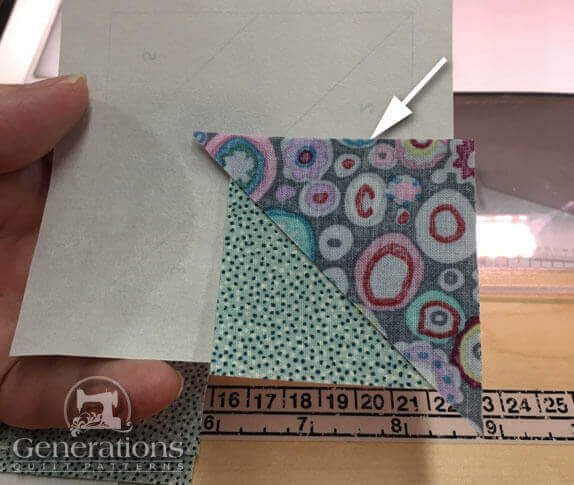 Patch #1 is in place, wrong side very-very-lightly glued to the unprinted side of the pattern, #2 is positioned RST on top.
General Sewing Machine Setup for Paperpiecing
- Reduce your stitch length to 16–20 stitches per inch (1.3-1.6 mm). This perforates the paper and stabilizes the seam when you remove the pattern. [Learn more about stitch length here.]
- Reduce your machine's speed or just plain slow down. Sew only as fast as you can stay on the stitching lines.
- Install an open toe appliqué foot (sometimes called an 'embroidery' or 'satin stitch' foot) if you have one (it's easier to see where you're stitching with one installed).
- Use a larger needle (90/14) if you have problems removing the pattern.
- If your machine has a needle stop up, use it. The stitching goes faster when you don't have to lift the presser foot with every seam.
- As you stitch each seam, start and stop a generous 1/4” before and after the solid stitching lines. ALWAYS. Future lines of stitching secure the ends.
After adding each patch, press the unit as it was sewn to set the seam and then open. The SA is automatically pressed towards the last patch added.
Before adding the next patch, take a look to make sure the one you just added covers the space plus seam allowance that it is supposed to.
Steam is optional and usually curls the pattern.
If that bothers you, don't use steam. Sometimes I do. Sometimes I don't.
It truly depends on my mood.
Remember, as you follow this paper piecing tutorial, the printed and the fabric sides of this block are mirror-images of each other.
At last!
Let's sew!
From the printed side, stitch on the solid line between 1 and 2. Start and stop your stitching a generous 1/4" before and after (white arrows) the solid marking.
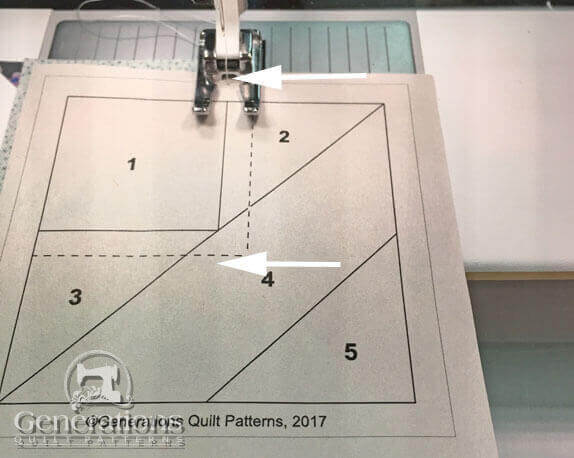
Press. Add the #3 patch to the adjacent edge of #1. Line up the edges (white arrow).
Stitch.
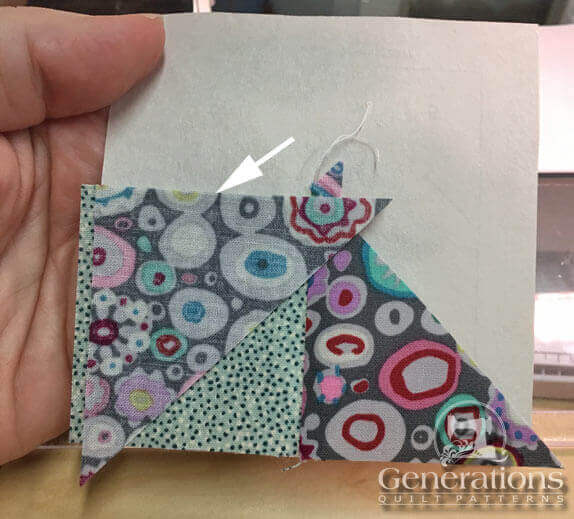
Press.
While this is a pretty straight edge, we're going to trim it to a perfect quarter inch to help us with the placement of #4.
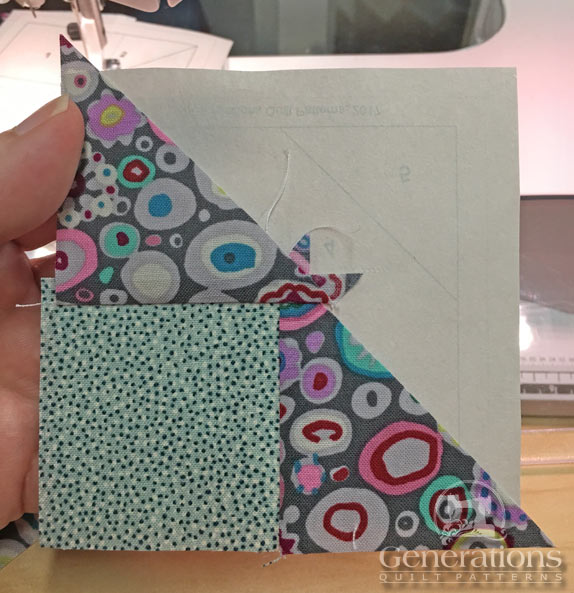 Don't worry about those thread tails—they'll be trimmed away in the next step
At your cutting mat, with the printed side up, match the edge of your ruler with the solid line between #2/#3 and #4.
Fold the paper back against the edge of the ruler and crease it. You will need to pull it away from the stitches a bit. (red arrows)
You can use your regular rotary cutting ruler for this, though an Add-A-Quarter Plus ruler makes the process virtually foolproof.
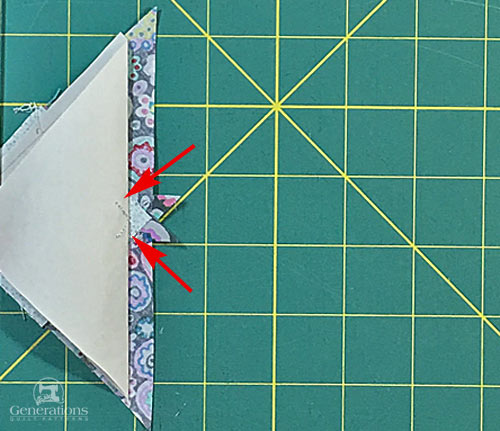
Fold the pattern back on itself along this crease.
Place the 1/4" mark on your ruler on the folded crease.
Cut with your rotary cutter.
Voila! A perfect quarter inch. The perfect placement line for #4. And that thread tail from before is gone, too!
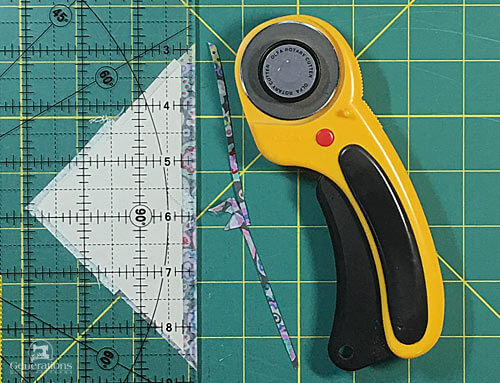 The 1/4" line of your ruler is directly over the folded crease—trimming gives us a perfect SA.
With RST, add #4 matching its long edge with the freshly trimmed one. (Click here to see it.)
Stitch and press.
Trim the #4 patch to size just as you did #2/#3.
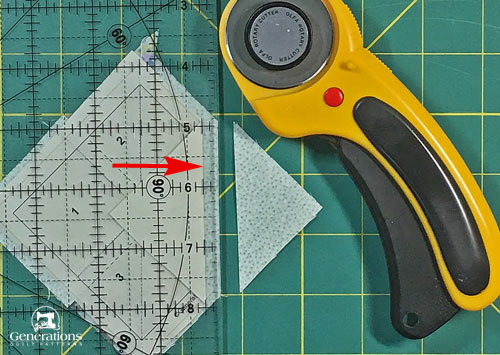 Again, 1/4" on the ruler is placed directly on the fold. Trim.
With RST, add the #5 patch—starting and stopping your stitches before and after the outside edges of the block pattern. Just like our last seam, because it runs from edge to edge, you can chain piece this seam.
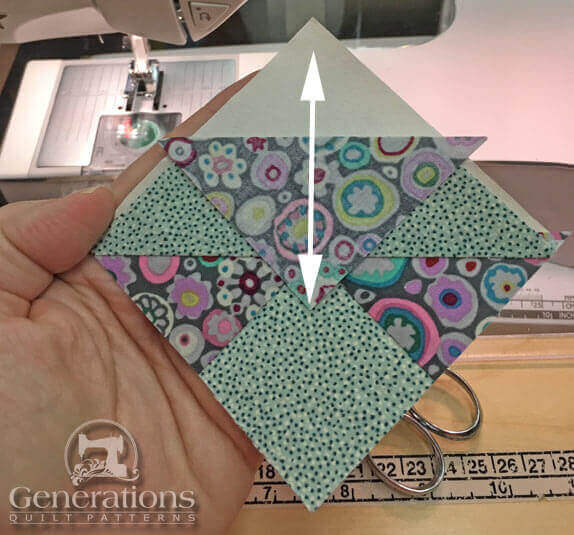 Line up the point of #5 with the corner of the unit (white arrow)
Give your units a good press.
Trim to size with your rotary cutter and ruler by positioning the 1/4" line of your ruler with the dark SOLID line (red arrow) and cutting away the excess.
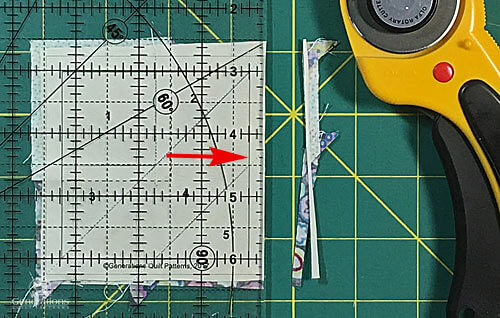 The 1/4" mark on your ruler is on the solid outline for trimming this Medieval Walls quilt block down to its exact size.
Turn the unit a 1/4 turn and trim again.
Repeat for all sides of all blocks.
Remove the paper. It's easiest if you remove the paper starting with the last patch added.
Trim any pesky thread tails as you go.
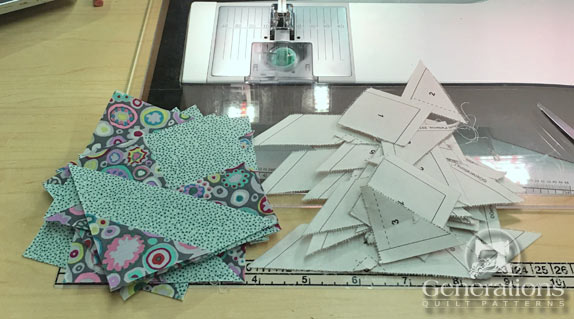 These 8 units are ready for our block
The paper piecing is complete. From this point forward, return your stitch length to the one you regularly use for piecing and install your favorite 1/4" presser foot.
Brave World Variation - Traditional Only
Using Patches #1-#5 cut from the green charts, click here for the instructions to make the Brave World variation with traditional piecing techniques. This link opens in a new window to make coming back to this point in the Medieval Walls tutorial easier.
Corners and Four Patches
First we create a stripset. It's used for both the corner and four-patch units.
With RST, stitch the #6 and #7 strips together along their long side.
Press, first flat to set the seam, and then open with the SA towards the darker #6.
At your cutting mat, using the chart below check to see that your stripset is the correct width. Make any needed adjustments.
StripSet WidthsCut 16 | ||
|---|---|---|
| Finished Block Size | Stripset Width after stitching | SubCut Width |
| 9" | 2½" | 1½" |
| 13½" | 3½" | 2" |
| 18" | 4½" | 2½" |
Straighten one short edge by aligning a line on your ruler with the seamline of the stripset. Keep this trimming at a 1/4" or less as shown here.
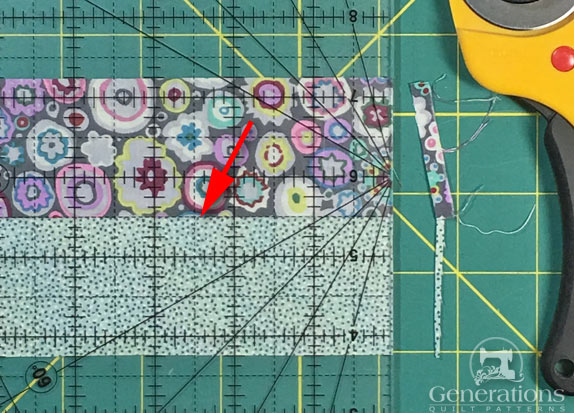 You can see that this strip set for our 13-1/2" finished block DOES measure 3-1/2" wide exactly.
Again, referring to the chart above, find the 'Sub Cut Width' that corresponds to your Finished Block Size.
For our 13-1/2" finished sample, subcuts are made every 2".
Cut 16 units.

Four Patches

Make 4
With RST, join two subcuts together alternating light and dark fabrics.
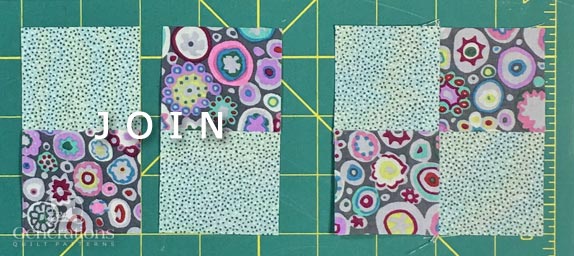 Make 4
Press the SA so that on the backside the SA are pressed toward one #6 as shown below (red arrows).
The other dark patch has one SA pressed towards it and one away from it.
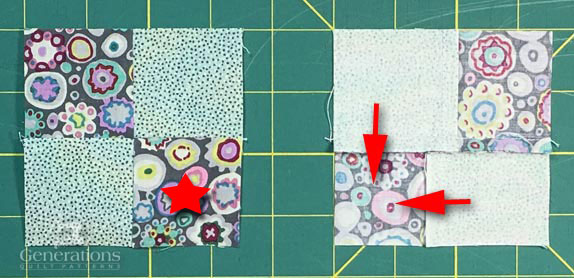 The patch with the red star on it is the one with both SA pressed towards it.
Corners
Make 4

With RST, stitch a #8 to the left side of a subcut pair.
Press SA away from #8.
While counter-intuitive, this is so that the seams of this unit nest with those units next to it in your finished Medieval Walls block.
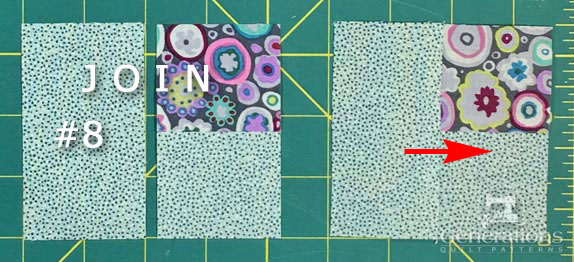 Make four just like this
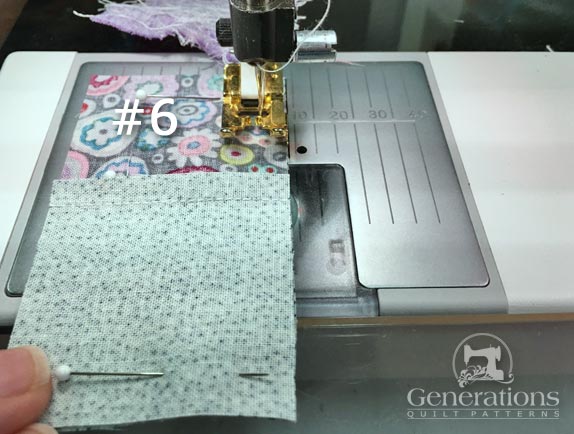
To make sure the #8 ends up on the correct side, stitch all the pairs so that the #6 is on top and feeds first into your sewing machine (below).
Sashing
To make the vertical sashings, with RST sew a #9 square to a #10 rectangle.
SA are pressed toward the dark #9.
Make 2
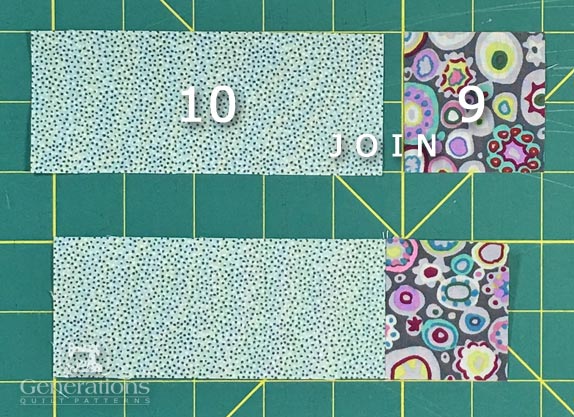 Make 2
For the single, horizontal sashing, with RST, stitch two 2-patch units (#6/#7s) from our strip set together. Make sure the darks and lights alternate.
Make 2.
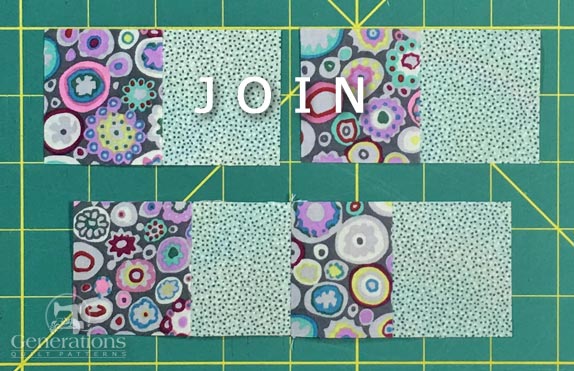 Make 2
With RST, join the light edge of the pairs of 2-patches to opposite sides of a #9 square to create a single sash.
SA are pressed away from the center #9.
Almost finished! Click here to go to the instructions to assemble our Medieval Walls quilt block.
- Home
- Free Quilt Block Patterns
- Medieval Walls, Pt 1
