This post contains affiliate links for which I receive compensation
Machine quilting a rail fence quilt pattern
by Dinah
Does anyone have some different ideas about machine quilting a rail fence quilt pattern (on a domestic machine)?
Reply
Your timing is amazing! I had just started outlining a section for the website on Rail Fence quilts...Because this is such a good beginning quilt pattern, a great stashbuster, and so quick to put together, most of these quilts are quilted quite simply.
For the beginning quilter...
If the blocks are small enough, stitch in the ditch between the blocks to accomplish the utilitarian purpose of holding all the layers together.To add a bit of interest but still maintain the simplicity of quilting, stitch diagonally through all the blocks in both directions so that each is filled with an 'X'. This method adds extra stitches for stability if the individual blocks are larger than, say, 4-6 inches. You need not mark the quilting lines, just aim for the corners of the blocks, again, if they're small enough.
Jazz up either of these two options by using a serpentine stitch if your sewing machine has one. The curvy lines add a bit of whimsy and now you needn't worry about hitting the ditch or the corners exactly.
Adding all-over patterns...
An all over pattern, something as simple as meandering, will hold the layers together nicely. You can add interest by meandering for a while and then throwing in a motif--I especially like pulling the inspiration for this motif from designs already in your quilt fabric.Be sure to keep the spacing between the stitches even. All over patterns layer another design over the patchwork. In my humble opinion, if they are too 'fancy' or intricate, they have a tendency to blur the lines of the patchwork. Maintaining even spacing goes a long way to minimize this blurring.

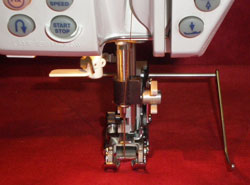
You'll need a walking foot with a channel guide (shown right) to complete the quilting.
If you have these guides, there'll be a left and a right guide...you'll use the left one to keep more of the quilt out from underneath the arm of the machine. The guide rides along your last line of stitching.
Use a patterned backing fabric...
...as your quilting design if you are comfortable free motion quilting a line drawing.Quilt your rail fence quilt from the back, following the design lines (some or all depending on the density of the lines) in your backing fabric. It'd save time; you wouldn't need to mark.
However, if your quilt is wider than the width of fabric, you may want to spend some time (and fabric) matching the design of the fabric as you join two panels of backing fabric together. You'll also want to fine-tune your tension settings as you won't be able to see any tension problems as you quilt. (There's always trade-offs in quilting, aren't there?!!!)
Circles or swirls can be randomly quilted across the quilt sandwich to counter all of the straight lines in the piecing. It'll probably take some marking and you'll need to tie off the ends of your stitching lines to secure them.
I've referred a couple of times to 'having enough quilting' to hold the layers together. For more information on this topic, visit our Quilt Batting and Machine Quilting Distances page.
Readers, what do YOU think? How would you quilt your next Rail Fence quilt pattern? How did you quilt your last? Just use the 'comments' link below to share your thoughts. Thank you!
Piecefully,
Julie Baird
Editor
Comments for Machine quilting a rail fence quilt pattern
|
||
|
||
|
||
|
||


