- Home
- Free Quilt Block Patterns
- Louisiana Quilt Block
Gumbo of Geometrics: Mastering the Louisiana
Quilt Block
Sew hot, it'll make your seam ripper sweat! 🌶️✂️"
This post contains affiliate links, for which I receive compensation.
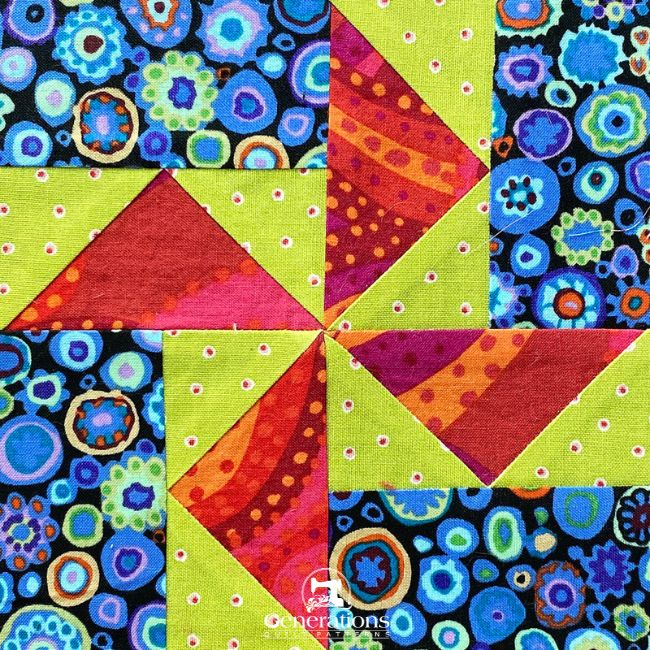
Let the good times roll with the Louisiana quilt block!
Simple foundation paperpiecing techniques make for perfect points and easy assembly.
Don't care for foundation piecing?
We've got instructions for a traditionally pieced block, too, with Flying Geese made 4-at-a-time. A pretty sweet technique! No special equipment required.
🧭 Before we dive into the bayou of quilting, here's your map to navigate this tutorial.🔍
🗺️ Grab your compass (or just use your rotary cutter ✂️) and explore these sections faster than you can say "Beignet, done that!" 🍩💨
- A cutting charts in four sizes with downloads to print of the chart and block design, one is for paperpiecing, the other for traditional only techniques.
- A coloring page for this Louisiana design to download and print. Great for you. Great for your young quilters-in-training.
- Step-by-step illustrated instructions for both paper and traditional piecing methods - what's not to love?!!
Cut. Sew. Press. Stirring up a gumbo of geometric genius!
📋 General Instructions

Please read through all the directions before beginning your block.
Remember, there are two different construction methods shared here. You want to choose the best one for YOU.
These abbreviations are used in the Louisiana block tutorial:
- SA - seam allowance
- RST - right sides together
- BAC - background fabric
- FG - Flying Geese
- PP - Paperpiecing
Pressing instructions are highlighted in yellow to make them easy to find.
If you've used any of the other tutorials on the website, you'll know I'm a big advocate of starching my quilt fabric before cutting. Learn more about starching fabric here.
Download and print the foundation patterns
If you've chosen traditional methods—no foundation piecing—click here to go straight to cutting.
Otherwise, you'll need the most current version of Adobe installed on your computer to download the pattern with its guidelines in place.
On the Adobe Print Menu page, under 'Page Size and Handling' set 'Custom Scale' to 100% before printing for accurate results. Click here to see what it looks like on an Adobe Print Menu page.
Choose your finished block size from the chart below and print 1 copy for each block you make.
Print the Louisiana Paper Piecing Units | |
|---|---|
| Click on the Finished Block Size | Print this many copies for each block |
| 4" | 1 |
| 6" | 1 |
| 7" | 1 |
| 8"*** | 1 |
***SPECIAL NOTE: You must ADD seam allowances to the outside edge of the 8" block because SAs won't fit on 8-1/2" wide papers.

Not sure which paper to use?
Take a look at my review of several of the most popular brands available to us quilters on the market.
You want a super-easy paper to tear away—less stress on the stitches.
After printing, use the 1" square graphic on the printed page(s) the patterns printed at the correct size
The newest quilt fabrics to tickle your fancy...
Click the images below to see the full collection. We share any commercial and/or free patterns that showcase them, too. (For inspiration, of course!)
Step 1: Cutting patches for a Louisiana quilt block
Click here if you prefer to skip all the paperpiecing and prefer traditional methods instead.
 As seen from the fabric side...
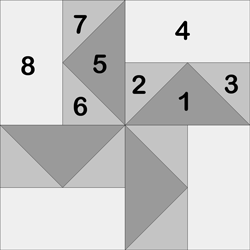 ...and from the paper side
Sample Size: 6" finished / 6½" unfinished
Grid: 4x4
Attribution: Hearth and Home
Design Type: Pinwheel
You'll notice immediately that this block looks different depending on which side (front or back) you're looking at. That's because it's not symmetrical.
Don't let that trip you up as you piece it.
I've used Kaffe Fasset's 'Paperweights' fabric for the background, using a dark version in place of the light fabric shown in the Louisiana patchwork illustration above.
Remember, YOU are the designer and can choose whichever fabrics please YOU. Be mindful that good contrast between your choices means that all your perfectly pieced points show up.
After all, that's the point, isn't it! :)
Download and print the coloring page if you'd like to map out your fabric choices.
Please label your patches. We refer to their numbers throughout this tutorial.
To print a copy of the block design and cutting chart to use at your cutting table, click here.
 | Cutting Chart for a~Paper Piecing ~ | ||||||
|---|---|---|---|---|---|---|---|
| Patch | Fabric | Qty | Finished Block Size | Sub Cut | |||
| 4" | 6" | 7" | 8" | ||||
| 1,5 | Dark | 1 | 3¾" x 3¾" | 4¾" x 4¾" | 5¼" x 5¼" | 5¾" x 5¾" | |
| 2, 3 6, 7 | Med | 4 | 2⅜" x 2⅜" | 2⅞" x 2⅞" | 3⅛" x 3⅛" | 3⅜" x 3⅜" | |
| 4, 8 | BAC | 4 | 2" x 3" | 2½" x 4" | 2¾" x 4½" | 3" x 5" | --- |
| Unfinished Block Size | 4½" | 6½" | 7½" | 8½" | --- | ||
| Grid Size | 1" | 1½" | 1¾" | 2" | --- | ||
🪡 Assemble your Louisiana unit - PP technique
We need to make some adjustments to our machine before we stitch.
We need to make a few adjustments to our sewing machine settings to paper piece.
- Reduce your stitch length to 16–20 stitches per inch (1.3-1.6 mm). This perforates the paper and stabilizes the seam when you remove the pattern. [Learn more about stitch length here.]
- Reduce your machine's speed or just plain slow down. Sew only as fast as you can AND stay on the solid stitching line.
- Install an open toe appliqué foot (sometimes called an 'embroidery' or 'satin stitch' foot) if you have one (it makes it easier to see where you're stitching).
- Use a larger needle (90/14) IF you have problems removing the pattern. Personally, I use an 80/12 Microtex Sharp for paper piecing without any issues.
The Louisiana units
Make 2
 Shown from the printed side of the pattern
If you are making traditional pieced blocks, click here for those instructions.
Use just the tiniest bit of Elmer's Washable Gluestick to stick the wrong side of a #1 to the unprinted side of the pattern. Use the dashed placement guides to make quick work of this.
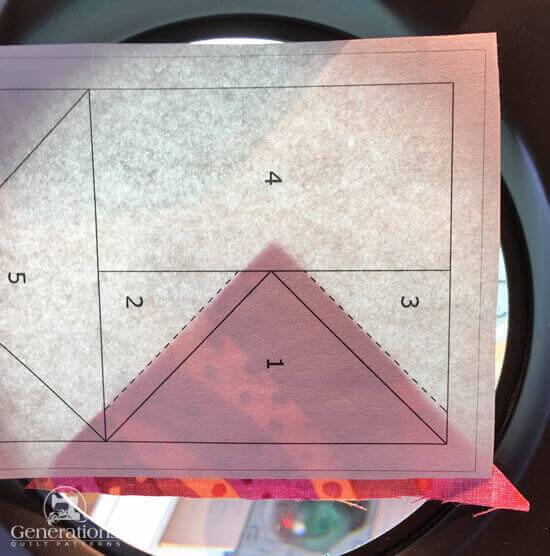 #1 is in place
With RST match the long edge of #2 to a short edge of #1. Cotton likes to stick to itself so you probably won't need a pin or anything else to hold it in place—but if you need pins, use them!
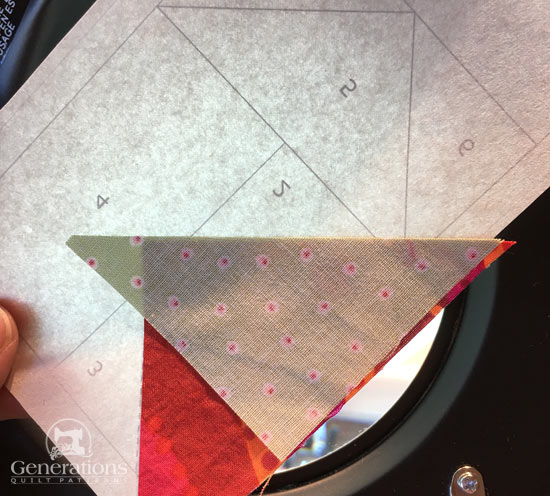
Stitching is started a good 1/4" before and ending a good 1/4" (pink arrow) after the solid line between #1 and #2.
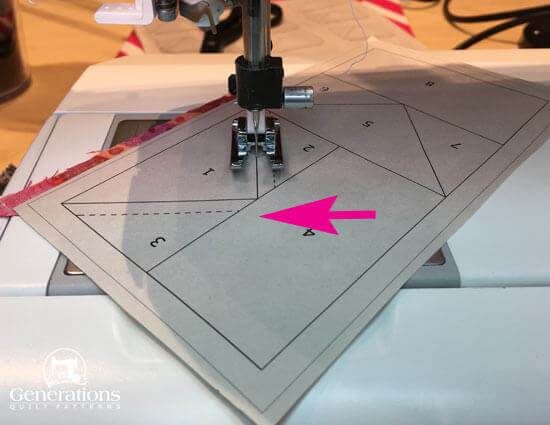 Sew the seam right up to the point of the pink arrow
Press.
With RST align a short edge of #3 with the adjacent edge of #1.
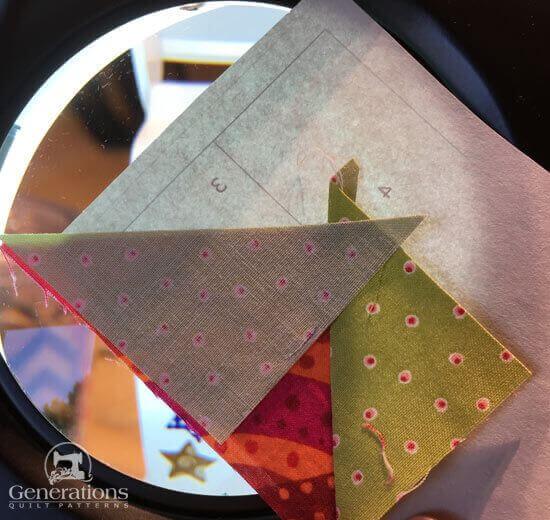 I haven't bothered to trim the thread tail because it'll be trimmed in the next step. No reason to make extra work for ourselves is there! :)
Stitch from the printed side as before, starting and ending a generous 1/4" past the ends of the solid line between #1 and #3.
Trim the SA between #2/#3 and #4 to 1/4" wide.
An Add-A-Quarter PLUS ruler makes this trim job virtually foolproof.
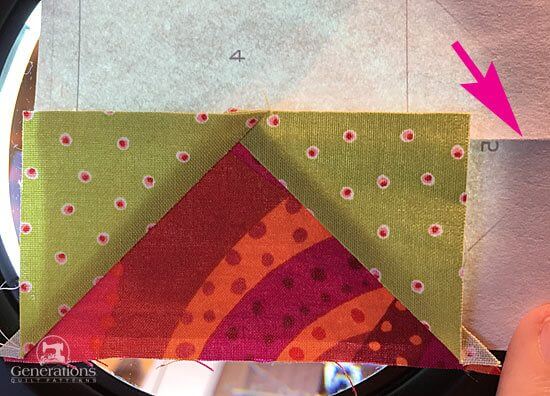 The pink arrow points to where the paper was folded when I trimmed the SA—yours will be folded like this, too.
With RST, align a long edge of #4 with the trimmed #2/#3 patches.
Stitch.
Below are the halves after adding #4 to each.
Press.
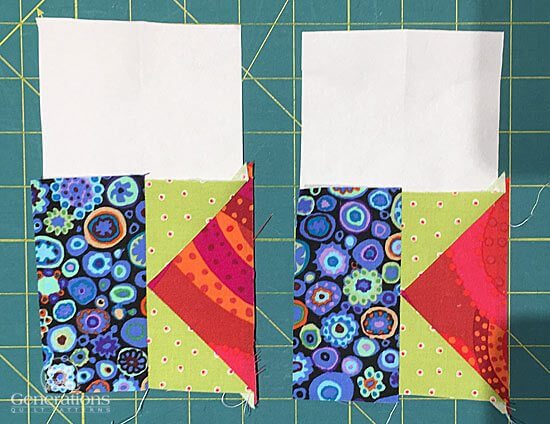 Remember to trim the SA to 1/4" for the perfect #5 placement
Time to trim again.
Pull back the paper from the stitching along the #2/#4 edge as shown below. The paper may rip a bit (pink arrow).
Don't worry. That's how this works.
Fold back the pattern on the solid line between #2/#4 and #5 using your ruler and thumb to get a good crease.
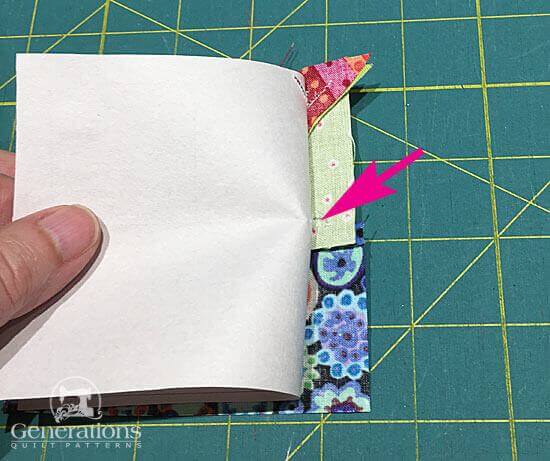
Trim the SA to 1/4".
Position the long side of #5 to this freshly trimmed edge...
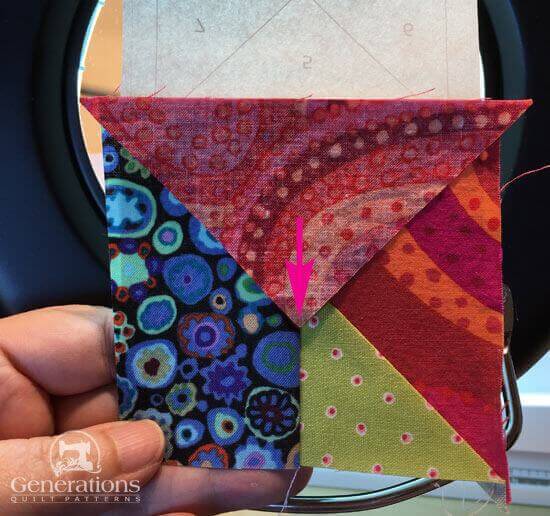 Match the point of this #5 triangle shape to the seam between #3 and #4 (pink arrow) for quick, proper placement.
...and stitch the seam as we've done before.
Since the stitching between #2/#4 and #5 extends from edge to edge, you'll be able to chain piece this step to speed up the process! (Who said you couldn't chain stitch in paperpiecing!)
Press.
Trim the SA to 1/4" on both short, exposed edges of #5.
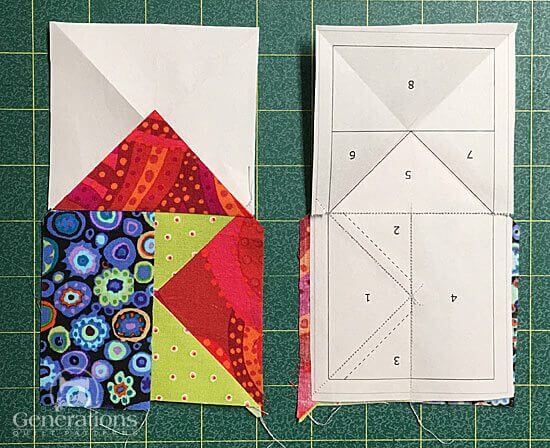 A trimmed #5 from the fabric side (left) and from the printed side (right).
From here on out, the #6, #7 ad #8 patches are sewn and trimmed exactly as #2, #3 and #4 were.
Again, when you add #8 you can chain piece. :)
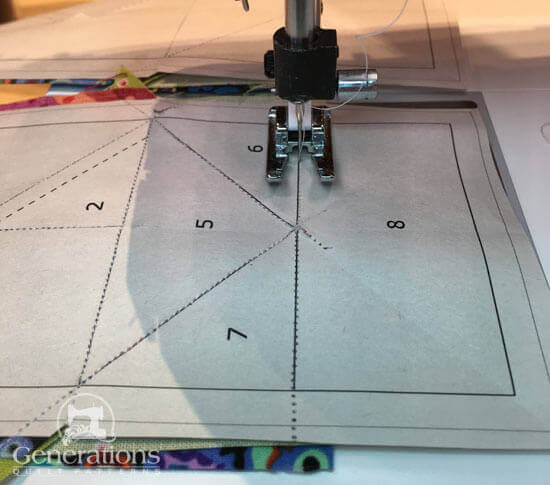
Press.
Trim the units to size with your rotary cutter and ruler.
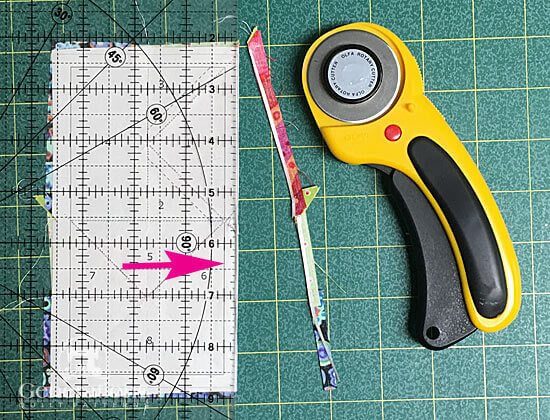 Match the 1/4" line on your ruler with the solid outside line and trim. Repeat for all four sides of both Louisiana units.
The piecing's halfway done here...
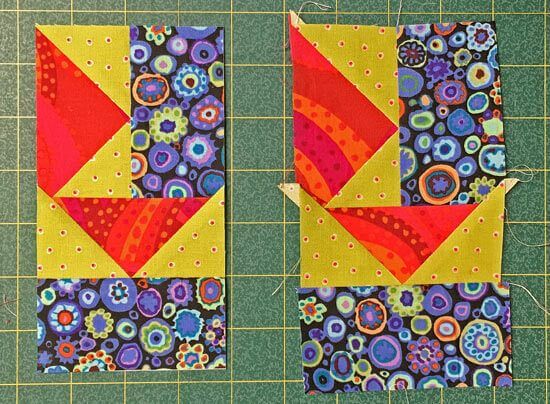 A Louisiana unit trimmed and ready for assembly (left), the 'hot mess' it was before trimming (right)
After both halves are trimmed, give them a good press, let them cool (so they don't stretch as you rip away the paper) and then remove the pattern.
The paper piecing is complete. From this point forward, return your stitch length to the one you regularly use for piecing and install your favorite 1/4" presser foot.

Are you ready to assemble your Louisiana quilt block?
📌Don't let this block slip away like a ghost in the French Quarter! 👻
Pin it for your next quilting adventure! 🧵🗺️
- Home
- Free Quilt Block Patterns
- Louisiana Quilt Block
