This post contains affiliate links for which I receive compensation
Layering Applique
by Lani
(Livermore, CA)
Question
Hi :)You mention that we need to avoid layers of the template paper.
What do you do in a situation where there are a couple of shapes on top of each other. ie: possibly a flower with a smaller layer (another color) and then a center circle on top of that?
Also, does this method work for layers of tiny pieces such as in a Pearl Pereira pattern?
Thank you so much for your tutorial. I'm looking forward to trying invisible machine applique. As you said "I don't have enough time for all the applique projects I want to do"!
Happy Quilting!
Lani
Reply
Hi Lani! I am so happy you're going to try this method. Once you get over the 'glue-on-your-fingers' it's a whole lot of fun!Layering Shapes
In the tutorial with the basket block, I traced the basket and the handle separately because that's how they were presented in the pattern.For more intricate applique patterns, say a flower with many petals, on the pattern sheet it is displayed as the whole flower and not spread out like the basket was.
Trace the whole flower and add the dashed line (or your own notation) to indicate an edge that goes under another piece. For intricate designs, this eliminates a lot of the layering.
There are some designs, though, that don't lend themselves to this.
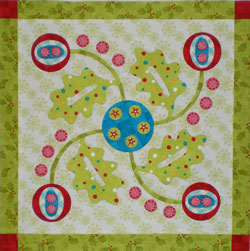
This invisible machine appliqued block to the right is from from Sue Garman's applique pattern, "Gingerbread Joy".
The outside red 'flowers' contain 3 layers of Rinsaway.
Only the top red snowflake circles do not use the stabilizer.
It didn't make sense to me for this particular flower shape to remove the layers from behind each succeeding layer.
The Rinsaway, once washed, becomes soft and while it does add some dimension...the fibers fall apart, they don't disappear...it made sense for this particular shape. Quite frankly there's more 'stuff' behind the top circle because of the gathered seam allowance.
Perfect circles
I prefer to use Karen K. Buckley's product called Perfect Circles' for making these small 1/2" circles. I get a much better-finished shape when the circles get this small.For circles about 3/4" or bigger, I'll use the Rinsaway stabilizer because my results are good and it's faster. The hardest part is cutting a nice round circle with scissors, so if I've got one the right size, I'll use a hole-punch.
Size doesn't matter, unless...
...it gets too small for your fingers.Once you've glued the stabilizer to the back of your fabric and pressed it dry, it's very stable to work with. I find that for small pieces, I cut a smaller seam allowance...down to about 1/8" for very small pieces. Using cuticle sticks instead of your fingers helps, too.
I've successfully turned edges as small as 1/4" circles using this method, but the really tiny stuff will take more practice. But that's all it takes...practice.
Building up shapes
I find it easier to 'build-up' my applique shapes on a piece of parchment paper (the glue doesn't stick to it).If I can do all the zig-zag stitching before I stitch the finished shape to the background fabric, I do. It's easier to maneuver the smaller piece under the needle.
These pieces will be totally stabilized when I come back and do the quilting as I like to quilt around all of my applique shapes.
Lani, I hope you enjoy using this technique. Let me know if you have further questions, I'd be glad to help!
Piecefully,
Julie Baird
Editor
Click here to return to Machine Applique Questions...Answered!.


