- Home
- Free Quilt Block Patterns
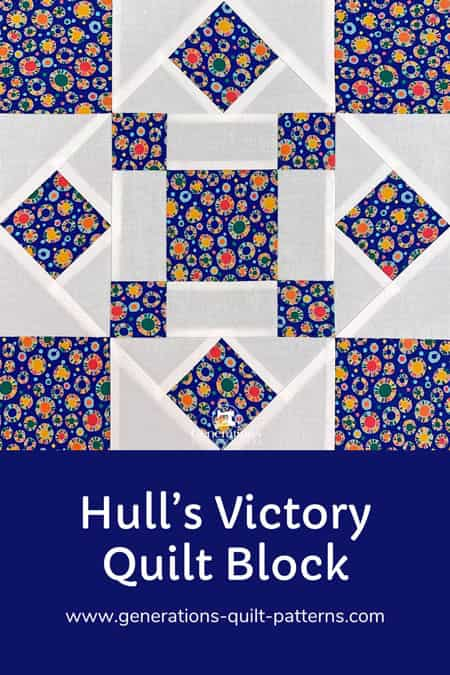
- Hull's Victory Quilt Block
Set Sail with the Hull's Victory Quilt Block: A Paper Piecing Adventure ⛵
Your compass to quilting confidence 🗺️
This post contains affiliate links, for which I receive compensation.
Those picture-perfect Flying Geese in the Hull's Victory block? They're not tricky at all!
Paper piecing does all the heavy lifting while you simply stitch on a line. No specialty rulers, no complicated math—just you and your machine moving at whatever speed feels right.
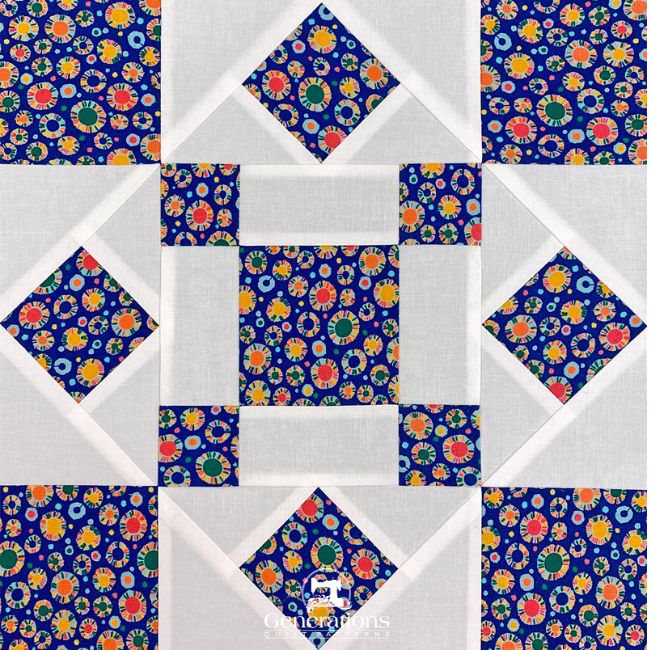
Seriously. That's all it takes.
Those beautiful fabrics you've been hoarding for just the right project? Their time has come! Let's turn them into something spectacular! 🧵
🧭 Ready to set sail?
Drop anchor at any point in your journey with these handy navigation markers. ⚓ Your quilting adventure is mapped out below!
- A cutting chart in 5 sizes, with downloads of the chart and block design
Cut. Sew. Press. Time to turn that beautiful fabric into something spectacular! ⚓ 🧵
📋 General Instructions
Several abbreviations are used on this page. They are:
- SA - seam allowance
- RST - right sides together
- HST - Half Square Triangle
- QST - Quarter Square Triangle
- SiaS - Square in a Square
A 1/4" SA is used in this tutorial.
Highlighted in yellow, pressing instructions are easy to spot.
To press, first press the patches in the closed position as they came off your sewing machine. This sets the seam, melding the fibers of the threads into the fibers of the fabric.
Then press the SA to the dark unless otherwise noted.
📥 Download and print the paper piecing pattern
To download the pattern, use the most current version of Adobe.
For accurate results, on Adobe's Print Menu page, under 'Page Size and Handling' set 'Custom Scale' to 100%. Then print.
Click here to see what it looks like on the Print Menu page.
Find your finished block size from the chart below. For each block, you want to make, print the corresponding number of copies for a total of:
- Four Flying Geese Variation #3 units
Download and Print | ||
|---|---|---|
| Finished Block Size | # of Copies to Print | Flying Geese Download Link |
| 6" | 1 | 1½" x 3" |
| 8" | 1 | 2" x 4" |
| 10" | 2 | 2½" x 5" |
| 12" | 2 | 3" x 6" |
| 16" | 2 | 4" x 8"** |
**You will need to add the seam allowance to the left and right sides of the pattern because our paper is exactly 8½".
After printing, use the 1" square graphic on the printed page(s) to double check that your patterns printed at the correct size.
Then cut out the required number of patterns from your copies. A rough cut is good enough—an 1/8"-1/4"-ish away from the outside dashed square.

Not sure which paper to use?
Take a look at my review of several of the most popular brands available to us quilters on the market.
You want a super-easy paper to tear away—less stress on the stitches.
The newest quilt fabrics to tickle your fancy...
Click the images below to see the full collection. We share any commercial and/or free patterns that showcase them, too. (For inspiration, of course!)
✂️ Cutting patches for your Hull's Victory quilt block
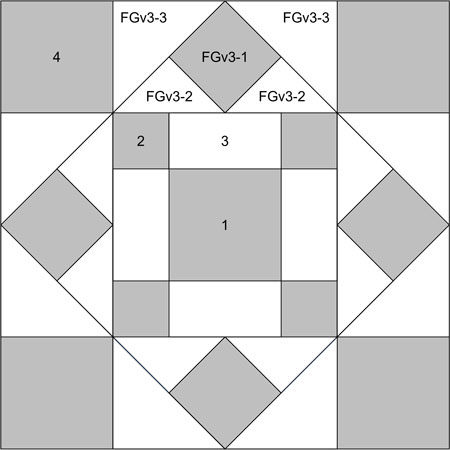
Sample Block Size: 10" finished / 10½" unfinished
Grid: 8x8
Attribution: Clara Stone
Barbara Brackman: 2044a
Design Type: Paper piecing | Unequal 9-Patch Large Center
Your success depends on labeled patches—they're your navigational markers throughout this tutorial.
 | Cutting Chart for a~ Includes Paper Piecing ~ | |||||||
|---|---|---|---|---|---|---|---|---|
| Patch | Fabric | Qty | Finished Block Size | Sub Cut | ||||
| 6'' | 8'' | 10'' | 12'' | 16'' | ||||
| 1, 4 | A | 5 | 2'' x 2'' | 2½'' x 2½'' | 3'' x 3'' | 3½'' x 3½'' | 4½'' x 4½'' | --- |
| 2 | A | 4 | 1¼'' x 1¼'' | 1½'' x 1½'' | 1¾'' x 1¾'' | 2'' x 2'' | 2½'' x 2½'' | --- |
| 3 | Bac | 4 | 1¼'' x 2'' | 1½'' x 2½'' | 1¾'' x 3'' | 2'' x 3½'' | 2½'' x 4½'' | --- |
| FGv3-1 | A | 4 | 1⅝'' x 1⅝'' | 1⅞'' x 1⅞'' | 2¼'' x 2¼'' | 2⅝'' x 2⅝'' | 3⅜'' x 3⅜'' | --- |
| FGv3-2 | Bac | 2 | 3¼'' x 3¼'' | 3¾'' x 3¾'' | 4¼'' x 4¼'' | 4¾'' x 4¾'' | 5¾'' x 5¾'' | |
| FGv3-3 | Bac | 4 | 2⅞'' x 2⅞'' | 3⅜'' x 3⅜'' | 3⅞'' x 3⅞'' | 4⅜'' x 4⅜'' | 5⅜'' x 5⅜'' | |
| Unfinished Block Size | 6½'' | 8½'' | 10½'' | 12½'' | 16½'' | na | ||
| Grid Size | 3/4'' | 1'' | 1¼'' | 1½'' | 2'' | na | ||
Subcutting
The patches for FGv3-2 are cut twice on the diagonal to form QST.
The patches for FGv3-3 are cut once on the diagonal to make HST.
These subcuts help us create FG that have straight of grain on all the outside edges for stability.
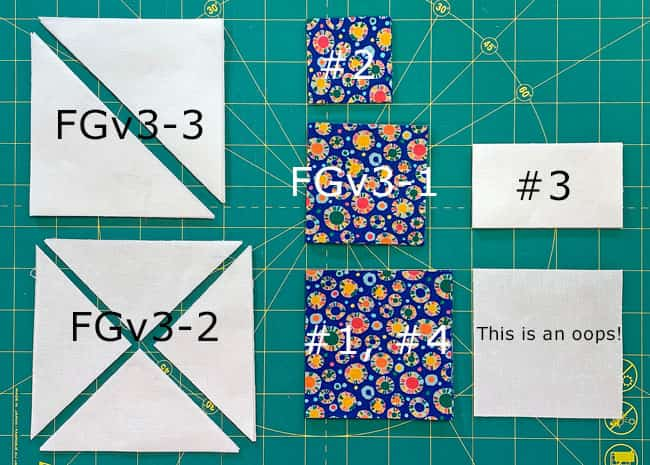 Not sure why I put that extra white square on the board...maybe not enough caffeine. You don't need it to make this block.
🧵 Create the units for a Hull's Victory block
Flying Geese Variation 3
Make 4
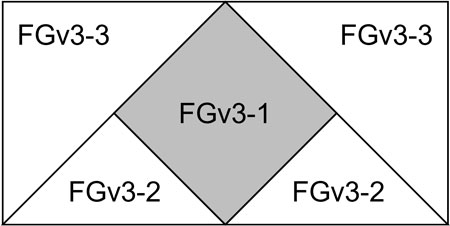 The Flying Geese Variation #3 unit
Before we being, we need to make a few adjustments to our sewing machine settings to paper piece.
- Reduce your stitch length to 16–20 stitches per inch (1.3-1.6 mm). This perforates the paper and stabilizes the seam when you remove the pattern. [Learn more about stitch length here.]
- Reduce your machine's speed or just plain slow down. Sew only as fast as you can and stay on the solid stitching line.
- Install an open toe appliqué foot (sometimes called an 'embroidery' or 'satin stitch' foot) if you have one (it's easier to see where you're stitching with one installed).
- Use a larger needle (90/14) IF you have problems removing the pattern. Personally, I use an 80/12 Microtex Sharp for paper piecing without any problems.
Use a dot of Elmer's Washable Glue Stick to hold FGv3-1 in position on the unprinted side of the pattern between the dashed guidelines.
Some of these squares will be a wee bit less than the guidelines. That's O.K. Simply center the square between the lines.
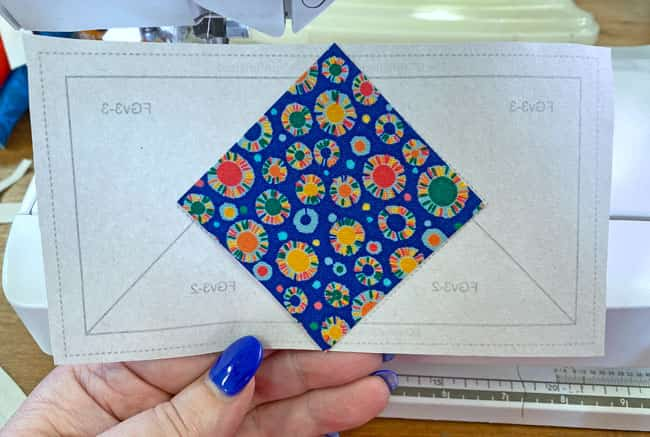
With RST, match one of the bias edges of aFGv3-2 to a lower side of FGv3-1. It's edges should be even with the dashed guidelines. Doing so means you won't need to trim anything, thus saving yourself an extra bit of work. Use the photo below to help you position it correctly.
To be on the safe side, while holding the patches together in the seam allowance, open #2 to see that it fills the space.
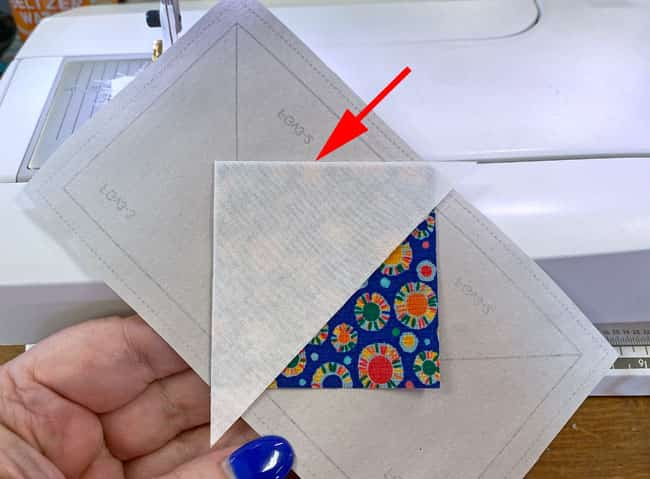
Press.
Repeat for the second FGv3-2.
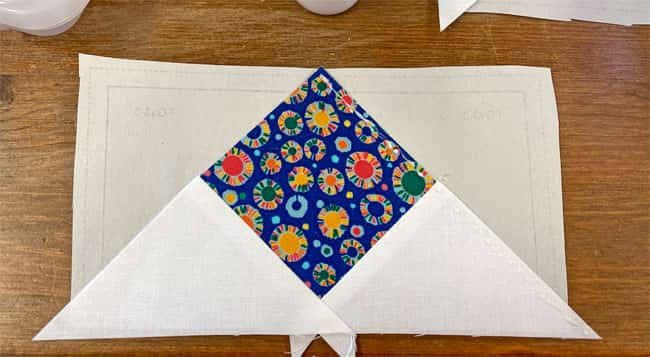
Align the long bias edge of FGv3-3 with the FGv3-1/FGv3-2 edge. Use the dashed guide for quick placement.
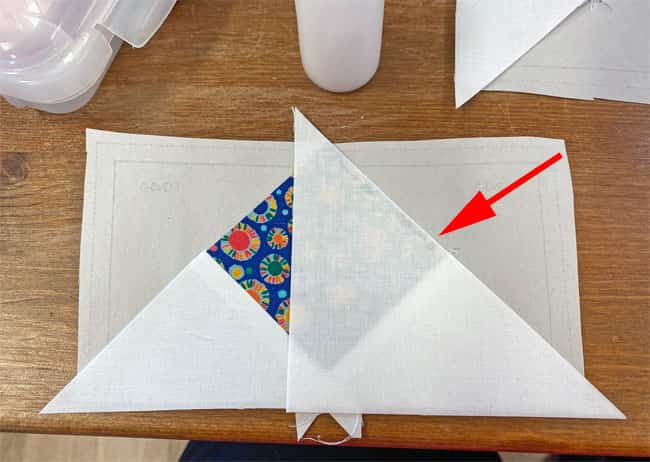
Sew this seam and press.
Repeat for the final FGv3-3.
After this last patch is pressed, put them paper side up on your cutting mat so that we can trim them to the perfect size.
Place the 1/4" line on your ruler directly over one of the solid lines that surrounds our Goose. Trim away the excess. Repeat for each side of every FG.
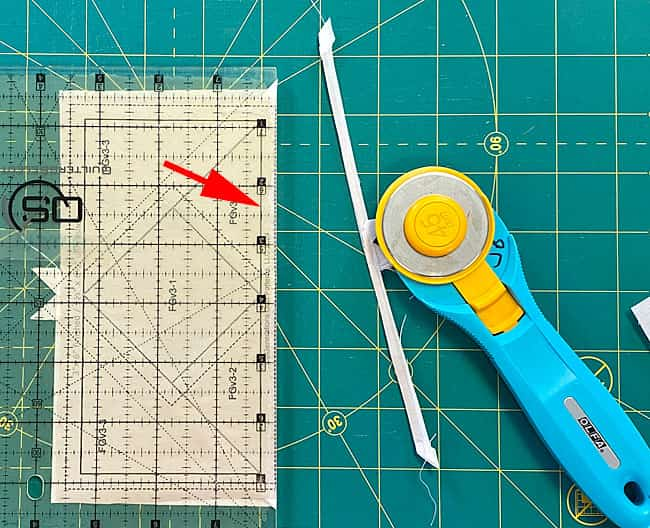
These look pretty fabulous, don't they? Piecing perfection without breaking a sweat. Gotta love paper piecing!
All that's left to do is remove the paper. All the outside edges are on the straight of grain by design—just like any block you pieced with traditional methods. So its work is done.
Besides, it's much easier to remove now, instead of picking out little bits from a 1/4" seam allowance once it's sewn into the block.
The paper piecing is complete. From this point forward, return your stitch length to the one you regularly use for piecing and install your favorite 1/4" presser foot.
Center
Make 1
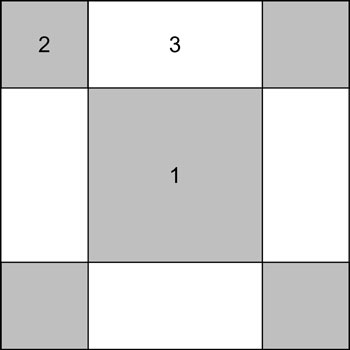
With RST, stitch a #2 to each short side of a #3 for a total of two units.
With RST, stitch a #3 to opposite sides of a #1.
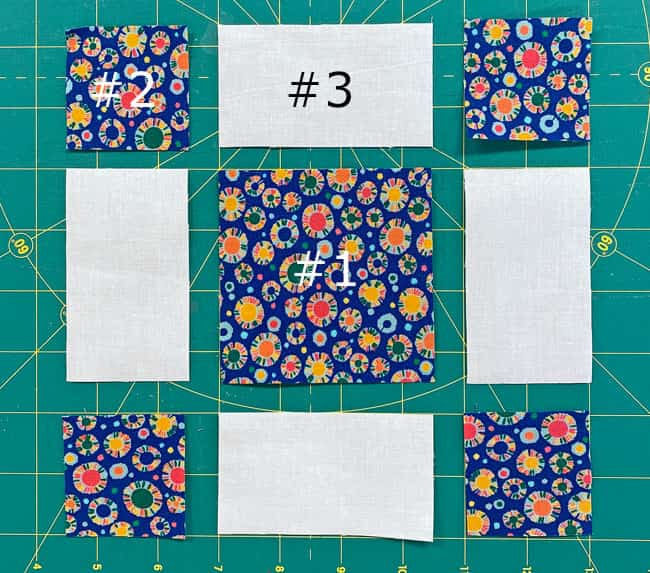
SAs are pressed toward the darker #1 and #2s.
Stitch the #2/#3 to two opposite sides of the #1/#3.
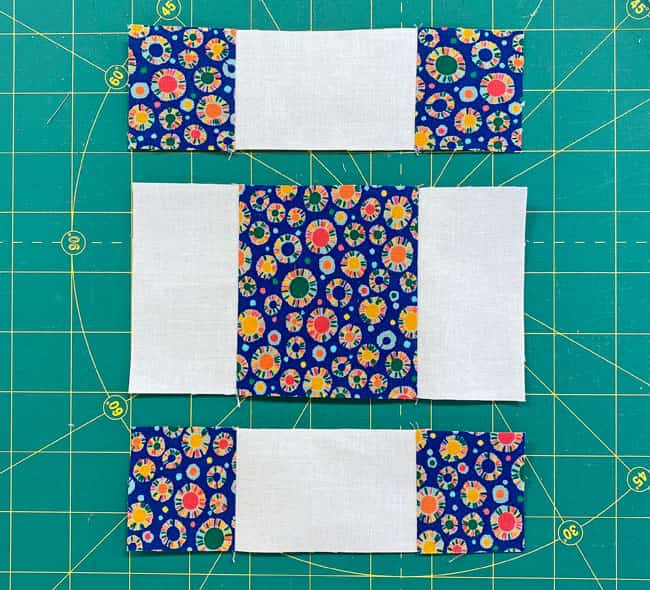
These last two seams can be pressed in either direction or open. They are not matched to another seam.
📏Check for Accuracy
After sewing, the Center measures... | |
|---|---|
| Finished Block Size | Edge-to-edge Measurement |
| 6" | 3½" x 3½" |
| 8" | 4½" x 4½" |
| 10" | 5½" x 5½" |
| 12" | 6½" x 6½" |
| 16" | 8½" x 8½" |
🧩 The Grand Assembly
Time to watch your Hull's Victory take shape! First, grab those units and lay them out:
- Solid squares in the four corners.
- The Goose points out from the center. Its seams form a square on point in our block
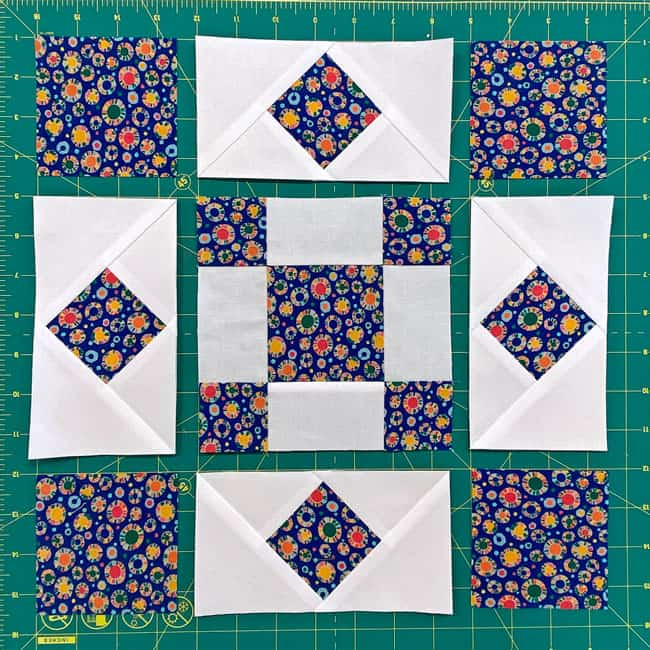
Now for the fun part!
Create each row, pinning at the edges to keep everything lined up nice and tidy.
These seams are pressed away from the FG to minimize bulk.
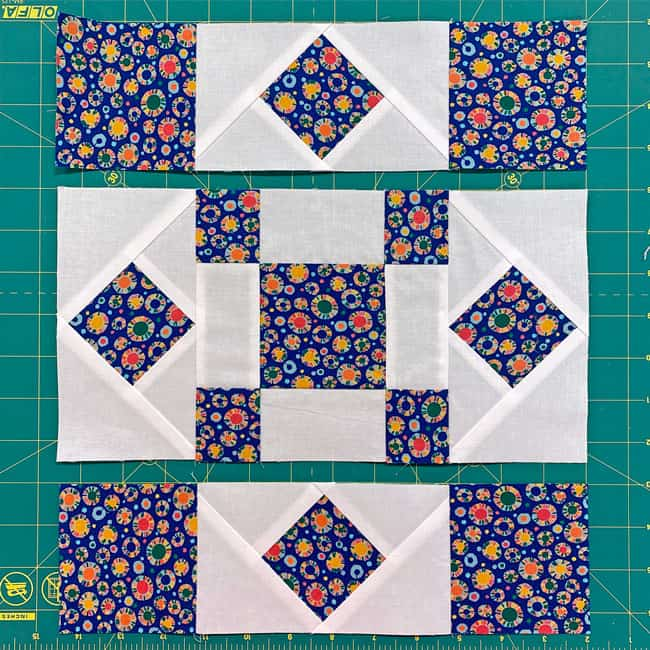
Next up: rows meet rows!
Pin those intersections (yes, really—you'll thank yourself later), and stitch them together.
For this block, pressing those final seams toward the center makes everything play nicely together.
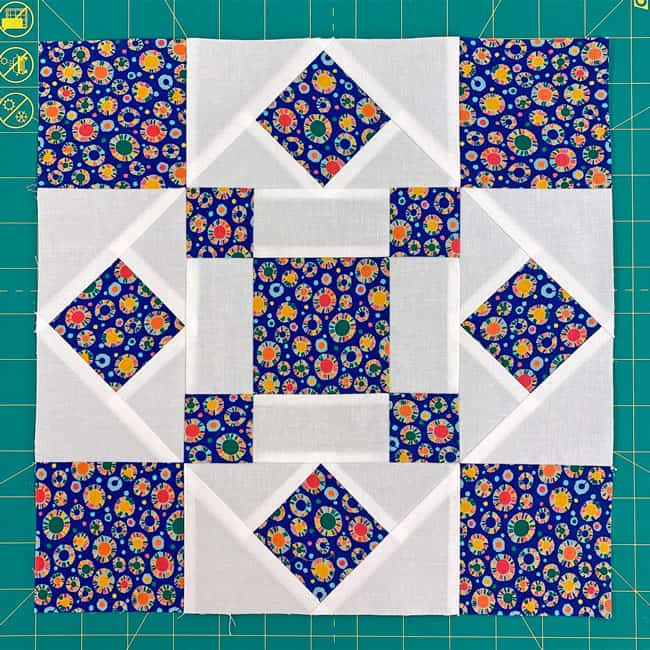
Flip your block over and admire how those seams nest together like they were meant to be!
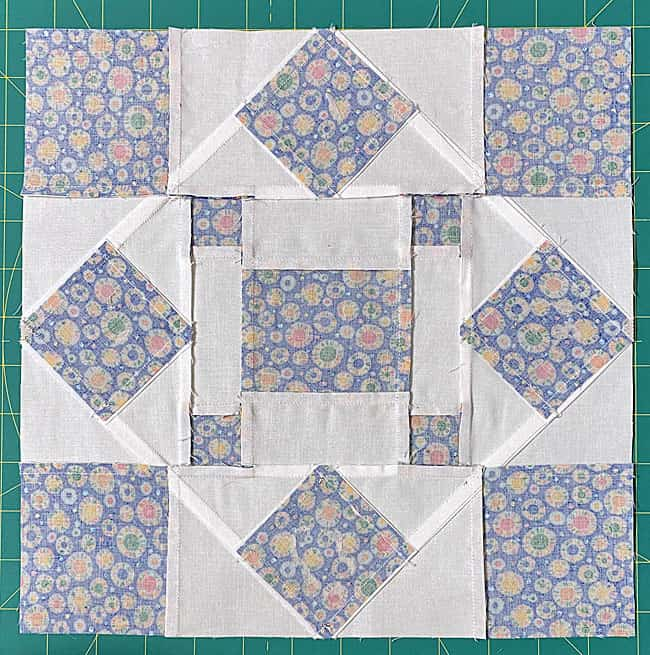
You did it! ⛵
Your Hull's Victory block is a real stunner, and those seams? Smooth as butter! 🎯
Give yourself a high-five and maybe treat yourself to a little more fabric (because we both know that stash isn't going to grow itself!).
Until we meet again, may your thread never tangle and your needles never break! 🪡 🚢
📌 Navigate Back Later!
Don't let this treasure map drift away. Pin it for your next quilting voyage!
For even MORE blocks to make... 🧩🎨

...visit our Free Quilt Block Pattern Library, with over 230+ blocks to choose from in multiple sizes.
Free downloads are included in all sizes for any blocks require paper piecing patterns or templates.
- Home
- Free Quilt Block Patterns
- Hull's Victory Quilt Block
