This post contains affiliate links for which I receive compensation
How to Quilt a Quilt Pattern
by Barbara
(Tucson, AZ)
I have completed a 'Steps to the Altar' quilt and don't know how to quilt it. Any ideas?
Reply
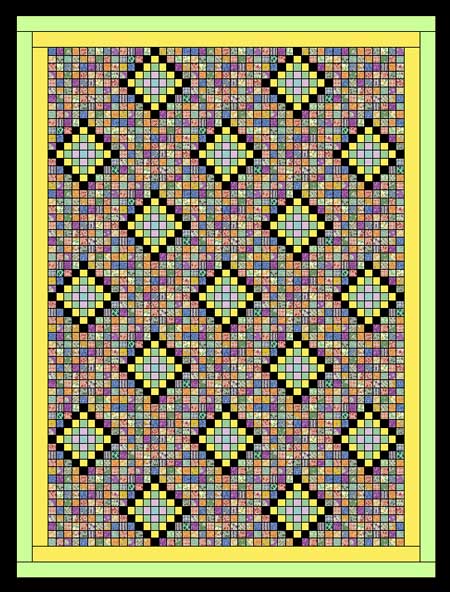
There is a quilt pattern known as "Steps to the Altar" (shown below), as well as a quilt block by the same name.I am working on the assumption that this is the quilt pattern that you have finished.

Steps to the Altar Quilt Pattern
First, CONGRATULATIONS! It's so nice to get to the end of piecing a top and hold in our hands what we envisioned when we first started on this quilt's journey!
The Focal Point(s)
For this particular quilt pattern, the focal point of the quilt is the area contained within the black squares. Your fabrics in the focal point area are probably lighter and less busy. Your quilting WILL SHOW here, so this is the place to put your quilting designs.They can be as fancy and ornate, or as simple and elegant as your free motion machine quilting skills allow. You can use the same design and repeat for each black square or used different but related quilting designs for these areas. The choice is up to you.
The Background Quilting
The area outside of the black squares is very busy because of the many small pieces. For this area, I would suggest using one of the many free motion background fill patterns. The quilting is less likely to show so it's a good place to practice your skills.The other benefit to a free motion fill pattern is that you'll have fewer stops and starts to make, avoiding all that tying off.
Choose a clear monofilament thread (you'll need to test both smoke and clear to see which works best for you). The nice thing about monofilament is it can be used over many different fabrics and still be inconspicuous. What the viewer sees most is the texture created by the quilting stitches rather than the stitches, themselves.
If clear thread isn't for you, then choose a nice 50 wt cotton thread in a value that blends with as many of your fabrics as possible. Again, you'll be left with more of the texture of the quilting. This lets your stitching in the black squares shine.
Quilting with Your Walking Foot
If free motion quilting isn't your forte, you could easily just stitch in the ditch for the entire quilt. However, ditch quilting does get boring for a large project. (All of the quilting in the Birthday Quilt was done with a walking foot. Thrilled to have the finished quilt...but, MAN! was it boring to do!)To get a 'jazzier' finished project, but still using your walking foot, try quilting on the diagonal through all the blocks, aiming from corner to corner for each square so that you don't have to mark anything.
Be sure to use plenty of safety pins for basting. Since all the quilting is done on the bias, there is a tendency to pull the quilt out of square. Use enough pins and that shouldn't be a problem.
NOTE: If you're OK with washing your finished quilt, then I would suggest basting with water soluble thread in several vertical and horizontal lines across the quilt top to help stabilize it.
To create a different illusion, instead of ditch quilting, why not try stitching through the center of each block both vertically and horizontally.
You may need to do some marking to keep the lines straight. Unlike the corner to corner quilting, there are no landmarks to aim for. The resulting quilt, from a distance, will give the illusion there is more piecing in the top than you actually did. I saw this on a Lone Star quilt by Ricky Tims at a show several years ago and had to getthisclose to understand the quilting just made it look like there was more piecing.
Readers, if you've got ideas for quilting this...just use the 'comment' link below. We welcome your suggestions!
Barbara, I hope this has gotten your quilting juices flowing. Do let us know how your quilt turns out. Better yet! Once it's finished, upload a picture of it to our online Show and Tell for everyone to enjoy.
Piecefully,
Julie Baird
Editor


