- Home
- Beginner Quilt Blocks
- Half Rectangle Triangle
The Half Rectangle Triangle Quilt Block ~ No special Ninja-Quilting skills required
All that spiky goodness made easy!
This post contains affiliate links, for which I receive compensation.
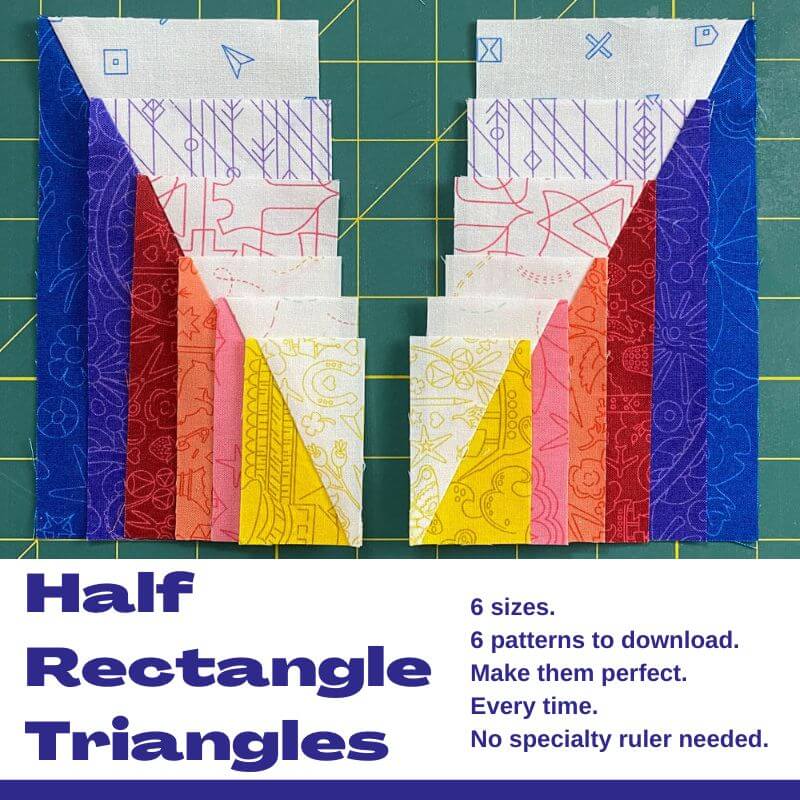
A kissin' cousin of the half square triangle, the half rectangle triangle is an uncommon unit in the quilting world.
The sewing isn't hard—there's only one seam!
It's the sewing a perfect 'scant' 1/4" seam on a bias edge or figuring out how to trim the little bugger that makes it a bit tricky.
In this tutorial, we skip the pricey specialty rulers. We'll use what you've already got to make half rectangle triangles that come out exactly right every time.
All you have to do it sew on a line and square up a block.
In this tutorial, you'll find:
- An introduction to this rectangular unit that includes a definition and takes you through the 'anatomy' of an HRT and why they're trickier to trim than HST
- A cutting chart in 6 sizes that you can download, plus the details of cutting for mirror imaged units
- What? Don't need this unit right now? Pin or bookmark it for later when you do!
What is a Half Rectangle Triangle?
A half Rectangle Triangle is a rectangle twice as tall as tit is wide, split in half by a single diagonal seam. This seam runs from either lower right to upper left or upper right to lower left.
A Half Rectangle Triangle is frequently abbreviated as HRT in a quilt pattern.
Anatomy of an HRT
At first glance, this unit created from two identical-looking patches should be easy to construct. And truthfully, the sewing is incredibly easy—it's a single seam.
But this is an asymmetrical block and it can be a bit tricky.
Seams look different than usual
When shown as an illustration in a finished block or quilt design or as a diagram in a quilt pattern, you see the image on the left (below).
However, when you're finished sewing the unit together, it looks like the right. (The dashed lines represent the finished size after the unit is stitched into a block or quilt.)
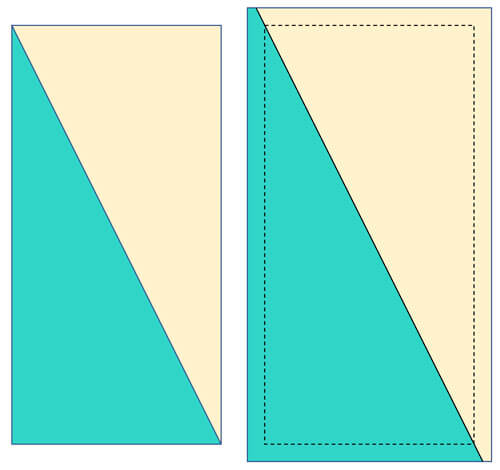 Half Rectangle Triangles, finished (left) and unfinished (right)
Notice in the unfinished unit, the seam doesn't cut the corner in half like a Half Square Triangle does. Rather, it falls an 1/8" away from the edge for these rectangles that are twice as tall as they are wide.
Trimming an oversized unit to the perfect size is more fiddly and requires more firing brain cells to get it right.
Trimming patches requires your undivided attention
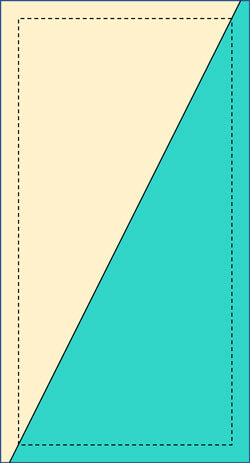 Unfinished HRT with a seam that runs from lower right to upper left
The seam in an HRT can run from either upper left to lower right as shown previously above, or lower left to upper right as show here (right).
Whether your quilt fabric is right side up or right side down makes ALL the difference when you cut your patches.
Because it's important, this information is included in the cutting charts below.
Make HRT the easy, foolproof way
I don't know about you, but stitching up perfect little units makes it so much easier and faster to assemble your blocks...with accuracy.
And if I'm only going to make a block a few times, buying a specialty ruler for that bit of piecing seems like a waste of money—and storage space when the project is complete.
My preferred method to make these units is paper piecing. They always come out perfect.
And the trimming—usually the tricky part—is straightforward and easy. No fiddly 'inside' 1/4" SAs to line up.
You'll find all you need below to use this technique yourself.
Ready? Let's cut up. And Sew!
General Instructions
Several abbreviations are used on this page. They are:
- SA - seam allowance
- RST - right sides together
- HRT - half rectangle triangle
A 1/4" SA is used throughout this tutorial.
Pressing instructions are highlighted in yellow to make them easy to spot.
For BEST RESULTS!
Starch your quilt fabric before cutting. Your fabric will shift less as you cut, sew, and press your way through this tutorial.
[Find more information about how to starch your fabrics here.]
Download and print paper piecing pattern(s)
Each pattern page you print contains at least one mirror imaged PAIR of single HRTs, more if they will fit. Most block patterns that use this unit take 4 pairs. The chart below shows how many are contained in each copy.
After printing, the patterns DO look backwards compared to the finished units.
It's okay.
That's how paper piecing works for asymmetrical units.
You'll need the most current version of Adobe installed on your computer to download the pattern.
On the Adobe Print Menu page, under 'Page Size and Handling' set 'Custom Scale' to 100% before printing for accurate results. Click here to see what it looks like on the Print Menu page.
DO NOT select 'Fit to Page' or 'Scale to Fit' in your printer settings. Doing so enlarges or reduces the templates and patterns. They will be the wrong size and need to be reprinted.
 | Printing Chart for~ Paper Piecing ~ |
|---|---|
  # of HRT pairs per copy | Finished Block Size |
| 4 | 1" x 2" |
| 4 | 1¼" x 2½" |
| 3 | 1½" x 3" |
| 2 | 2" x 4" |
| 1 | 2½" x 5" |
| 1 | 3" x 6" |
After printing, use the 1" square graphic on the printed page(s) to double-check that your patterns are printed at the correct size.

Not sure which paper to use?
Have a look at my review of several of the most popular brands available to us quilters on the market.
My personal preference is for a super-easy paper to tear away—less stress on the stitches.
Since there's only one seam in each block, it's perfectly fine to use the cheapest printer paper that will go through your machine. Cheaper usually means thinner.
Step 1: Cutting patches for Half Rectangle Triangles
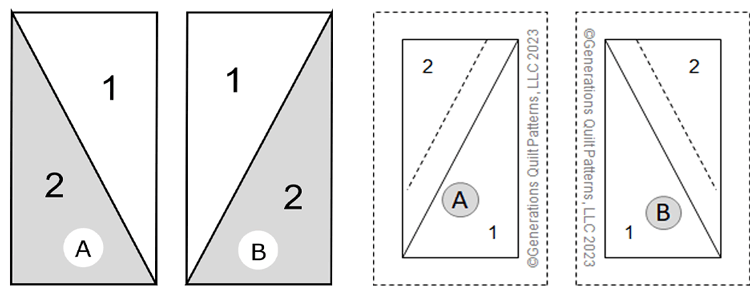 Half Rectangle Triangle units, A & B, from fabric side (left) and pattern side (right)
Sample Block Size: 2½" x 5" finished / 3" x 5½" unfinished
Grid: 1x2
AKA: Split Rects (when using the Split Recs ruler by Studio 180 - find a tutorial for that ruler here.
Design Type: Rectangles
This cutting instructions in the chart below make a pair of mirror-imaged HRT.
As you stitch these units, be aware that the pattern is the reverse of the finished HRT.
To print a copy of the block design and cutting chart to use at your cutting table, click here.
 | Cutting Chart for a~ Paper Piecing ~ | |
|---|---|---|
| Finished Size | Unfinished Size | Cut 1 each from Fabric 1 and Fabric 2 per pair of HRT Width x Height |
| 1" x 2" | 1½" x 2½" | 2⅞" x 3¼" |
| 1¼" x 2½" | 1¾" x 3" | 3⅛" x 3¾" |
| 1½" x 3" | 2" x 3½" | 3⅜" x 4¼" |
| 2" x 4" | 2½" x 4½" | 3⅞" x 5¼" |
| 2½" x 5" | 3" x 5½" | 4⅜" x 6¼" |
| 3" x 6" | 3½" x 6½" | 4⅞" x 7¼" |
Subcutting the rectangles
Some patterns require pairs of mirrored imaged units. Others use half rectangle triangles with the seam allowance all in one direction. Each has its own subcutting instructions.
For pairs of mirror-imaged HRTs

Layer each pair of Fabric 1 and Fabric 2 rectangles right sides together. Short edges (Width) top and bottom. Long edges (Height) on the sides.
With a pencil and your ruler, make a tiny mark 5/8" in from the top-left side.
Make another tiny mark 5/8" in from the bottom-right side.
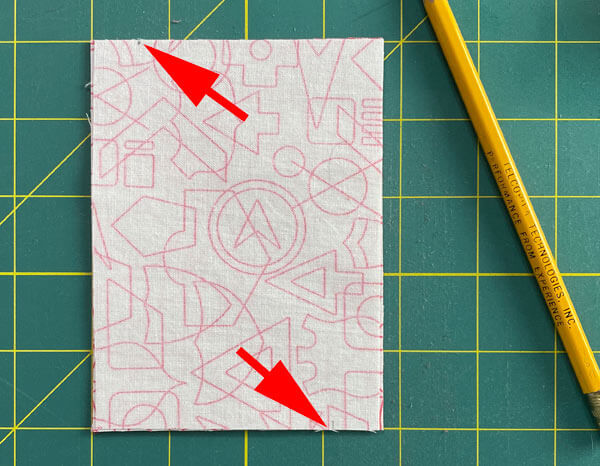 In this stack there are 2 background rectangles, right sides together, and two red rectangles, right sides together.
Align your ruler at the mark at the edge of your fabric, top and bottom. (This is so we get the angle of our cut right.)
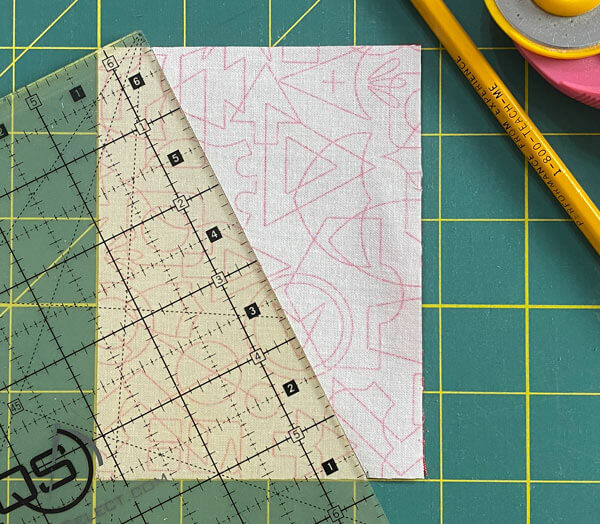 Align your ruler with the top and bottom edges at the mark
Cut along the edge of your ruler with your rotary cutter.
You now have patches to make 2 pairs of mirror-imaged HRT.
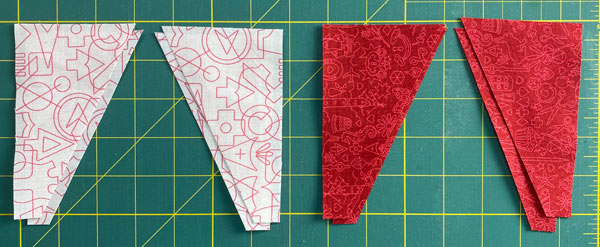
For units with the SA all in one direction—all Unit A or all Unit B
Sometimes the quilt pattern uses half rectangle triangles that are all the same instead of mirror imaged.
For units with the SA allowance in only one direction, place all the Fabric 1 and Fabric 2 rectangles wrong side up on your cutting mat, short edges are at the top and bottom. That way the angle of your cut will match the angle on the paper pattern.
The sewn unit is the mirror image of the pattern.
Cutting for Unit A's only
Mark 5/8" in from upper right and from lower left.
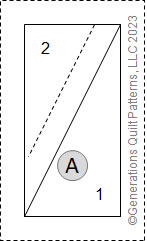 The pattern
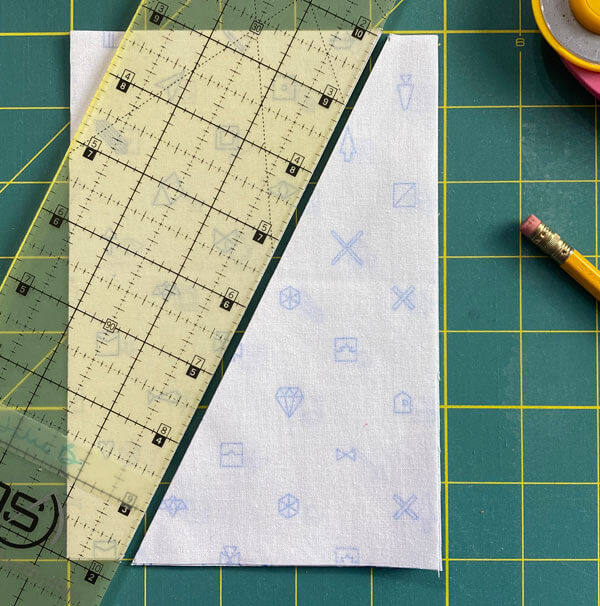 Subcutting rectangles for Unit A
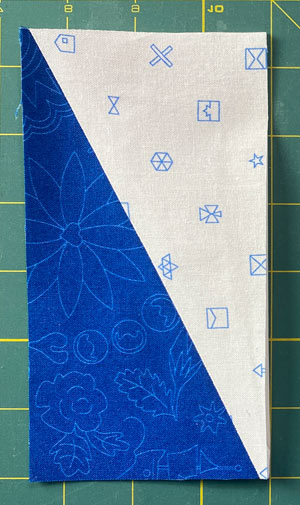 Unit A after stitching
Cutting for Unit B's only
Mark 5/8" in from upper left and lower right.
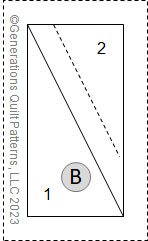 The pattern
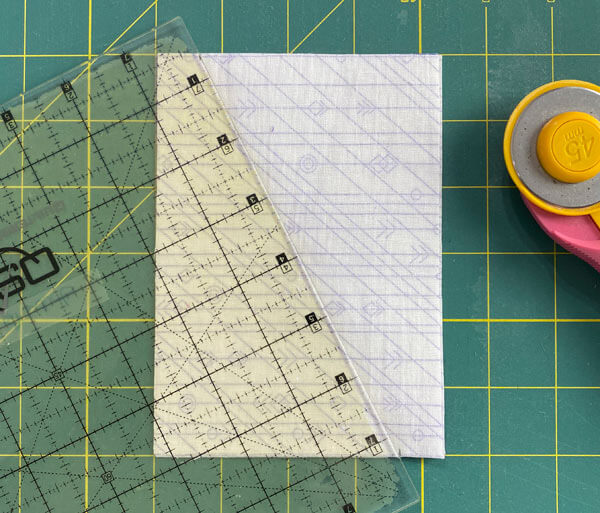 Subcutting rectangles for Unit B
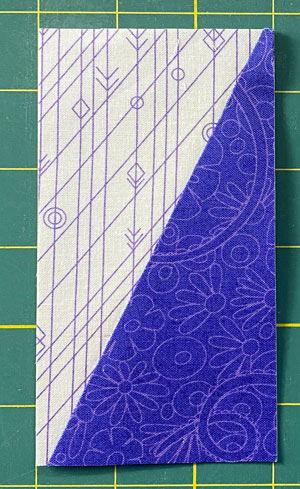 Unit B after stitching
Step 2: Make the Half Rectangle Triangles
Since we're paper piecing these little beauties, we'll need to set up our sewing machine a bit different.
General Sewing Machine Setup for Paperpiecing
- Reduce your stitch length to 16–20 stitches per inch (1.3-1.6 mm). This perforates the paper and stabilizes the seam when you remove the pattern. [Learn more about stitch length here.]
- Reduce your machine's speed or just plain slow down. Sew only as fast as you can stay on the stitching lines.
- Install an open toe appliqué foot (sometimes called an 'embroidery' or 'satin stitch' foot) if you have one (it's easier to see where you're stitching with one installed).
- Use a larger needle (90/14) if you have problems removing the pattern.
- If your machine has a needle stop up, use it. The stitching goes faster when you don't have to lift the presser foot with every seam.
- As you stitch each seam, start and stop a generous 1/4” before and after the solid stitching lines. ALWAYS. Future lines of stitching secure the ends.
After adding each patch, press the unit as it was sewn to set the seam and then open. The SA is automatically pressed towards the last patch added.
Before adding the next patch, take a look to make sure the one you just added covers the space plus seam allowance that it is supposed to.
Steam is optional and usually curls the pattern.
If that bothers you, don't use steam. Sometimes I do. Sometimes I don't.
It truly depends on my mood.
Remember, as you follow this paper piecing tutorial, the printed and the fabric sides of this block are mirror-images of each other.
At last!
Let's sew!
Use the smallest dab of Elmer's Washable Glue Stick to stick the backside of the #1 patch to the unprinted side of the pattern. Use the dashed line for quick, accurate placement the first time.
Your fabric should stick out past the dashed outline of the unit by roughly 1/4" on the top, bottom, and one side with the long bias cut aligned with the dashed placement line at the red arrow.
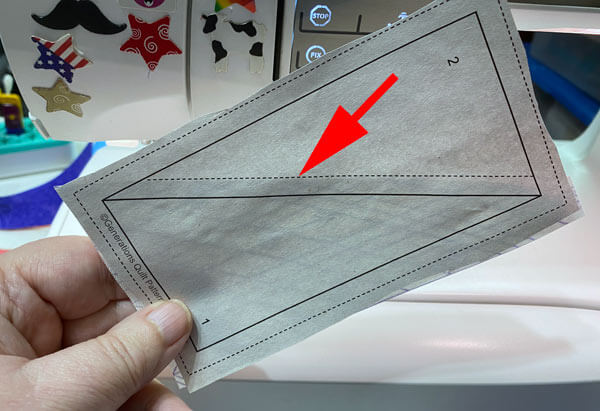 Position #1, wrong side to the unprinted side of the pattern, using the dashed guideline for quick placement
With RST, layer the #2 patch on top of the #1. The ends will extend as show below. (Remember these patches are cut generously to make placement as foolproof as possible.)
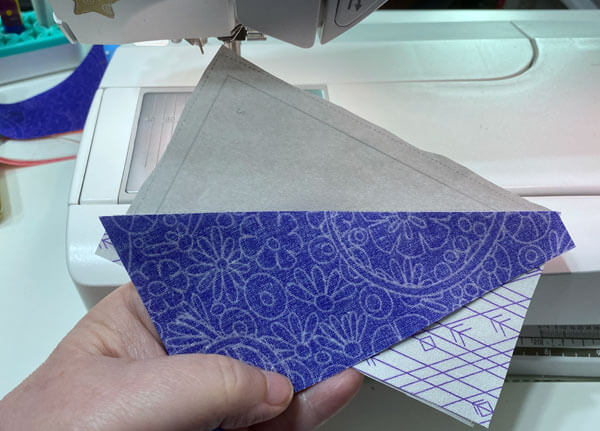
Sew on the solid line between #1 and #2, starting (red arrow) and stopping past the outside solid line of the block.
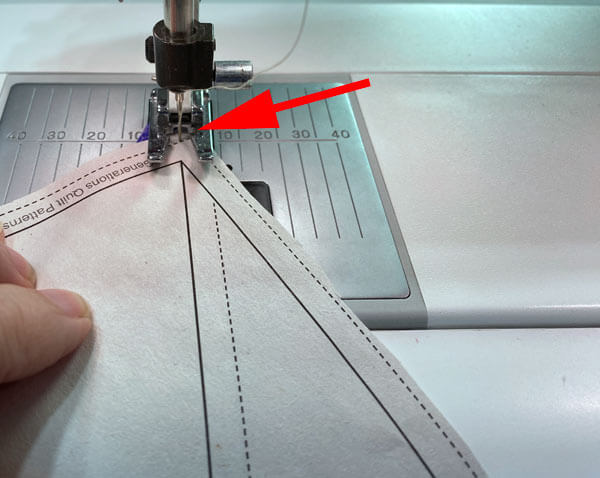
Since the seam line goes from one edge to the other, you CAN chain piece these units.
After stitching, press the units flat to set the seam, and then towards the #2 patch.
If you've starched your fabrics, use your thumbnail to fingerpress open the seam and avoid the possibility of a tuck.
Here's the beauty of this Half Rectangle Triangle technique
At this point, you've got an oversized HRT.
Since a perfect unit is easier to stitch into a block and get the points to match—it's time to trim.
At your cutting mat, align the 1/4" mark on your ruler with the solid stitching line (red arrow) on one side of your HRT to create the perfect 1/4" SA. (You'll trim away roughly 1/4" of excess fabric.)
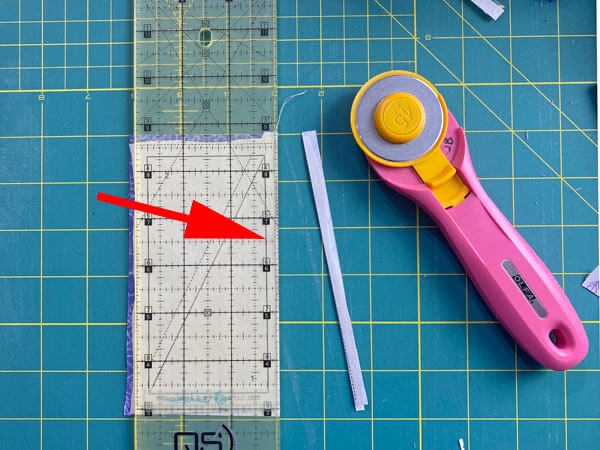
Rotate and trim three more times until your unit is complete.
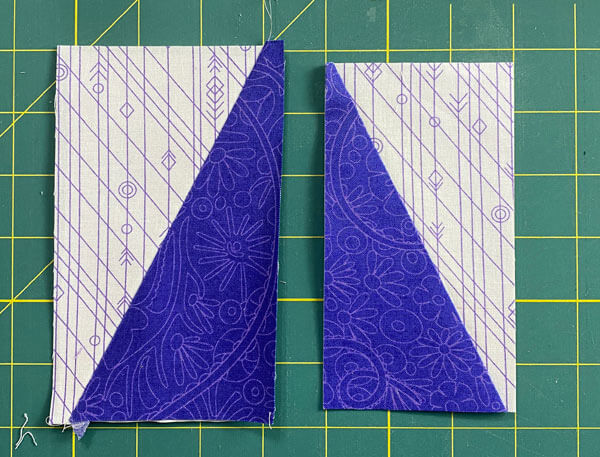 Untrimmed, hot mess Unit B (left) and perfectly sized Unit A after trimming (right)
Since our outside edges are all cut on the straight of grain, you can remove the paper now.
Repeat for your remaining HRTs.
Give them a final press.
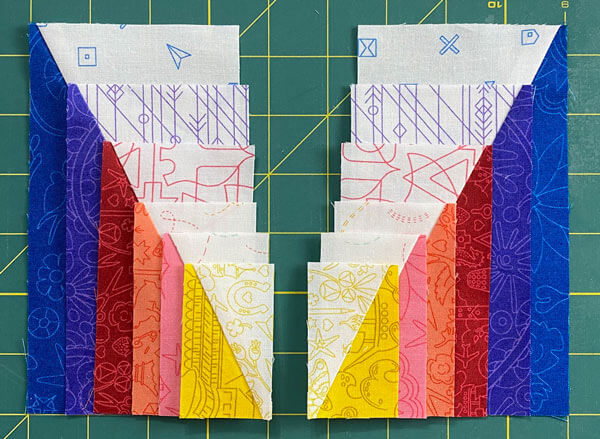 Finished A and B units in all 6 sizes
No specialty rulers needed.
No fiddly trimming to do, just straightforward squaring up a block.
Who doesn't love that?
If you're a gadget girl and love new tools...
There's always more than one way to get things done in quilting, and making half rectangle triangles is no different.
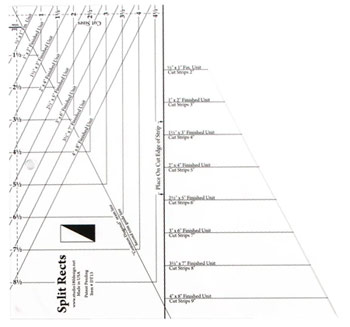
If you love your rulers, I can personally recommend the Split Rects Ruler by Studio 180—it's a trim down ruler. You'll find a tutorial, cutting chart, and my thoughts after using it for several projects here.
Of course, tips are included that I found helpful that aren't in the directions that come with the ruler.
If your seam allowance to always perfect, then perhaps you would prefer the Recs ruler out of the Tri Recs combo ruler. You'll find more information about the Tri Recs here.
What about a different quilt block?
For a list of all the 220+ quilt block patterns on this site, start here.
If you know the name of the block, shorten your search by using these links:
Click here if you're looking for blocks with at least some paper piecing.
Click here if you're looking for the basic building blocks of quilting, i.e., Flying Geese, half square triangles, quarter square triangles, etc., along with several techniques to make each.
And finally, use these links to find blocks in these finished sizes:
- Home
- Beginner Quilt Blocks
- Half Rectangle Triangle
