- Home
- Free Quilt Block Patterns
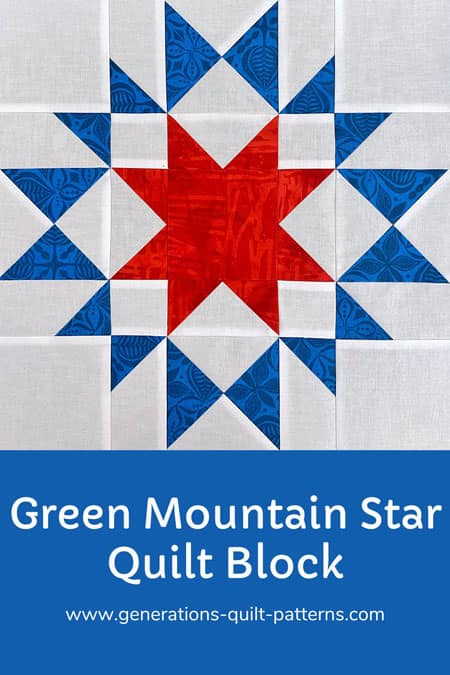
- Green Mountain Star Quilt Block
Summit Success: The Green Mountain Star Quilt Block Tutorial 🏔️
Quilting sherpa included - we'll guide you to the peak! 🎯
This post contains affiliate links, for which I receive compensation.
Ready to scale the heights of quilting mastery? The Green Mountain Star quilt block is your next peak to conquer!
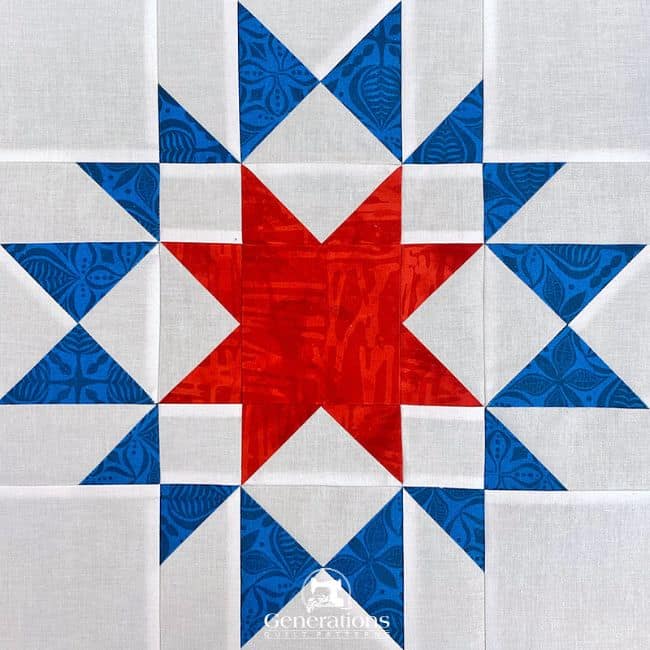
Like any successful summit attempt, we've got your gear list (cutting chart), trail map (step-by-step instructions), and experienced guides (detailed photos) ready for your ascent.
Lace up your quilting boots—this is one climb you won't want to miss! 🏔️
🧭Welcome to base camp!
These trail markers will help you navigate directly to any section of your Green Mountain Star journey. 🎯
- A cutting chart in five sizes, with downloads of the chart and block design
Cut. Sew. Press. From base camp to breathtaking summit views! 🏔️
📥 General Instructions
Several abbreviations are used on this page. They are:
- SA - seam allowance
- RST - right sides together
- HST - half square triangles
- QST - quarter square triangles
- FC - folded corners
A 1/4" SA is used in this tutorial.
Highlighted in yellow, pressing instructions are easy to spot.
The patches are pressed in the closed position as they came off your sewing machine. This sets the seam, melding the fibers of the threads into the fibers of the fabric.
Then press the SA to the dark unless otherwise noted.
The newest quilt fabrics to tickle your fancy...
Click the images below to see the full collection. We share any commercial and/or free patterns that showcase them, too. (For inspiration, of course!)
✂️ Cutting patches for a Green Mountain Star quilt block

Sample Block Size: 12" finished / 12½" unfinished
Grid: 8×8
AKA: Aunt Mary's Star (Clara Stone)
Design Type: Star | Uneven 9-patch, small center
Like any well-planned expedition, organization is key. Label your patches carefully - these numbers are your compass points as we climb.
 | Cutting Chart for a~ Traditional Piecing ~ | ||||||
|---|---|---|---|---|---|---|---|
| Patch | Fabric | Qty | Finished Block Size | ||||
| 8'' | 10'' | 12'' | 16'' | 20'' | |||
| QST1 | Bac | 2 | 3½'' x 3½'' | 4'' x 4'' | 4½'' x 4½'' | 5½'' x 5½'' | 6½'' x 6½'' |
| QST2 | Dark | 2 | 3½'' x 3½'' | 4'' x 4'' | 4½'' x 4½'' | 5½'' x 5½'' | 6½'' x 6½'' |
| Goose.1, 2 | Bac | 12 | 1½'' x 2½'' | 1¾'' x 3'' | 2'' x 3½'' | 2½'' x 4½'' | 3'' x 5½'' |
| Sky.1 | Med | 8 | 1½'' x 1½'' | 1¾'' x 1¾'' | 2'' x 2'' | 2½'' x 2½'' | 3'' x 3'' |
| 1 | Bac | 4 | 2½'' x 2½'' | 3'' x 3'' | 3½'' x 3½'' | 4½'' x 4½'' | 5½'' x 5½'' |
| 3 | Dark | 8 | 1½'' x 1½'' | 1¾'' x 1¾'' | 2'' x 2'' | 2½'' x 2½'' | 3'' x 3'' |
| 4 | Bac | 4 | 1½'' x 1½'' | 1¾'' x 1¾'' | 2'' x 2'' | 2½'' x 2½'' | 3'' x 3'' |
| 5 | Med | 1 | 2½'' x 2½'' | 3'' x 3'' | 3½'' x 3½'' | 4½'' x 4½'' | 5½'' x 5½'' |
| Unfinished Block Size | 8½'' | 10½'' | 12½'' | 16½'' | 20½'' | ||
| Grid Size | 1'' | 1¼'' | 1½'' | 2'' | 2½'' | ||
✏️ Marking
With the Folded Corners technique, we've got some marking to do.
I like to use a mechanical pencil, either like the Bohin with chalk, or like the ones we use at our desk (used for these patches). Regardless of how many lines we mark, the line stays consistently fine.
Draw a diagonal line on the backsides of the following patches:
- Two QST1s
- Eight Sky1
- Eight #3s for the FC Rectangles
This line should go directly through the center of the corners for accuracy and only be as dark as YOU need to see it while stitching.
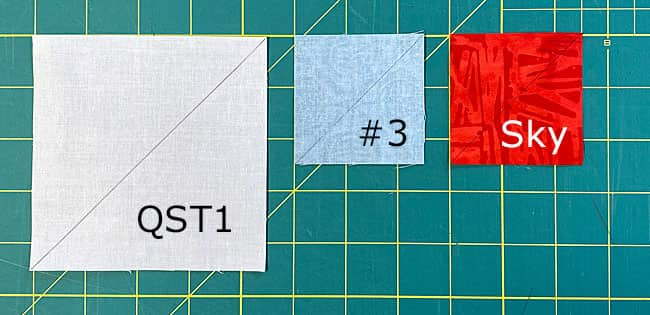 One of each patch that needs to be marked: QST1, #3, and Sky
🪡 Assemble the units for a Green Mountain Star
Quarter Square Triangles (QST)
Make 4
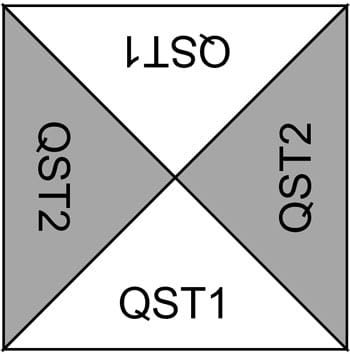
With RST, layer a QST1 and QST2 square, pin if it's helpful, and with your trusty 1/4" presser foot installed, stitch a 1/4" from both sides of the line.
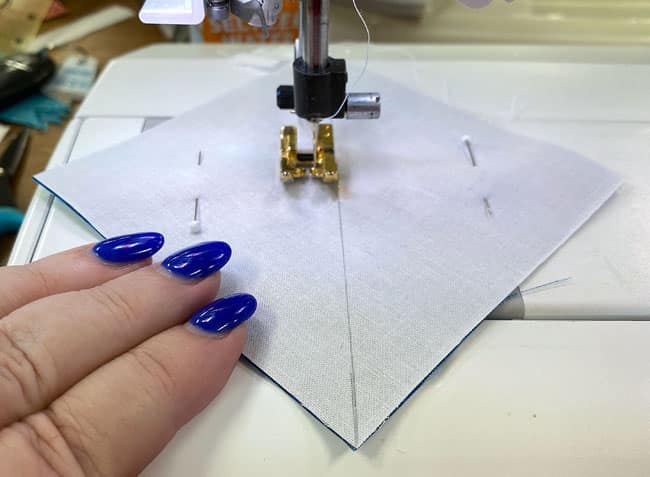
Press flat to set the seam.
Cut in half between the stitching lines.
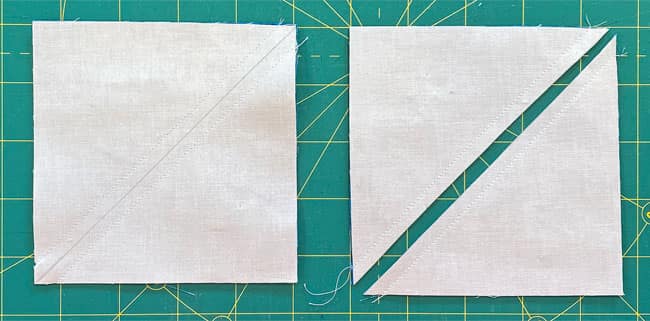
Press the SAs toward the darker fabric.
With RST, and the patches alternated, layer a QST1/QST2 patch, nesting the SAs.
Stitch.
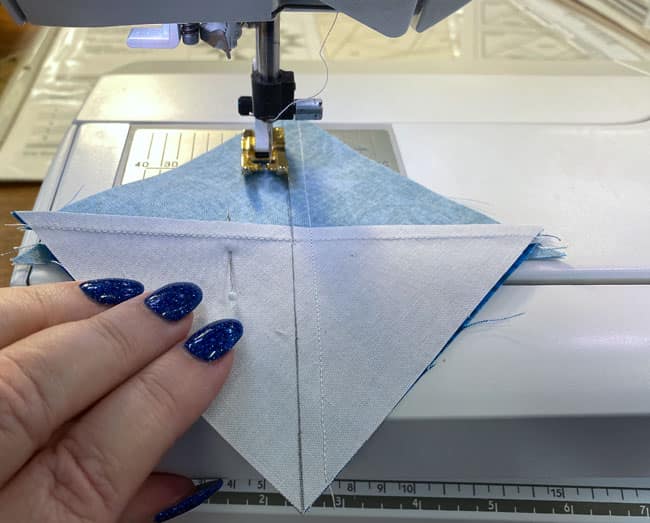
Press. This seam will have one of the light QST1 triangles with both SAs pressed away from it. We need this later on in construction.
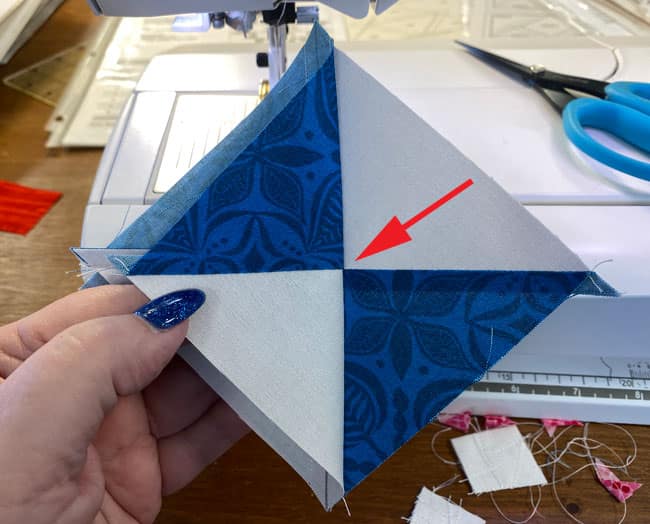
Use the chart below to find the Center measurement that corresponds to the Finished Block Size you're working on.
QST Dimensions | ||
|---|---|---|
| Finished Block Size | Center Measurement | Trim QST to… |
| 8" | 1¼" | 2½" x 2½" |
| 10" | 1½" | 3" x 3" |
| 12" | 1¾" | 3½" x 3½" |
| 16" | 2¼" | 4½" x 4½" |
| 20" | 2¾" | 5½" x 5½" |
At your cutting mat with a square ruler (because it's got a diagonal line running from corner to corner), position that measurement on your ruler directly over the intersection of seams in the middle of the QST.
For our 12" sample, the Center is at 1¾".
Then align the diagonal line on the ruler, with the diagonal seam as shown below. (upper-right corner of ruler to lower-left corner of the QST)
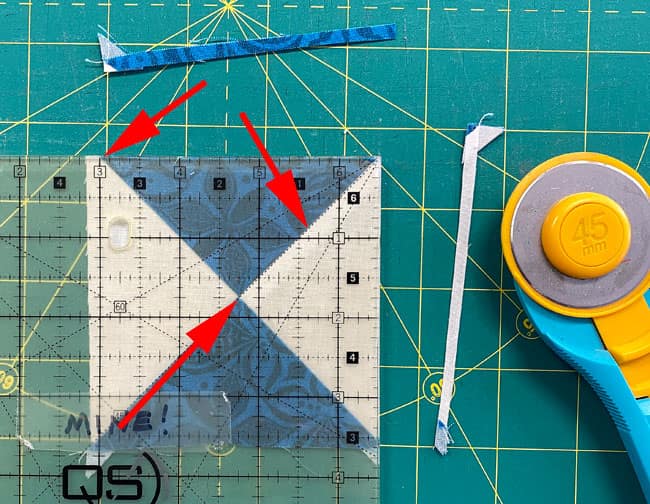
Trim away the exposed excess fabric on two sides.
Turn the QST so that the trimmed edges are both underneath the ruler. Align the edge-to-edge measurements with the cut edges. For our 12" sample, it's 3½".
Check these other points:
- The diagonal line is directly over one seam line
- The Center measurement is over the intersection of the seams
Once these are in position, trim away the remaining two exposed edges.

Repeat for a total of four QST.
Flying Geese (FG)
Make 4
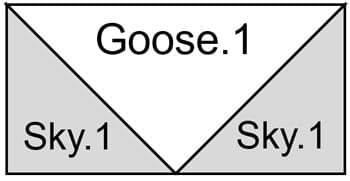
With RST, layer a marked Sky.1 with the short edge of the Goose.
Stitch just on the side of the line closest to the corners to account for the turn of the cloth taken up in the SA.

Press the Sky.
Do the edges meet? (blue arrows) This determines whether the Goose's top point and corner seams are in the correct position.
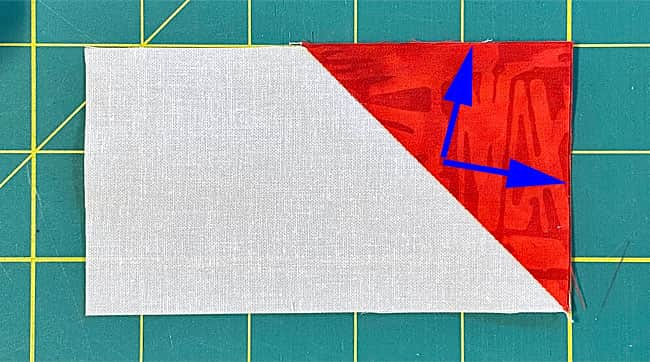
When they do, trim away the excess, leaving behind a 1/4" SA.
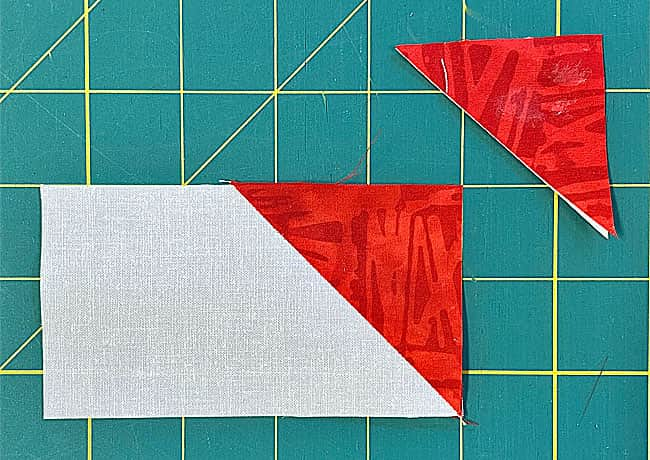
Add the second Sky.1 following the same steps.
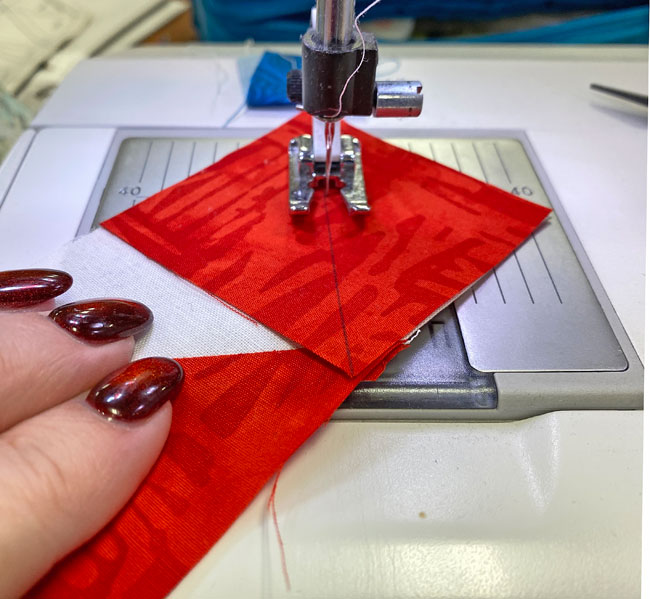
Repeat for a total of 4.
The Sawtooth Star center
Make 1
Arrange the 4 FGs, medium #5 and four background #4s as shown below.
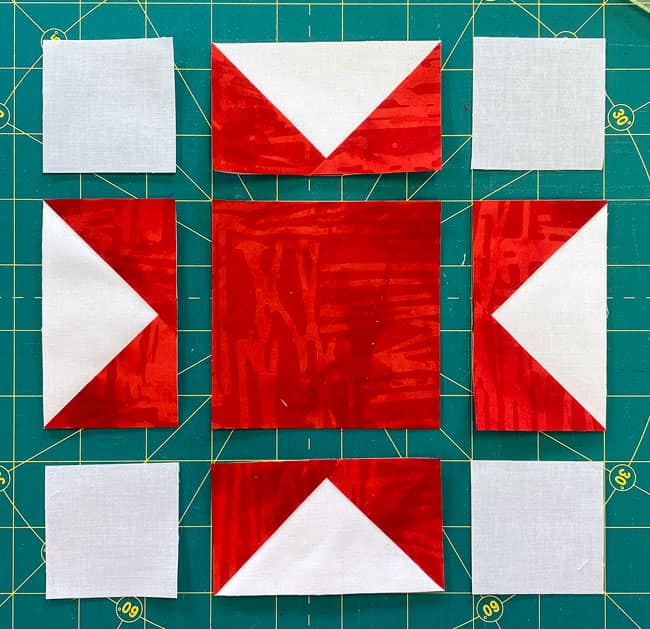
Sew the units into rows, pressing the SAs away from the FG in each row.
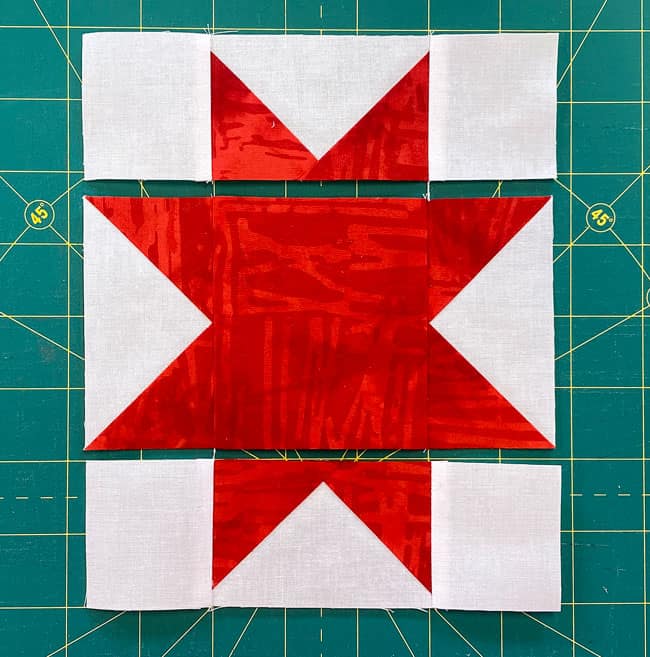
Stitch the rows together. These last two seams are pressed toward the center.
Folded Corner Rectangles
Make 4 pairs of mirror imaged patches
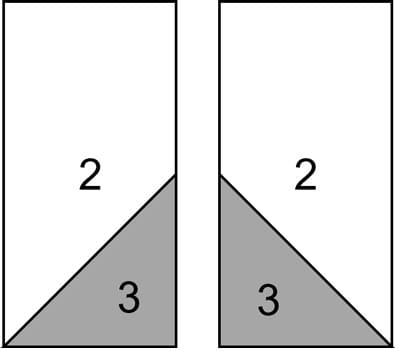
With RST, layer a #3 with a #2, the mark is angled from lower left to upper right.
Layer a second pair with the mark angled from upper right to lower. This creates the mirror-imaged units we need. (below, left)

Stitch on the side of the line closest to the corner for accuracy. (above, center)
Press and then check for accuracy, i.e., when the #3 squares are pressed into position and toward the corners all the edges should be even. Make any needed adjustments. When the edges are even, trim away the excess, leaving behind the 1/4" seam allowance. (above, right)
Sides
Make 4
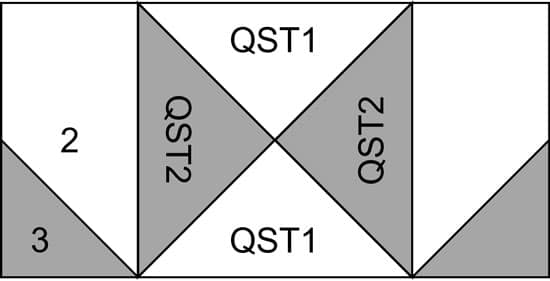
Place your #2/#3 folded corner rectangle, with the dark #3 triangle facing you . For your QST unit, position it so the background fabric edge (where both seam allowances are pressed away) is also closest to you. This creates our path for perfect nesting.
You can see this two photos down from the backside of the stitched unit.
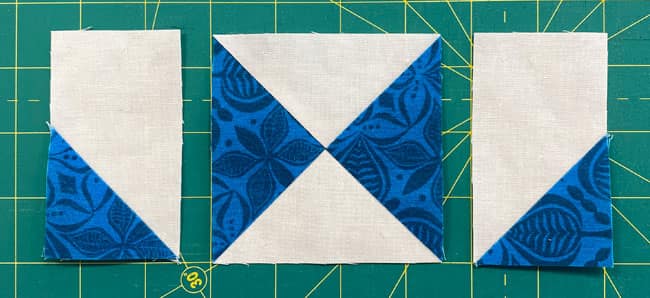
With RST, align and pin the long background edge of your #2/#3 rectangle to a dark side of your QST.
Here's where the magic happens. Those seam allowances will nest together perfectly, helping you get a good match between the points.
Repeat for the opposite side.
SA are pressed toward the QST.
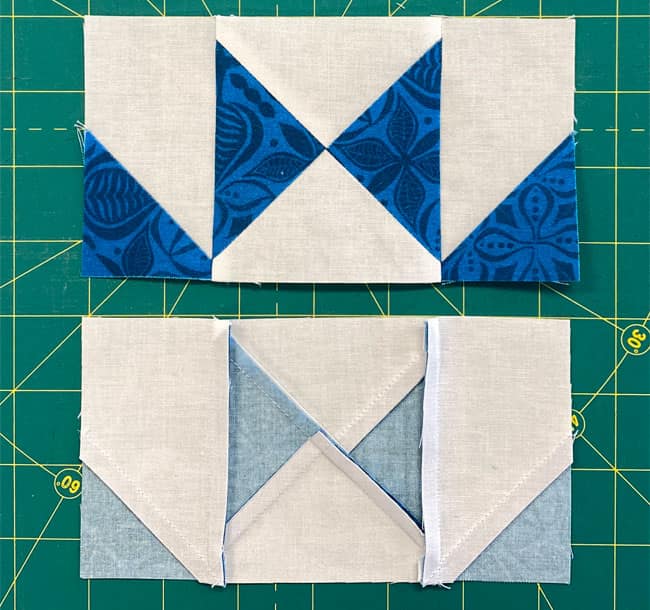 In the bottom image, you can see how the SAs on the bottom edge of the QST are pressed away from the background fabric. This enables the seams to nest.
Repeat for a total of 4.
🧩 The Final Assent: Assembling your Green Mountain Star quilt block
You've conquered each challenging section of the climb. Now it's time to bring all your hard work together at the summit.
Just like reaching a mountain peak, these final steps require attention to detail, but the view will be worth it.
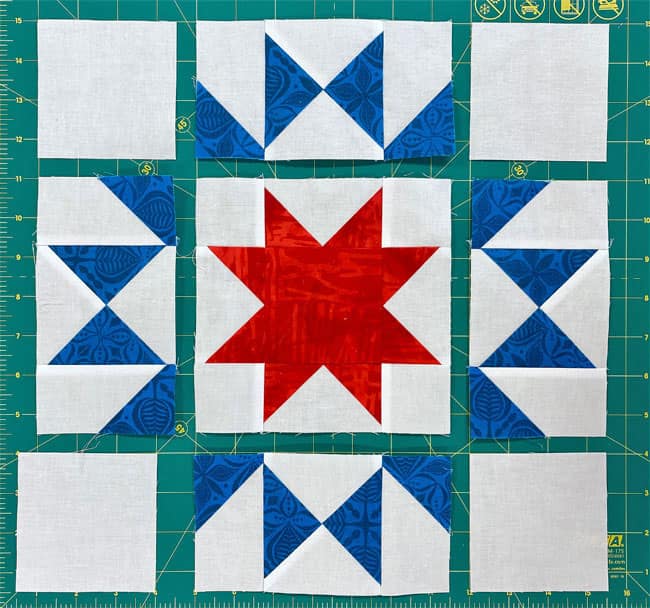
Layout
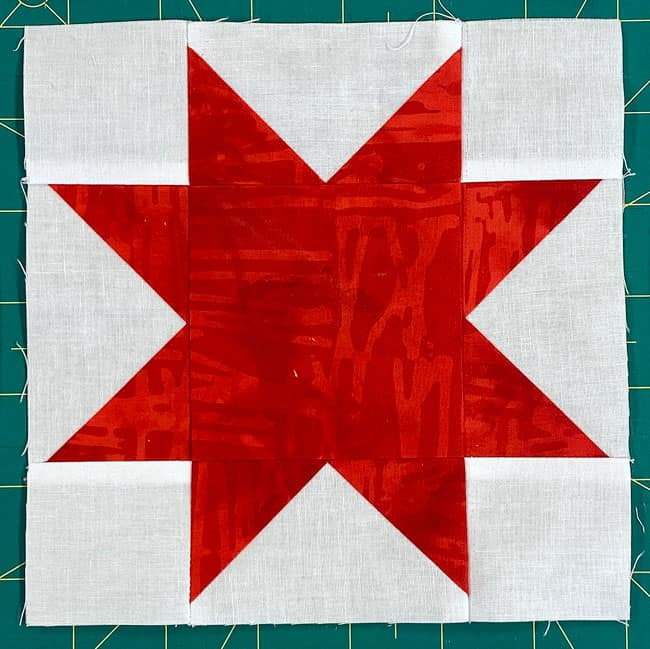
Take a moment to arrange your units following the photo guide below, creating your star formation. Background fabric should frame every edge.
Joining the rows
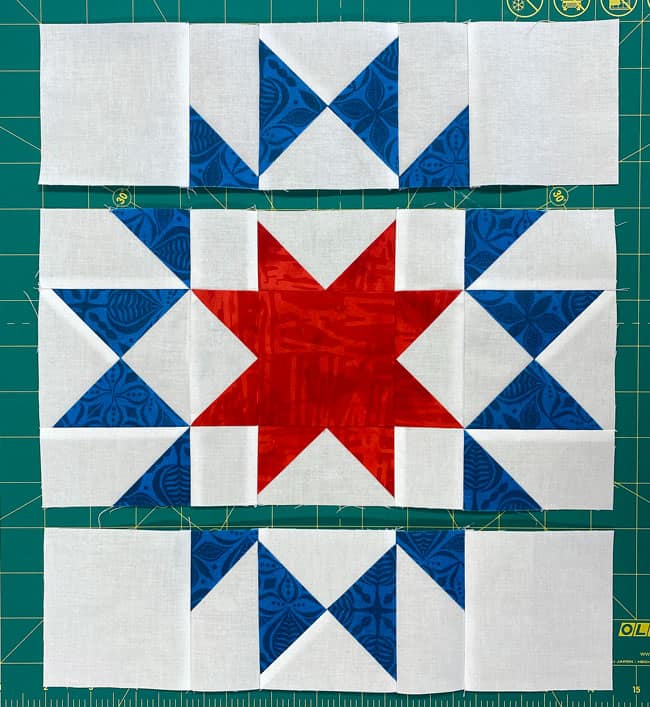
Stitch the units in each row together. Use pins to hold all the points in alignment as you stitch. Need a refresher on pinning techniques? Our Perfect Points article is your trusty trail guide
The SAs are pressed to the #4s in the top and bottom rows, and toward the Sawtooth Star in the center row.
Final assembly
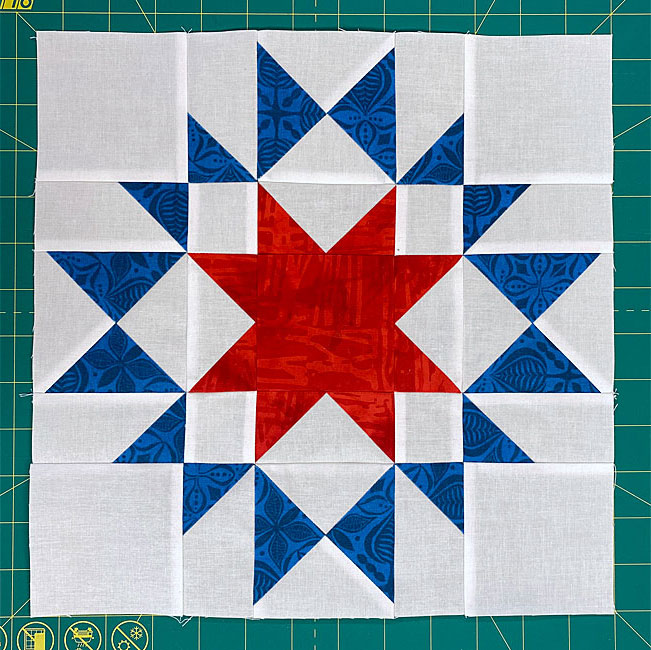
Finally, sew the rows together. Take time to pin those intersections where your points meet.
These final two seams are pressed away from the center.
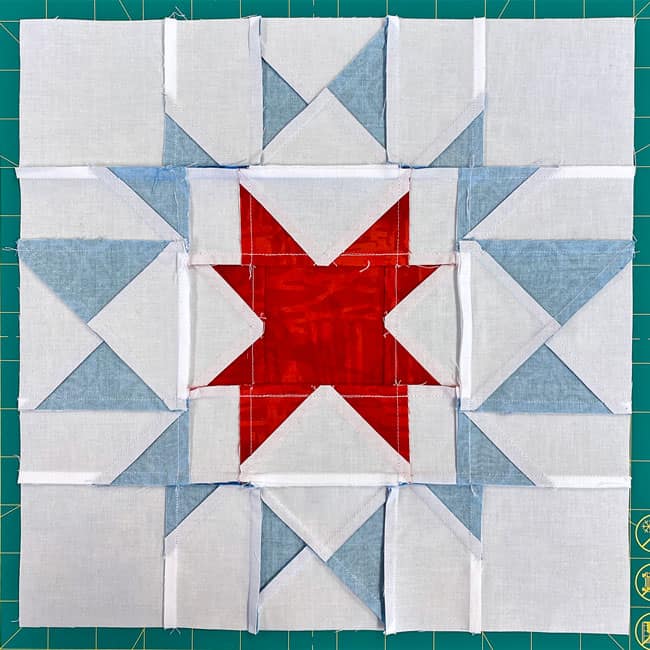
When you flip your block over, you'll see how beautifully those seam allowances nest together.
Trail's End: Your Mountain Star Masterpiece 🗻
Congratulations, intrepid quilter—you've reached the peak of the Green Mountain Star! 🌟 From precise Quarter Square Triangles to soaring Flying Geese, you've conquered every challenge this block presented. Those perfectly nested seams and precise points? They're your triumph markers, showing just how far you've come.
Remember, every quilting master started as a beginner who took that first brave step. Whether this was your first star block or your fiftieth, you've proven that any quilting summit is within reach.
Until we meet again, may your geese fly true and your stars shine bright! 🦅✨
📌 Summit Success Awaits!
🏔️ Don't let this quilting peak disappear into the clouds—pin this Green Mountain Star tutorial for your next fabric expedition!
🔭 Looking for something truly stellar?
You've finished your star quilt block, and you're ready for more!
Browse our collection of 60 stellar star quilt block patterns. All have instructions and cutting charts in multiple sizes. If templates or paper piecing is used in the tutorial, there's a free download for you of those materials.

Eeny. Meenie. Miney. Moe.
Which star quilt block will you sew?
For a star-studded quilting experience, choose from 100+ bedazzling star quilt patterns—for beginners and beyond—click here.
For even MORE blocks to make... 🧩🎨

...visit our Free Quilt Block Pattern Library, with over 230+ blocks to choose from in multiple sizes.
Free downloads are included in all sizes for any blocks require paper piecing patterns or templates.
- Home
- Free Quilt Block Patterns
- Green Mountain Star Quilt Block
