- Home
- Free Quilt Block Patterns
- Good Cheer Quilt Block
🏆
Perfect Points, Happy Hearts: Good Cheer Quilt Block Guide in 5 Sizes 🎊
From our Free Quilt Block Patterns Library
This post contains affiliate links, for which I receive compensation.
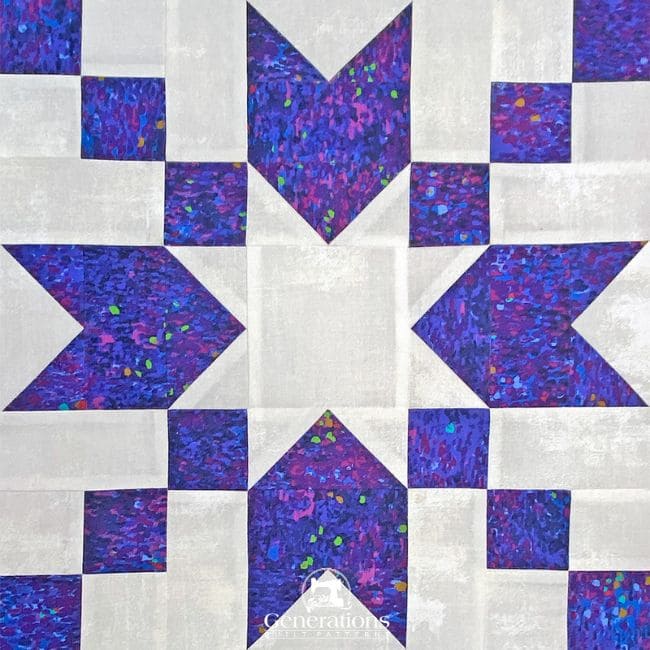
🌈✨ Happiness is just a stitch away with our Good Cheer quilt block tutorial! 🧵😊
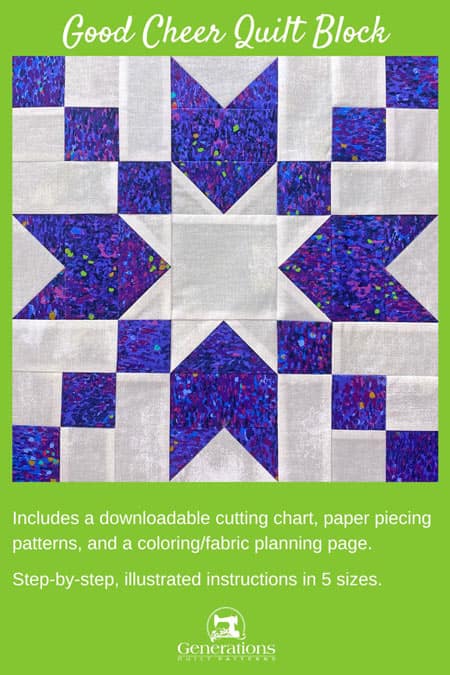
This peppy pattern is the perfect pick-me-up for your next quilting project. 🎉🧶 Featuring a clever twist on the classic 9-patch 🔲 and Flying Geese units 🦆, this block is guaranteed to put a smile on your face 😄 and a spring in your step. 🦘💃
Use these links to quickly move around the tutorial:
- A cutting chart in five sizes, with downloads of the chart and block design
Cut. Sew. Press. Get ready to spread some joy, one block at a time! 💖🌟
📋General Instructions
Several abbreviations are used on this page. They are:
- SA - seam allowance
- RST - right sides together
- HST - Half Square Triangles
- QST - Quarter Square Triangles
- FGChev - Flying Geese Chevrons
- FC - Folded Corners
A 1/4" SA is used in this tutorial.
Highlighted in yellow, pressing instructions are easy to spot.
Press the patches in the closed position as they came off your sewing machine. This sets the seam, melding the fibers of the threads into the fibers of the fabric.
SA are then pressed to the dark unless otherwise noted.
Download and print the paper piecing pattern
To download the pattern, use the most current version of Adobe.
For accurate results, on Adobe's Print Menu page, under 'Page Size and Handling' set 'Custom Scale' to 100%. Then print.
Click here to see what it looks like on the Print Menu page.
Find your finished block size from the chart below. Print the corresponding number of pages for a total of four Flying Geese Chevrons for each block you want to make.
Download and print the paper piecing pattern | ||
|---|---|---|
| Finished Block Size | # of copies to print | PDF Download Link |
| 8" | 1 | 2"x3" |
| 12" | 2 | 3"x4½" |
| 16" | 2 | 4"x6" |
| 20" | 4 | 5"x7½" |
| 24" | 4 | 6"x9½" |
After printing, use the 1" square graphic on the printed page(s) to double-check that your patterns printed at the correct size.
Then cut out the required number of patterns from your copies. A rough cut is good enough—an 1/8"-1/4"-ish away from the outside dashed square.

Not sure which paper to use?
Take a look at my review of several of the most popular brands available to us quilters on the market.
You want a super-easy paper to tear away—less stress on the stitches.
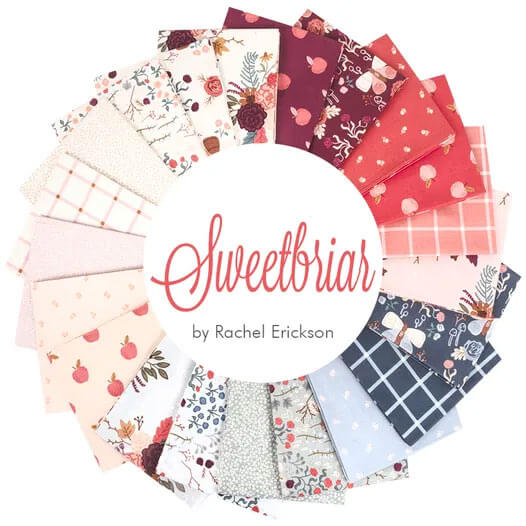
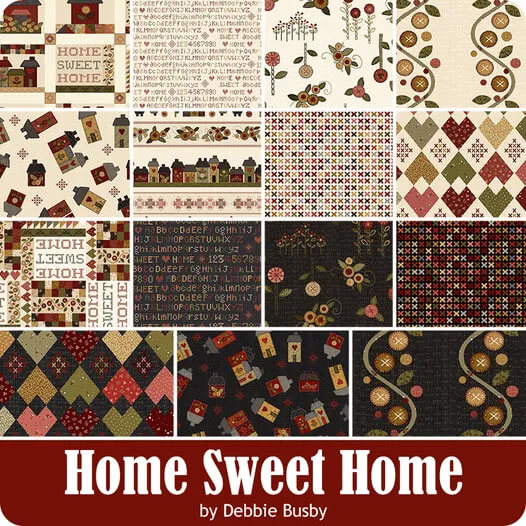
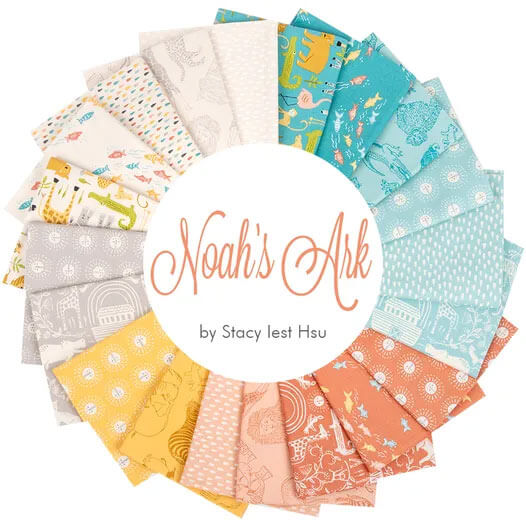
The newest quilt fabrics to tickle your fancy...
Click the images below to see the full collection. We share any commercial and/or free patterns that showcase them, too. (For inspiration, of course!)
✂️Cut the patches for a Good Cheer block

Sample Block Size: 12" finished / 12½" unfinished
Grid: 8x8
Attribution: Clara Stone
Design Type: | Paper piecing
AKA: Stepping Stone (KC Star)
Please label all your patches. We use their numbers throughout this tutorial.
My favorite neutral Moda Grunge is used as the background fabric and a cute little psychedelic purple splotchy thing for fabric A. All we really want is a good contrast between our fabric choices so our pointy-points stand out.
The purple is marginally directional, but for the purposes of this tutorial (surprisingly) I chose to ignore it and let what happens happen—that's WAY out of my comfort zone. 😳
 | Cutting Chart for a~ Paper PLUS Traditional Piecing ~ | |||||||||||||||||||||||||||||||||||||
|---|---|---|---|---|---|---|---|---|---|---|---|---|---|---|---|---|---|---|---|---|---|---|---|---|---|---|---|---|---|---|---|---|---|---|---|---|---|---|
| Patch | Fabric | Qty | Finished Block Size | Sub Cut | ||||||||||||||||||||||||||||||||||
| 8'' | 12'' | 16'' | 20'' | 24'' | ||||||||||||||||||||||||||||||||||
| 1 | Bac | 8 | 1½'' x 13'' | 2'' x 17'' | 2½'' x 21'' | 3'' x 25'' | 3½'' x 29'' | --- | ||||||||||||||||||||||||||||||
| 2 | A | 8 | 1½'' x 13'' | 2'' x 17'' | 2½'' x 21'' | 3'' x 25'' | 3½'' x 29'' | --- | ||||||||||||||||||||||||||||||
| 3 | Bac | 8 | 1½'' x 2½'' | 2'' x 3½'' | 2½'' x 4½'' | 3'' x 5½'' | 3½'' x 6½'' | --- | ||||||||||||||||||||||||||||||
| 4 | A | 4 | 1½'' x 1½'' | 2'' x 2'' | 2½'' x 2½'' | 3'' x 3'' | 3½'' x 3½'' | --- | ||||||||||||||||||||||||||||||
| 5 | Bac | 1 | 2½'' x 2½'' | 3½'' x 3½'' | 4½'' x 4½'' | 5½'' x 5½'' | 6½'' x 6½'' | --- | ||||||||||||||||||||||||||||||
| Goose.1 | Bac | 1 | 3¾'' x 3¾'' | 4¾'' x 4¾'' | 5¾'' x 5¾'' | 6¾'' x 6¾'' | 7¾'' x 7¾'' | | ||||||||||||||||||||||||||||||
| Sky.1 | A | 4 | 2⅜'' x 2⅜'' | 2⅞'' x 2⅞'' | 3⅜'' x 3⅜'' | 3⅞'' x 3⅞'' | 4⅜'' x 4⅜'' | | ||||||||||||||||||||||||||||||
| Goose.2 | A | 4 | 1¾'' x 2¾'' | 2¼'' x 3¾'' | 2¾'' x 4¾'' | 3¼'' x 5¾'' | 3¾'' x 6¾'' | --- | ||||||||||||||||||||||||||||||
| Goose.3 | A | 1 | 3¾'' x 3¾'' | 4¾'' x 4¾'' | 5¾'' x 5¾'' | 6¾'' x 6¾'' | 7¾'' x 7¾'' | | ||||||||||||||||||||||||||||||
| Sky.3 | Bac | 4 | 2⅜'' x 2⅜'' | 2⅞'' x 2⅞'' | 3⅜'' x 3⅜'' | 3⅞'' x 3⅞'' | 4⅜'' x 4⅜'' | | ||||||||||||||||||||||||||||||
| Unfinished Block Size | 8½'' | 12½'' | 16½'' | 20½'' | 24½'' | na | ||||||||||||||||||||||||||||||||
| Grid Size | 1" | 1½'' | 2" | 2½" | 3" | na | ||||||||||||||||||||||||||||||||
Subcutting
Sky.1 and Sky.3 are subcut once on the diagonal to make HSTs. Goose,1 and Goose.3 are cut twice diagonally to create QSTs.
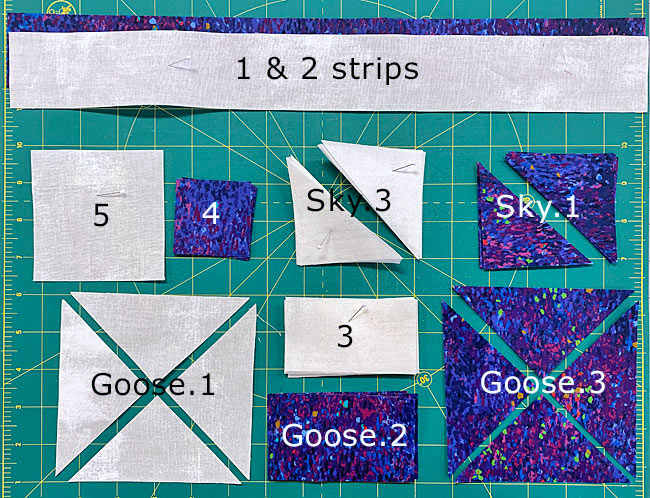
As much as I love it, that neutral Grunge is a real pain to tell the difference between the back and front sides.
After I cut those patches, I immediately layer them all front side up and put a pin down through the top of the stack. That way I always know which was is up! 😉
Simple trick. Huge time saver! 💡
🪡Assemble the units for your Good Cheer quilt block
FG Chevrons
Make 4
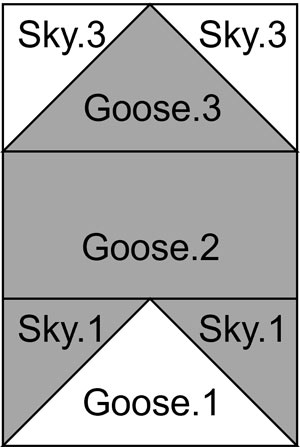
Use a small dot of Elmer's Washable Glue Stick to hold a Goose.1 in position between the dashed guideline.

We need to make a few adjustments to our sewing machine settings to paper piece.
- Reduce your stitch length to 16–20 stitches per inch (1.3-1.6 mm). This perforates the paper and stabilizes the seam when you remove the pattern. [Learn more about stitch length here.]
- Reduce your machine's speed or just plain slow down. Sew only as fast as you can AND stay on the solid stitching line.
- Install an open toe appliqué foot (sometimes called an 'embroidery' or 'satin stitch' foot) if you have one (it makes it easier to see where you're stitching).
- Use a larger needle (90/14) IF you have problems removing the pattern. Personally, I use an 80/12 Microtex Sharp for paper piecing without any issues.
With RST, position the long bias edge of a Sky.1 with that of Goose.1.
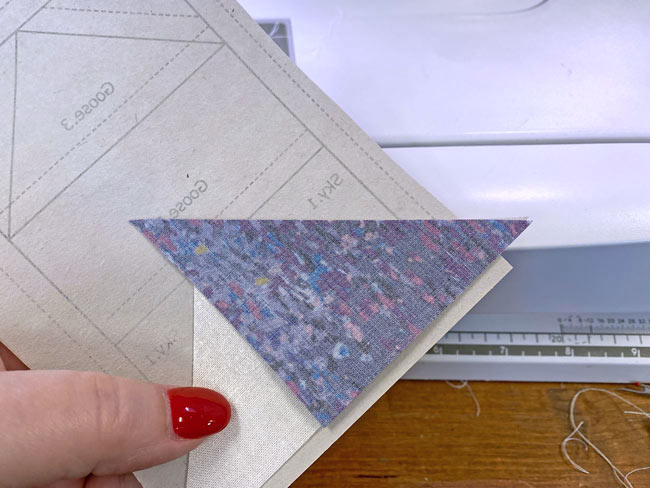
Sew the seam, starting and stopping your stitched a generous 1/4" before and after the solid line. (blue arrows)
Future lines of stitching will secure these threads.
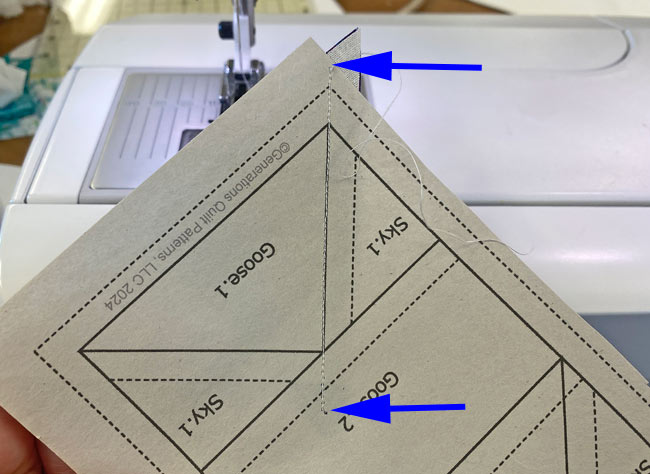
Press.
With RST, position the second Sky.1 with the open short side of Goose.1. There's no need to trim those thread tails you see on this side of the pattern. They'll automatically get trimmed in the next step.
No reason to waste a motion here. 😉
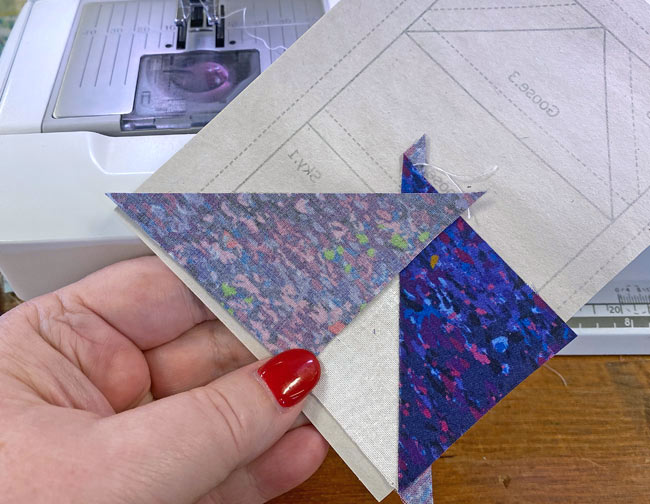
Stitch the seam and press.
At your cutting mat, paper side up, pull the pattern away from the stitches enough so that you can fold the pattern on the line between your stitched patches and Goose.2.
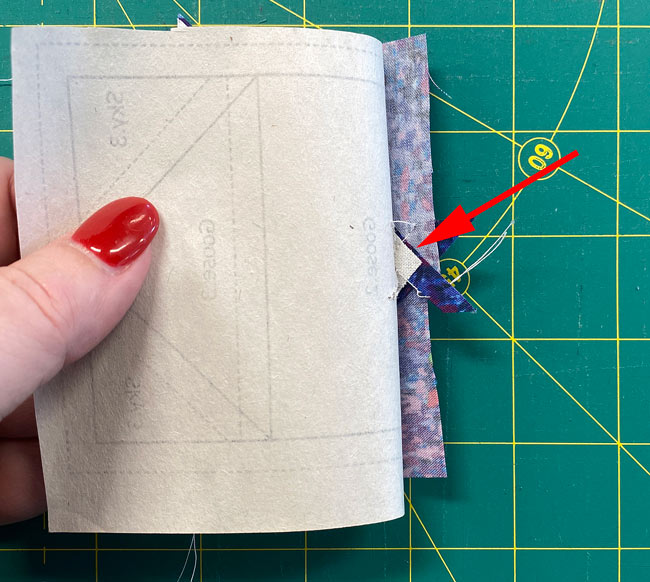
The paper rips at least a bit. That's no problem. If it is too much for your liking, use a piece of Magic Tape&#reg; to repair it.
Place your ruler on the solid line and crease a fold with your thumbnail.
Fold the pattern back on itself, and line up the 1/4" mark on your ruler with the fold.
Trim away the excess with your rotary cutter.

Position Goose.2, RST, with the freshly trimmed edge.
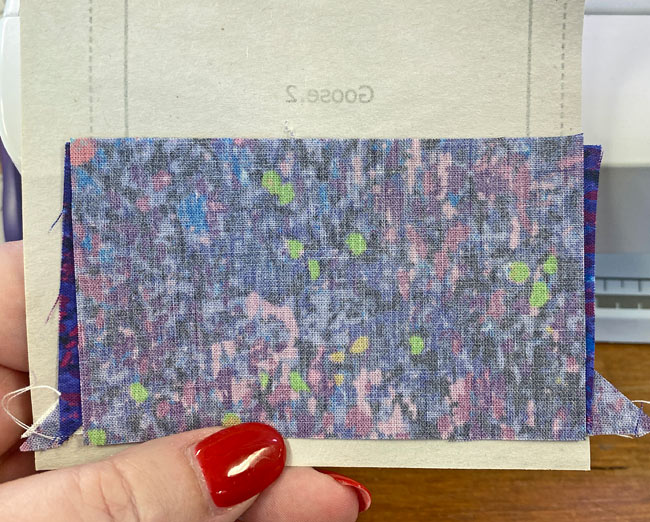
Sew the seam on the solid line starting and stopping past the outside dashed edges of your block.
After a quick use of your iron and a trim (just like we did before) position Goose.3 RST with the cut edge.

Sew the seam and press.
Let's get the sides of that Goose trimmed so we know where the last sky units go.
Fold the pattern back on itself on the line and trim both sides to 1/4" just like we did earlier. Here's the first side...

...and the second one...

...and what it looks like after trimming.
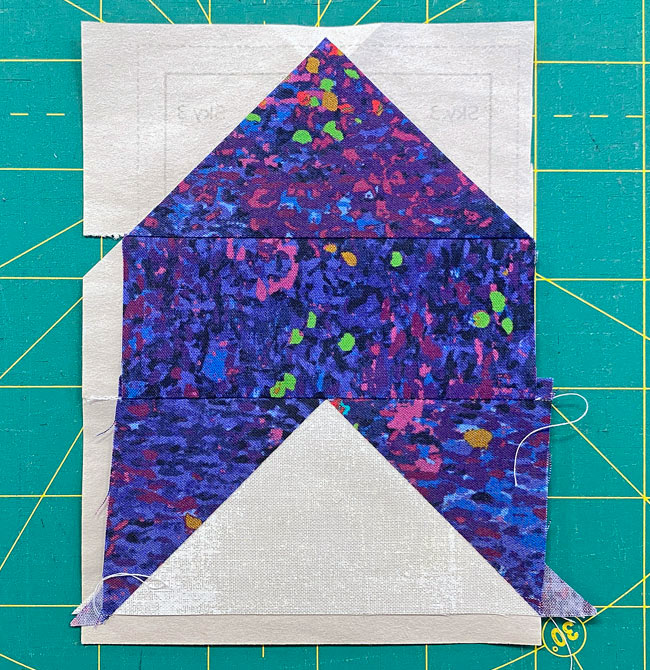
With RST, position the first Sky.3, sew and press.
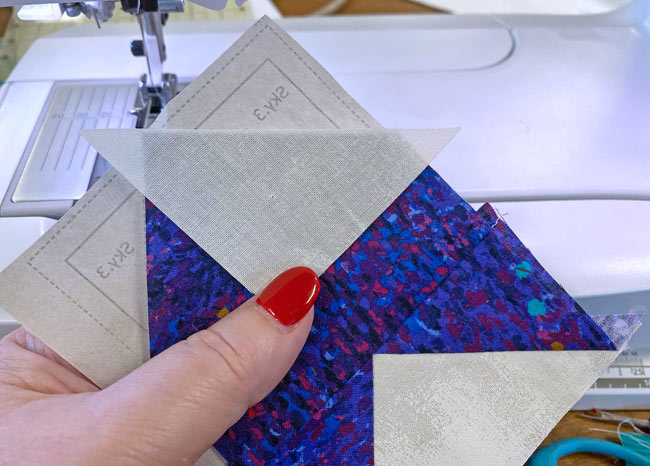
Repeat for the second Sky.3.
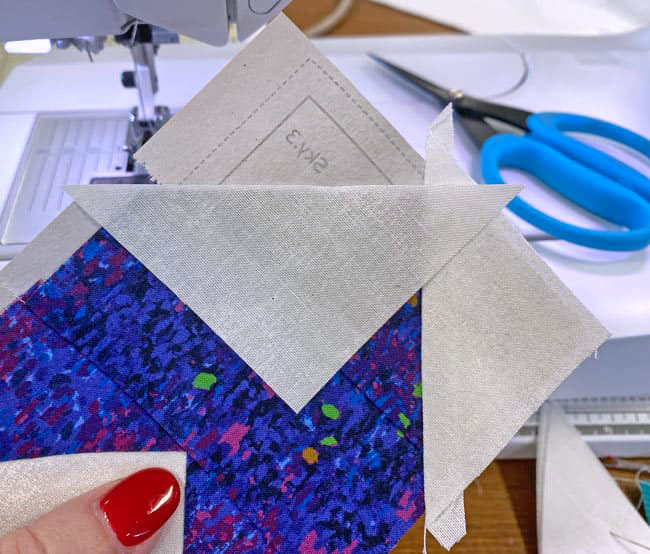
At your cutting mat, trim the units to the exact size by positioning your ruler's 1/4" line directly over the solid line on one side and cut away the excess. Repeat for all sides of all four FGC.
I use my rotating cutting mat for this job and load up the mat with as many as it will hold.
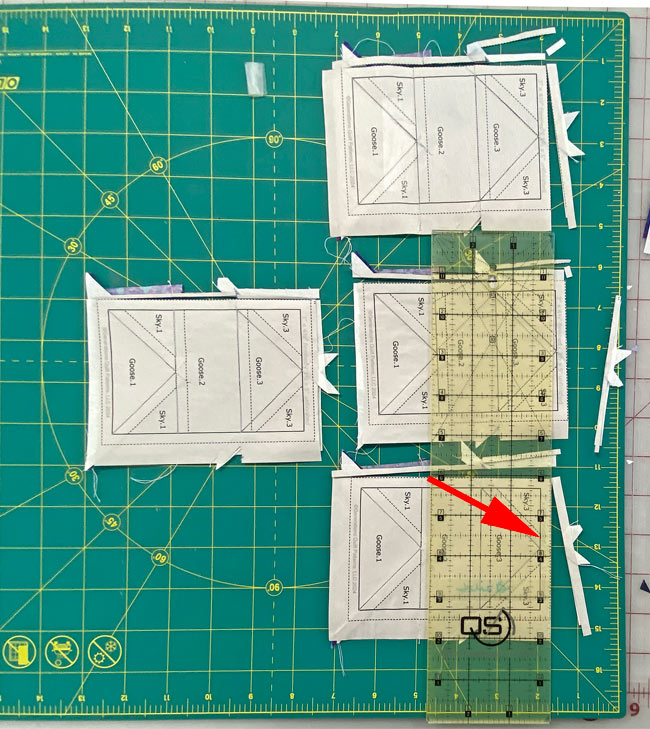 I love my 17" rotating cutting mat for trimming blocks. I purchased a 12" one first, but moved up to the 17" one year and Christmas and never looked back.
Did you see it?
In the photo above, top left FG, you can see the big ol'piece of Magic Tape that was needed after pulling back the paper with a bit too much gusto! 🤭
It happens to everyone!
All the paper piecing's done, It sure made quick work of these Chevron units, didn't it?!!
All the outside edges are on the straight of grain (because why would you cut your patches any other way—we smart quilters don't make extra work for ourselves!) You can remove all the paper now.
Finally, return your sewing machine to its everyday settings. Regular piecing stitch length. Favorite quarter inch foot. Adjust the needle position if you do it to get the perfect 1/4" SA.
Modified 9-patch Units
Make 4
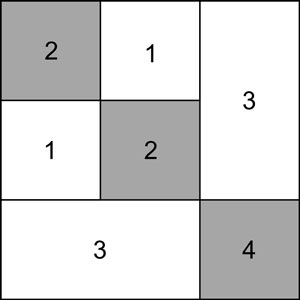
With RST, sew the long edges of 1 and 2 together.
Press.
At your cutting mat, trim one short edge. Align a line on your ruler with the seam line and cut away a small bit of excess.
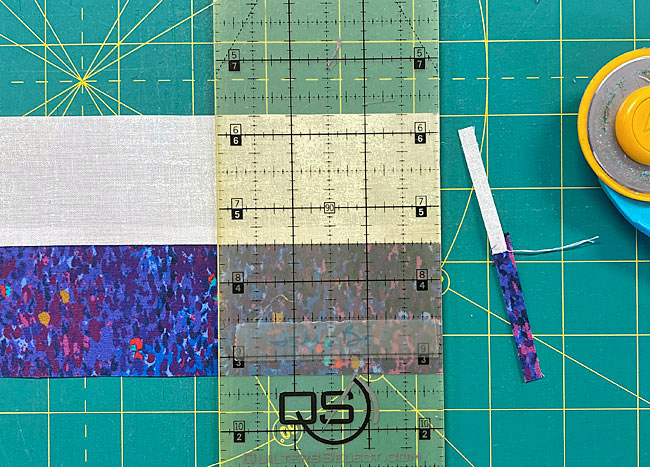
Use the chart below to check your accuracy. Given the finished block size you chose, does the width of your #1/#2 strip set match the width in the chart. Make adjustments as needed before proceeding.
Modified 9-Patch Measurements | ||||
|---|---|---|---|---|
| Finished Block Size | Stripset Width after stitching | SubCut Width | SubCut Patch Dimensions | 4-patch Edge-to-edge Measurement |
| 8" | 2½" | 1½" | 1½" x 2½" | 2½" x 2½" |
| 12" | 3½" | 2" | 2" x 3½" | 3½" 3½" |
| 16" | 4½" | 2½" | 2½" x 4½" | 4½" x 4½" |
| 20" | 5½" | 3" | 3" x 5½" | 5½" x 5½" |
| 24" | 6½" | 3½" | 3½" x 6½" | 6½" x 6½" |
Using the SubCut width that goes with your block size, subcut 8 units from your stripset. There's very little waste, but enough if you've got any extra straightening to do.
Alternate the patches light to dark and sew into four 4-patches.
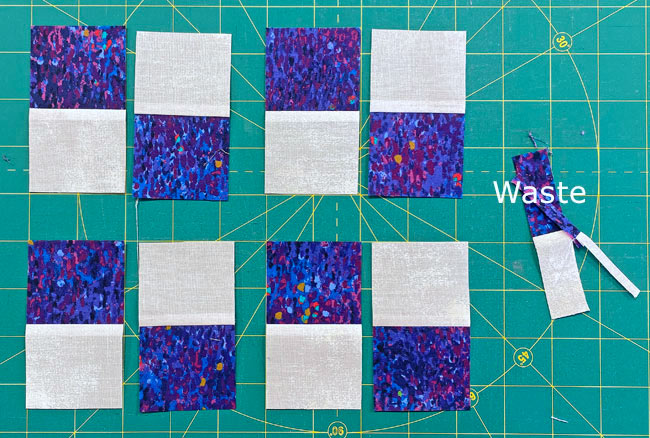
I did choose to fan or twirl the SA in the center of the 4-patch to reduce bulk there. You could decide to press it either to one side or open, too. It doesn't nest with anything.
Again, referring to the chart, you can check your accuracy, this time using the Edge-to-edge measurement for your 4-patches.
With RST, stitch a #3 to the left side of a 4-patch as shown below, pressing afterwards towards #3.
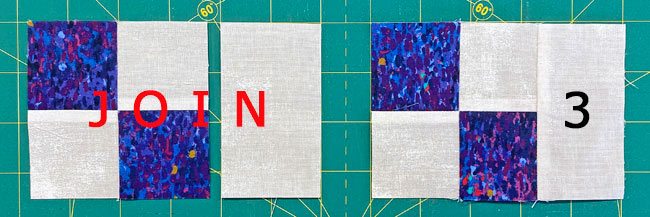
With RST, join a #4 to the short side of #3 for a total of 4 units.
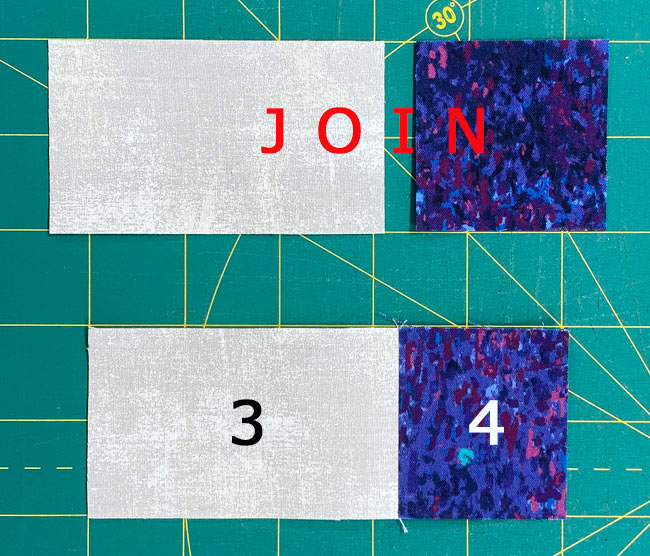
To finish up the Corner, with RST, add this #3/#4 to the bottom of the #1/#2/#3.
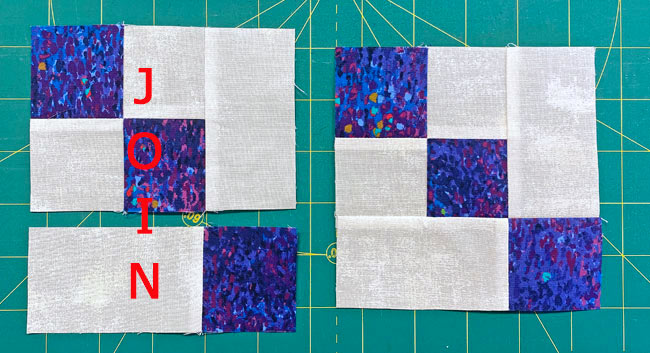
Press this last seam towards the 4-patch side of the Corner, You can see it from the backside here, along with the fanned or twirled SA.
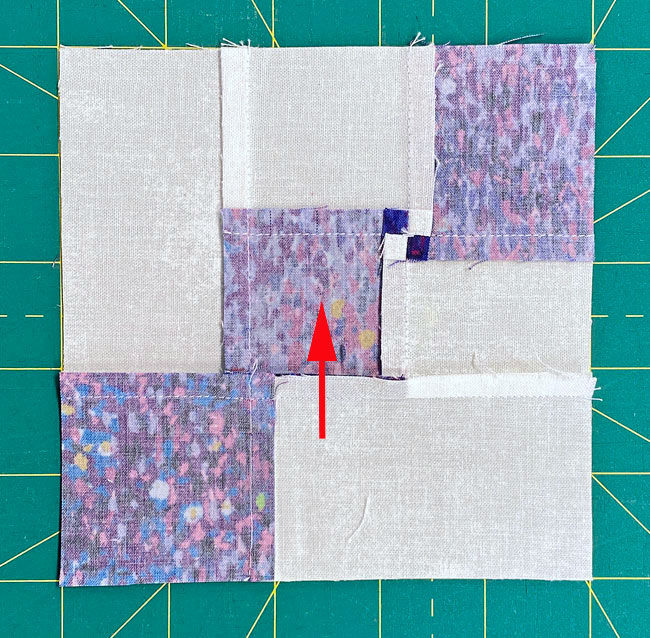 The fanned or twirled SA makes a cute little 4-patch on the backside of our Modified 9-patch.
One last time, check your accuracy using this chart.
After sewing the Corners... | |
|---|---|
| Finished Block Size | Edge-to-edge Measurement |
| 8" | 3½" x 3½" |
| 12" | 5" x 5" |
| 16" | 6½" x 6½" |
| 20" | 8" x 8" |
| 24" | 9½" x 9½" |
🧩Assemble your Good Cheer quilt block
Arrange your patches with the FG Chevrons pointing in towards the center and the 4-patches in the outside four corners. #5 completes the design in the very center.
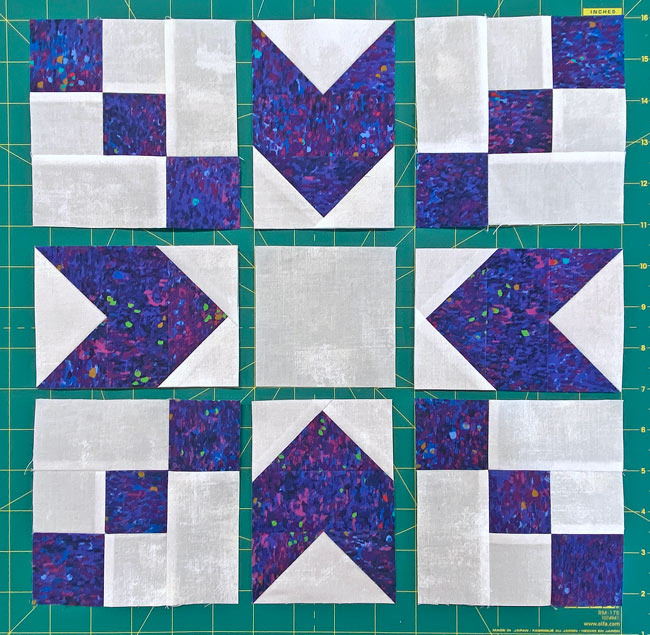
Sew the units in each row together. The SA between #3/#4 and Goose.2/Goose.3 nest to make matching them easier. If you've done a good job stitching on the line, these seams will almost sew themselves.
These seams are all pressed AWAY from the Flying Geese Chevrons.
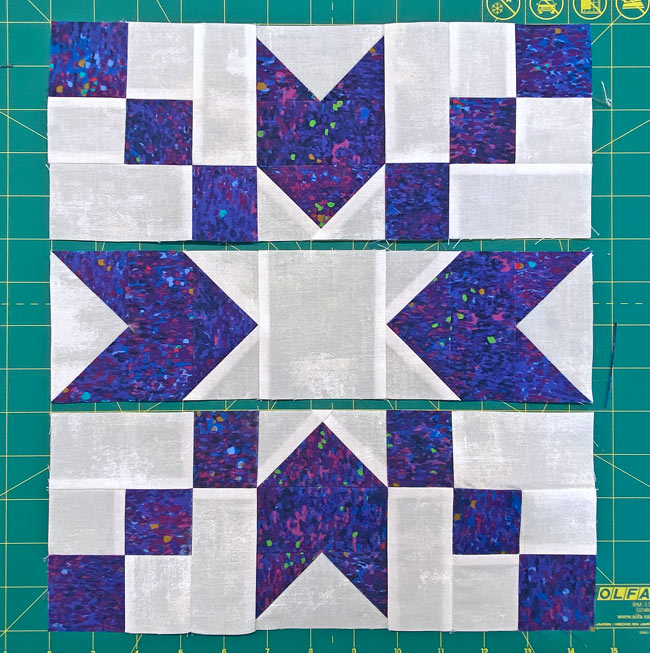
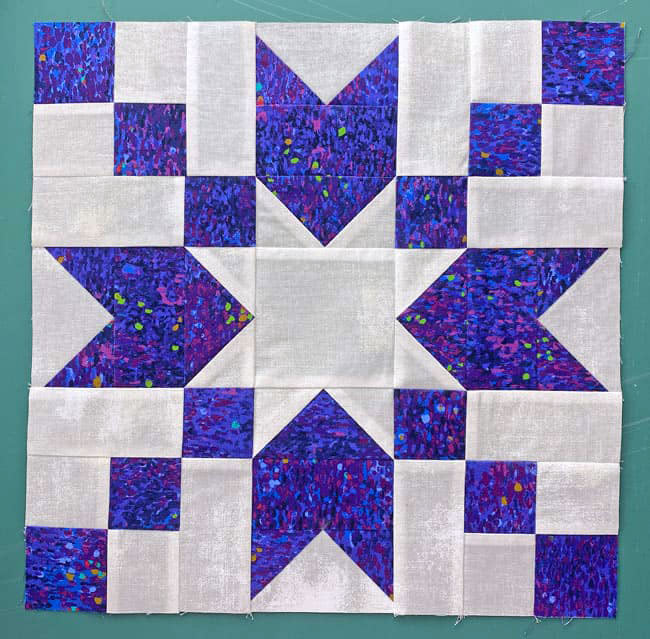
With RST, stitch the rows together. Use pins to help keep all the edges even and the points in place and stationary as you sew.
Once final turn at the ironing board with the SA away from the center, and this is our finished Good Cheer quilt block.
From the backside, you can see how all the SAs work together for a flatter block.
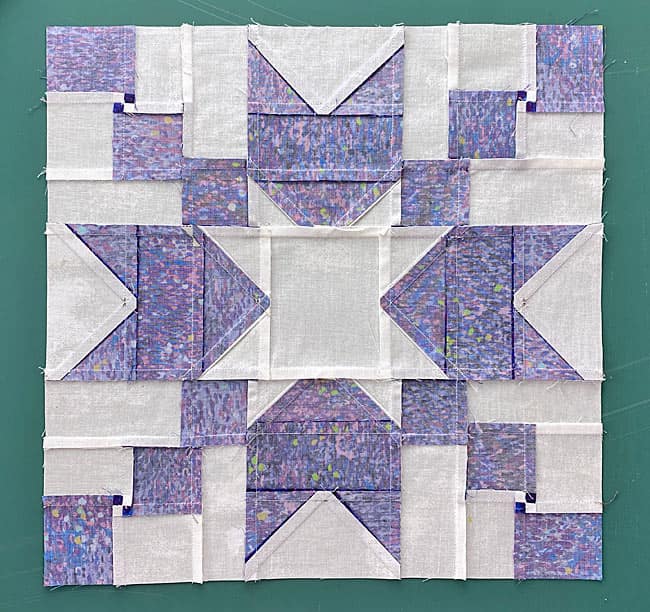 Looks like this quilter's got a few bits of paper left to pick out!
Struggling to find the perfect block for your next quilt? 📍📍📍
Pin our Good Cheer tutorial now. When inspiration strikes, you'll have this ray of sunshine ready to brighten up your project!
🔭 Looking for something truly stellar?
You've finished your star quilt block, and you're ready for more!
Browse our collection of 70 stellar star quilt block patterns. All have instructions and cutting charts in multiple sizes. If templates or paper piecing is used in the tutorial, there's a free download for you of those materials.

Eeny. Meenie. Miney. Moe.
Which star quilt block will you sew?
For a star-studded quilting experience, choose from 100+ bedazzling star quilt patterns—for beginners and beyond—click here.
For even MORE blocks to make… 🧩🎨

...visit our Free Quilt Block Pattern Library, with over 260+ blocks to choose from in multiple sizes.
Free downloads are included in all sizes for any blocks require paper piecing patterns or templates.
- Home
- Free Quilt Block Patterns
- Good Cheer Quilt Block
