- Home
- Free Quilt Block Patterns
- God's Eye Quilt Block
God's Eye Quilt Block Tutorial: Precision Made Possible
Sharp points. Satisfied smiles. You've got this! 😊
This post contains affiliate links, for which I receive compensation.
Skill Level: Confident Beginner
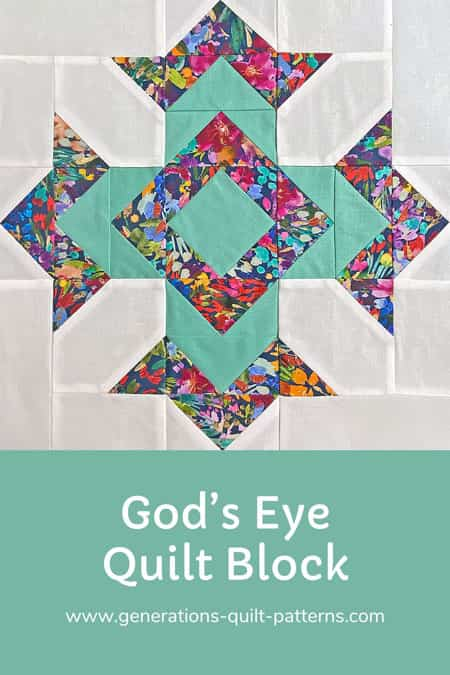
The God's Eye quilt block, with its striking radiating design and crisp points, is a showstopper in any quilt. ✨🔍
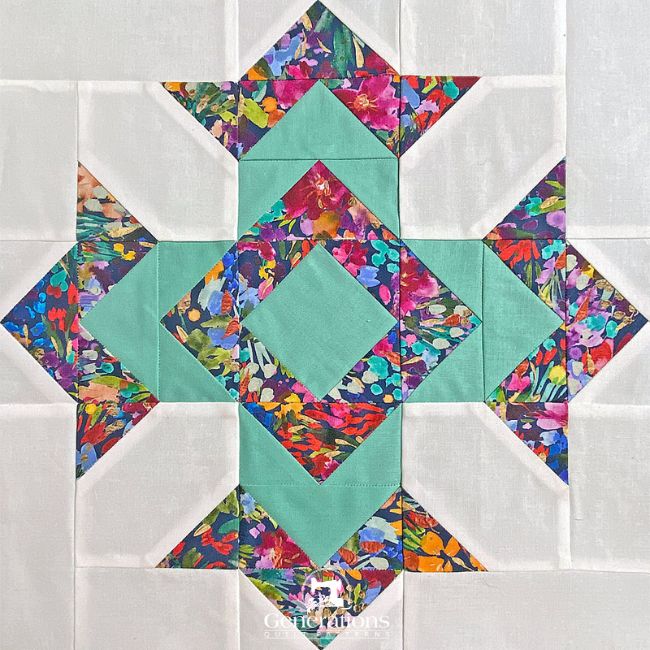
While those perfect points might look complex, this tutorial simplifies the process using paper piecing for the units that benefit most from precision. 📐🧩 No specialty rulers required—just sew on the line, trim, and watch those perfect points emerge! 🪡✂️
If you're paper piecing for the first time or simply looking to add another block to your repertoire, this step-by-step guide leads you through creating a God's Eye block you're proud of. 🏆🧵
🧭 Cut to the Chase: Navigation Shortcuts
Finding what you need should be as easy as possible. Use these shortcuts to jump directly to the information you're looking for:
- A cutting chart in 5 sizes, with downloads of the chart and block design
📋 General Instructions
⚡ PRINTING TIP: Need help printing this tutorial? Click here for easy instructions!
Several abbreviations are used on this page. They are:
- SA - seam allowance
- RST - right sides together
- HST - Half Square Triangle
- QST - Quarter Square Triangle
- SiaS - Square in a Square
- FC - Folded Corners
A 1/4" SA is used in this tutorial.
Highlighted in yellow, pressing instructions are easy to spot.
✅ KEY TECHNIQUE: To press efficiently, first press the patches in the closed position as they came off your sewing machine. This sets the seam, melding the fibers of the threads into the fabric. Then press the SA to the dark unless otherwise noted.
📥 Download and print the paper piecing pattern
To download the pattern, use the most current version of Adobe.
For accurate results, on Adobe's Print Menu page, under 'Page Size and Handling' set 'Custom Scale' to 100%. Then print.
Click here to see what it looks like on the Print Menu page.
Find your finished block size from the chart below. For each block you want to make, print the corresponding number of copies for a total of:
- Four Flying Geese Trios
- One Square in a Square
Download and Print FG Trio and SiaS Units | |||
|---|---|---|---|
| Finished Block Size | FG Trio | SiaS | |
| # of copies | Download | Download Print 1 copy | |
| 8" | 1 | 2"x3" | 2" |
| 10" | 1 | 2½"x3¾" | 2½" |
| 12" | 2 | 3"x4½" | 3" |
| 16" | 2 | 4"x6" | 4" |
| 20" | 4 | 5"x7½" | 5" |
After printing, use the 1" square graphic on the printed page(s) to double check that your patterns printed at the correct size.
Then cut out the required number of patterns from your copies. A rough cut is good enough—an 1/8"-1/4"-ish away from the outside dashed square.

Not sure which paper to use?
Take a look at my review of several of the most popular brands available to us quilters on the market.
You want a super-easy paper to tear away—less stress on the stitches.
✂️ Cutting patches for your God's Eye quilt block
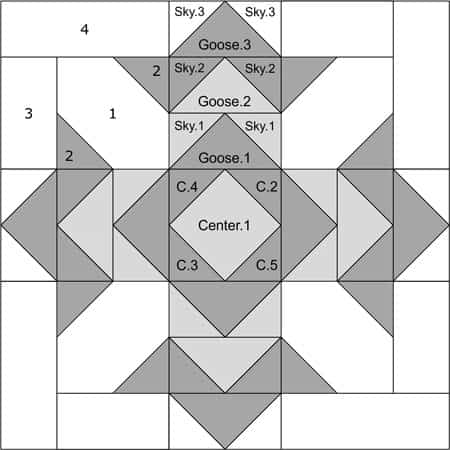 God's Eye design
Sample Block Size: 12" finished / 12½" unfinished
Grid: 8x8
Design Type: Uneven 9-patch | Paper piecing
Please label all your patches. We use their numbers throughout this tutorial.
 | Cutting Chart for a~ Includes Paper Piecing ~ | |||||||
|---|---|---|---|---|---|---|---|---|
| Patch | Fabric | Qty | Finished Block Size | Sub Cut | ||||
| 8'' | 10'' | 12'' | 16'' | 20'' | ||||
| 1 | Bac | 4 | 2½'' x 2½'' | 3'' x 3'' | 3½'' x 3½'' | 4½'' x 4½'' | 5½'' x 5½'' | --- |
| 2 | Dark | 8 | 1½'' x 1½'' | 1¾'' x 1¾'' | 2'' x 2'' | 2½'' x 2½'' | 3'' x 3'' | --- |
| 3 | Bac | 4 | 1½'' x 2½'' | 1¾'' x 3'' | 2'' x 3½'' | 2½'' x 4½'' | 3'' x 5½'' | --- |
| 4 | Bac | 4 | 1½'' x 3½'' | 1¾'' x 4¼'' | 2'' x 5'' | 2½'' x 6½'' | 3'' x 8'' | --- |
| Center.1 | Med | 1 | 1⅞'' x 1⅞'' | 2¼'' x 2¼'' | 2⅝'' x 2⅝'' | 3⅜'' x 3⅜'' | 4⅛'' x 4⅛'' | --- |
| C.2, C.3 C.4, C.5 Sky.2 | Dark | 6 | 2⅜'' x 2⅜'' | 2⅝'' x 2⅝'' | 2⅞'' x 2⅞'' | 3⅜'' x 3⅜'' | 3⅞'' x 3⅞'' | |
| Goose.1 Goose.3 | Dark | 2 | 3¾'' x 3¾'' | 4¼'' x 4¼'' | 4¾'' x 4¾'' | 5¾'' x 5¾'' | 6¾'' x 6¾'' | |
| Sky.1 | Med | 4 | 2⅜'' x 2⅜'' | 2⅝'' x 2⅝'' | 2⅞'' x 2⅞'' | 3⅜'' 3⅜'' | 3⅞'' x 3⅞'' | |
| Goose.2 | Med | 1 | 3¾'' x 3¾'' | 4¼'' x 4¼'' | 4¾'' x 4¾'' | 5¾'' 5¾'' | 6¾'' x 6¾'' | |
| Sky.3 | Bac | 4 | 2⅜'' x 2⅜'' | 2⅝'' x 2⅝'' | 2⅞'' x 2⅞'' | 3⅜'' 3⅜'' | 3⅞'' x 3⅞'' | |
| Unfinished Block Size | 8½'' | 10½'' | 12½'' | 16½'' | 20½'' | |||
| Grid Size | 1'' | 1¼'' | 1½'' | 2'' | 2½'' | |||
✂️✂️ Subcutting
Subcut C.2 thru C.5, and all the Sky squares in half once on the diagonal to form HST shapes.
All the Goose patches are subcut twice on the diagonal to form QST shapes.
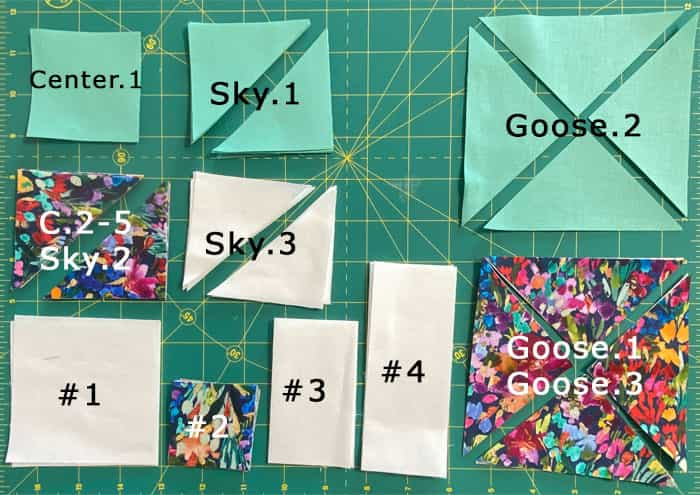
🧵 Create the units for your God's Eye block
We'll paper piece the Flying Geese (FG) and Square in a Square (SiaS) units for maximum precision. Paper piecing here significantly reduces trimming time—instead of 12 cuts for the FG Trio, you make only four. What's not to love?!!
Add to that pointy points, and, well, the added work of removing the paper pattern is well worth the time.
Let's get to work.
Use a tiny dot of Elmer's Washable Glue Stick to stick the Goose.1s and Center.1 to the unprinted side of their respective patterns. Those dashed lines help make this positioning quick and accurate.
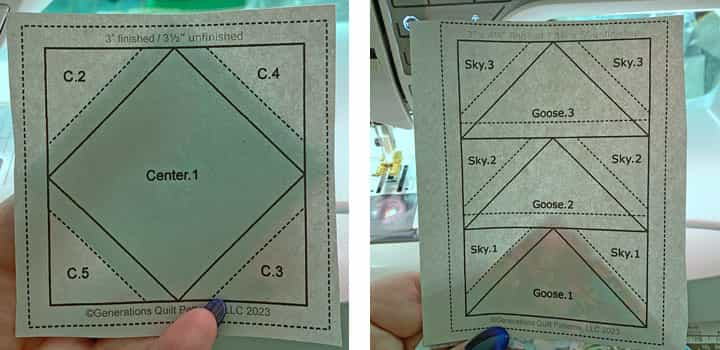
That's it for our glue stick, you can put it away.
We need to make a few adjustments to our sewing machine settings to paper piece.
- Reduce your stitch length to 16–20 stitches per inch (1.3-1.6 mm). This perforates the paper and stabilizes the seam when you remove the pattern. [Learn more about stitch length here.]
- Reduce your machine's speed or just plain slow down. Sew only as fast as you can AND stay on the solid stitching line.
- Install an open toe appliqué foot (sometimes called an 'embroidery' or 'satin stitch' foot) if you have one (it makes it easier to see where you're stitching).
- Use a larger needle (90/14) IF you have problems removing the pattern. Personally, I use an 80/12 Microtex Sharp for paper piecing without any issues.
FG Trios
Make 4

To piece the first Flying Goose, with RST, match the long bias edge of a Sky.1 with one side of Goose.1.
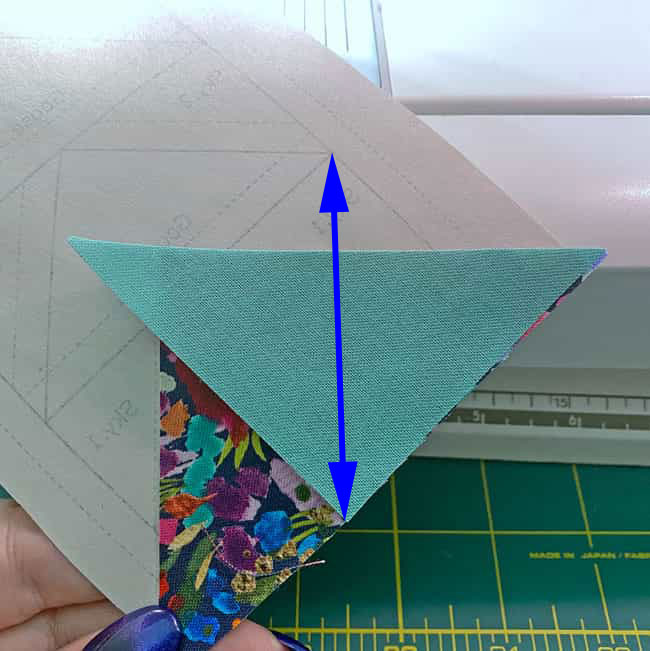
💡 Helpful Hint: Make it a habit to start with the same side for all units to develop a consistent workflow. Position Sky.1 so its point aligns directly opposite the point on the pattern shape (blue arrow).

Stitch on the solid line, extending a full 1/4" past both the beginning and end. (Future seams secure these extra stitches..)
Press. (Fingerpressing works well if you pre-starched your fabric.)
Repeat for the second Sky.1 on the opposite side of Goose.1.
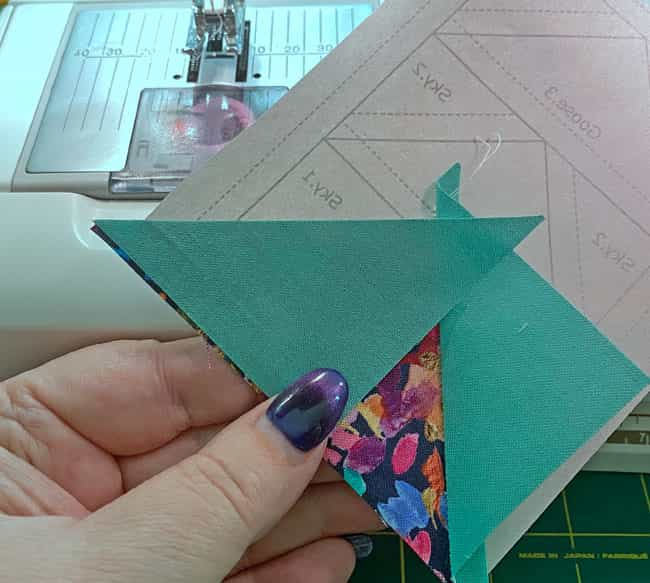
Before moving to the next step, press the unit with an iron.
Creating Perfect Placement Lines
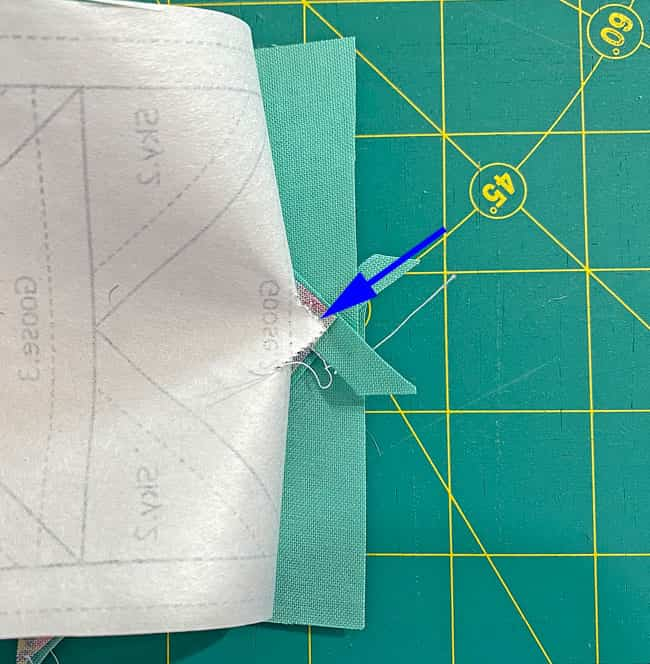
With paper side up, gently pull the pattern away from a few stitches at the Goose point. (blue arrow)
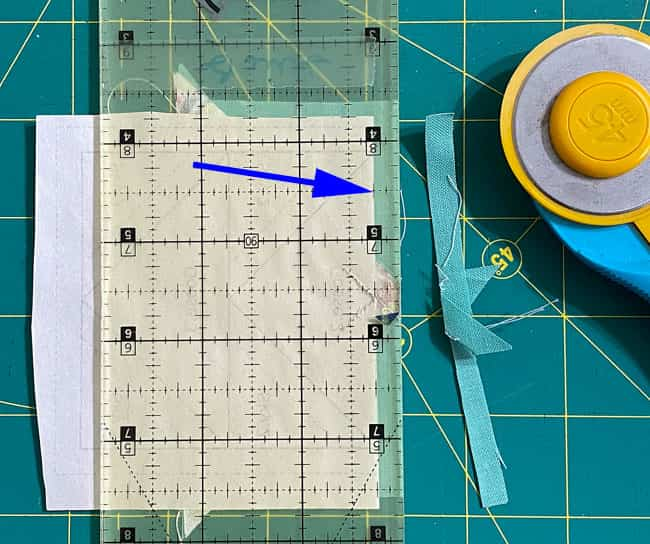
Position your ruler on the solid line between Goose.2 and Sky.1.
Crease the pattern on this line with your thumbnail and fold the paper back on this line.
Match the 1/4" mark on your ruler to the folded edge (blue arrow) and trim away the excess fabric.
Result: You've created the perfect positioning line for Goose.2.
Press. Goose1 is complete!
With RST, position the Goose.2's long edge with this fresh cut.
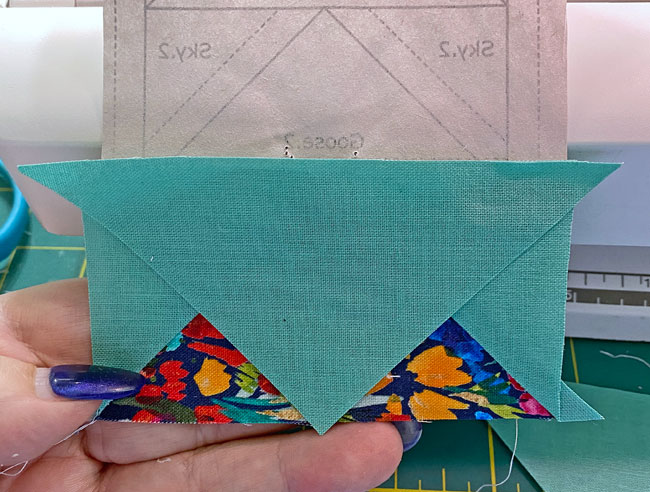
This seam runs across the whole unit, so if you're working on all 4 FGs it can be chain pieced. Yes, Virginia, there is chain piecing in paper piecing...sometimes.
Press.
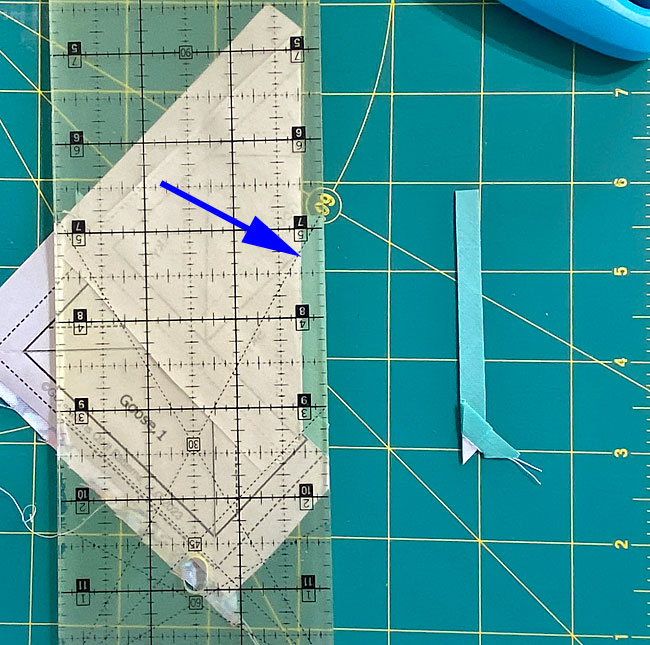
After stitching, trim both sides of Goose.2:
- Fold the pattern back on the solid line.
- Position the ruler with 1/4" mark at fold (blue arrow).
- Trim away the excess fabric beyond 1/4" seam allowance.
- Repeat for the opposite side.
Position the long bias edge of a Sky.2 with a cut side of Goose.1.
⚡ TIME-SAVER: After matching cut edges, position the point on the triangle with the seam to get the patch perfectly centered.
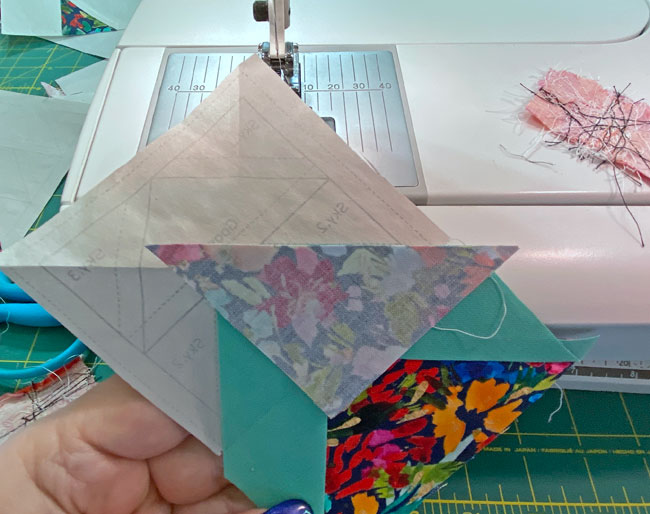
Stitch and press.
Repeat for the second Sky.2.
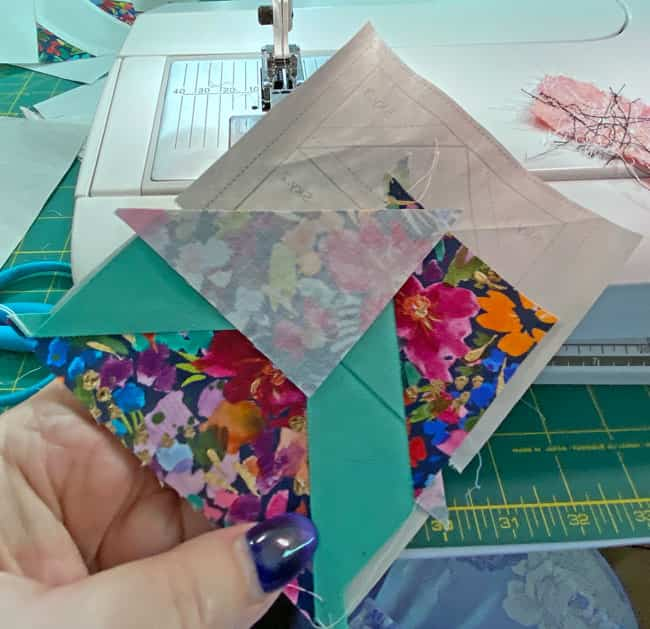 Again, I've used that seam line to quickly and accurately position this small triangle
Trim the SA to 1/4" on the two Sky.2s, just like you did for the Sky.1s..
Position the Goose.3. Another seam that can be chain pieced.
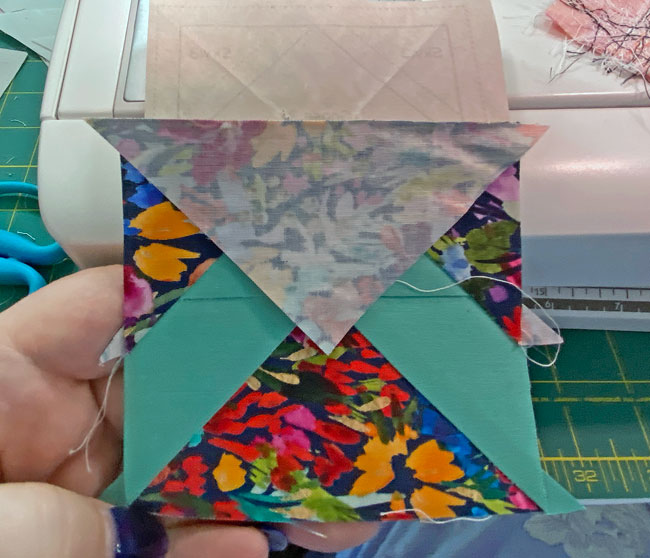
After sewing, trim the edges like you did for Goose.2.
Align the bias edge with one side of the Goose.3.
✅ KEY TECHNIQUE:
In our sample, the background fabric is much lighter than the dark. To keep the darker print from shadowing through the light background in the finished block, nudge the edge of the lighter patch a couple of threads past that of the print. (blue arrow)
A simple technique to prevent a lot of angst later.
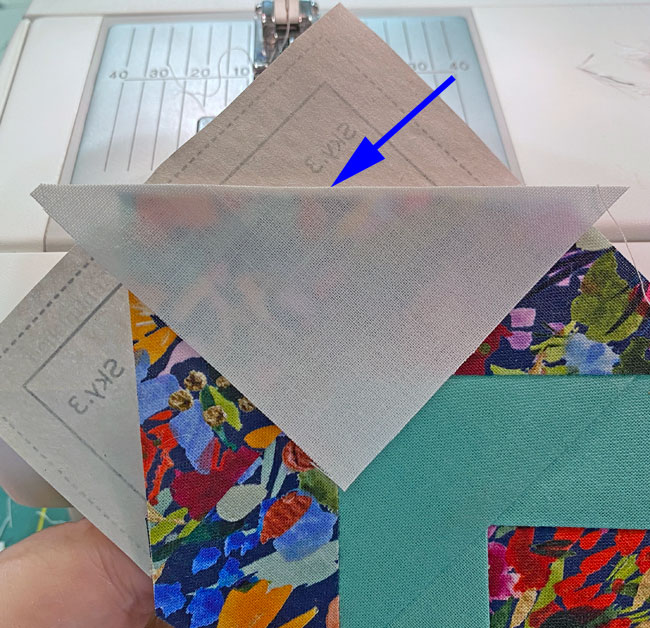
Sew the seam and press. Repeat for the second Sky.3. These last two seams can be chain pieced to save time.
When all stitching is complete, the points are perfect, but outside edges are uneven. This is correct.
Set the four finished FG aside until we're ready to trim everything.
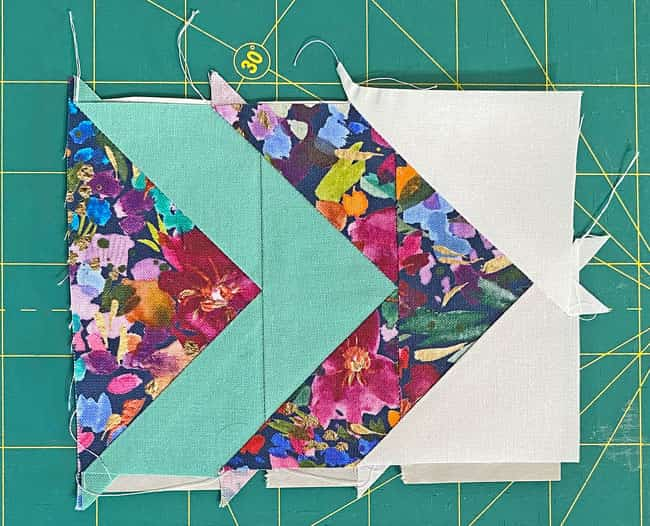
SiaS
Make 1

With right sides together (RST), align the long bias edge of C.2 with one side of Center.1.

Stitch completely across the unit, starting and ending beyond the dashed edges (outside the block boundaries).
These units can be chain pieced if making multiple blocks.
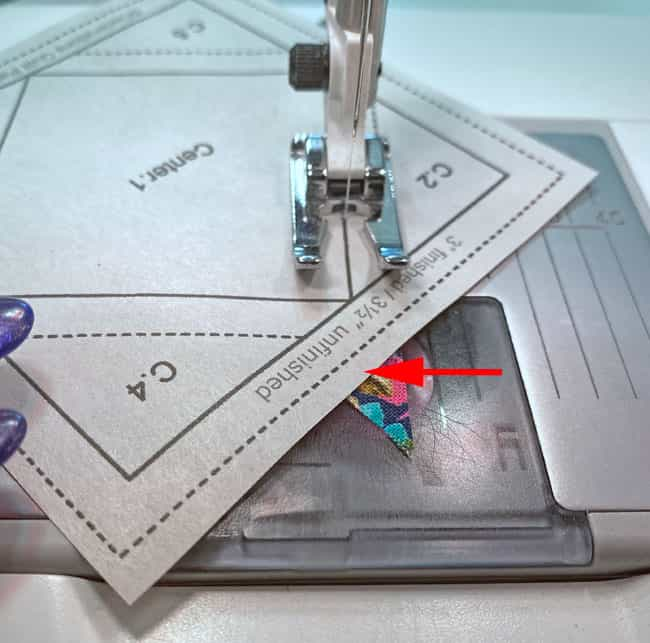 Stitch all the way to the point of the red arrow.
Fingerpress C.2 out of the way and position C.3.
Sew the seam and press with your iron.
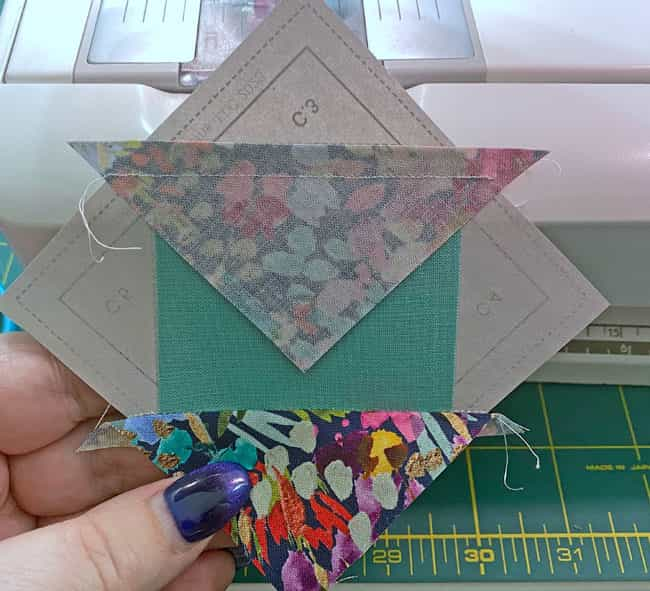
Add C.4,

Trim away the dog ears (blue arrows) after stitching this seam to reduce bulk.
Finish with C.5, trimming remaining dog ears. Give the completed unit a good final press.
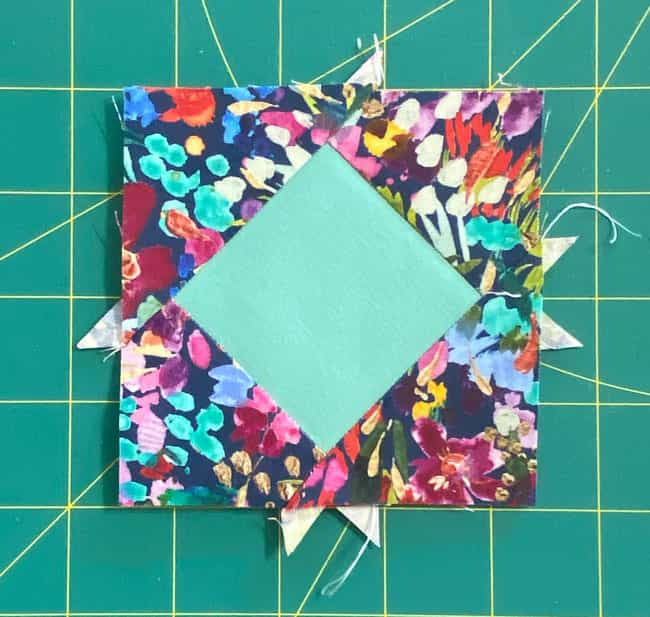
Trim all the paper pieced units
Position the 1/4" marking on your ruler along one side of the solid square (SiaS) or rectangle (FG) surrounding the block. Trim away the excess fabric.

Rotate unit one-quarter turn and repeat trimming.
Continue until all four sides are trimmed.
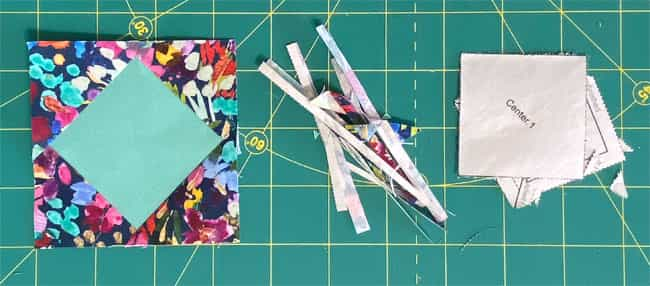 The trimmed SiaS. the trimmings, and the remnants of the pattern after removal.
Repeat this process for the four FG units.
 Before (left) and after (right) trimming
Remove the paper pattern
All your fabric patches were cut to create a unit with straight of grain on the outside edges, i.e., minimal stretch.
The paper's job is done. It should be removed as it no longer has a purpose..
Final Result
Paper piecing makes stitching these units easy, accurate, and time-savers.
- All points are exactly 1/4" in from the edge
- Top points of each Goose are perfect—not cut off or blunt
- You've made just 4 trims for a single FG Trio instead of 12 for 3 individual separate Flying Geese
Don't forget to trim away any remaining thread tails.
The paper piecing is complete. From this point forward, return your stitch length to the one you regularly use for piecing and install your favorite 1/4" presser foot.
Folded Corners unit
Make 4
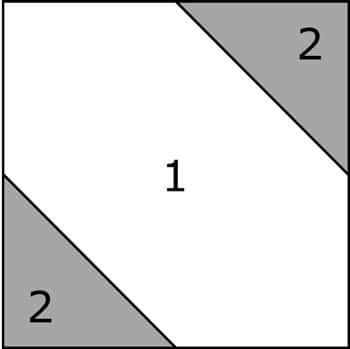
Using the Folded Corners technique, on the backside of each #2, draw a diagonal from corner to corner. I've used a mechanical pencil for this. The lead stays the same size/width, no matter how many squares you mark.
Accuracy is what we need for this line.
With RST, position a #2 in the corner of #1 with the ends of the lines touching adjacent sides.
To accommodate the 'turn of the cloth', sew on the side of the line closest to the corner.
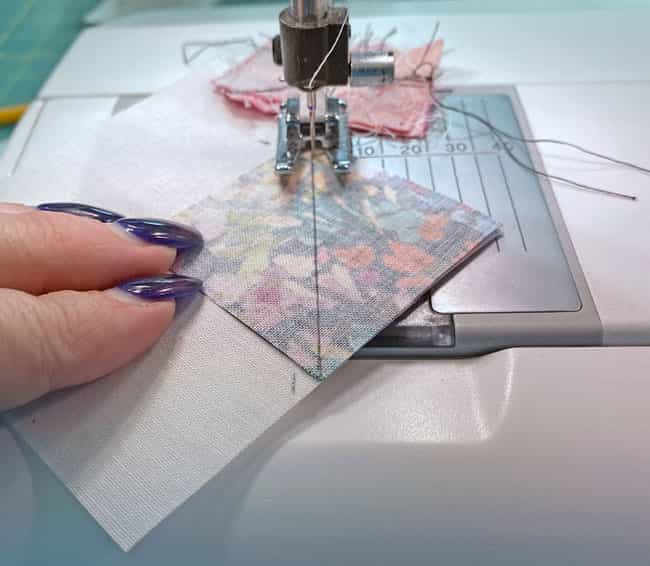
Repeat for the second #2 in the opposite diagonal corner.
Press the unit flat, as sewn (left below), and then open the #2s and press them towards the corner (right below). Check to see that the edges match.

To complete the patch, trim away the excess #1 & #2 fabric.
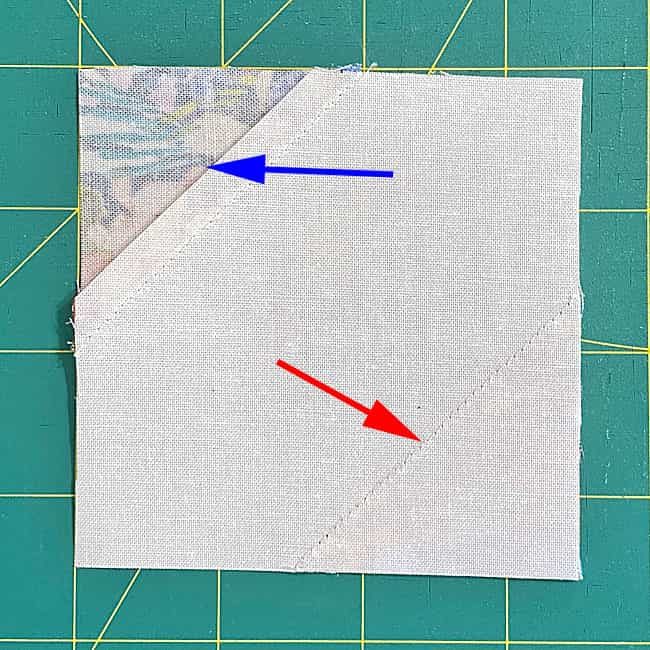 The upper left seam allowance (blue arrow) has been trimmed. The lower right (red arrow) will be trimmed before moving on.
Repeat for all four units.
And now the 'secret sauce' for our God's Eye block
We don't usually do this with patches pieced with folded corners, but now take the units back to the ironing board. Fold that corner back towards the center and press it flat, RST with #1, to get rid of the crease and 'reset' the seam.
Both corners.
Now press those SAs toward the center. This simple modification means your seams will nest when it comes time to assemble the block.
We quilters work smarter, not harder!
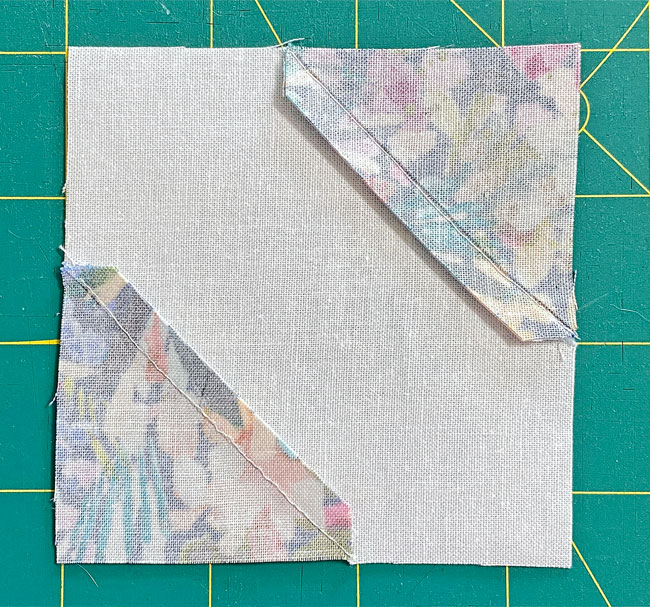 Those SAs are like this because we trimmed away the excess before we re-pressed the units.
Corner units
Make 4
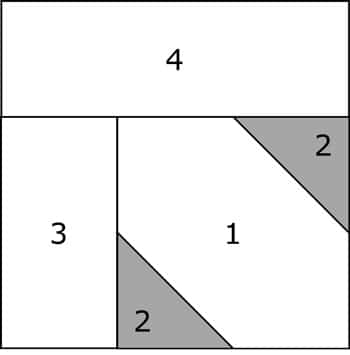
With RST, stitch a #3 to the left side of the Folded Corners unit, The dark #2 triangle-shape is along the lower edge.

Press with the SA toward #2/#1/#2. (Yes, this feels weird, but we want this seam to nest properly with the FG Trios.)
With RST, sew the #4 to the top edge of #1/#2/#3.
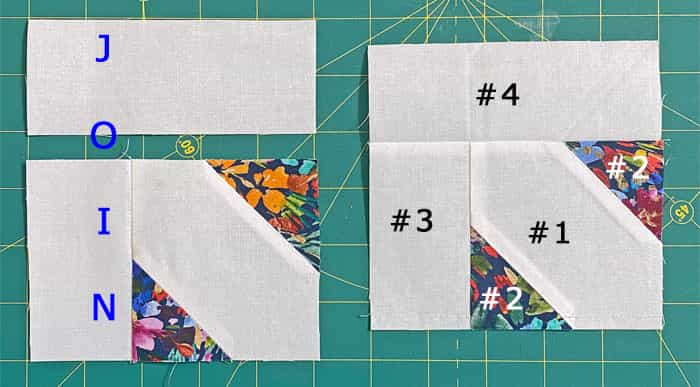
This seam is also pressed TOWARD the #1/#2/#3 to minimize bulk when we assemble the block.
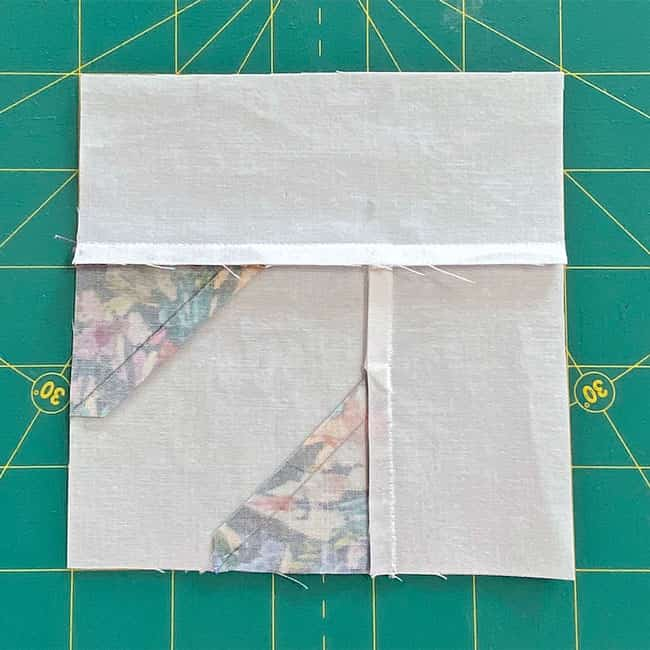 A Corner unit from the backside
📏Check for Accuracy
Before we assemble the block, take a sec to confirm your Corners are the correct size. Make any needed adjustments before proceeding.
After sewing, the Corner units measure... | |
|---|---|
| Finished Block Size | Edge-to-edge Measurement |
| 8'' | 3½" x 3½" |
| 10'' | 4¼" x 4¼" |
| 12" | 5" x 5" |
| 16" | 6½" x 6½" |
| 20" | 8" x 8" |
🧩 Final Assembly
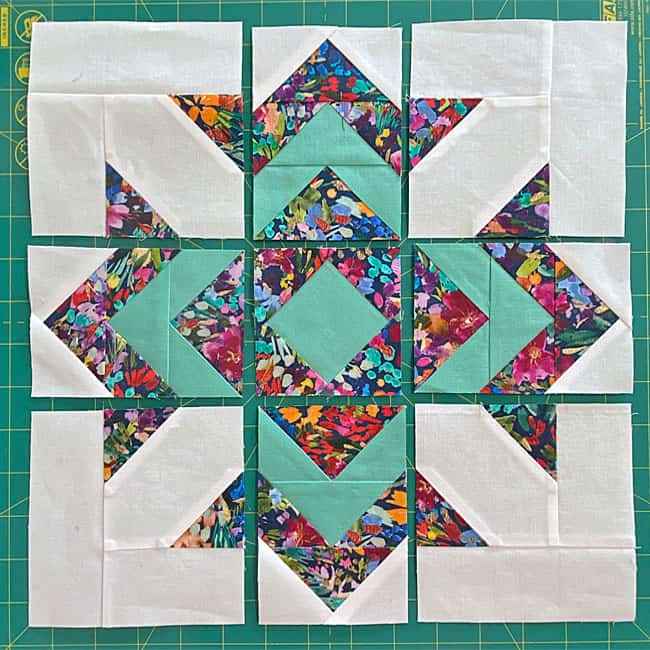
Stitch the units in each row together.
The seams of the Corners and FG nest (on purpose) to make matching the points easier. I strongly urge you to use pins to hold the edges even and points together while you stitch.
All the SAs are pressed away from the FG units, i.e. out from the center on the top and bottom rows, and in toward the SiaS in the center one.
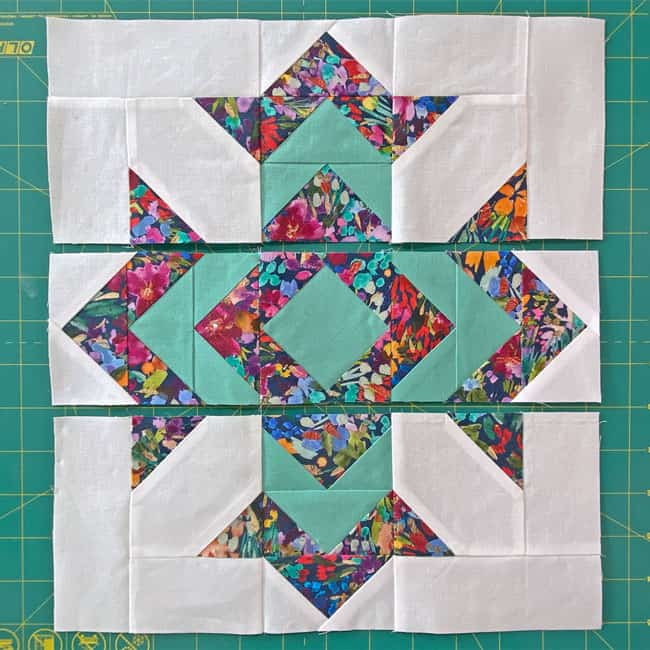
Sew the rows together, pinning again, as needed, to get the matches you want. Our nested SAs go a long way towards getting the matches we want
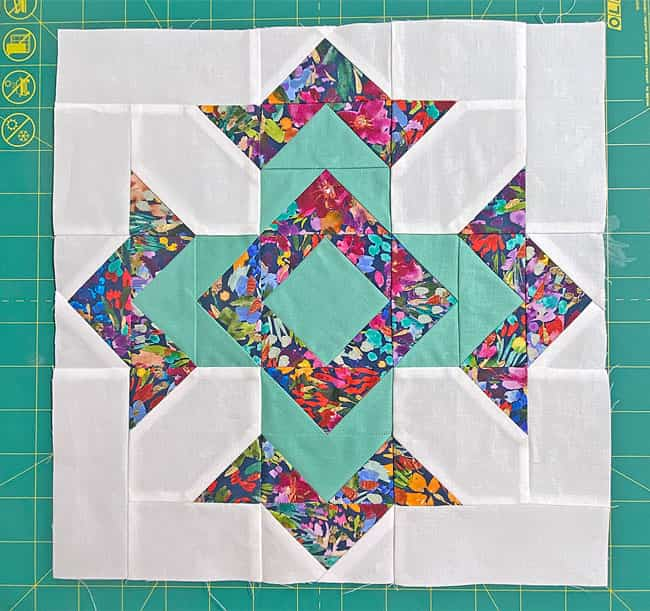
A final press, and this is the finished God's Eye quilt block.
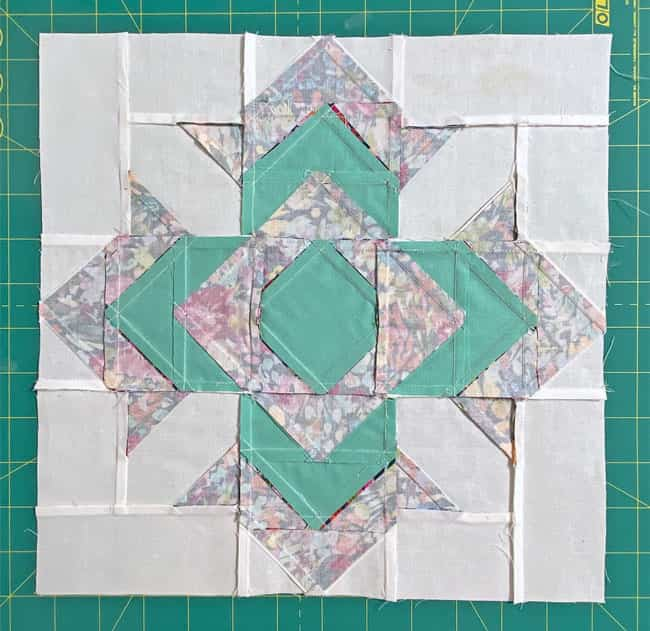
A peek at the back shows how all the pressed seams work together.
Take a moment to admire those perfect points that radiate from the center—they're spectacular because of your attention to detail and the precision of paper piecing.
Until next time, may you always win at 'bobbin chicken'!
📌 Pin Now, Piece Later: When life interrupts sewing time
Quilting time competes with life's other priorities. It's a fact of life.
Pin this tutorial to your favorite board, and it'll be waiting for you when you carve out that precious creative time.
Filed under 'Whoopsie!'
When you're reading through a tutorial, it's hard to imagine that the writer is anything but a 'perfect' quilter.
But in reality, stuff (you know the word I really want to use 🤭) happens to us all. Usually when we're in a hurry, or maybe too dialed into what's on Netflix.
While making this block, it came to trimming the SA that'd be the placement line for Goose.2. I've made these units 100s, if not 1000s, of times.
Meet the correct trimming on the left and it's not-so-cool cousins Rut! and Ruh!
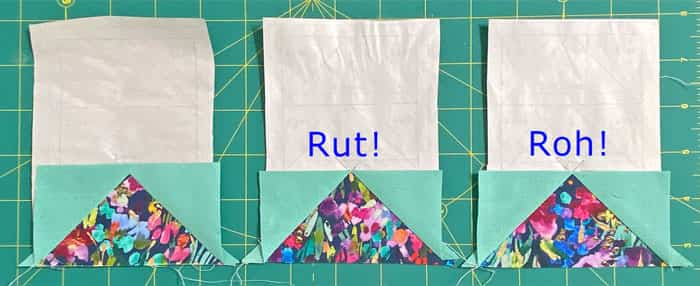 The only thing the two on the right are good for is to show you what NOT to do.
 Yep. Not once. But twice I cut it wrong.
If this kind of problem plagues you from time to time, then try an Add-A-Quarter ruler...it makes the job foolproof as along as you fold on the line.
For even MORE blocks to make... 🧩🎨

...visit our Free Quilt Block Pattern Library, with over 230+ blocks to choose from in multiple sizes.
Free downloads are included in all sizes for any blocks require paper piecing patterns or templates.
- Home
- Free Quilt Block Patterns
- God's Eye Quilt Block
