- Home
- Quilt Design Inspiration
- Garden Maze Quilt Pattern
Garden Maze Quilt Pattern Design
A Scrappy Twist on a Traditional Design!
This post contains affiliate links, for which I receive compensation.
Our Garden Maze quilt pattern that follows was designed in response to a readers question about an old quilt that she had made some 20 years ago.
 Garden Maze quilt pattern
She sent in this picture and wondered if anyone knew the pattern.
A check in some of my quilt block reference books revealed its name, 'Garden Maze'. Other names include: Tangled Garter, Tirzah's Maze and Sun Dial.
In each of these variations, the strips in the 'sashing' units are solid and not pieced as in our directions.
I put together a quick drawing (in EQ7) of the Garden Maze quilt pattern. I then asked for some dimensions and possibly another picture and Evelyn graciously sent this close-up photo of the quilt.
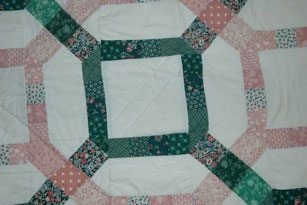 Garden Maze, closeup
The extra picture was A LOT of help for fine tuning the pattern because it showed this was a scrappy quilt.
I totally missed that in the original picture!
Evelyn also shared that the patches in the 'sashings' measured 1-1/2" by 2" finished and that the original quilt measures about 64" by 84".
and see my original rendition.
With Evelyn's measurements as a reference, I drafted the blocks into Electric Quilt 7. The result is a set of three blocks--a 6" finished 'X' block, 6"x8" finished sashing, and 8" finished solid neutral squares.
For the most part, all the patches are rotary cutter friendly!
Let's get to it!
📋 General Instructions
Before you begin stitching, download the following pages that we have prepared for you in EQ7.
You may find it helpful to leave the rotary cutting directions open in a browser window as you read through the following instructions.
Fabric choices
For this block you'll need a single background fabric.
The example shows a typical light neutral, but there's no reason you couldn't use a darker fabric. Or use scraps for the background pieces. Just be sure that they are all of the same value (lightness or darkness) and that they contrast sufficiently with the colors you choose for the 'X' blocks. If there is not enough contrast, you will not be able to see the rings and squares this pattern forms.
For your 'X' blocks you'll need scraps in two different color families. Do note that though there is a single design for this block, there are two different color placements.
Garden Maze blocks
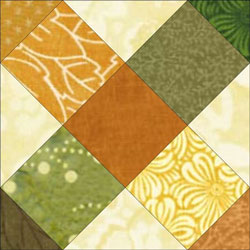 Gold center square
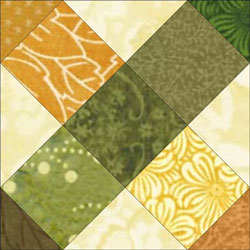 Green center square
No special fabric preparation is needed. However, I must admit, that the more piecing I do, the more I like to starch my fabric. It's especially helpful for controlling bias edges.
You can learn more on our page Starch Quilt Fabric.
Construction tips
The 'X' block is rather like a modified 9-patch. Stitch a 'B' quarter square triangle (QST) to each side of a gold 'C' square. (As you align the two patches, you can see that the 'B' triangle is oversized. You'll be trimming it just a bit at the end.) Press the seam allowances toward the squares. Repeat for the other gold square.
Sew a green 'C' to oppose sides of a darker gold 'C' square.
Press the seam allowances away from the center. (Remember that about half the blocks will have a green center, the other half will have a gold center...or whatever colors you've chosen.)
Join these strips together, pressing the seam allowances away from the 'B' QSTs.
Add the 'A' half square triangles to the like colored corners matching the centers.
Trim off any dog-ears that form.
Give your 'X' block one final trim and then press.
The construction of the sashing blocks is, I believe, self explanatory from the rotary cutting instructions page. If I was making the whole quilt, strip piecing the colored sections of these units (with 2-1/2" wide strips) would be the most efficient way to stitch them together.
Don't forget to cut out 8-1/2" background squares (that will finish to 8".)
Helpful Hint
For an extra flat block, after the final press, lay your rotary ruler on top of the block until the block cools. This sounds so simple...yet the result in a beautifully flat quilt block.
A stitched block
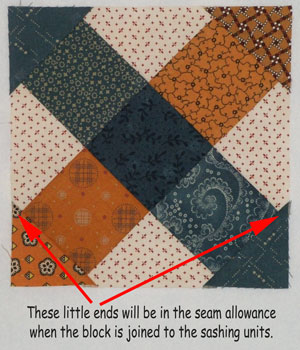
I swapped in blue fabrics for the greens and the result is to the right.
See the little 'arrows' that form at the outside corners?
That is because I added the 'A' triangles at the very end. Those jagged points will disappear once the block is stitched to a sashing block.
Arrange the blocks
The blocks are arranged so that alternating circles and squares form in the same row. To do this the sashings are alternately flipped.
Take a close look at the 'X' blocks. See how they, too, alternate both in the direction of the gold 'leg' and also the color of the center patch. As I worked on the drawing, it helped to squint my eyes to make sure the blocks were aligned properly.
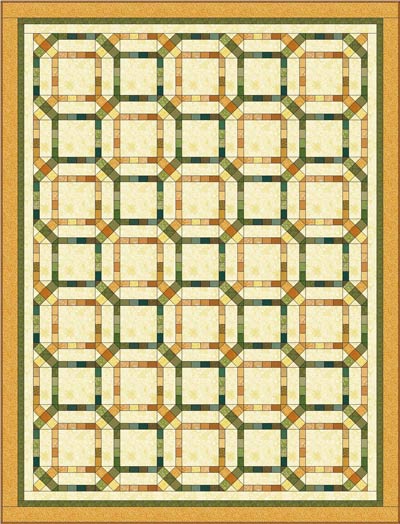
Our Garden Maze quilt pattern is almost complete...
There are three borders around the center field of blocks.
The first is made from strips of the background fabric cut 1-3/4" wide (1-1/4" finished).
The middle border is from green fabric cut into 1-1/4" wide green strips (3/4" finished).
The final border is from a gold fabric cut in 3" wide strips (2-1/2" finished).
A dark gold 1/4" finished binding completes the design.
If you have any questions about constructing the blocks in this scrappy
Garden Maze quilt pattern, please use the Facebook comments section
below or use our Contact Us form. Your input helps me write better instructions, so don't hesitate to ask!
The blocks just keep on comin'!
For other quilt blocks to make, check out our Free Quilt Block Patterns Library.
To get those creative juices flowing, go to our Quilt Design 101 pages.


