- Home
- Free Quilt Block Patterns
- Diamond Ring Quilt Block - Traditionally pieced
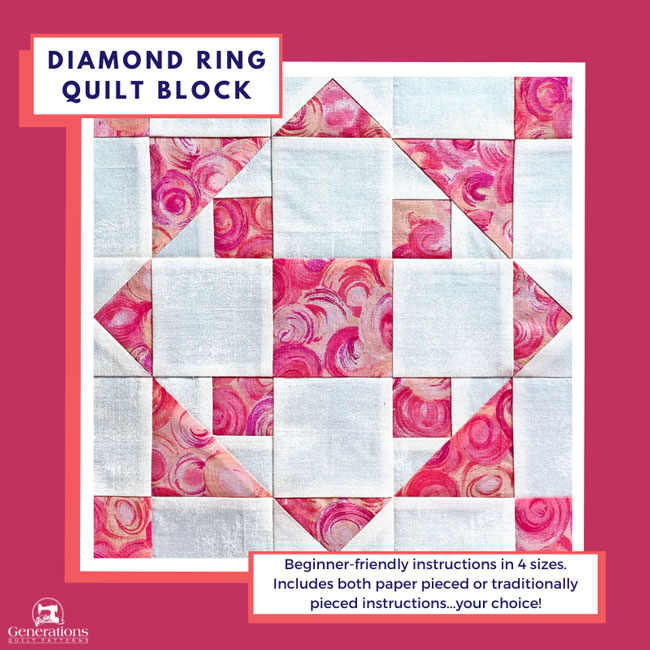
Diamond Ring Quilt Block Tutorial for Quilters who prefer Traditional Piecing 🙂
From our Free Quilt Block Patterns Library
This post contains affiliate links, for which I receive compensation.
If paper piecing a Diamond Ring quilt block isn't your thing, I've got you covered.
On this page, you'll learn how to use traditional piecing methods to make all the units. When they're finished, we'll head back to putting them together...and that's the same way regardless of the techniques you used to get to that point.
 If you like it, why not put a 'pin' on it?!!
As always, beginner-friendly, illustrated instructions are the backbone of the tutorial. There's more free goodies available for you to download to help you. They are:
Cut. Sew. Press. Turn your fabric into MAGIC!
📋General Instructions
Several abbreviations are used on this page. They are:
- SA - seam allowance
- RST - right sides together
- HST - half square triangles
- QST - quarter square triangles
- FG - Flying Geese units
- BW - Brave World units
A 1/4" SA is used in this tutorial.
Highlighted in yellow, pressing instructions are easy to spot.
To press, first press the patches in the closed position as they came off your sewing machine. This sets the seam, melding the fibers of the threads into the fibers of the fabric.
Then press the SA as instructed.
✂️Cutting patches for a traditional Diamond Ring block
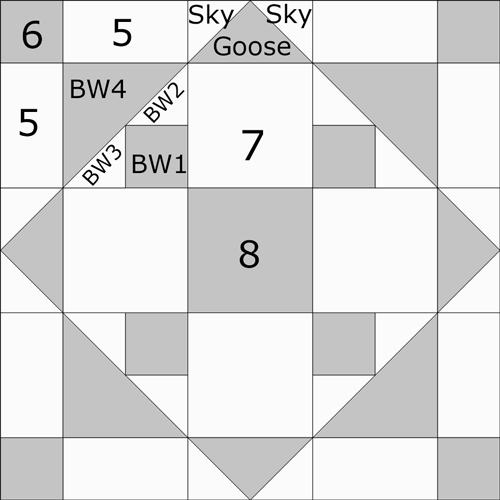 Diamond Ring block design
Sample Block Size: 10" finished / 10½" unfinished
Grid: 4x4
Design Type: 9-patch, uneven small center | Paper piecing
There's a lot of patches in this one. Label them. You'll refer to this numbering throughout construction.
To print a copy of the block design and cutting chart to use at your cutting table, click here.
 | Cutting Chart for a~ Traditional Piecing ~ | ||||||
|---|---|---|---|---|---|---|---|
| Patch | Fabric | Qty | Finished Block Size | Sub Cut | |||
| 8'' | 10'' | 12'' | 16'' | ||||
| BW-1 | A | 4 | 1½'' x 1½'' | 1¾'' x 1¾'' | 2'' x 2'' | 2½'' x 2½'' | --- |
| BW-2, BW-3 | Bac | 4 | 1⅞'' x 1⅞'' | 2⅛'' x 2⅛'' | 2⅜'' x 2⅜'' | 2⅞'' x 2⅞'' | |
| BW-4 | A | 2 | 2⅞'' x 2⅞'' | 3⅜'' x 3⅜'' | 3⅞'' x 3⅞'' | 4⅞'' x 4⅞'' | |
| Goose | A | 1 | 3½'' x 3½'' | 4'' x 4'' | 4½'' x 4½'' | 5½'' x 5½'' | --- |
| Sky | Bac | 4 | 2¼'' x 2¼'' | 2½'' x 2½'' | 2¾'' x 2¾'' | 3¼'' x 3¼'' | --- |
| 5 | A | 8 | 1½'' x 2½'' | 1¾'' x 3'' | 2'' x 3½'' | 2½'' x 4½'' | --- |
| 6 | Bac | 4 | 1½'' x 1½'' | 1¾'' x 1¾'' | 2'' x 2'' | 2½'' x 2½'' | --- |
| 7 | A | 4 | 2½'' x 2½'' | 3'' x 3'' | 3½'' x 3½'' | 4½'' x 4½'' | --- |
| 8 | A | 1 | 2½'' x 2½'' | 3'' x 3'' | 3½'' x 3½'' | 4½'' x 4½'' | --- |
| Unfinished Block Size | 8½'' | 10½'' | 12½'' | 16½'' | na | ||
| Grid Size | 1'' | 1¼'' | 1½'' | 2'' | na | ||
🪡Assemble the units for a Diamond Ring
Brave World units
Make 4
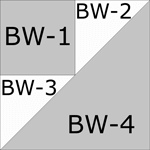
With RST, stitch the short edge of BW2 to BW1. Start at the 'flat' side so your machine doesn't chew up the point of the patch.
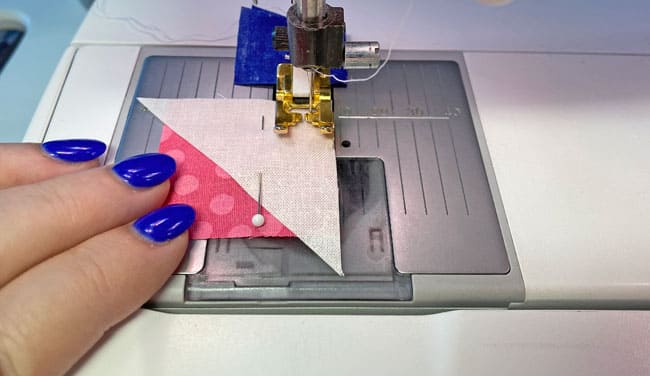
SA is pressed toward BW2.
Check the positioning of BW3. The long edges of BW/BW3 should form one long edge.
In the photo, notice how the bottom end of BW2 extends past the edge of BW1. It looks a little weird, but it's correct.
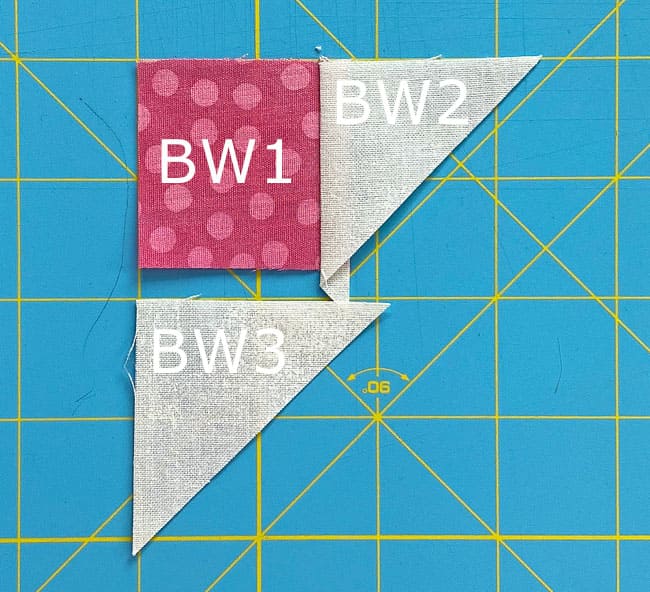
Layer the patches RST. I like to pin this to hold the edges even.
Starting from the blunt side again, stitch your 1/4" seam. If your cutting and stitching is accurate, that little upside down 'V' formed by the patches is 1/4" in from the edge. Your stitches should end there. (pink arrow)

Press, again, away from BW1.
At this point, the BW1/BW2/BW3 patch should be equal in size to the BW4.
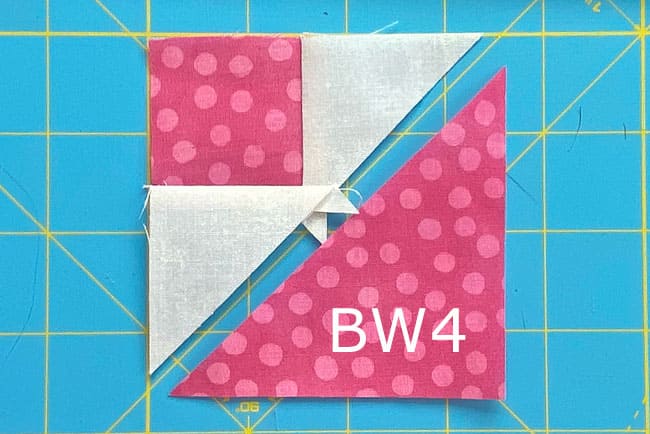 Trim away the dog ears. They serve no purpose and get in the way of sewing if you're using a 1/4" foot with a guide.
Though pins are perfectly fine, I do like to glue baste this long bias edge.
I'm using Elmer's Washable, No-Run School Glue (the white stuff your kids use in school).
I've put it in a small bottle with a fine tip to make it easy to dot the edge of BW4 with the glue. Make sure to have dots in the pointy end points.
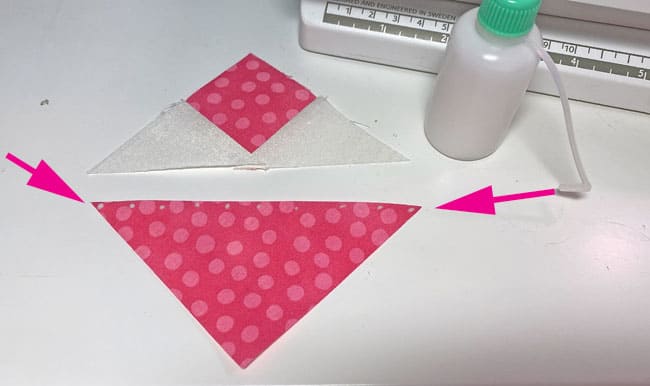
Layer the two patches together. When you're satisfied the edges are even, give them a quick press to heat set or dry out the glue.
There are several benefits to this extra step:
- the edges are exactly even
- the glue adds a bit more stability, especially at the points
- there are no pins to distort the points
And the sewing is easy!
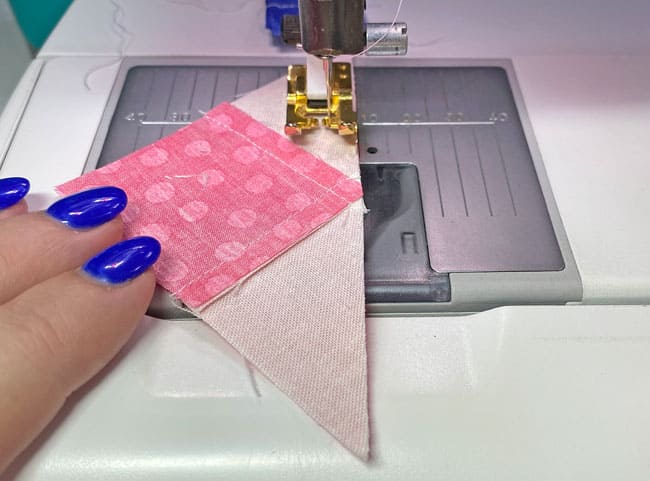
Give the BW a final press and trim away the dog ears.
This is how it looks up close and personal.
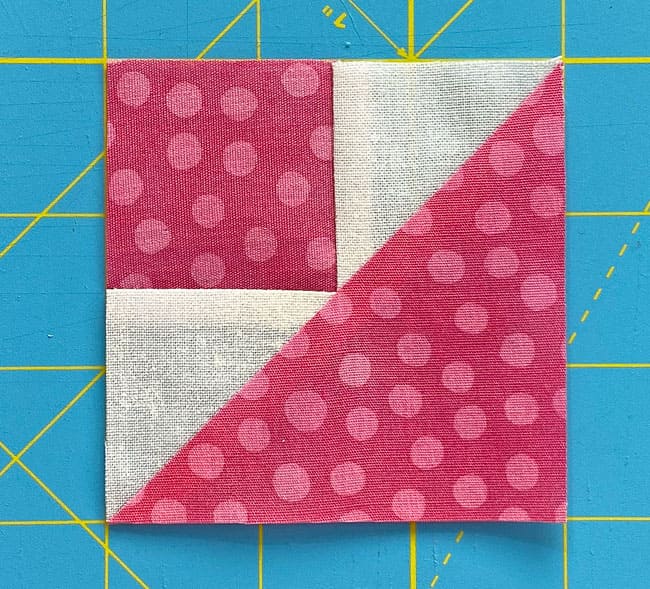
Repeat for a total of four.
Flying Geese - 4-at-a-time method
Make 4

We're using the 4-at-a-time method to make these FG. A bit less sewing and the same amount of trimming.
While many instructions use a version of this technique where the cutting and sewing must be absolute perfection for the units to turn out the right size, here we're starting with oversized patches to up the probability of success.
With RST, layer a large Goose square with two smaller Sky squares in opposite diagonal corners.
With your ruler and a marking tool (I like a mechanical pencil for this because the line is always a consistent width), mark a diagonal line through the Sky patches starting and ending at the pink arrows.
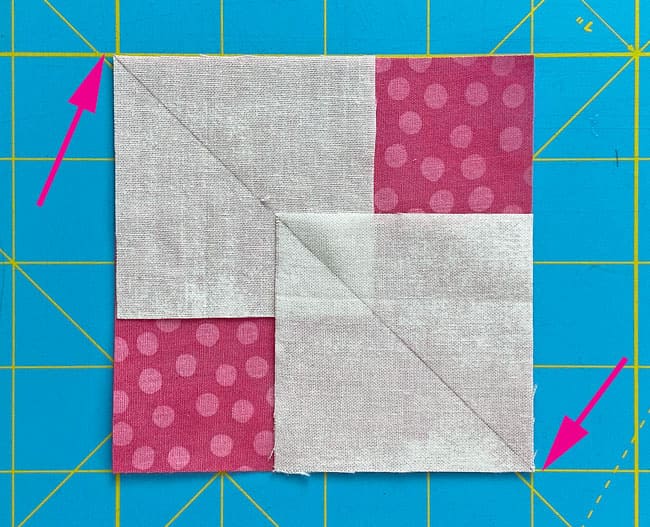
To remove excess bulk at the points of our soon-to-be Geese, cut away the excess Sky squares, so there's no overlap. This cut is perpendicular to the drawn line.
Fill in the pencil line if you need it.
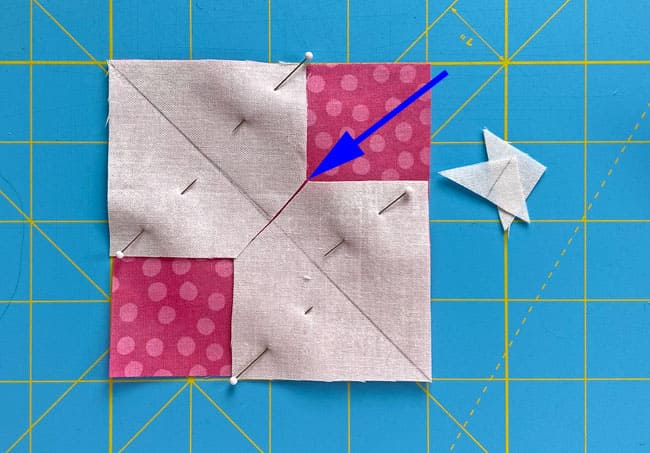
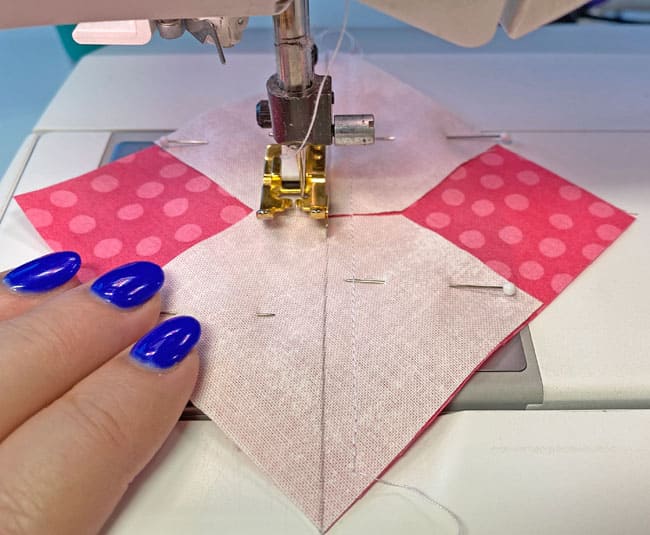
With your favorite 1/4" presser foot installed, stitch 1/4" away from both sides of the line. I use pins, strategically positioned to avoid having to stop to remove them, to hold all the edges even.
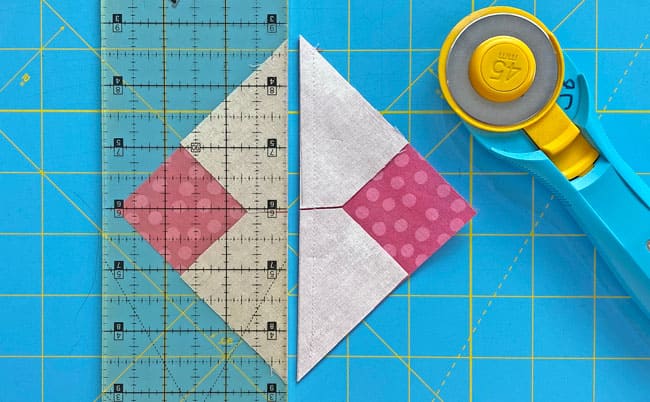
Give the sewn unit a press and cut in half between the stitching lines.
After pressing the patches (SA toward the BW2/BW3), layer a marked Sky square with the BW4 corner of eash.
The drawn line should fall through the 'V' created by the BW2/BW3 patches as shown below, pink arrow.
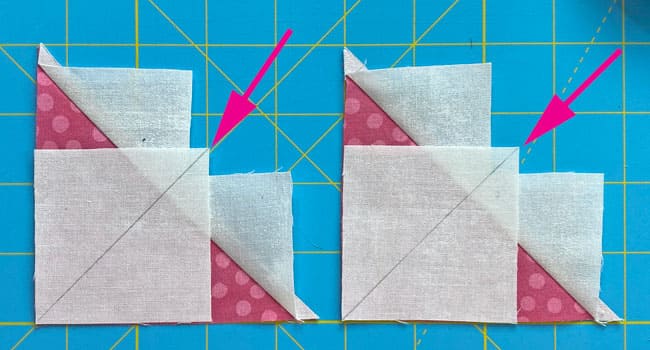
This time, it's harder to avoid having to remove pins as you sew 1/4" away from both sides of each line.
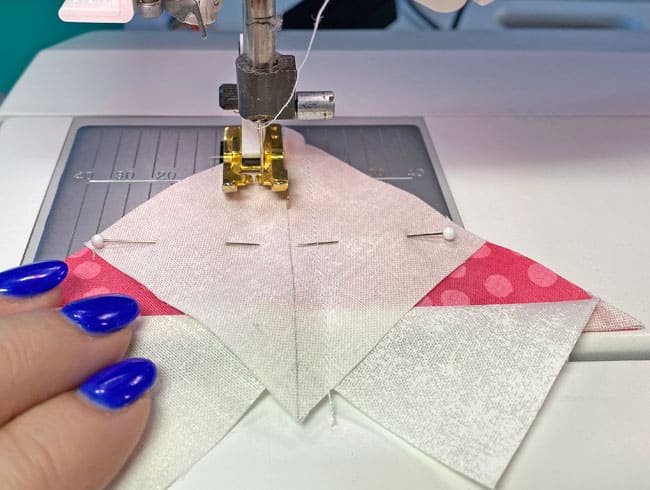
Press. Cut in half between the stitching lines.
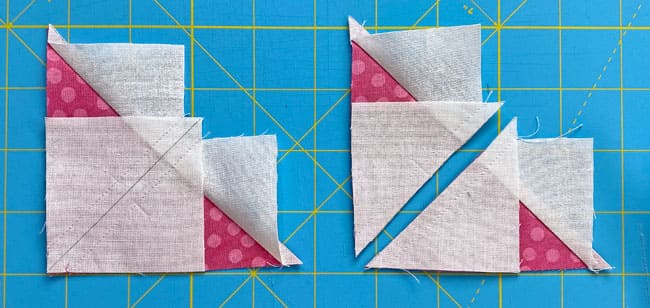
Press again with SA away from the Goose.

All that's left is to trim to perfection.
There are several tools available on the market, like the Wing Clipper by Studio 180 (which I've discussed here) or the BlocLoc ruler,.
Here we'll use an everyday rotary ruler and the handy-dandy chart below. No need to shoot the lock off the wallet to try out a single block, right?!!
Measurements for Trimming FG Units | |||
|---|---|---|---|
| Finished Block Size | Center | Unfinished FG Dimensions | |
| Height | Width | ||
| 8" | 1¼" | 1½" | 2½" |
| 10" | 1½" | 1¾" | 3" |
| 12" | 1¾" | 2" | 3½" |
| 16" | 2¼" | 2½" | 4½" |
Find the Center Measurement that corresponds to your finished FG Size.
For our 10" sample, it is 1½". The unfinished size of our FG is 1¾" x 3" for a unit that finishes at 1¼" x 2½".
Lay your FG on the cutting mat pointing away from you.
Position your ruler so that the point of the Goose is at this Center measurement and 1/4" in from the edge of your ruler. (pink arrow)
A seam should intersect your ruler on the bottom right at the Unfinished Height (1¾" for our sample) and on the bottom left at the Unfinished Width (3" for the sample).
Once you're satisfied everything is in the proper position, trim away the exposed excess with your rotary cutter.

Flip your Goose with the point towards you.
On the left side, the Unfinished Width line is directly over the cut edge. On the bottom, it lines up with the Unfinished Height. (blue arrows)
Again, trim away the exposed excess.
Repeat for all four FGs.

After trimming, we've got four perfect little FG to use in our Diamond Ring quilt block. Top points an exact 1/4" in from the edge. The bottom angles bisect the corners exactly in half. Love it!
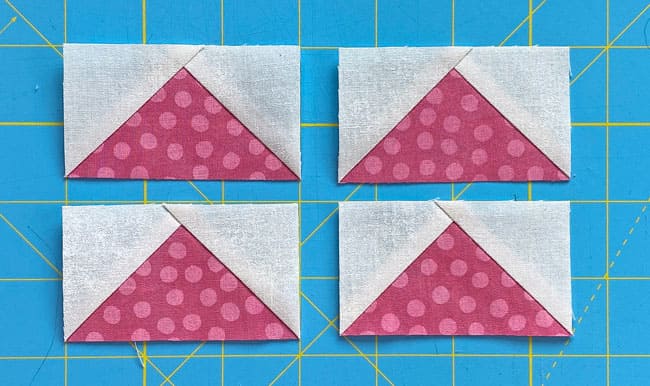
On to assembling our Diamond Ring quilt block
We're so close to finishing!
For even MORE blocks to make... 🧩🎨

...visit our Free Quilt Block Pattern Library, with over 230+ blocks to choose from in multiple sizes.
Free downloads are included in all sizes for any blocks require paper piecing patterns or templates.
- Home
- Free Quilt Block Patterns
- Diamond Ring Quilt Block - Traditionally pieced
