- Home
- Free Quilt Block Patterns
- Cross and Star Quilt Block
Cross and Star Quilt Block Tutorial: 9", 13½", and 18" finished blocks
From our Free Quilt Block Patterns Library
This post contains affiliate links, for which I receive compensation.
Let's get right to the point with the Cross and Star quilt block.
There's a whole lotta points!
You probably groaned a bit—I certainly did!—thinking of all those half square triangles to stitch and trim, not to mention the Corner Beams that form that four-pointed star.
But I've got a trick up my sleeve for you to get stunning accuracy with minimal fuss.
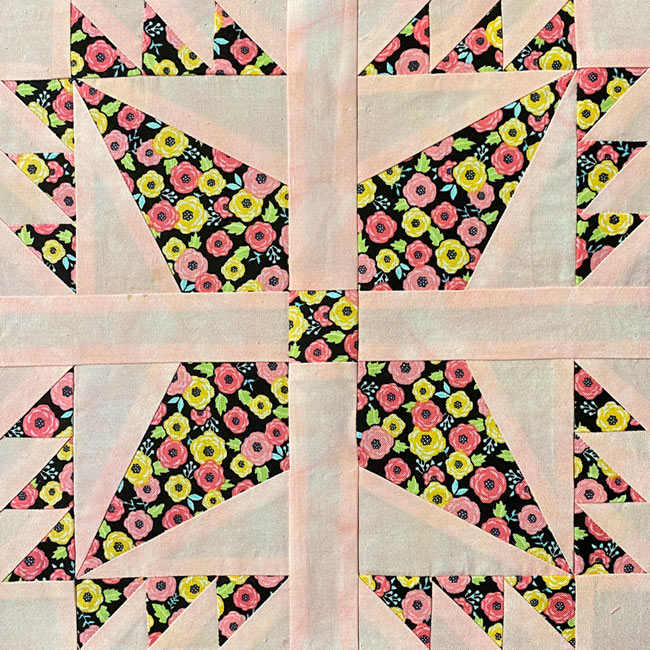
We're going to paper piece this little beauty!
The benefits are twofold:
- There's no specialty rulers to buy, to learn to use, and instructions to keep handy
- By slowing down enough to stitch on the line, all those points end up exactly where they need to be. All that's left is to check the accuracy of your 1/4" seam and adjust as necessary.
It's a pleasure to make a new block without having to learn a new technique, isn't it.
And paper piecing is simply sewing on a printed line.
You CAN do the thing!
As always, beginner-friendly, illustrated instructions are the backbone of the tutorial. There's more free goodies available for you to download to help you. They are:
- A cutting chart in three sizes, with downloads of the chart and block design
- Stash this tutorial for when you're ready to stare down all those points and beams by bookmarking or pinning.
Cut. Sew. Press. Turn your fabric into MAGIC!
General Instructions
Several abbreviations are used on this page. They are:
- SA - seam allowance
- RST - right sides together
- HST - half square triangles
- CB - Corner Beam
A 1/4" SA is used in this tutorial.
Highlighted in yellow, pressing instructions are easy to spot.
To press, first press the patches in the closed position as they came off your sewing machine. This sets the seam, melding the fibers of the threads into the fibers of the fabric.
Paper pieced SAs are always pressed towards the last patch you stitched.
Download and print the paper piecing patterns and template
To download the pattern, use the most current version of Adobe.
For accurate results, on Adobe's Print Menu page, under 'Page Size and Handling' set 'Custom Scale' to 100%. Then print.
Click here to see what it looks like on the Print Menu page.
Find your finished block size from the chart below. Print the corresponding number of pages for a total of 4 Corner Beams and 4 each of the A and the B HST Trios for each block you want to make.
Print Paper Piecing Patterns and Templates | |||||
|---|---|---|---|---|---|
| Finished Block Size | HST Trios | Corner Beam | |||
| # of Copies to Print | Finished Size | Template Print 1 copy | # of Copies to Print | Finished Size | |
| 9" | 1 | 1" x 3" | 3" | 1 | 3" |
| 13½" | 1** | 1½" x 4½" | 4½" | 2 | 4½" |
| 18" | 2** | 2" x 6" | 6" | 4 | 6" |
**1 copy of this is 2 pages containing both A and B HSTs
After printing, use the 1" square graphic on the printed page(s) to double check that your patterns printed at the correct size.
Then cut out the required number of patterns from your copies. A rough cut is good enough—an 1/8"-1/4"-ish away from the outside dashed square.
Not sure which paper piecing paper to use?
Click here for "Does it really matter which paper piecing paper you use?" to help you make the best decision for your needs.
The newest quilt fabrics to tickle your fancy...
Click the images below to see the full collection. We share any commercial and/or free patterns that showcase them, too. (For inspiration, of course!)
Step 1: Cutting patches for your Cross and Star block
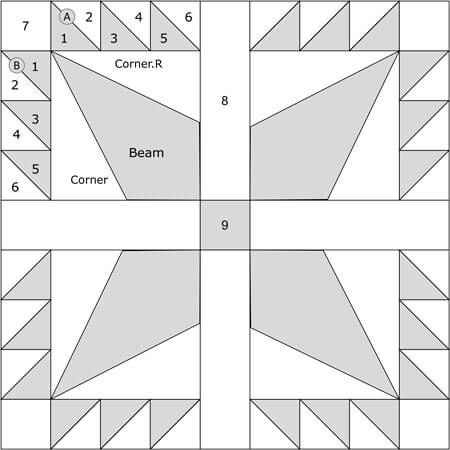
Sample Block Size: 9" finished / 9½" unfinished
Grid: 9×9
Attribution: Clara Stone
Design Type: Star | Paper piecing | Uneven 9-patch, small center
Be sure to label your patches. We refer to their numbers throughout this tutorial.
I used one of my own hand dyed fabrics for the background. The beauty of using hand dyes or batiks is the right and wrong sides are usually interchangeable.
The sweet little print is 'Rosey Posey' from the At Home collection by Cherry Guidry for Benartex,
To print a copy of the block design and cutting chart to use at your cutting table, click here.
 | Cutting Chart for a~ Paper & Traditional Piecing ~ | |||||
|---|---|---|---|---|---|---|
| Patch | Fabric | Qty | Finished Block Size | Sub Cut | ||
| 9'' | 13½'' | 18'' | ||||
| 1, 3, 5 | Dark | 12 | 2⅜'' x 2⅜'' | 2⅞'' x 2⅞'' | 3⅜'' x 3⅜'' | |
| 2, 4, 6 | Light | 12 | 2⅜'' x 2⅜'' | 2⅞'' x 2⅞'' | 3⅜'' x 3⅜'' | |
| 7 | Light | 4 | 1½'' x 1½'' | 2 '' x 2'' | 2½'' x 2½'' | --- |
| 8 | Light | 4 | 1½'' x 3½'' | 2 '' x 5'' | 2½'' x 6½'' | --- |
| 9 | Dark | 1 | 1½'' x 1½'' | 2'' x 2'' | 2½'' x 2½'' | --- |
| Beam | Dark | 4 | 3¾'' x 3¾'' | 5¼'' x 5¼'' | 6¾'' x 6¾'' | yes |
| Corner, Corner.R | Light | 4 | 3⅜'' x 4¼'' | 4⅛'' x 5¾'' | 4⅞'' x 7¼'' | yes |
| Unfinished Block Size | 9½'' | 14'' | 18½'' | na | ||
| Grid Size | 1'' | 1½'' | 2'' | na | ||
Subcutting
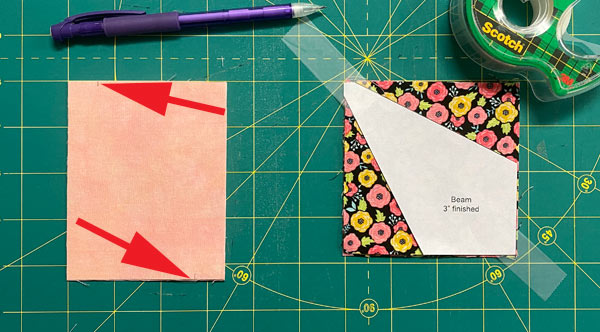
For our CBs we need mirror image patches for the side triangles. Layer your Corner/Corner.R rectangles in pairs that are RST. The width or shorter sides are at the top and bottom.
With a pencil make a mark 5/8" in from the top left edge, and 5/8" in from the bottom right edge. The red arrows point to my marks.
After cutting out the Beam template, lay it on top of the stack of Beam patches. These can be either right or wrong side up. Match the corners of the template to the corners of your patches.
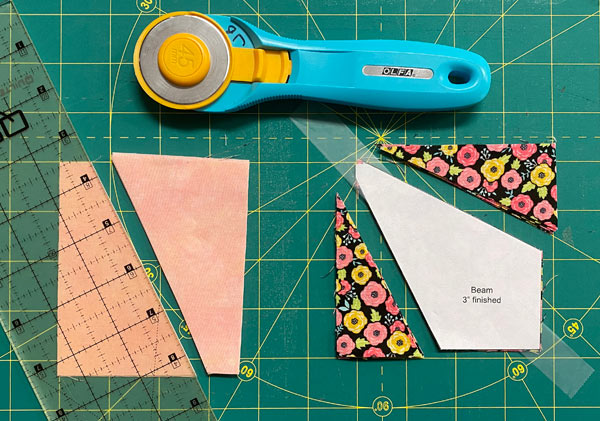
Align the edge of your ruler with the marks and cut the Corner/Corner.R rectangles in half as shown. Cut away the excess fabric from the Beam patches.
All the squares for the HST (#1-#6) are cut in half once on the diagonal.
Step 2: Assemble the units for your Cross and Star quilt block
I like to use a dot of Elmer's Washable Glue Stick to hold the #1 and Beam patches to the unprinted side of the pattern. Use the dashed lines to help you quickly (and accurately) position them.
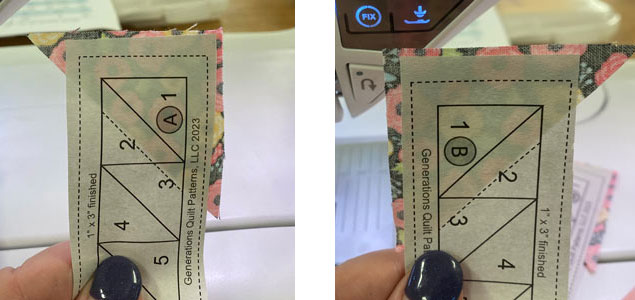
These patches are oversized on purpose,
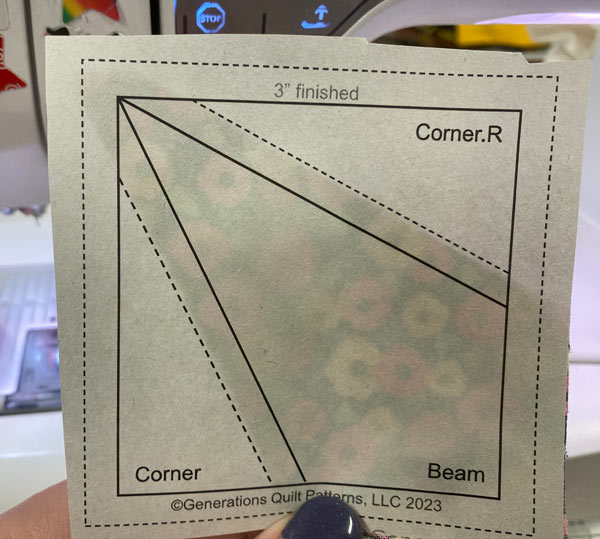
Once all the #1s and Beams are stuck to the pattern, you can put away the glue stick. We won't need it again.
General Sewing Machine Setup for Paperpiecing
- Reduce your stitch length to 16–20 stitches per inch (1.3-1.6 mm). This perforates the paper and stabilizes the seam when you remove the pattern. [Learn more about stitch length here.]
- Reduce your machine's speed or just plain slow down. Sew only as fast as you can stay on the stitching lines.
- Install an open toe appliqué foot (sometimes called an 'embroidery' or 'satin stitch' foot) if you have one (it's easier to see where you're stitching with one installed).
- Use a larger needle (90/14) if you have problems removing the pattern.
- If your machine has a needle stop up, use it. The stitching goes faster when you don't have to lift the presser foot with every seam.
- As you stitch each seam, start and stop a generous 1/4” before and after the solid stitching lines. ALWAYS. Future lines of stitching secure the ends.
After adding each patch, press the unit as it was sewn to set the seam and then open. The SA is automatically pressed towards the last patch added.
Before adding the next patch, take a look to make sure the one you just added covers the space plus seam allowance that it is supposed to.
Steam is optional and usually curls the pattern.
If that bothers you, don't use steam. Sometimes I do. Sometimes I don't.
It truly depends on my mood.
Remember, as you follow this paper piecing tutorial, the printed and the fabric sides of this block are mirror-images of each other.
At last!
Let's sew!
Half Square Triangle Trios
Make 4 each
 These HST Trios are shown from the fabric side. The pattern side is the mirror image.
All our #1 patches are stuck in place. So with RST, line up the long bias edge of a light #2 with #1.
If your #2 is significantly lighter than #1, nudge #2 a few threads past the edge of #1. This will prevent the darker fabric from shadowing through the lighter one once the block (or quilt) is finished.
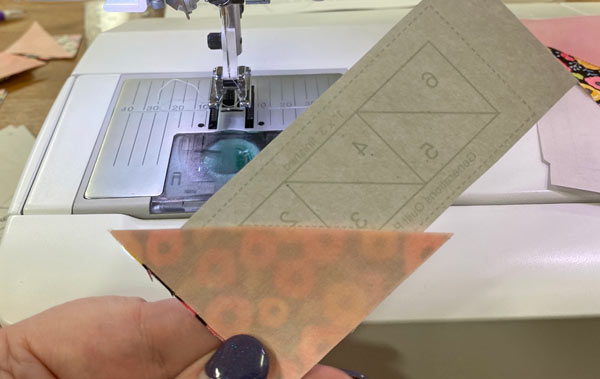
All the seams in these HST Trios run from one side of the unit to the other. That makes them candidates for chain piecing.
Stitch the seam from one side to the other between #1 and #2, starting and stopping outside the dashed lines.
To create the perfect placement for #2, at your cutting mat, pattern side up, fold the pattern back on itself on the line between #1 and #2. Crease the paper with your finger.
Below I'm using an Add-A-Quarter Plus ruler to trim away the excess fabric. It's a foolproof way to leave behind the perfect 1/4" SA.
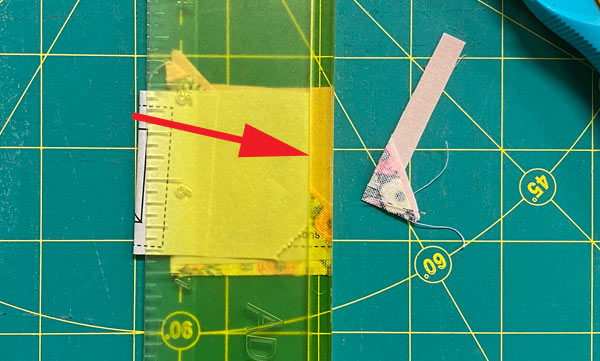
If you don't have this ruler, simply line up the 1/4" markings on your ruler with the folded edge of the pattern and trim away the excess. It works just as well without having to shoot the lock off your wallet.
After trimming, here's the fresh cut edge where you added the #3 patch.
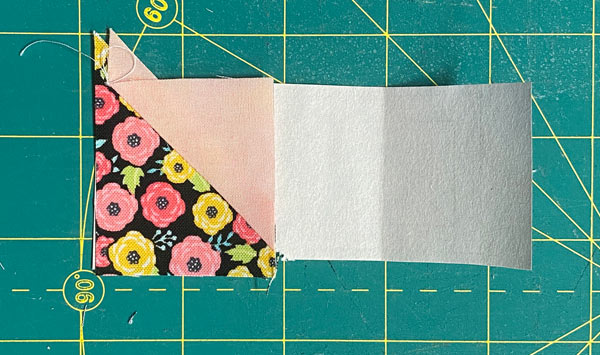
Continue adding the rest of the patches by sewing the seam, pressing, and the trimming the patch leaving behind the perfect 1/4".
Do this until all 8 of the HST trios—4 A's and 4 B's—are complete. (below, top row)
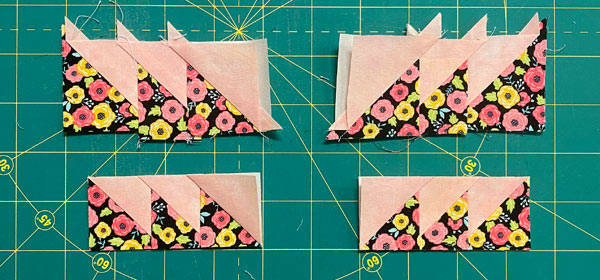 Untrimmed A amd B trios (top), and trimmed A and B (bottom)
After a final press, back at the cutting mat, pattern side up, lay the 1/4" markings on your ruler directly over one side of the solid line rectangle that surrounds the unit.
Trim away the excess. Repeat for all sides of all the HST Trios.
Here's where the time savings come in.
If we'd pieced each HST individually, oversized and then trimmed to perfection, there'd be a total of 24 HSTs to trim. I don't know about you, but I can think of a lot of other things I'd rather do. Not to mention, that's just for one block.
But we got smart and paper pieced our HSTs in groups of three—8 trios to be exact. A lot less trimming to muddle through, wouldn't you agree?
And if you've been diligent about stitching on the line, those points are all exactly 1/4" away from the trimmed edge.
It's a beautiful thing!
Corner Beam (CB)
Make 4
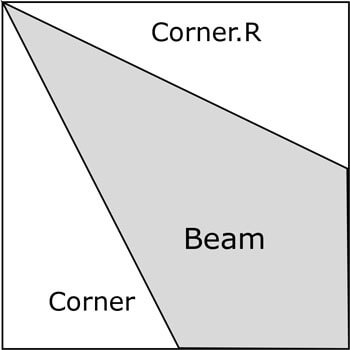
With RST, layer the Corner with the Beam patch. Narrow ends together.
If you've not made this unit before, flip the patch open to check that it's positioned correctly. Notice that, again, I've nudged the lighter patch over a couple of threads to prevent shadowing. Just like we did for the HST.
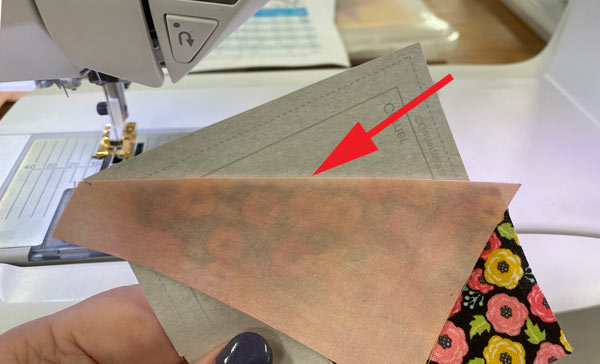
Stitch on the solid line between Beam and Corner, starting and ending past the outside dashed lines. Since the SA extends from one side to the other, our CBs are also candidates for chain piecing.
Press.
Repeat the process for the Corner.R.
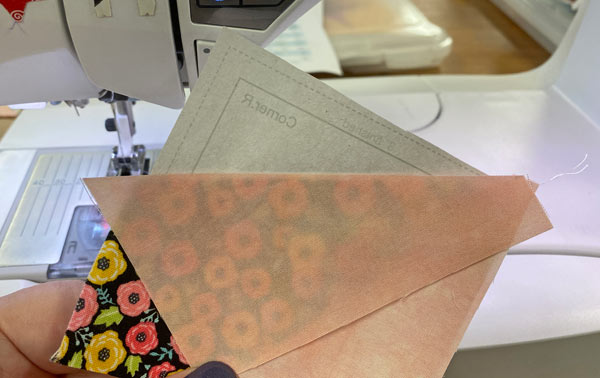
Press.
Repeat for all four CBs with one last good press.
At your cutting mat, pattern paper side up, line up the 1/4" marking on your ruler with one side of the solid line that surrounds your block. Trim away the excess with your rotary cutter.
Repeat for all four sides of each.
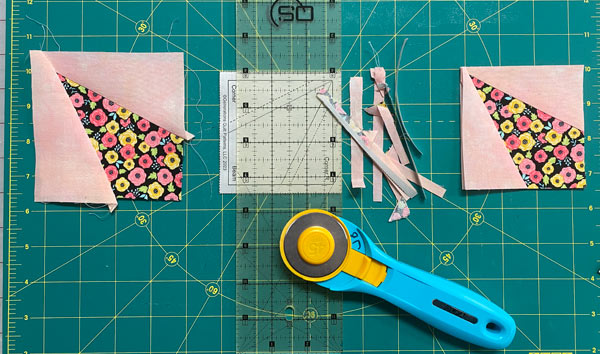 Untrimmed (left), trimming the first side (center), and perfection! (right)
The paper piecing is complete. From this point forward, return your stitch length to the one you regularly use for piecing and install your favorite 1/4" presser foot.
Once the trimming's complete, remove the paper from all the HSTs and CBs. Our patches were cut to put the straight of grain on the outside edges of all these units.
You'd have had the same result if you'd used traditional piecing techniques.
Corners
Make 4
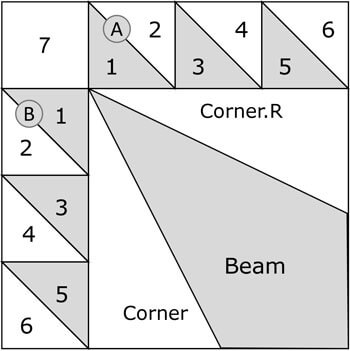
Since we were good about sewing on the line, our points are right where they need to be.
Now we're going back to traditional piecing methods to put it all together. Take a minute and take a Sewing Test to check the accuracy of your 1/4" SA.
With RST, add a #7 square to the left side of an HST-A. Add an HST-B to the left side of the CB with the point in the upper-left corner. (below left)
Make four of each.
SAs are pressed toward #7 and the CB.
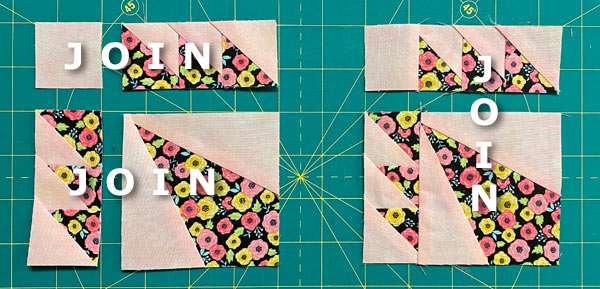
With RST, join the HST-A/#3 to the top of the CB/HST-B. (above right)
Repeat for a total of four.
This seam allowance is pressed toward the HST-As.
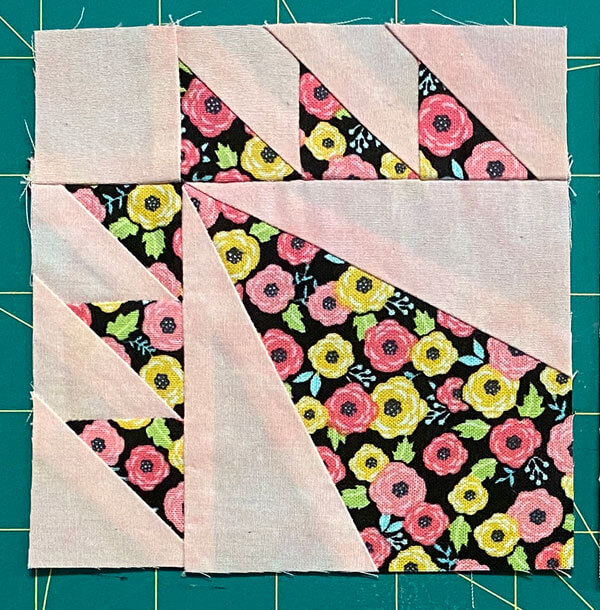
Step 3: Assemble your Cross and Star quilt block
Arrange the Corners and cut pieces to create the Cross and Star design. Every point points away from the center.
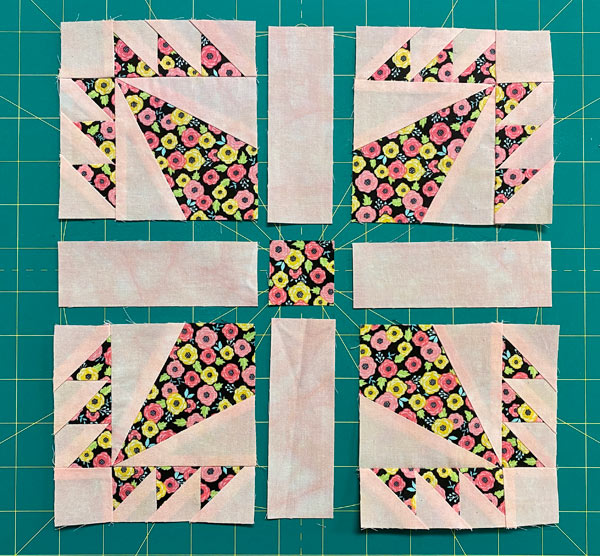
With RST, sew the units in each row together.
SAs are pressed toward the #8s and away from the #9.
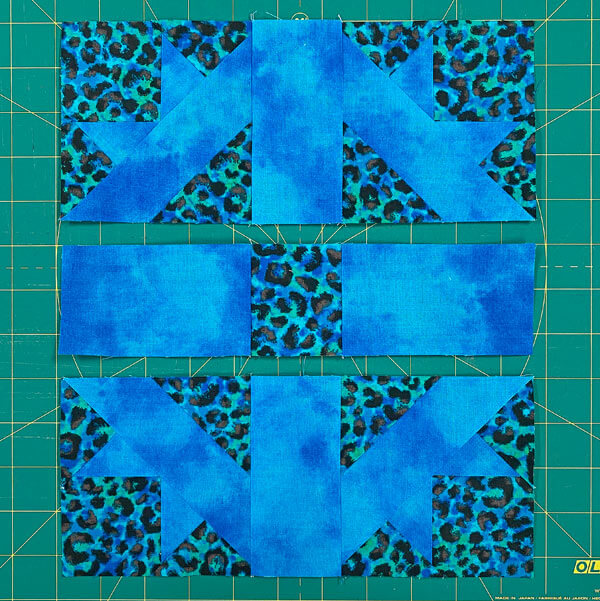
With RST, stitch the rows together and give your Cross and Star a final press.
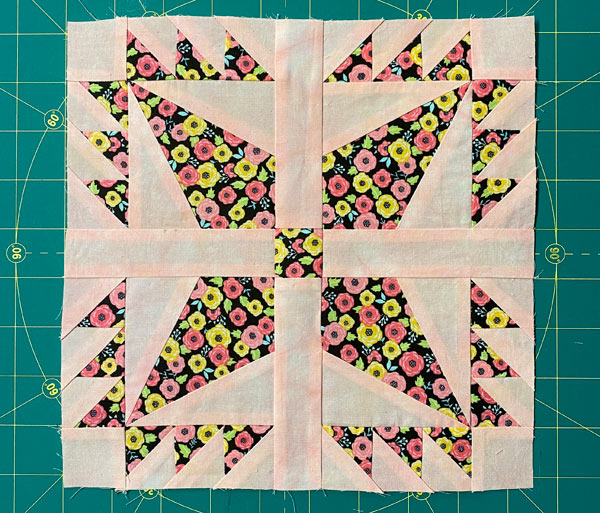
And now the view from the backside. You can see all the places where the lighter patch was nudged to prevent the darker one from shadowing through.
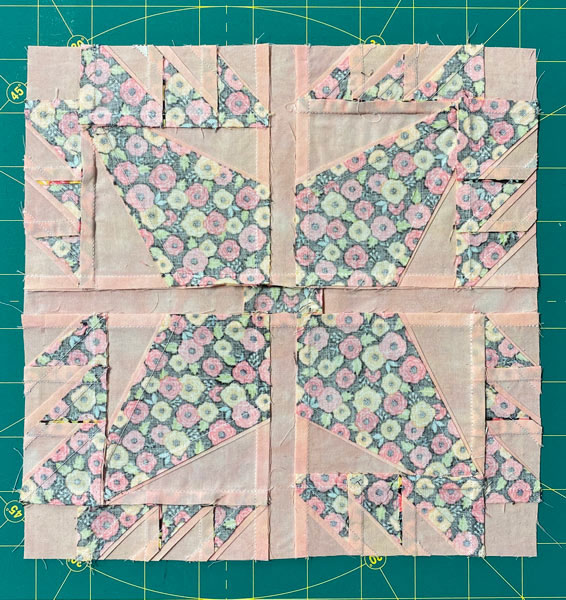
You did the thing!
After all those points and 'tricky' (yeah, those are air-quotes) CBs, you successfully stitched up the dynamic Cross and Star quilt block.
Paper piecing ensured every seam lined up precisely for stunning results.
Give yourself a pat on the back, knowing YOU made this complex-looking block completely from scratch. From perfectly matched half square triangles to framing star points, you nailed every detail.
Well done Fellow Quilter. You rule!
🔭 Looking for something truly stellar?
You've finished your star quilt block, and you're ready for more!
Browse our collection of 60 stellar star quilt block patterns. All have instructions and cutting charts in multiple sizes. If templates or paper piecing is used in the tutorial, there's a free download for you of those materials.

Eeny. Meenie. Miney. Moe.
Which star quilt block will you sew?
For a star-studded quilting experience, choose from 100+ bedazzling star quilt patterns—for beginners and beyond—click here.
For even MORE blocks to make... 🧩🎨

...visit our Free Quilt Block Pattern Library, with over 230+ blocks to choose from in multiple sizes.
Free downloads are included in all sizes for any blocks require paper piecing patterns or templates.
- Home
- Free Quilt Block Patterns
- Cross and Star Quilt Block
