- Home
- Free Quilt Block Patterns
- Crazy Ann Quilt Block
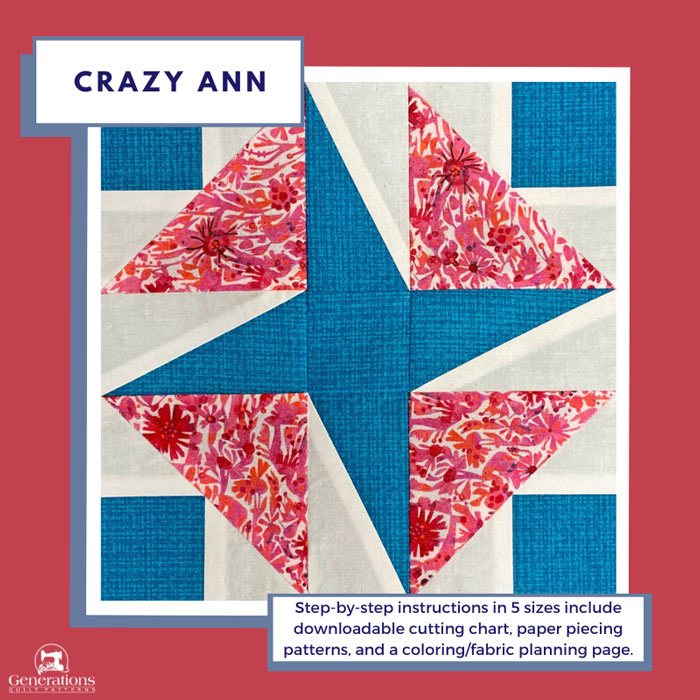
Crazy Ann Quilt Block Tutorial: 5", 7½", 10", 12½", and 15" finished
Perfect a new technique for quilting magic!
This post contains affiliate links, for which I receive compensation.
Get ready to jazz up your quilting game with the playful and dynamic jaunty Crazy Ann block.
With its sharp 45 and 63-ish degree angles, this block creates eye-catching points.
And we get it, angles can be a bit challenging at first—potentially intimidating some quilters.
But don't worry, we've got your back!
Our technique will help you master those angles with ease. With just a bit of patience and practice, you'll be amazed at the precision and accuracy you'll achieve. Not only will this take your Crazy Ann block to the next level, it'll also have a ripple effect on your overall quilting skills.
So let's dive in and have some fun with the Jaunty Crazy Ann block!
As always, beginner-friendly, illustrated instructions are the backbone of the tutorial. There's more free goodies available for you to download to help you. They are:
- A cutting chart in five sizes with downloads of the chart and block design
- What??? No time to quilt today. Pin or bookmark this tutorial for later.
It's time to cut up and sew!
General Instructions
Several abbreviations are used on this page. They are:
- SA - seam allowance
- RST - right sides together
- HRT - half rectangle triangles
- BW - Brave World units
A 1/4" SA is used in this tutorial.
Highlighted in yellow, pressing instructions are easy to spot.
First press the patches in the closed position as they came off your sewing machine. This sets the seam, melding the fibers of the threads into the fibers of the fabric.
Then press the SA to the dark unless otherwise noted.
Download and print paper piecing pattern
To download the pattern, use the most current version of Adobe.
For accurate results, on Adobe's Print Menu page, under 'Page Size and Handling' set 'Custom Scale' to 100%. Then print.
Click here to see what it looks like on the Print Menu page.
Find your finished block size from the chart below. Print the corresponding number of pages for a total of 4 each of the BW and HRTs.
Print the Patterns | |||||
|---|---|---|---|---|---|
| Finished Block Size | Brave World Units | Half Rectangle Triangles | |||
| Copies to print | BW Size | Copies to print | HRT-A Size | ||
| 5" | 1 | 2" | 1 | 1" x 2" | |
| 7½'' | 1 | 3" | 1 | 1½" x 3" | |
| 10" | 2 | 4" | 1 | 2" x 4" | |
| 12½'' | 4 | 5" | 2 | 2½" x 5" | |
| 15" | 4 | 6" | 2 | 3" x 6" | |
After printing, use the 1" square graphic on the printed page(s) to double-check that your patterns printed out at the correct size.
Cut out 4 of each unit, set aside the rest. A rough cut is good enough, somewhere between 1/8"-1/4" past the outside dashed square or rectangle surrounding each unit.

Not sure which paper to use?
Take a look at my review of several of the most popular brands available to us quilters on the market.
You want a super-easy paper to tear away—less stress on the stitches.
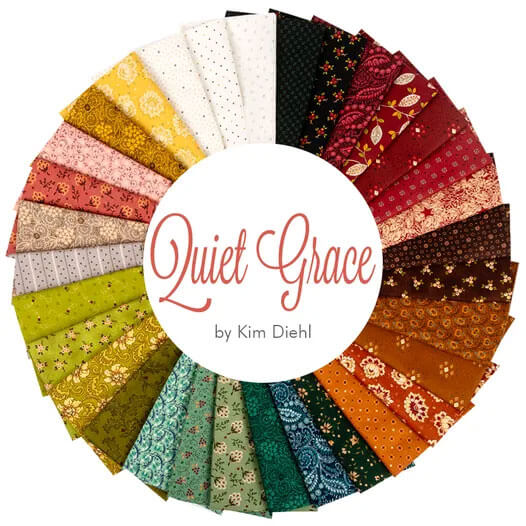
The newest quilt fabrics to tickle your fancy...
Click the images below to see the full collection. We share any commercial and/or free patterns that showcase them, too. (For inspiration, of course!)
Step 1: Cutting patches for a Crazy Ann quilt block
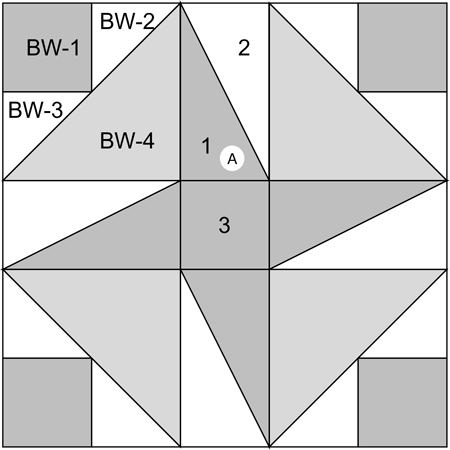 Crazy Ann quilt block design
Sample Block Size: 7½" finished / 8" unfinished
Grid: 5x5
Design Type: Star | Pinwheel | Paper Piecing
Please label all your patches. We use their numbers throughout this tutorial.
Like all the other blocks with pointy-points, choose fabrics with a good contrast between. We don't want our 'spikey peaks' getting lost.
To print a copy of the block design and cutting chart to use at your cutting table, click here.
 | Cutting Chart for a~ Paper & Traditional Piecing ~ | |||||||
|---|---|---|---|---|---|---|---|---|
| Patch | Fabric | Qty | Finished Block Size | Sub Cut | ||||
| 5'' | 7½'' | 10'' | 12½'' | 15'' | ||||
| BW-1 | Dark | 4 | 1¾''x1¾'' | 2¼''x2¼'' | 2¾''x2¾'' | 3¼''x3¼'' | 3¾''x3¾'' | no |
| BW-2 BW-3 | Bac | 4 | 2⅜''x2⅜'' | 2⅞''x2⅞'' | 3⅜''x3⅜'' | 3⅞''x3⅞'' | 4⅜''x4⅜'' | |
| BW-4 | Medium | 2 | 3⅜''x3⅜'' | 4⅜''x4⅜'' | 5⅜''x 5⅜'' | 6⅜''x6⅜'' | 7⅜''x7⅜'' | |
| 1 | Dark | 2 | 2⅞''x3¼'' | 3⅜''x4¼'' | 3⅞''x5¼'' | 4⅜''x6¼'' | 4⅞''x7¼" | yes |
| 2 | Bac | 2 | 2⅞"x3¼'' | 3⅜"x4¼'' | 3⅞"x5¼'' | 4⅜"x6¼'' | 4⅞"x7¼" | yes |
| 3 | Dark | 1 | 1½''x1½'' | 2''x2'' | 2½''x2½'' | 3''x3'' | 3½''x3½'' | --- |
| Unfinished Block Size | 5½'' | 8'' | 10½'' | 13'' | 15½'' | na | ||
| Grid Size | 1'' | 1½'' | 2'' | 2½'' | 3'' | na | ||
Subcutting
Layer the dark #1s either all right sides up or all right sides down, aligning the edges. (This is so all the patches are the same.)
Position these rectangles on your mat with the shorter edges (the Width) are on the top and bottom.
With a pencil, make a mark 5/8" in from the top-right side, and another 5/8" in from the bottom left. Line up your ruler with the marks at the edges of the rectangles and cut in half with your rotary cutter.
DO NOT SWITCH THE SIDES OF THE MARKINGS, otherwise the angle of these triangles will be in the wrong direction. If that happens, you'll need to recut the patches.
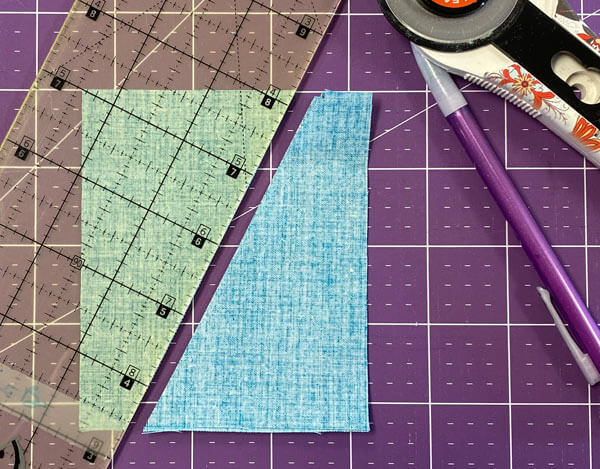
After cutting the #1s you should have 4 triangles that look like this.
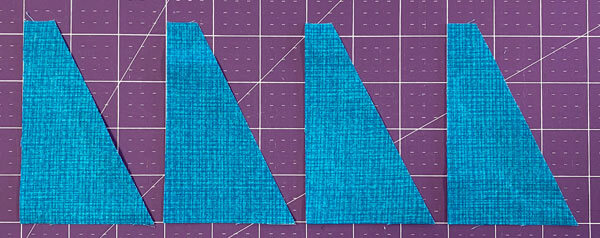
Repeat this step exactly for the lighter #2s, ending with 4 identical triangles of the background fabric. (They look just like the ones above except they're background fabric.)
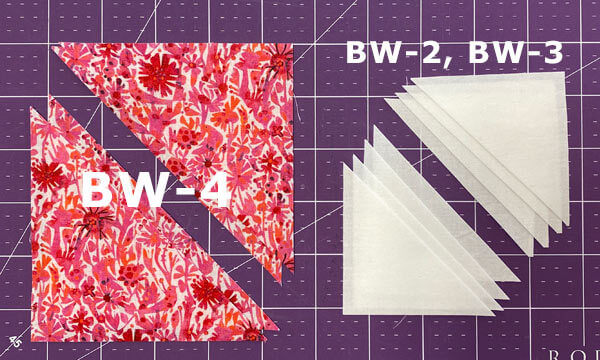
Subcut the BW-2, BW-3, and BW-4 squares in half once on the diagonal as shown below.
Step 2: Assemble the units for a Crazy Ann quilt block
The first up is to glue the first patch onto the BW and HRT patterns.
Double check to confirm that all four of your HRT paper piecing patterns have an A in a circle on them—otherwise the angle of the HRT will be in the wrong direction.
A small bit of Elmer's Washable Glue Stick does the job. The dashed guidelines around the first patch helps you quickly position it with its backside is stuck to the unprinted side of the paper pattern.
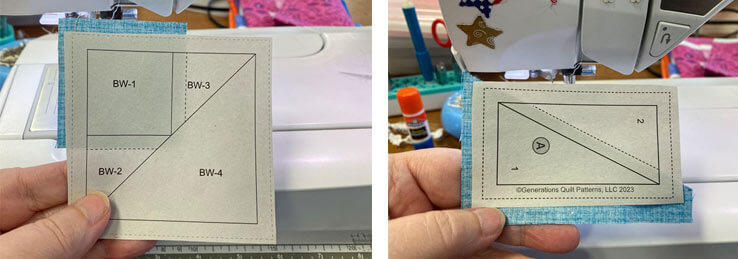 Glue 4 of each
When all 8 patches are glued in place, put the glue stick away. We won't need it again for this block.
Use the directions below to set up your sewing machine for paper piecing.
General Sewing Machine Setup for Paperpiecing
- Reduce your stitch length to 16–20 stitches per inch (1.3-1.6 mm). This perforates the paper and stabilizes the seam when you remove the pattern. [Learn more about stitch length here.]
- Reduce your machine's speed or just plain slow down. Sew only as fast as you can stay on the stitching lines.
- Install an open toe appliqué foot (sometimes called an 'embroidery' or 'satin stitch' foot) if you have one (it's easier to see where you're stitching with one installed).
- Use a larger needle (90/14) if you have problems removing the pattern.
- If your machine has a needle stop up, use it. The stitching goes faster when you don't have to lift the presser foot with every seam.
- As you stitch each seam, start and stop a generous 1/4” before and after the solid stitching lines. ALWAYS. Future lines of stitching secure the ends.
After adding each patch, press the unit as it was sewn to set the seam and then open. The SA is automatically pressed towards the last patch added.
Before adding the next patch, take a look to make sure the one you just added covers the space plus seam allowance that it is supposed to.
Steam is optional and usually curls the pattern.
If that bothers you, don't use steam. Sometimes I do. Sometimes I don't.
It truly depends on my mood.
Remember, as you follow this paper piecing tutorial, the printed and the fabric sides of this block are mirror-images of each other.
At last!
Let's sew!
BW Unit
Make 4
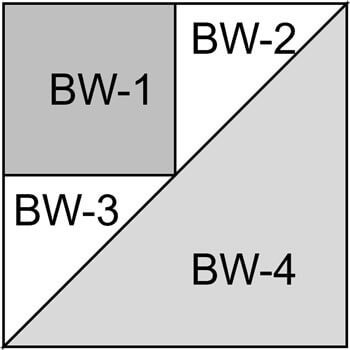
With RST, align one of the short edges of the BW-2 with the edge of BW-1.
If you're new to the BW unit, flip the patch part way into place to check that it's in the correct position. It's easy to flip these triangles the wrong way.
This quick check can prevent a 'sudden unexpected disassembly', AKA ripping.
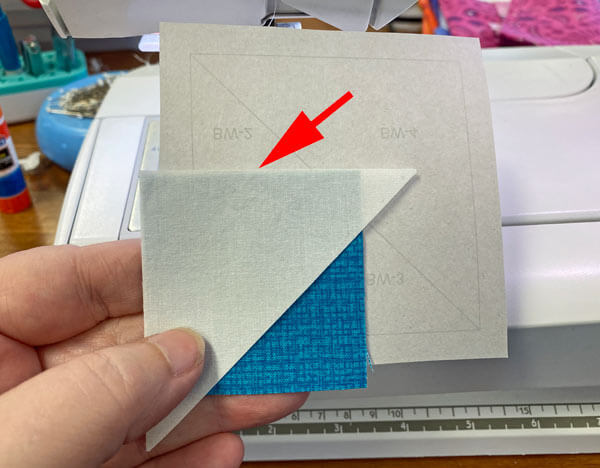
Helpful Tip
When adding a light patch to a darker one in a paper pieced block, you may notice the darker fabric can show through and create a shadow effect on the top.
To avoid this, simply nudge the light patch a few threads past the edge of the dark one.
This will ensure that the dark fabric stays hidden underneath, and your light patch remains crisp and clear on top.
Starting your stitching before the line between BW-1 and BS-2 by 1/4" and ending a good 1/4" after it ends.
Press.
With RST, add BW-3 in the same manner.
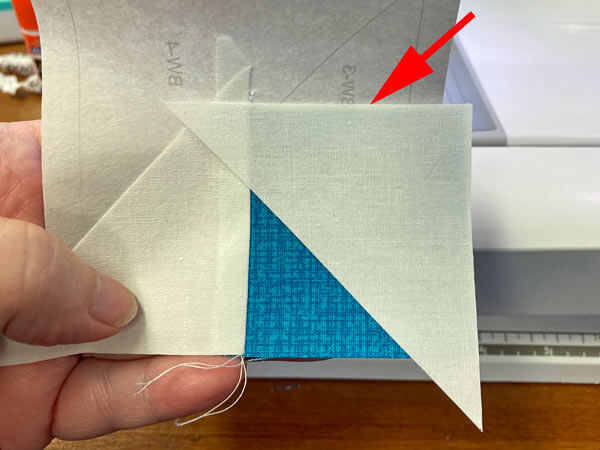
Below you can see how we've stitched a generous 1/4" before and after the solid lines (red arrow).
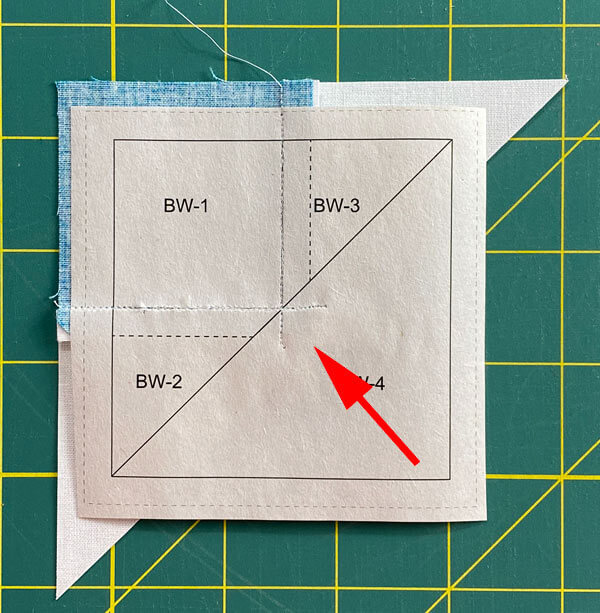
Make a trip to the ironing board for a quick pressing.
Move to your cutting mat and with the paper side up, fold the pattern back on itself on the line between BW-2/BW-3 and BW-4. You'll have to tear the paper away from the stitches a bit.
Don't worry. This is perfectly normal.
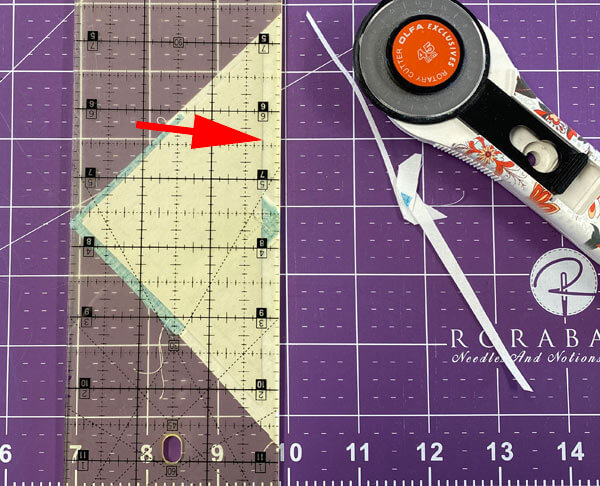
Line up the 1/4" mark on your ruler (red arrow) with the folded edge.
With your rotary cutter, cut away the excess fabric to create the perfect placement line (and 1/4" seam allowance) for BW-4.
With RST, align the long bias edge of BW-4 with the freshly cut #BW-2/#BW-3.
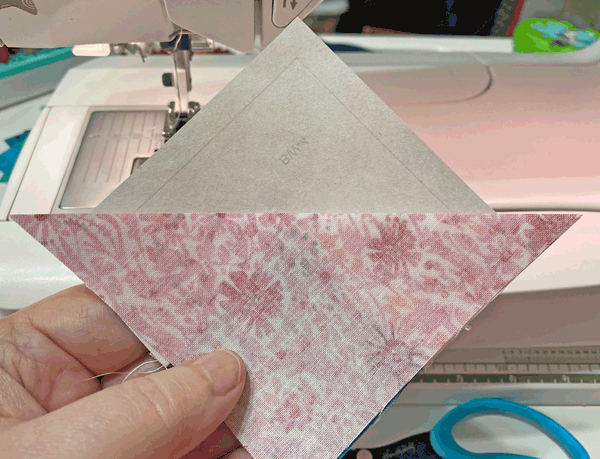
Sew from outside edge to outside edge. This seam is ideal for chain piecing, just like any other seam that runs from one side of a quilt block to the other.
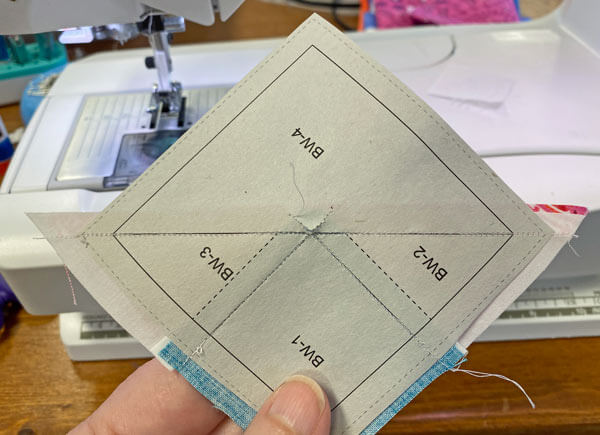 Unlike the first two seams in our BW that stop in the middle of the unit, this seam crosses the entire patch. You can chain piece it to save time.
One last turn at the ironing board for this unit, and we're ready to trim.
With the sewn BWs, pattern side up, on your cutting mat, align the 1/4" mark on your ruler (red arrow) with the solid square that surrounds the block.
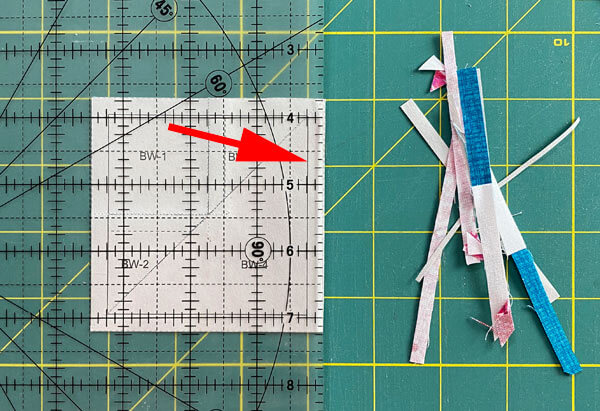 Don't you think it's a lot easier to line up the marks with the solid line rather than trying to match the edge of your ruler with the outside dashed, finished size line.
Cut away the excess fabric. Repeat for all four BWs.
These patches clean up nicely with the trimming. Notice what a crisp point there is on the square at the center. This is what paper piecing does for you. Perfection without the hassle.
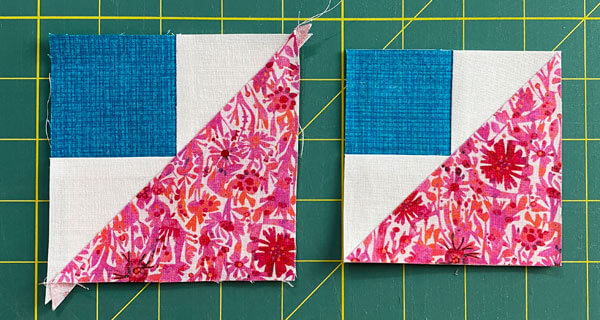 Untrimmed (left) versus trimmed (right) Brave World unit
HRT Unit
Make 4
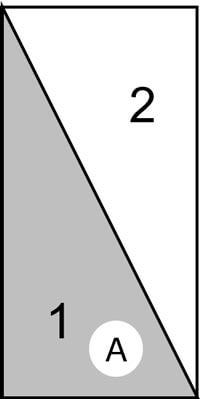 Half Rectangle Triangles unit
With RST, line up the long angled edges of the #2 and #1 patches.
Small triangles of pretty much equal size form at both outside ends.
Stitch on the line between #1 and #2, starting and stopping past the outside dashed lines.
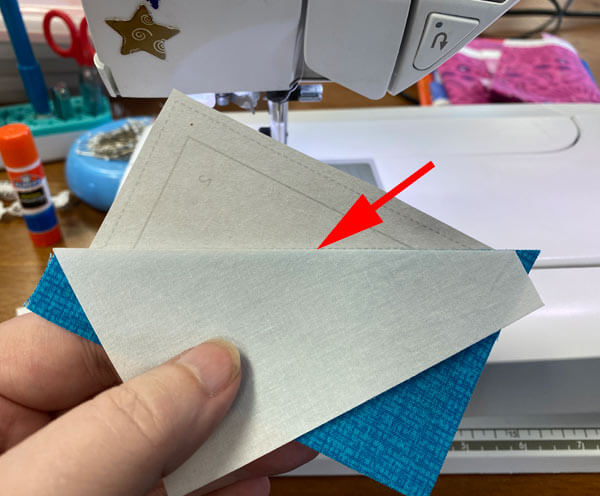
Press.
We trim these to size just like we did the BWs. Shown below is before trimming from the pattern side (left), the fabric side (middle) and perfection (right).
All this quilty goodness and no specialty ruler to shell out for and store. :)
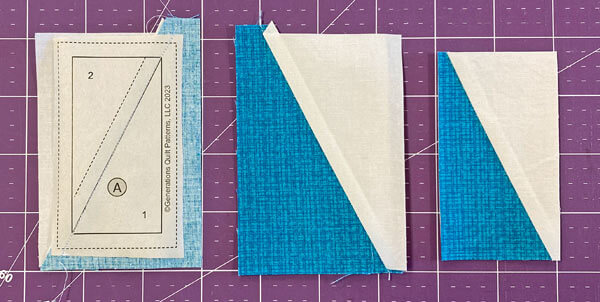
To complete the job, remove the paper pattern from all the sewn patches.
A little nervous about removing the paper?
Don't be. We cut all our over-sized patches so the outside edges of the units are on the straight of grain for stability. The paper has done its job and serves no further purpose.
[Click here to learn more about grainline and how it affects your piecing.]
You might have wondered...
Why didn't I start with the lighter fabric and add the darker one to it—then there'd be no worry about fabrics shadowing through the quilt top?
Right?
While that is correct, I was more concerned about the match of the points on the large HST and the HRT. If that SA had been pressed towards the darker fabric, there'd have been gobs of bulk right in that seam allowance. A pain to stitch through AND get a good match at the same time. Harder to pin through, too. And a nightmare if you have to machine quilt through it.
So for this design, the decision was made to reduce the bulk and make it easier to piece.
~ Julie
Step 3: Assemble the Crazy Ann quilt block
Let's get our patches laid out to form the Crazy Ann design.
Dark BW-1 squares are in the outside corners, background fabric is on the outside edge of the block at the HRTs.
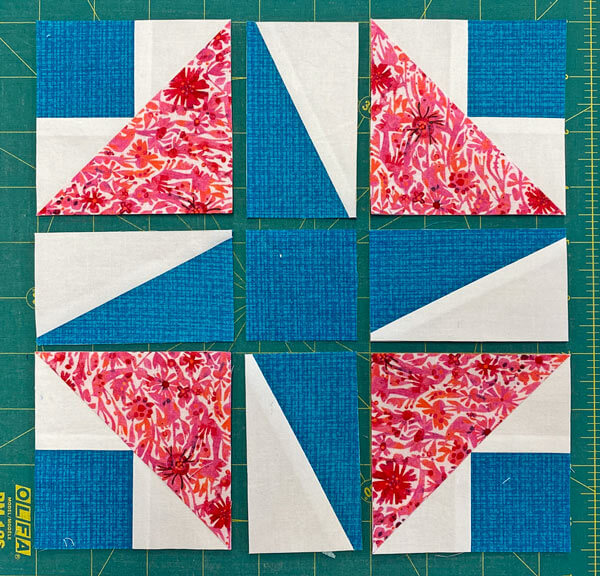
Stitch the units in each row together.
If you've been careful stitching on the line—particularly where the line crosses the solid square or rectangle that represents the finished size of the block—your points will virtually match themselves.
If you're off just a bit and want a refresher on pinning points, click here.
Remember as you stitch up to a SA, if it gets a bit bulky
- Stop with the needle down through the fabric.
- Lift the presser foot up and then set it back down by hand.
- Then slowly continue stitching.
This helps your presser foot get over that bumpiness and makes it easier for the feed dogs do their job.
The SAs are pressed towards the BW in the top and bottom rows, and towards #3 square in the center row.
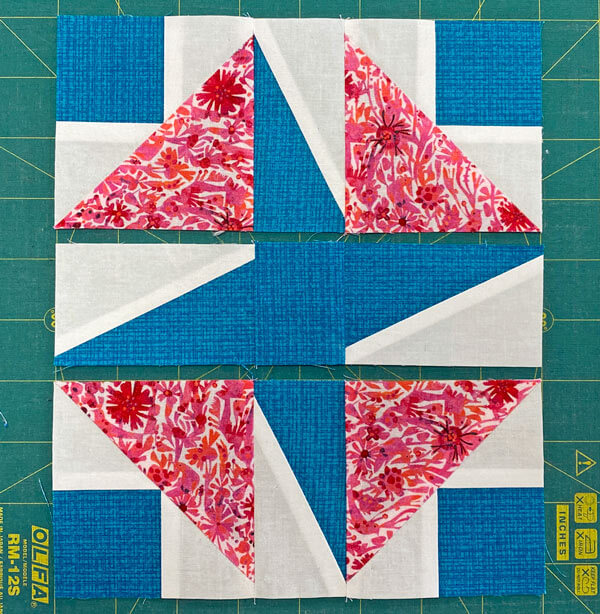
Stitch the rows together, pinning as needed.
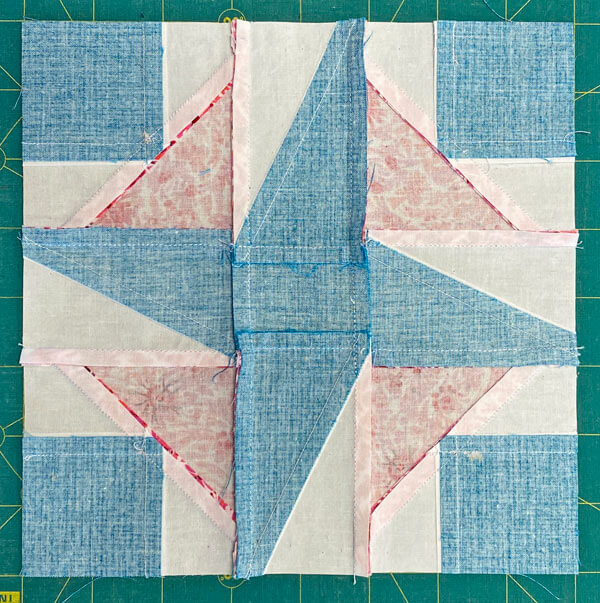
One last trip to the ironing board and Our Crazy Ann quilt block is finished.
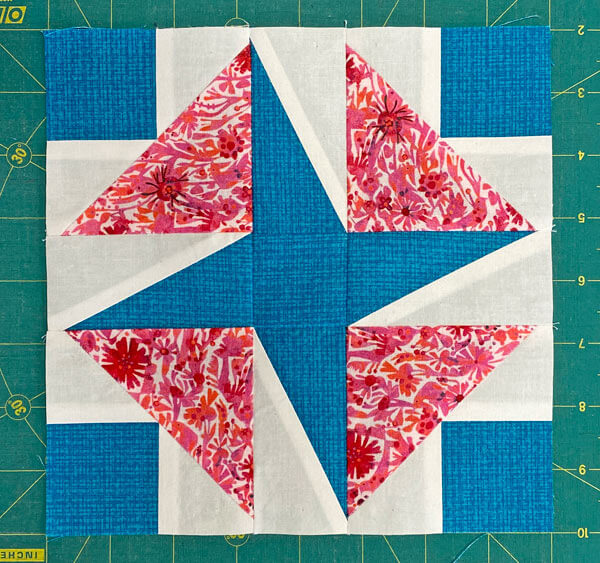
And a look at the back of the block to see how all the SAs fit together.
It's easy to see that if we'd pressed the SA in the middle of the HRTs toward the dark #1s there'd have been a wicked bit of bulk at those skinny points.
Not fun to piece.
Not fun to press.
Not fun to quilt.
I prefer to make things easy on myself. Quilting should be FUN!
🔭 Looking for something truly stellar?
You've finished your star quilt block, and you're ready for more!
Browse our collection of 70 stellar star quilt block patterns. All have instructions and cutting charts in multiple sizes. If templates or paper piecing is used in the tutorial, there's a free download for you of those materials.

Eeny. Meenie. Miney. Moe.
Which star quilt block will you sew?
For a star-studded quilting experience, choose from 100+ bedazzling star quilt patterns—for beginners and beyond—click here.
For even MORE blocks to make… 🧩🎨

...visit our Free Quilt Block Pattern Library, with over 260+ blocks to choose from in multiple sizes.
Free downloads are included in all sizes for any blocks require paper piecing patterns or templates.
- Home
- Free Quilt Block Patterns
- Crazy Ann Quilt Block
