- Home
- Free Quilt Block Patterns
- Christmas Star quilt block
Christmas Star Quilt Block
From our Free Quilt Block Patterns Library
This post contains affiliate links for which I receive compensation
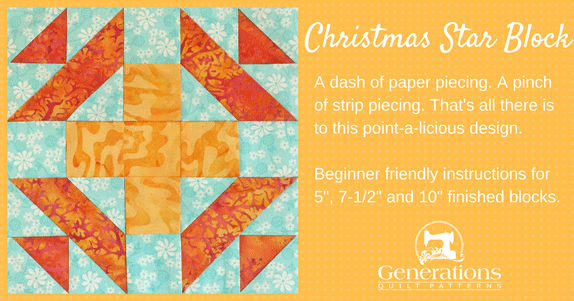
The Christmas Star quilt block isn't as tricky as it might look.
A dash of paperpiecing. A pinch of strip piecing.
That's all there is to the point-a-licious design.
In this tutorial you'll find:
- A cutting chart in three sizes to print
- No time for quilting today? Then Pin this tutorial for later!
It's time to cut up and sew!
General Instructions
Several abbreviations are used on this page. They are:
- SA - seam allowance
- RST - right sides together
- BITA - Birds in the Air units
1/4" SA are used through this tutorial.
Pressing instructions are highlighted in yellow so they're easy to find.
SAs in the paperpieced units are always pressed towards the last added patch.
Download and print paperpiecing pattern
If you prefer to use all traditional piecing methods, skip this step and go straight to Step 1: Cutting and use the green cutting chart.
Otherwise, you need the most current version of Adobe installed on your computer to download the pattern.
On the Adobe Print Menu page, under 'Page Size and Handling' set 'Custom Scale' to 100% before printing for accurate results. Click here to see what it looks like on the Print Menu page.
Choose your finished block dimension from the chart below and print the corresponding number of pages for a total of four units.
Print the Birds in the Air Variation Units for your Christmas Star Block | ||
|---|---|---|
| Finished Block Size | # of copies of BITA to Print | Link to PDF Download |
| 5" | 1 | 2" |
| 7-1/2" | 1 | 3" |
| 10" | 2 | 4" |
Use the blue cutting chart in Step 1 if you printed these patterns.
After printing, use the 1" square graphic on the printed page(s) the pattern printed correctly.

Not sure which paper to use?
Take a look at my review of several of the most popular brands available to us quilters on the market.
You want a super-easy paper to tear away—less stress on the stitches.
The newest quilt fabrics to tickle your fancy...
Click the images below to see the full collection. We share any commercial and/or free patterns that showcase them, too. (For inspiration, of course!)
Step 1: Cutting for a Christmas Star
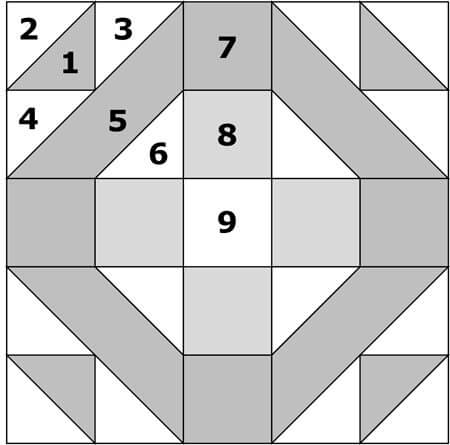 Christmas Star design
Sample Size: 7½" finished / 8" unfinished
Grid: 5x5
Attribution: Oklahoma Farmer Stockman
AKA: Red Cross (Hearth & Home)
Design Type: Uneven 9-patch, small center | Star
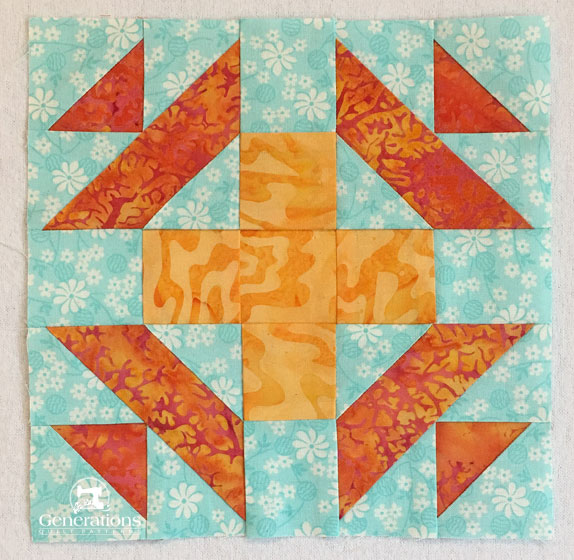
Okay, okay. I know this is called the 'Christmas Star', but I just couldn't resist the yummy orange and yellow batik fabrics. The turquoise came from my stash.
You get to choose three fabrics that you like.
As with any blocks with lots of points, good contrast between the fabrics means you'll be able to see all your piecing.
Click here to download the block design and cutting chart—this download includes cutting charts for both paperpieced and traditionally pieced blocks.
Label your patches. We refer to their numbers throughout this tutorial.
Choose the green chart if you prefer to use traditional piecing methods instead of paperpiecing.
Includes paperpiecing
 | Cutting Chart for a~Traditional Piecing PLUS Paperpiecing ~ | |||||
|---|---|---|---|---|---|---|
| Patch | Fabric | Qty | Finished Block Size | Sub Cut | ||
| 5" | 7½" | 10" | ||||
| 1 | Dark | 2 | 1⅞" x 1⅞" | 2⅜" x 2⅜" | 2⅞" x 2⅞" | |
| 2, 3, 4, 6 | Light | 8 | 2⅜" x 2⅜" | 2⅞" x 2⅞" | 3⅜" x 3⅜" | |
| 5 | Dark | 2 | 3⅜" x 3⅜" | 4⅜" x 4⅜" | 5⅜" x 5⅜" | |
| 7 | Dark | 1 | 1½" x 7" | 2" x 9" | 2½" x 11" | --- |
| 8 | Med | 1 | 1½" x 7" | 2" x 9" | 2½" x 11" | --- |
| 9 | Light | 1 | 1½" x 1½" | 2" x 2" | 2½" x 2½" | --- |
| Unfinished Block Size | 5½" | 8" | 10½" | --- | ||
| Grid Size | 1" | 1½" | 2" | --- | ||
Traditional piecing only
 | Cutting Chart for a~Traditional Piecing ONLY ~ | |||||
|---|---|---|---|---|---|---|
| Patch | Fabric | Qty | Finished Block Size | Sub Cut | ||
| 5" | 7 1/2" | 10" | ||||
| 1 | Dark | 2 | 1⅞" x 1⅞" | 2⅜" x 2⅜" | 2⅞" x 2⅞" | |
| 2, 3, 4 | Light | 6 | 1⅞" x 1⅞" | 2⅜" x 2⅜" | 2⅞" x 2⅞" | |
| 5 | Dark | 2 | 2⅞" x 2⅞" | 3⅞" x 3⅞" | 4⅞" x 4⅞" | |
| 6 | Light | 4 | 1½" x 1½" | 2" x 2" | 2½" x 2½" | --- |
| 7 | Dark | 1 | 1½" x 7" | 2" x 9" | 2½" x 11" | --- |
| 8 | Med | 1 | 1½" x 7" | 2" x 9" | 2½" x 11" | --- |
| 9 | Light | 1 | 1½" x 1½" | 2" x 2" | 2½" x 2½" | --- |
| Unfinished Block Size | 5 1/2" | 8" | 10 1/2" | --- | ||
| Grid Size | 1" | 1 1/2" | 2" | --- | ||
Step 2: Assemble the units for your Christmas Star
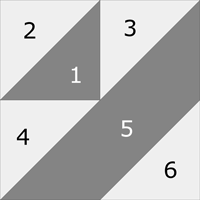
Birds in the Air (Modified)
Make 4
For the sample Christmas Star, I foundation pieced the unit.
If you cut your patches from the green chart, click here for the instructions to piece this unit traditionally. After you've completed the four units, skip down to 'Sides' and continue.
If you cut from the blue chart, continue on here.
Trim the paper away just past the dashed lines that encompass each unit.
No points for neatness here, a rough cut will do.
Everything gets trimmed at the end.
General Sewing Machine Setup for Paperpiecing
- Reduce your stitch length to 16-20 stitches per inch (1.3-1.6mm). This perforates the paper. It also stabilizes the seam when you remove the pattern. [Learn more about stitch length here.]
- Reduce your machine's speed or just plain slow down when you stitch. Sew only as fast as you can stay on the stitching lines.
- Install an open toe applique foot (sometimes called an 'embroidery' or 'satin stitch' foot) if you have one (it's easier to see where you're stitching with one installed).
- Use a larger needle (90/14) if you have problems removing the pattern.
- As you stitch each seam, start and stop a generous 1/4" before and after the solid stitching lines. ALWAYS. Future lines of stitching secure the ends.
After adding each patch, press the unit as it was sewn to set the seam. Then press it open. The SA is automatically pressed towards the last patch added.
Steam is optional and usually curls the pattern.
If that bothers you, don't use steam. Sometimes I do. Sometimes I don't.
It really just depends on my mood.
Remember, as you follow this paper piecing tutorial, the printed and the fabric sides of this block are mirror-images of each other.
At last!
Let's sew!
With a dab of Elmer's washable glue stick, position the #1 patch wrong sides together with the unprinted side of the paperpiecing pattern. Use the dashed placements guides for quick, easy and accurate positioning.
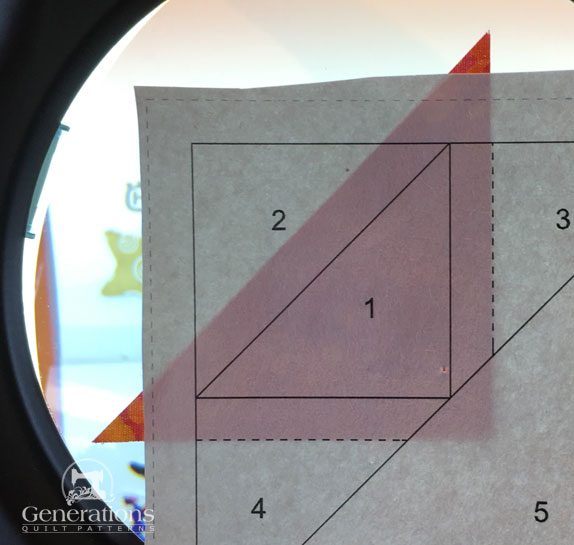 You can see how the pattern was trimmed just outside the dashes in this photo.
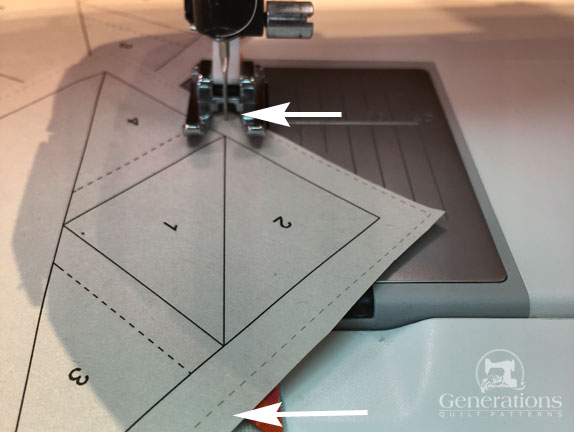
With RST match the long edge of a #2 with the long edges of the #1. Notice that the two patches—though they fill the same size space—are cut different sizes.
This is because the first patch can be placed exactly. The #2, #3, #4 and #6 all extend past the edges of the unit and are trimmed to perfection at the end.
The point of the #2 patch is opposite the corner of the paperpiecing pattern. (white arrow)
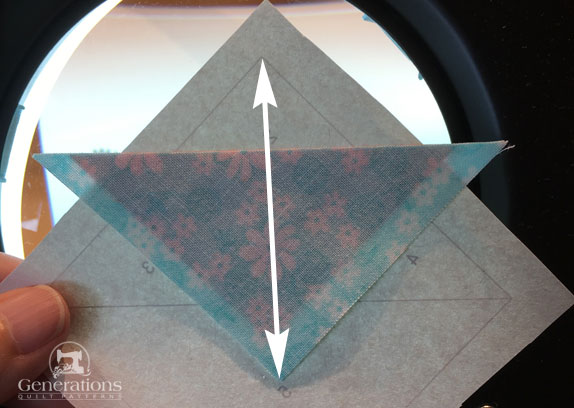
Stitch on the solid line between #1 and #2. Start and stop a generous 1/4" past the beginning and ending of these solid lines.
You'll use this technique for every single seam you stitch in this unit.
Press.
With RST, match a SHORT edge of a #3 to the short edge of #1 as shown below.
You'll notice I don't bother to trim thread tails at the outside edges of the unit as I work. These will be trimmed at the end. I DO trim thread tails at any other place as I go for neater patchwork.
Otherwise I'd have to go back and trim them individually with a scissor after the units are complete. A total time suck.
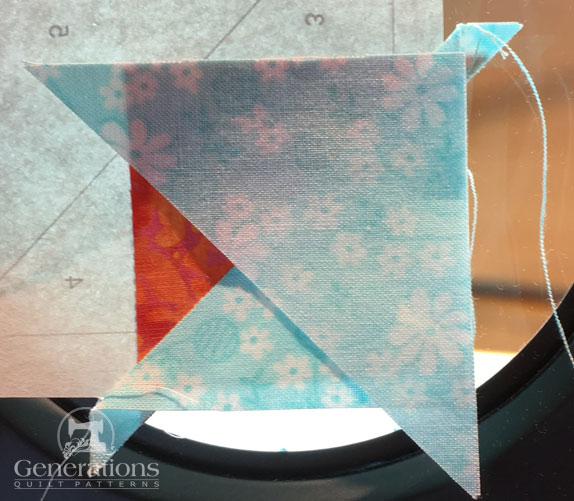
Stitch as before on the line between #1 and #3.
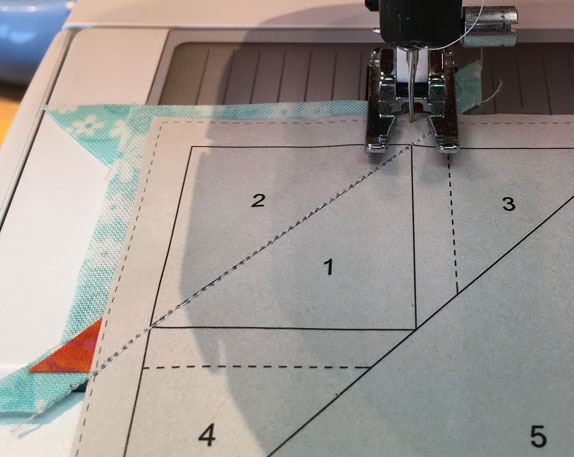
Press.
Position the short side of a #4 to the third side of #1 and stitch.
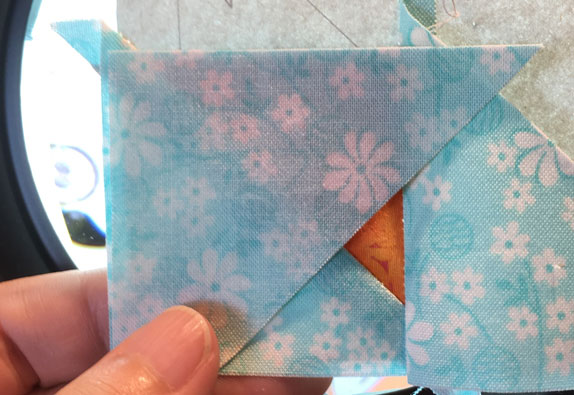
Press.
Next we trim to find the exact position for adding #5.
At your cutting mat, fold the pattern back on itself on the solid line between #3, #4 and #5. I lay my ruler on the line and use my thumbnail to crease the paper. Then fold the it back on that crease.
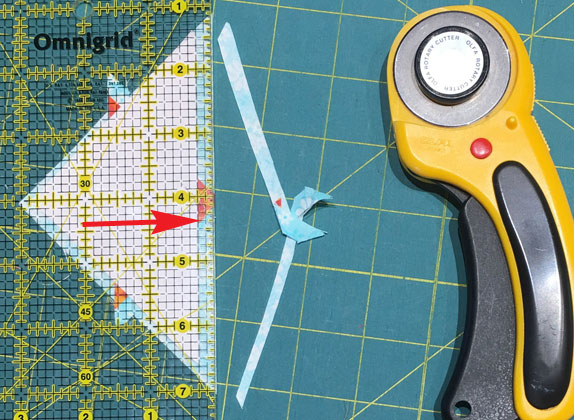
Position your 1/4" mark on your ruler on this fold (red arrow below). Trim the excess away with your rotary cutter.
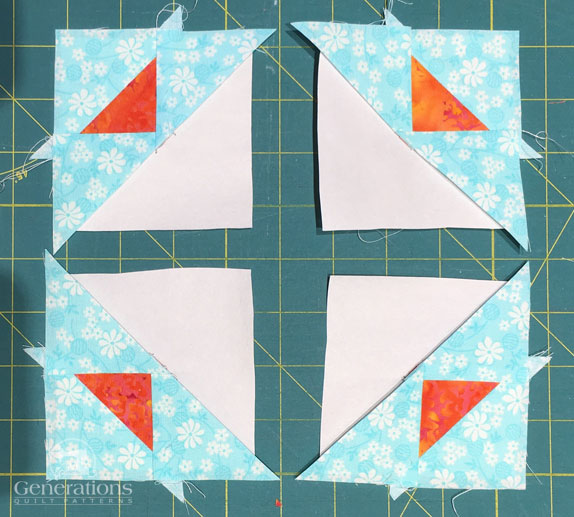
Before adding the #5s this is how your units look. Rough on the outside edges. Neat on the inside ones.
With RST, align the long edge of a #5 with the freshly trimmed edges.
Since the seam extends the full width of the block, you can chain piece this Birds in the Air variation in this step to speed things up a bit.
After stitching, press.
Time to trim again. This time, fold the paper back on the line between #5 and #6. Position the 1/4" on the fold and trim away the excess.
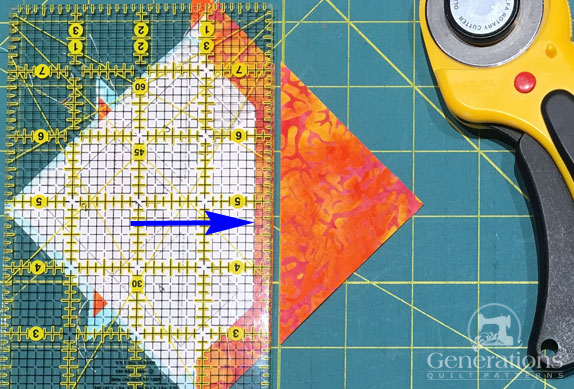 This SA is faster to trim because no seams cross the line.
Almost there!
With RST, align the long edge of a #6 with the cut edge of #5.
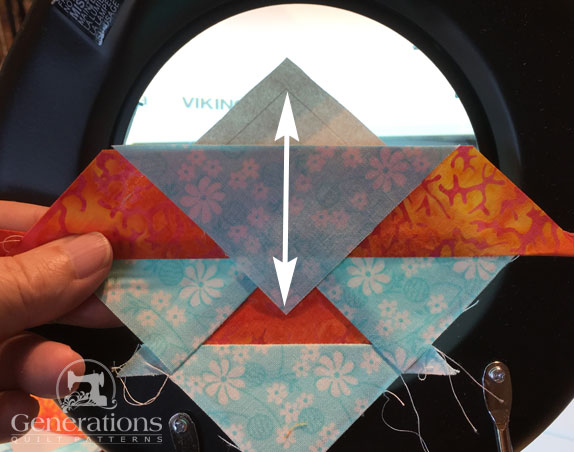
Stitch on the line between #5 and #6. Chain piece this step for efficiency.
Press.
Trim the units to perfection by positioning the 1/4" marking on your ruler on a solid line at the edge of the block. Repeat for the three remaining sides for each unit.
I find it much more accurate to line up this mark instead of trying to align the ruler's edge right on the outside dashes. Dont' you?

The paper piecing is complete. From this point forward, return your stitch length to the one you regularly use for piecing and install your favorite 1/4" presser foot.
Sides

Make 4
With RST, stitch the long edges of #7 and #8 together. For the sample, #8 is the orange fabric.
After stitching, press with the SA towards either the #7 or #8. In the sample I pressed towards #8.
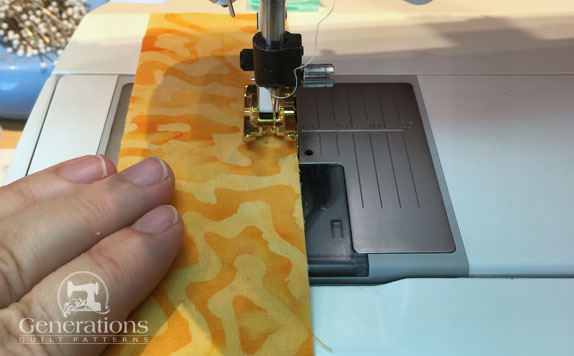
Using the chart below, take a second to double check the width of your stripset after stitching, make any adjustments as needed.
Then find the SubCut Width that goes with your finished block size.
StripSet Widths | ||
|---|---|---|
| Finished Block Size | Stripset Width after stitching | SubCut Width |
| 5" | 2 1/2" | 1 1/2" |
| 7 1/2" | 3 1/2" | 2" |
| 10" | 4 1/2" | 2 1/2" |
Straighten one of the short edges of your strip set and then subcut four units the required width.
Step 3: Assemble your Christmas Star quilt block
Arrange the modified Birds in the Air and side units and cut center square into the Christmas Star design.
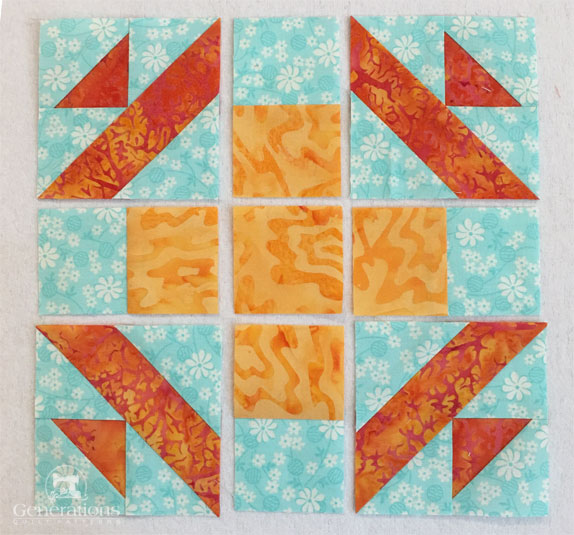
With RST, stitch the units into rows.
SA are pressed toward the #7/#8 side units to reduce bulk.
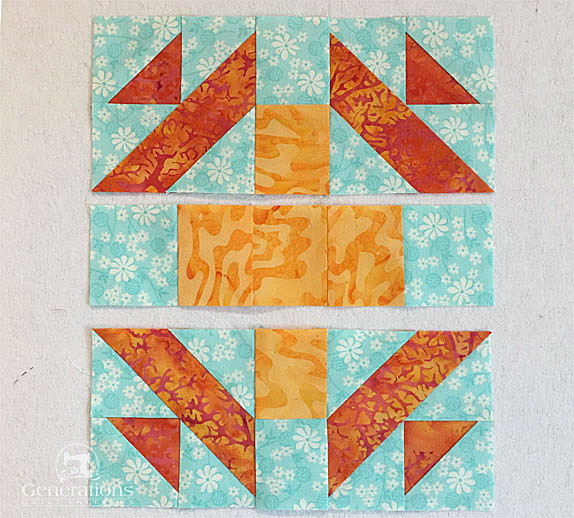
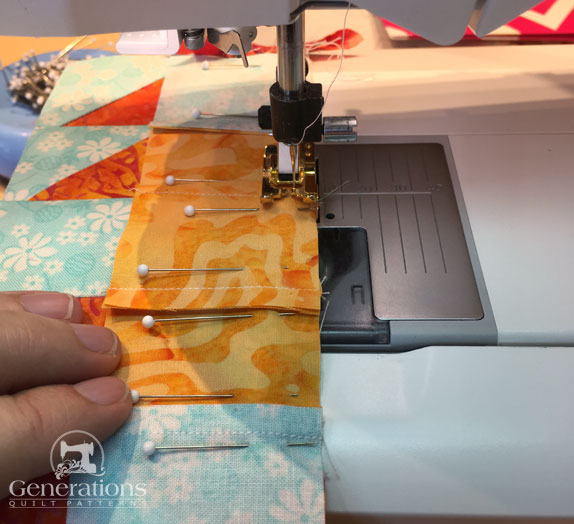
With RST, stitch the rows together to finish the block
Pin the rows if it helps you. For a refresher, brush up on your pinning technique here.
After a final pressing, your Christmas Star quilt block looks like this.
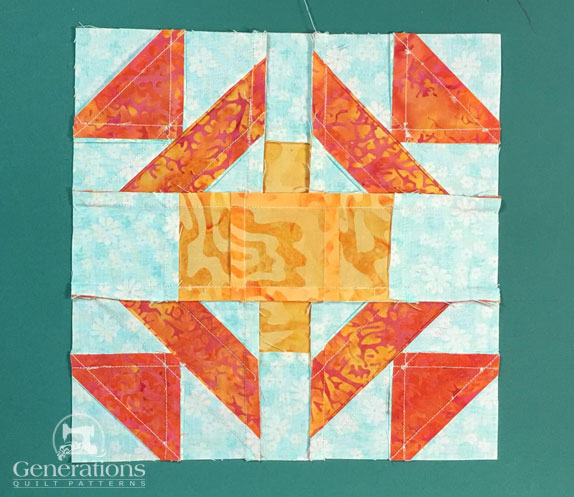
Here's a view of our Christmas Star sample from the back so that you can see how all the SAs fit together.
🔭 Looking for something truly stellar?
You've finished your star quilt block, and you're ready for more!
Browse our collection of 70 stellar star quilt block patterns. All have instructions and cutting charts in multiple sizes. If templates or paper piecing is used in the tutorial, there's a free download for you of those materials.

Eeny. Meenie. Miney. Moe.
Which star quilt block will you sew?
For a star-studded quilting experience, choose from 100+ bedazzling star quilt patterns—for beginners and beyond—click here.
For even MORE blocks to make… 🧩🎨

...visit our Free Quilt Block Pattern Library, with over 260+ blocks to choose from in multiple sizes.
Free downloads are included in all sizes for any blocks require paper piecing patterns or templates.
What about a different quilt block?
For a list of all the 220+ quilt block patterns on this site, start here.
If you know the name of the block, shorten your search by using these links:
Click here if you're looking for blocks with at least some paper piecing.
Click here if you're looking for the basic building blocks of quilting, i.e., Flying Geese, half square triangles, quarter square triangles, etc., along with several techniques to make each.
And finally, use these links to find blocks in these finished sizes:
- Home
- Free Quilt Block Patterns
- Christmas Star quilt block
