- Home
- Free Quilt Block Patterns
- Christmas Cactus Quilt Block
Prickly
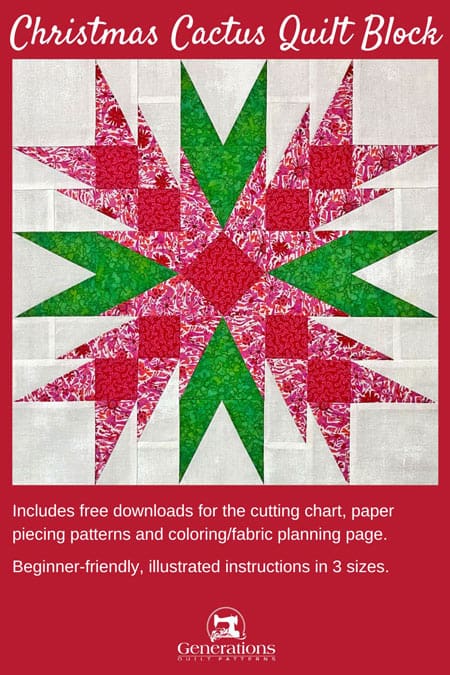
Perfection: Master the Christmas Cactus Quilt Block 🌵🎁
From our Free Quilt Block Patterns Library
This post contains affiliate links, for which I receive compensation.
Get ready to unwrap a gift that keeps on giving—the Christmas Cactus quilt block! 🎅
This prickly 🌵 beauty features easy paper piecing techniques that'll have you creating stunning, pointy perfection in no time. With free patterns, cutting charts, and coloring pages, you'll be rockin' around the quilt block in three festive sizes. 🎄🎁
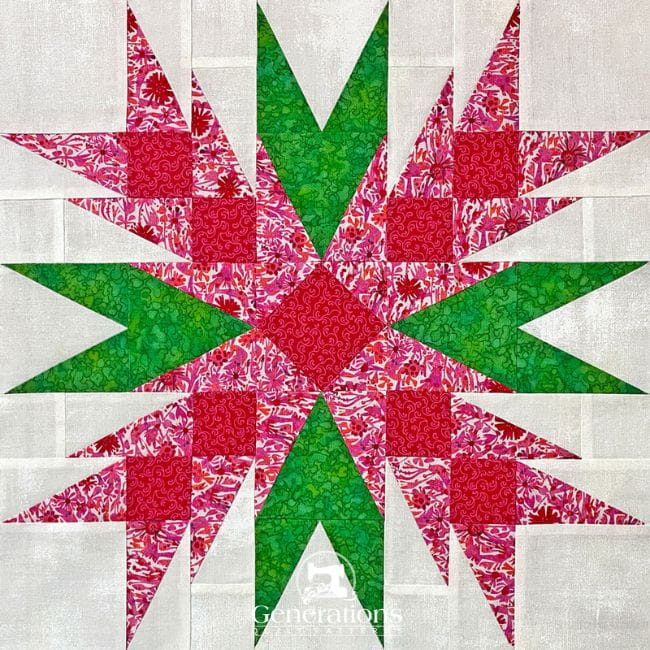
Don't let all those pin-sharp points intimidate you—our tutorial makes it as smooth as Santa's slide down the chimney! 🎅
Use these links to quickly jump to what you're looking for:
Cut. Sew. Press. Transform your fabric into a prickly wonder! 🌵🌟
 A Christmas Cactus plant, left, and a close-up of its flowers and leaves, right
📋General Instructions
Several abbreviations are used on this page. They are:
- SA - seam allowance
- RST - right sides together
- HRT - half rectangle triangles
- SiaS - square in a square
- TiaS-Pairs - a pair triangle in a square units
A 1/4" SA is used in this tutorial.
Highlighted in yellow, pressing instructions are easy to spot.
To press, first press the patches in the closed position as they came off your sewing machine. This sets the seam, melding the fibers of the threads into the fibers of the fabric.
Then press the SA to the dark unless otherwise noted.
Download and print the paper piecing patterns
To download the pattern, use the most current version of Adobe.
For accurate results, on Adobe's Print Menu page, under 'Page Size and Handling' set 'Custom Scale' to 100%. Then print.
Click here to see what it looks like on the Print Menu page.
Find your finished block size from the chart below and print the number of copies listed for each.
Print Paper Piecing Patterns and Templates | ||||||
|---|---|---|---|---|---|---|
| Finished Block Size | SiaS Unit Size Print 1 | HRT | TiaS-Pairs | |||
| # of Copies | Unit Size | # of copies | Unit Size | Template | ||
| 10" | 2" | 2 | 1" x 2" | 1 | 2"x4" | Print 1 |
| 15" | 3" | 3 | 1½" x 3" | 2 | 3"x6" | |
| 20" | 4" | 4 | 2" x4" | 4 | 4"x8" | |
After printing, use the 1" square graphic on the printed page(s) to double-check that your patterns printed at the correct size.
From the copies you printed, cut out the units before to make 1 block:
- 4 TiaS-Pairs
- 1 SiaS
- 16 HRTs (8 of each A and B unit)
No need to cut exactly on the lines. Close is good enough for now.
Cut the template out exactly on the top and bottom lines, the sides needn't be exact.

Not sure which paper to use?
Take a look at my review of several of the most popular brands available to us quilters on the market.
You want a super-easy paper to tear away—less stress on the stitches.
✂️ Cutting patches for a block
 Christmas Cactus quilt block design
Sample Block Size: 15" finished / 15½" unfinished
Grid: 10x10
Design Type: Star | Paper piecing
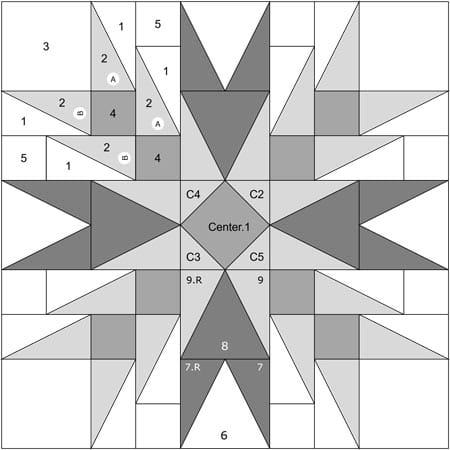
Please label all your patches. We use their numbers throughout this tutorial.
The light is an artsy pink print by Este MacLeod from Windham, the medium tone-on-tone pink and dark green are from my stash without selvedge information, and the background is the easy-on-the-eyes neutral Grunge from Moda.
 | Cutting Chart for a~ Paper Piecing ~ | |||||
|---|---|---|---|---|---|---|
| Patch | Fabric | Qty | Finished Block Size | |||
| 10'' | 15 '' | 20'' | ||||
| 1 | Bac | 8 | 2⅞'' x 3¼'' | 3⅜'' x 4¼'' | 3⅞'' x 5¼'' | yes |
| 2, 9, 9.R | Light | 12 | 2⅞'' x 3¼'' | 3⅜'' x 4¼'' | 3⅞'' x 5¼'' | yes |
| 3 | Bac | 4 | 2½'' x 2½'' | 3½'' x 3½'' | 4½'' x 4½'' | --- |
| 4 | Medium | 8 | 1½'' x 1½'' | 2'' x 2'' | 2½'' x 2½'' | --- |
| 5 | Bac | 8 | 1½'' x 1½'' | 2'' x 2'' | 2½'' x 2½'' | --- |
| 6 | Bac | 4 | 3'' x 2¾'' | 4'' x 3¾'' | 5'' x 4¾'' | yes |
| 7, 7R | Dark | 4 | 2⅞'' x 3¼'' | 3⅜'' x 4¼'' | 3⅞'' x 5¼'' | yes |
| 8 | Dark | 4 | 3'' x 2¾'' | 4'' x 3¾'' | 5'' x 4¾'' | yes |
| Center.1 | Medium | 1 | 1⅞'' x 1⅞'' | 2⅝'' x 2⅝'' | 3⅜'' x 3⅜'' | --- |
| C2, C3, C4, C5 | Light | 2 | 2⅜'' x 2⅜'' | 2⅞'' x 2⅞'' | 3⅜'' x 3⅜'' | |
| Unfinished Block Size | 10½'' | 15½'' | 20½'' | na | ||
| Grid Size | 1" | 1½" | 2" | na | ||
Subcutting
That neutral Grunge is a real bugger to tell the difference between the front and back. After cutting and/or subcutting, I layer all those patches right side up and then put a pin through the top to keep them organized. (You'll see this same pinning in all the Grunge patches.)
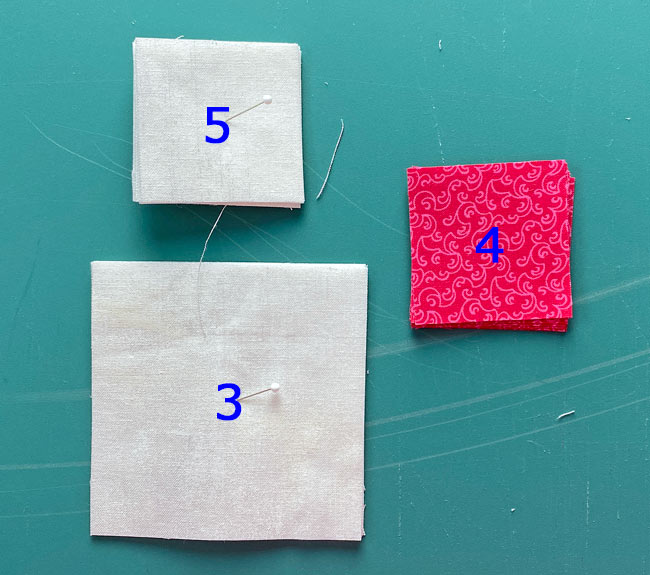 These patches are not subcut.
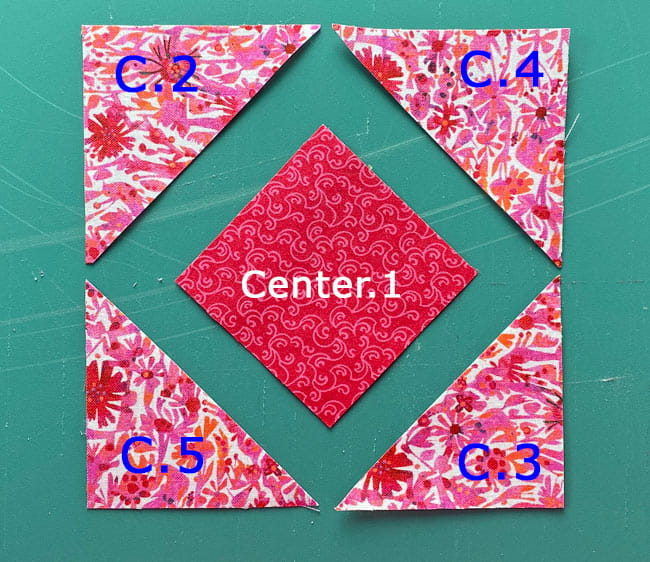
For our SiaS, these are the patches. C.2 through C.5 started as 2 squares, each subcut once on the diagonal to form 4 HST.

The tall triangles for the HRTs and TiaS-Pairs are the same size and subcut the same.
To insure we get the mirror-image triangles that we need for the TiaS-Pairs and HRTs, you MUST layer all these rectangles (1, 2, 7, 7,R, 9, and 9.R) in pairs of RST.
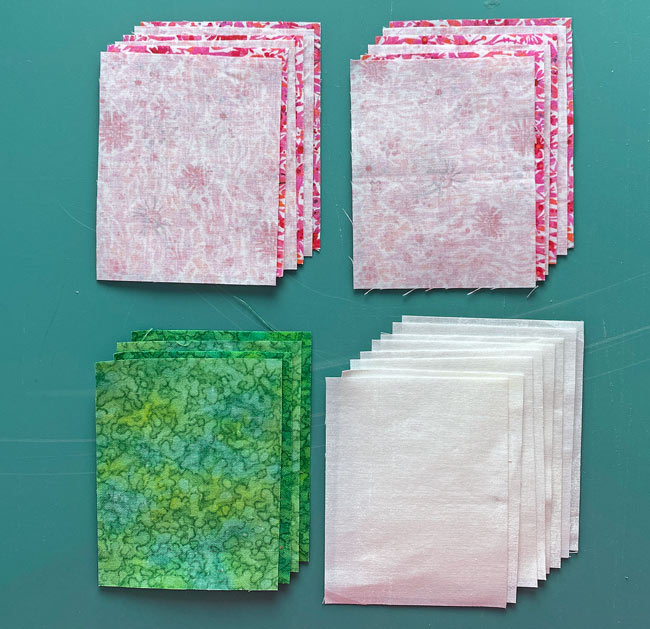 Rectangles for all the HRTs and TiaS-Pairs are layered in pairs right sides together
I tend to cut 4 layers at a time with my 45mm rotary cutter. If you're using a bigger one, you may be comfortable cutting more layers. Choose what works best for you.
Align the edges of each pile of pairs.
With a pencil, mark the top edge 5/8" in from the left and the bottom edge in 5/8" from the right (blue arrows) on each stack.
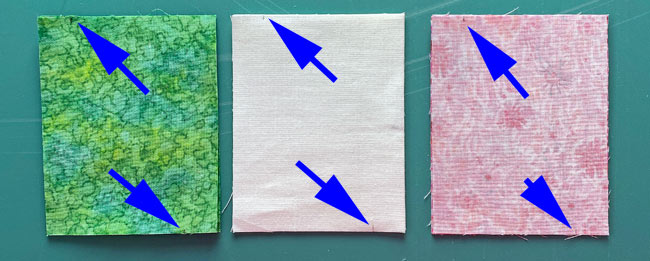
Line up your ruler's edge with the marks, and slice each pile in half. Repeat until all the 1, 2, 7, 7.R, 9, and 9.R are halved.
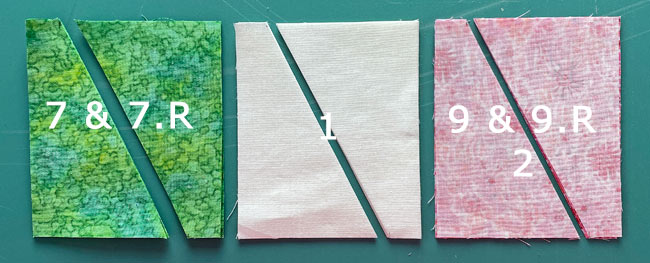
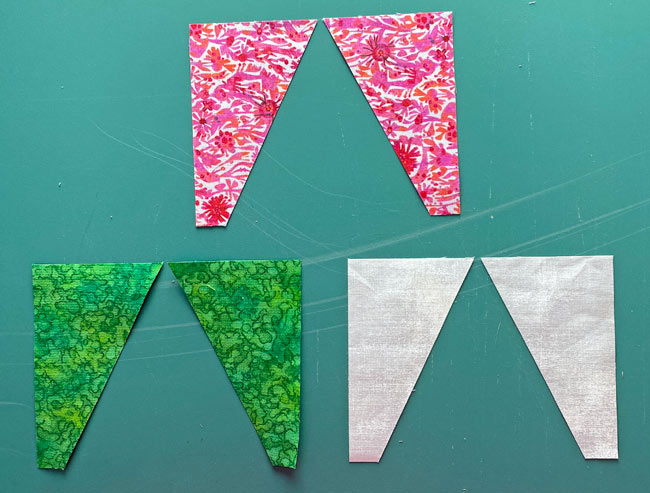
After cutting, you'll have mirror-imaged pairs of triangles like this.
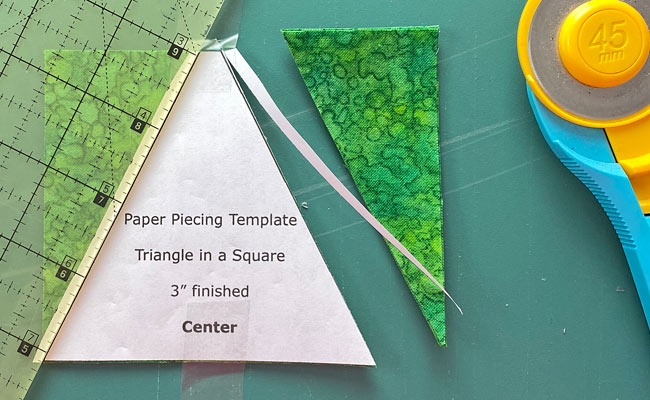
Use the template to cut the Centers for your TiaS-Pairs.
Line up the top and bottom with the edges of the #6 and #8 rectangles. (I've used a bit of tape to hold the template in position.)
Cut away the excess from both sides.
 Subcutting the #6 rectangles into triangles
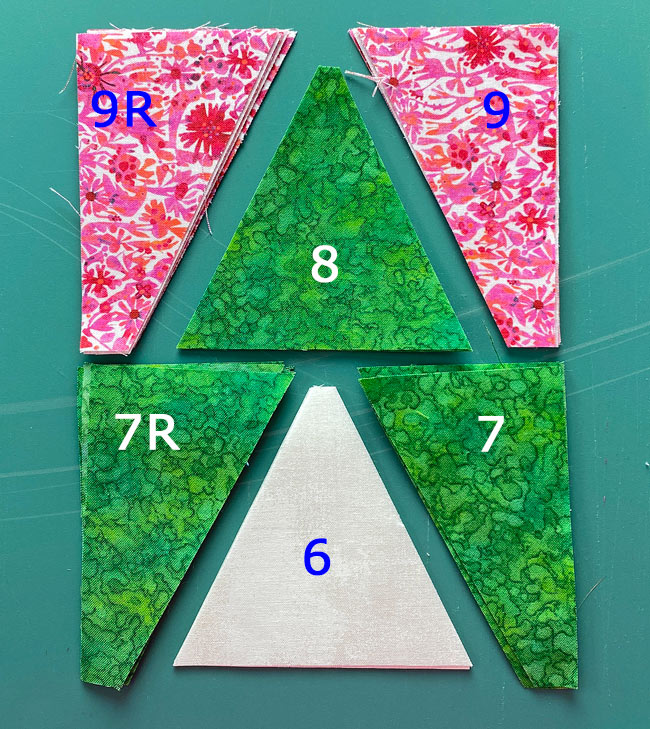
After all that subcutting here are your patches for the TiaS-Pairs.
And the HRT triangle mirror-image pairs.
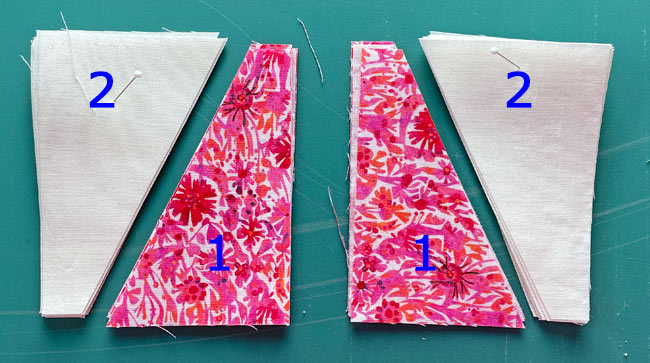
Subcutting's done. Time for the fun stuff!
🪡 Assemble the units for the Christmas Cactus
Use an Elmer's Washable Glue Stick&#reg; to stick the first patch for all the SiaS, HRTs, and TiaS-Pairs in place on the unprinted side of their patterns.
Those dashed guidelines make placement virtually foolproof.
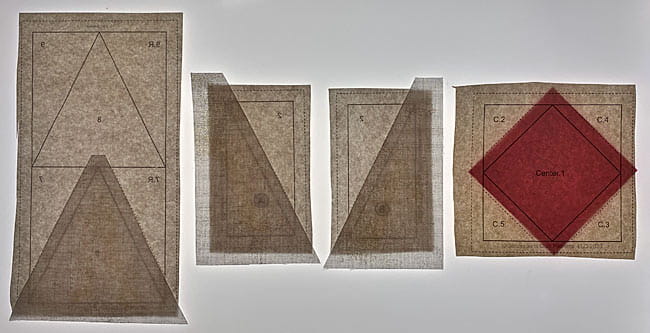 The view from my lightbox, from left to right, TiaS-Pair, HRT-A, HRT-B, Sias
You're done with the gluestick. It can be put away.
General Sewing Machine Setup for Paperpiecing
- Reduce your stitch length to 16–20 stitches per inch (1.3-1.6 mm). This perforates the paper and stabilizes the seam when you remove the pattern. [Learn more about stitch length here.]
- Reduce your machine's speed or just plain slow down. Sew only as fast as you can stay on the stitching lines.
- Install an open toe appliqué foot (sometimes called an 'embroidery' or 'satin stitch' foot) if you have one (it's easier to see where you're stitching with one installed).
- Use a larger needle (90/14) if you have problems removing the pattern.
- If your machine has a needle stop up, use it. The stitching goes faster when you don't have to lift the presser foot with every seam.
- As you stitch each seam, start and stop a generous 1/4” before and after the solid stitching lines. ALWAYS. Future lines of stitching secure the ends.
After adding each patch, press the unit as it was sewn to set the seam and then open. The SA is automatically pressed towards the last patch added.
Before adding the next patch, take a look to make sure the one you just added covers the space plus seam allowance that it is supposed to.
Steam is optional and usually curls the pattern.
If that bothers you, don't use steam. Sometimes I do. Sometimes I don't.
It truly depends on my mood.
Remember, as you follow this paper piecing tutorial, the printed and the fabric sides of this block are mirror-images of each other.
At last!
Let's sew!

Critical Paper Piecing Technique
For EVERY paper pieced seam:
- Start stitching a generous 1/4" BEFORE the solid seam line
- End stitching a generous 1/4" AFTER the solid seam line
📌 This applies to ALL seams in EVERY unit.
Why This Matters
This small extra step—starting and ending stitches 1/4" beyond the seam lines—might seem minor, but it significantly contributes to the overall quality and durability of your paper pieced quilt blocks. It's a prime example of how attention to detail in quilting can make a big difference in the final product.
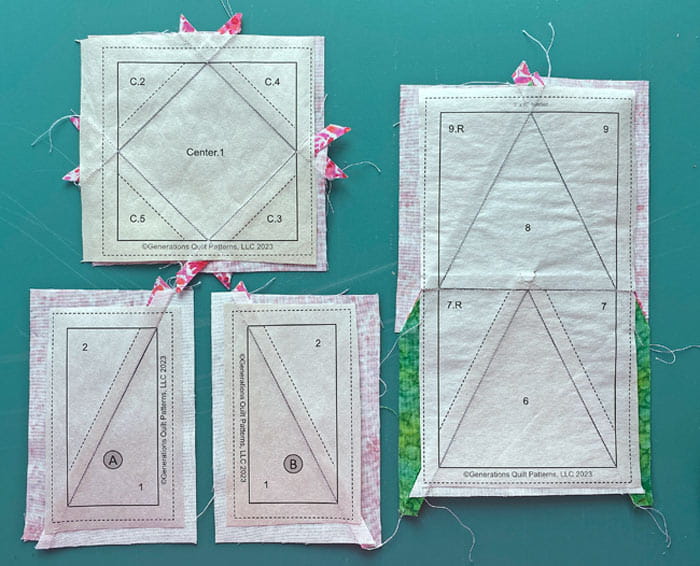
Half Rectangle Triangles (HRT)
Make 8 mirror-image pairs
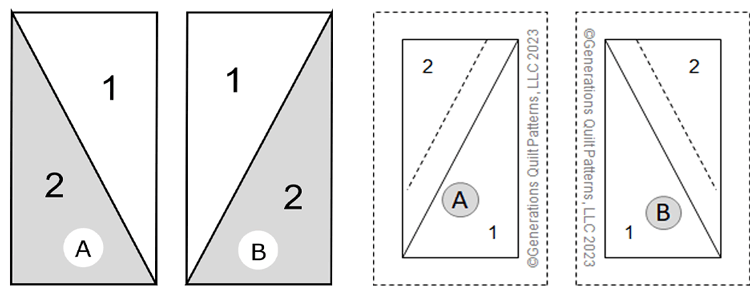 From the fabric side, left, and from the pattern side, right
You might think it's silly to use a paper piecing pattern with just two pieces...
I've used specialty rulers like the Diamond Rects by Studio 180 and the Tri Recs and keep coming back to the ease and precision of foundation piecing.
It.Works.Every.Time.
All there is to do is sew on a line and trim away the excess.
Match the long bias edge of a #2 to #1, big end to narrow end for an HRT-A.
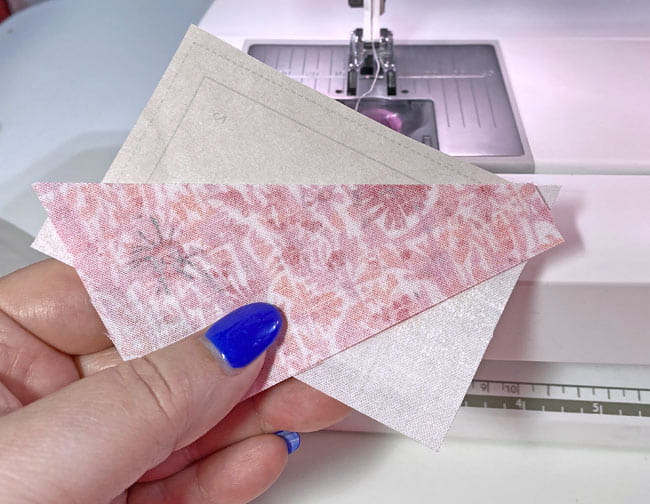
Sew the seam.
And now for an HRT-B, big to small again.
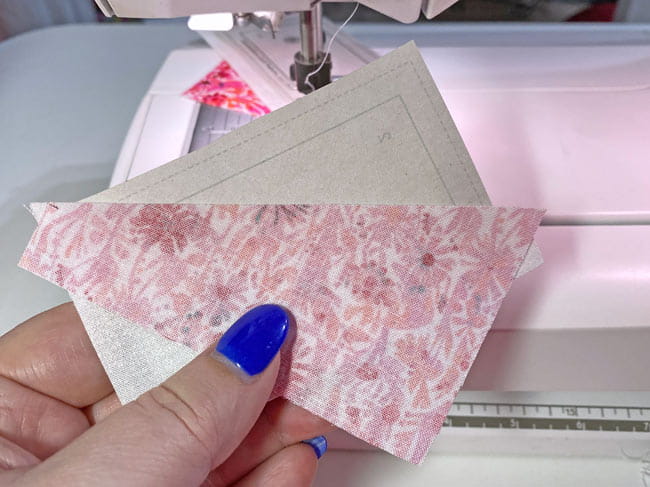
Sew the seam.
I like to fingerpress these seams open and then finish the pressing with my iron to avoid any tucks at the SA.
Repeat until all the HRTs are stitched.
The HRT looks like this before trimming (left) and after (right).
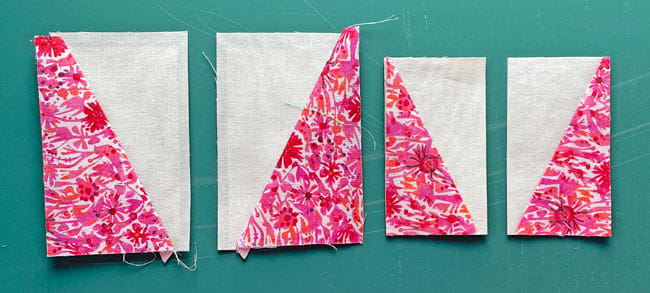
Set them aside for now. We'll trim everything after all the units are assembled.
Triangle in a Square Pairs (TiaS-Pairs)
Make 4
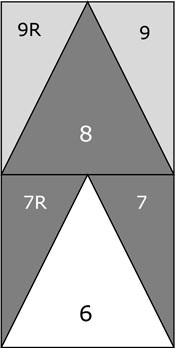
It doesn't matter which of 7 or 7.R you add first. I do recommend being consistent so that your piecing falls into a rhythm, with the only thing you're thinking about is sewing on the line.
With RST, match the long bias edge of either #7 with #6 with wide edge to narrow wedge at the top and bottom of the unit.
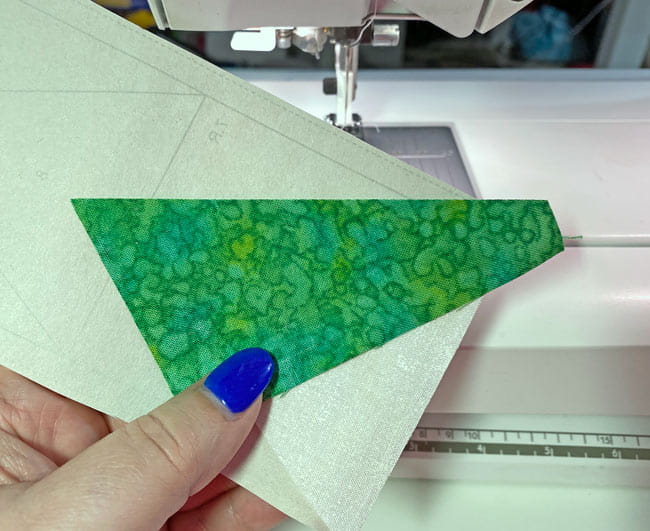
Sew.
Press. Again, since I've used heavily starched fabric, I can fingerpress this seam. But I do like to give it a turn at the ironing board to insure there's no tucks at the edge.
Add the other #7 in the same manner.
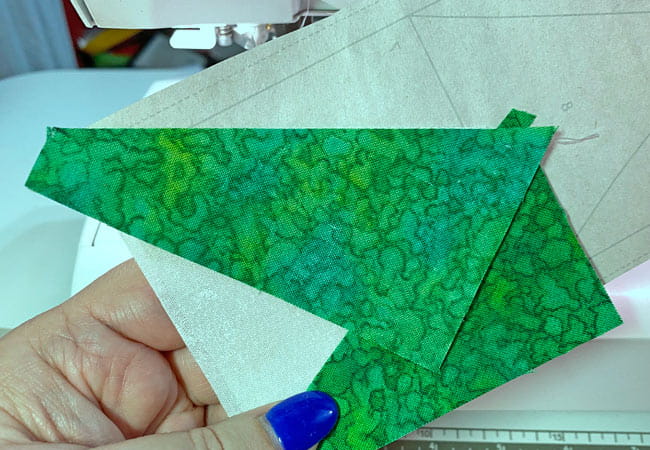
Don't forget to press this seam.
At your cutting mat, pull the paper away from a few of the stitches in the center. That paper's probably going to tear a bit.
It's normal.
If the rip bothers you, use a bit of Scotch Brand Magic Tape&#reg; to repair it.
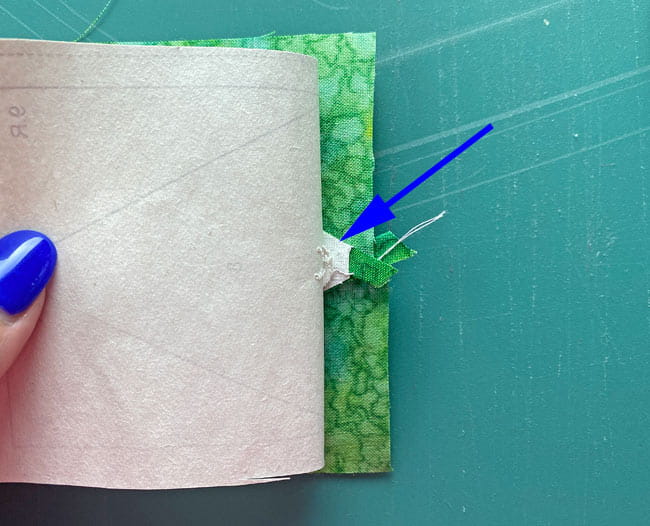
Paper-side up, line up the edge of your ruler with the solid line between the 7s and 8. Crease with your finger, using the ruler as a guide.
With the 1/4" line on your ruler directly over the fold (blue arrow), trim away the excess fabric, leaving behind a perfect 1/4" SA.
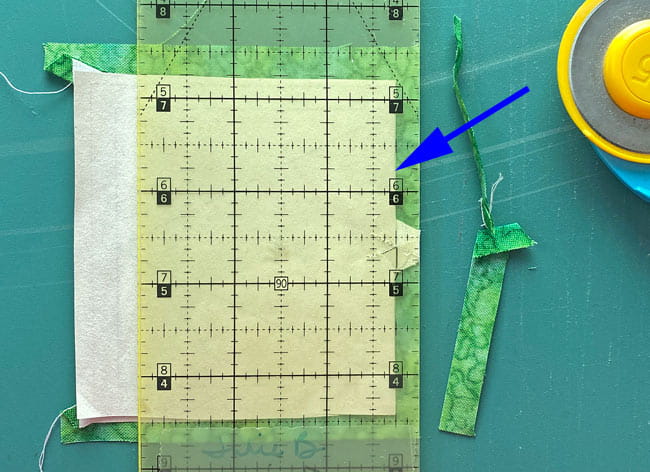
With RST, align the wide bottom edge of a #8 triangle with the fresh cut.
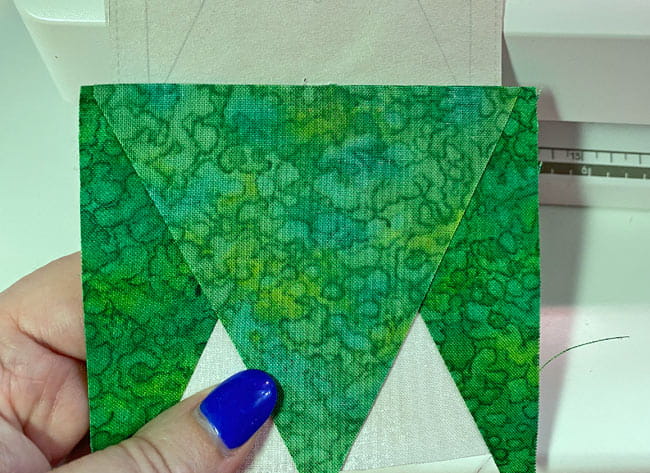
Sew the seam. This is an opportunity to chain piece because the seam runs from one outside edge to the other.
Press.
Back at the cutting mat, trim away the excess fabric from BOTH exposed sides of #8, leaving behind a perfect 1/4" SA.
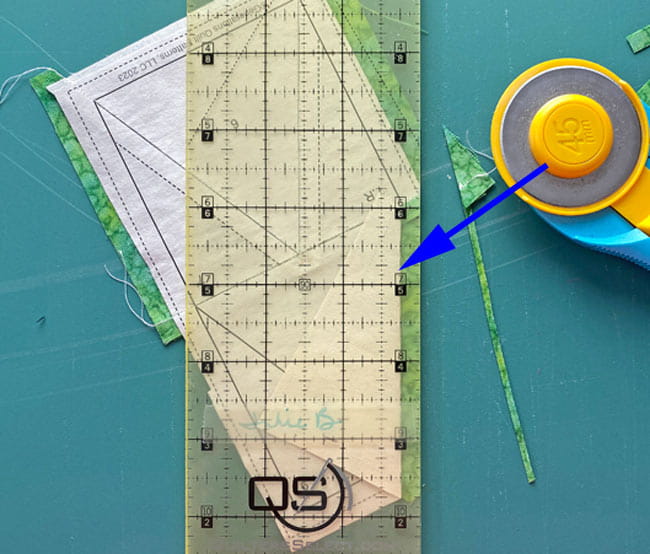 Trimming away the excess on the first exposed side of #8
Now we simply add each #9 the same way we added #7. Pressing after each addition.
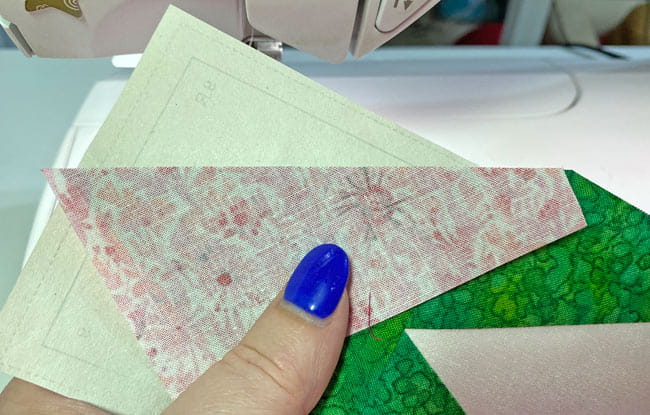
Set these aside.
Square in a Square (SiaS)
Make 1
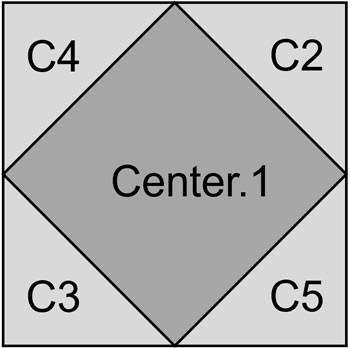
With RST, match the long bias edge of C.2 with one side of the Center.1.
Stitch starting and ending past the outside edge on the solid line.
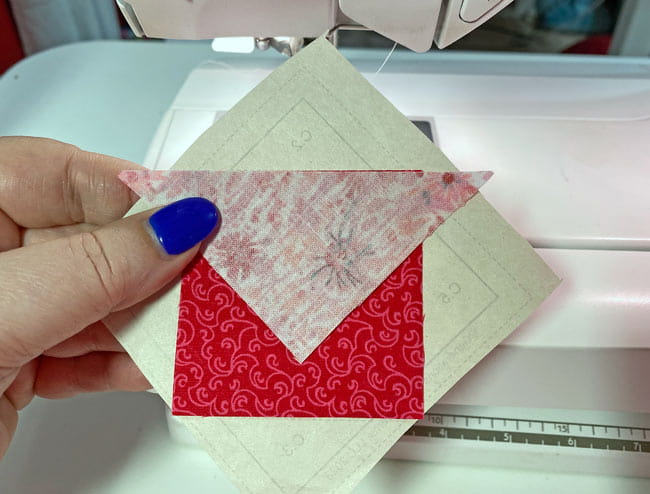
The 3" finished SiaS for the 15" sample block is big enough so that we can add C.3 without pressing first. (You may need to press between patches for the 2" finished SiaS.)
Stitch as before.
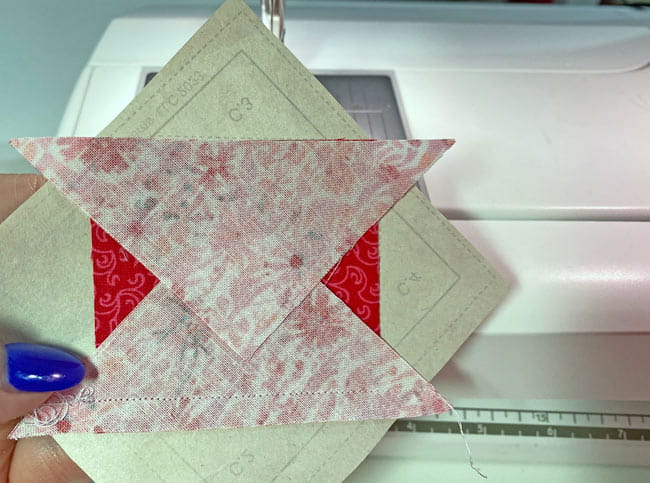
After pressing these seams, add the third triangle and then the fourth.
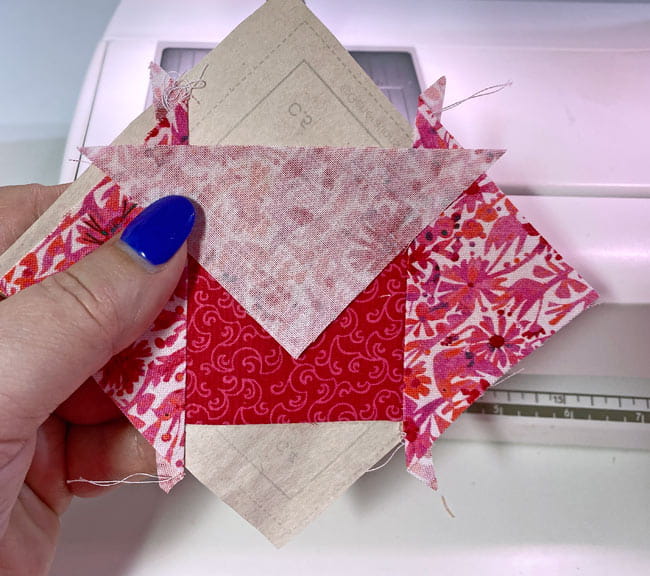
One last turn at the ironing board for a crisp flat unit.

The paper piecing is complete. From this point forward, return your stitch length to the one you regularly use for piecing and install your favorite 1/4" presser foot.
Trimming all the units
Regardless of the unit, trimming is the same for all. An HRT-A is used to illustrate the technique. 🧵✂️
- Place unit paper-side up on mat
- Align 1/4" mark on ruler with solid outline
- Trim excess with rotary cutter
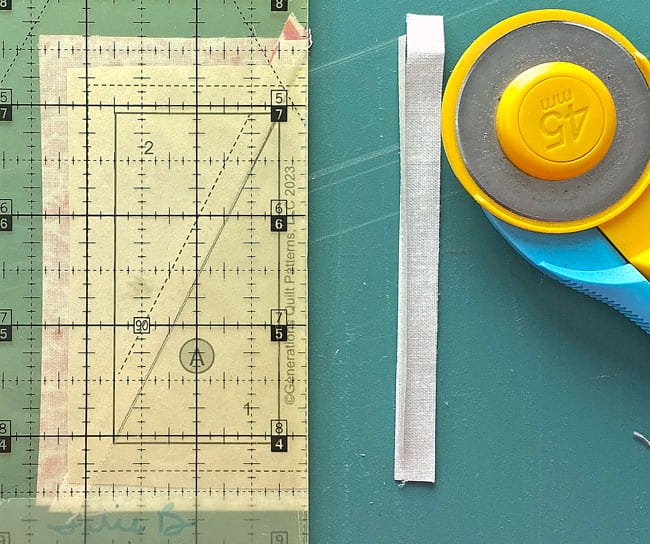
Turn the unit a quarter turn and repeat.
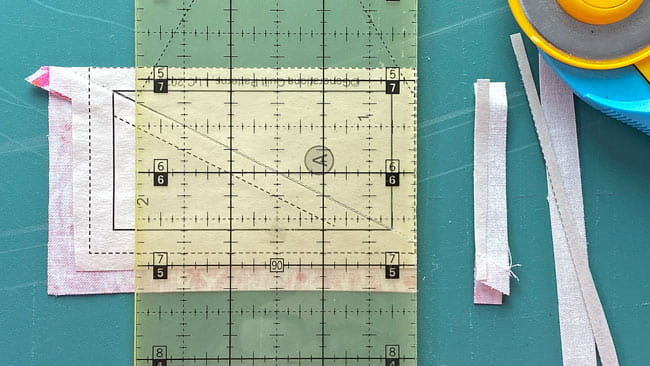
Turn a quarter turn, cutting away the exposed excess.
One final quarter turn and trim.
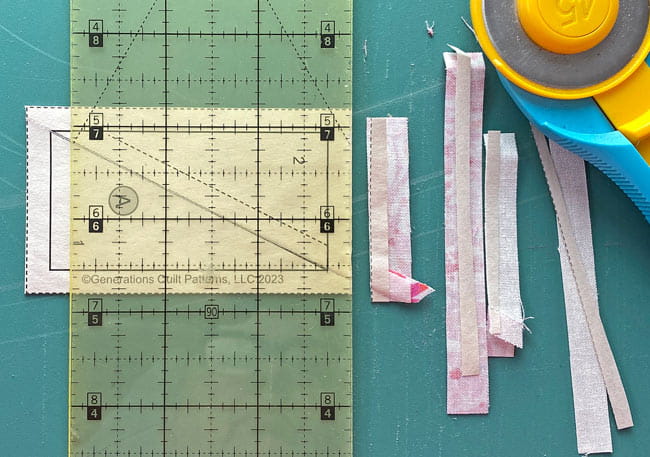
Repeat these steps for all 16 HRTs, 4 TiaS-Pair, and the SiaS.
Remove all the paper. Our patches were calculated so all our exposed edges are on the straight of grain—just like any traditionally pieced block would be.
It's job is finished.
Hasta la vista, Paper! (in my best 'Arnold' imitation!)
Do stack your HRT-As and HRT-Bs in separate piles and label them so they don't get mixed up as we move onto the next step.
Corners
Make 4
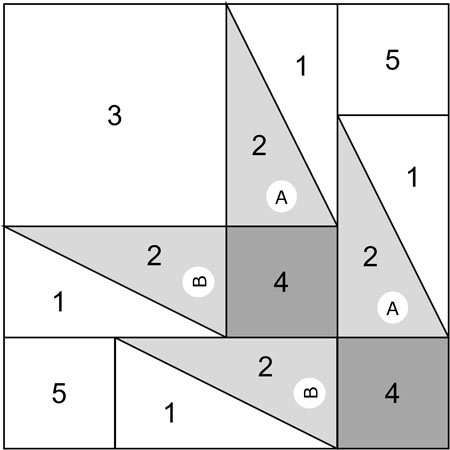
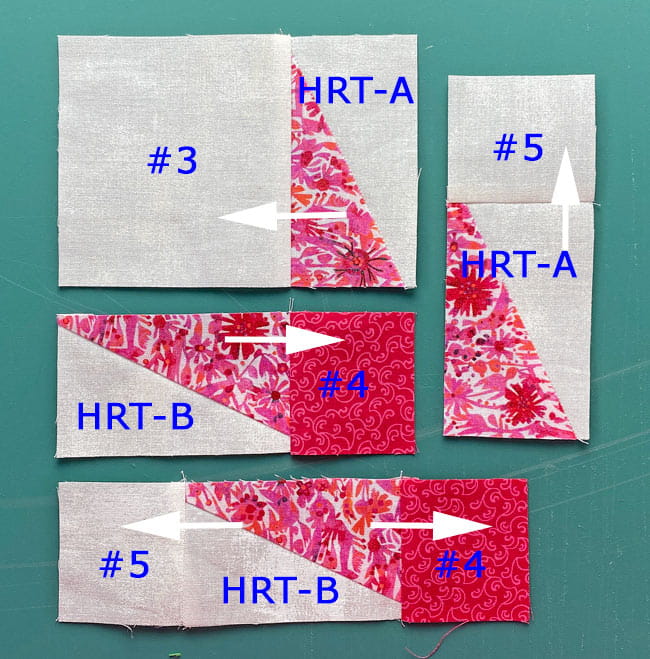
All four Corner units are sewn the same way.
With RST add:
- a #3 to the #2 side of an HRT-A
- a #4 to the short #2 edge of an HRT-B
- a #5 to the short #1 Bac edge of an HRT-B
- to an HRT-A, a #5 to the short Bac #1 edge, and a #4 to the short #2 edge
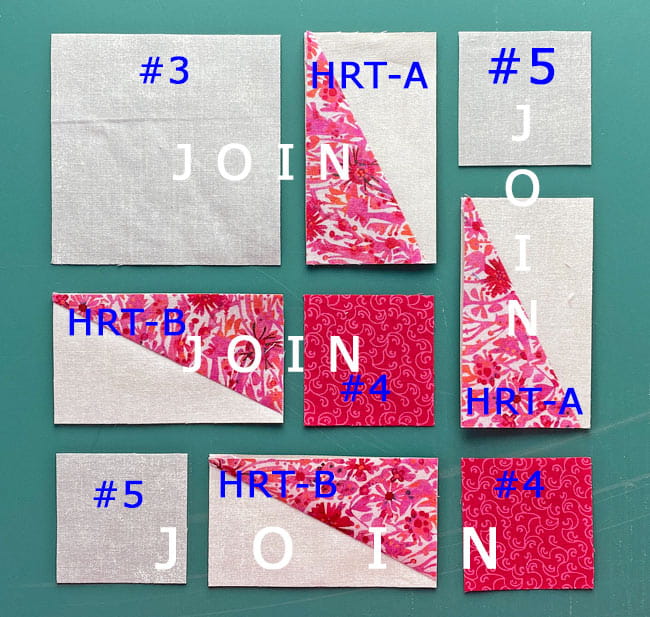
Repeat until you have four of each.
SAs are pressed away from the HRT for all these subunits, as shown below.
With RST, add the HRT-B/#4 to the #3/HRT-B. The seams nests.
This SA is pressed toward #3/HRT-B.
Join the #5/HRT-A to the left side of this group, RST.
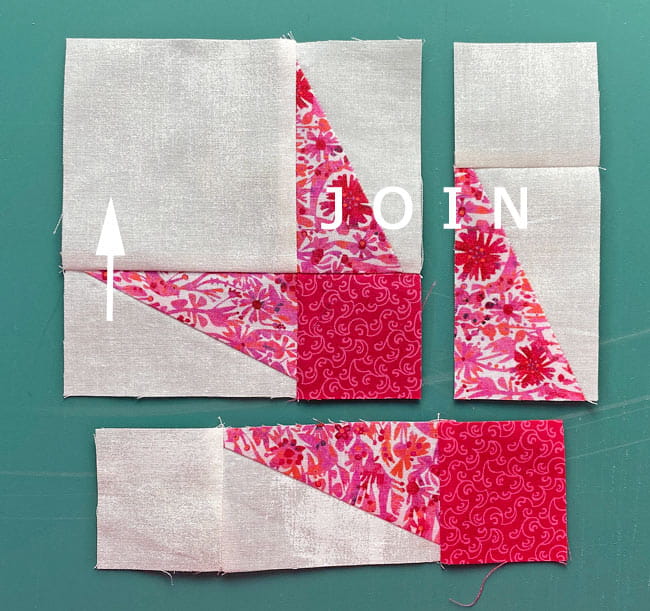
Press towards the first unit.
With RST, add the bottom #5/HRT-B/#4. Again, the seams nest.
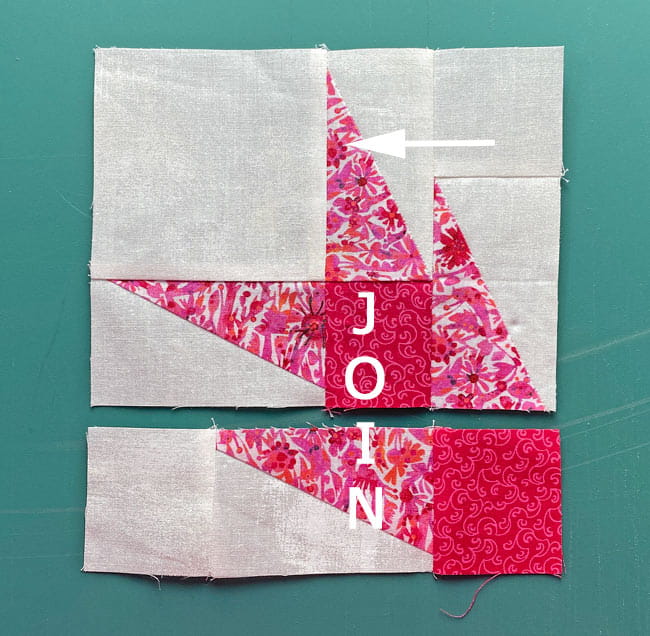
The Corner is finished. Give it a last turn at the ironing board with this SA towards #3.
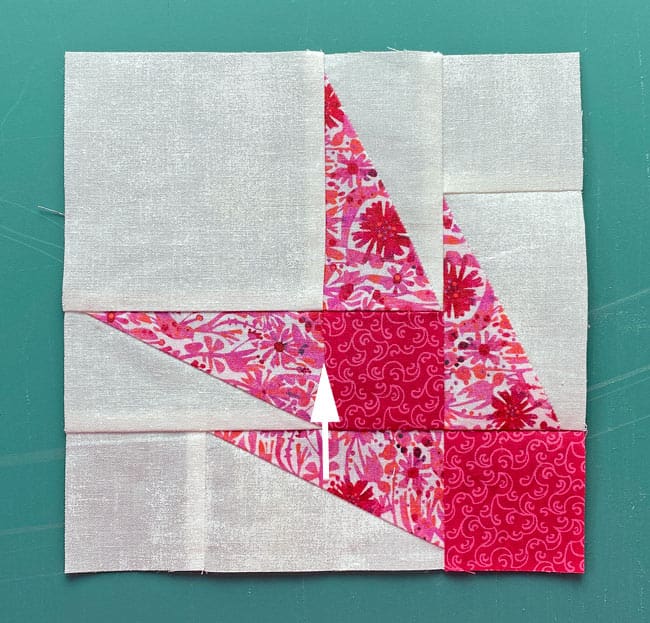
Use the chart below to check the accuracy of your Corners before assembling the block.
After sewing, all Corners measure... | |
|---|---|
| Finished Block Size | Edge-to-edge Measurement |
| 10" | 4½" x 4½" |
| 15" | 6½" x 6½" |
| 18" | 8½" x 8½" |
🧩 Assemble your Christmas Cactus quilt block
Arrange the Corners, TiaS-Pairs and lone Sias so the Bac fabric is on the outside edges.
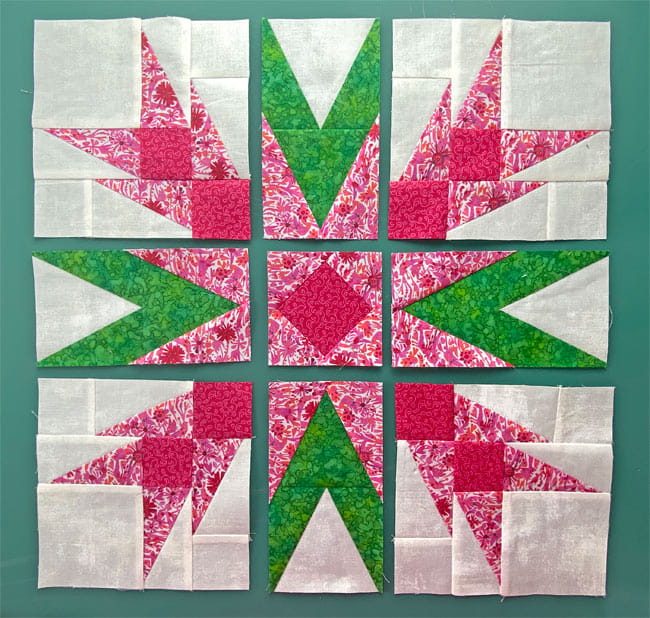
Sew the units in each row together. Because we cut and pieced carefully, the only thing you need concern yourself with is an accurate 1/4" seam and keeping the edges even. (Pin as needed, of course!)
And Voila! Wickedly pointy-points.
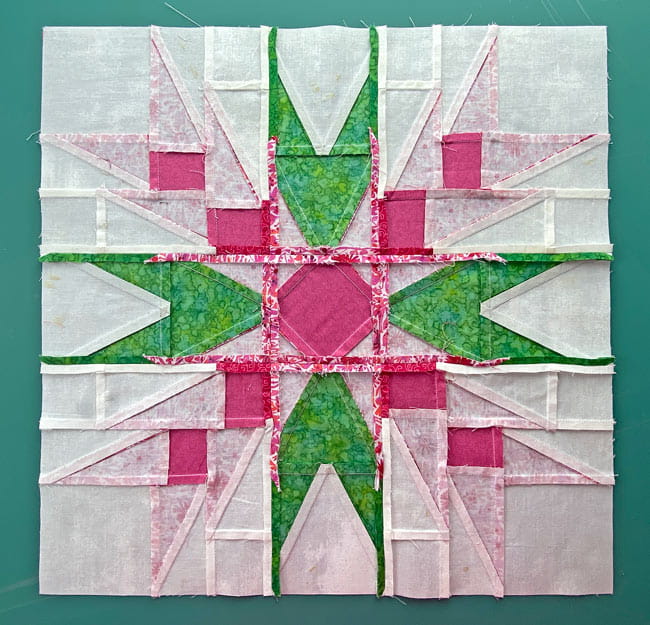
These seams are pressed open to avoid some bulk.
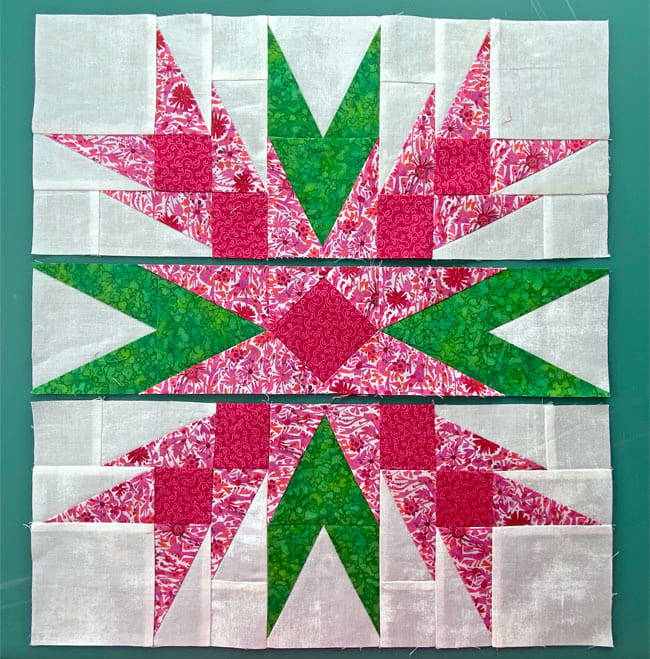
Sew the rows togethers, pinning as needed to keep the edges lined up.
These last two seams are also pressed open.
You can get a good look at all the pressing from the backside.
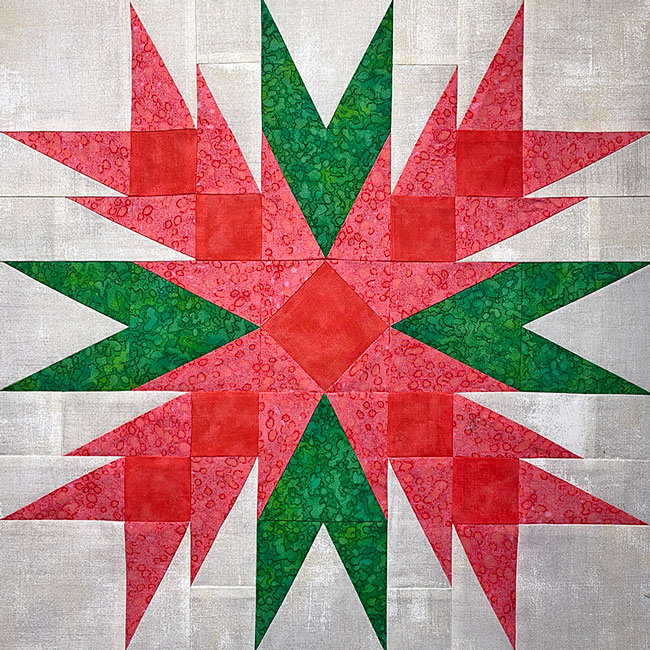
And from the front is our sample Christmas Cactus block. Pretty dramatic, eh?!!!
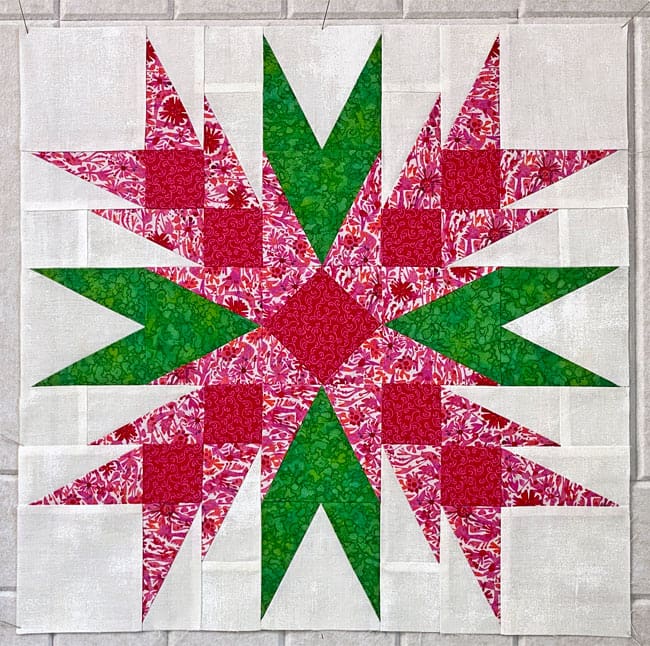
My original version below was a little more subdued, with the Light and Medium values (the coral pinks) much closer together in value.
Stuck in a fabric deep freeze? 📌📌📌
No worries!
Pin this Christmas Cactus tutorial and let it hibernate on your board until you're ready to make your quilt bloom.
When the time is right, you'll have all the tools you need to create a block that's merry, bright, and sharp as a reindeer's antlers!
🔭 Looking for something truly stellar?
You've finished your star quilt block, and you're ready for more!
Browse our collection of 70 stellar star quilt block patterns. All have instructions and cutting charts in multiple sizes. If templates or paper piecing is used in the tutorial, there's a free download for you of those materials.

Eeny. Meenie. Miney. Moe.
Which star quilt block will you sew?
For a star-studded quilting experience, choose from 100+ bedazzling star quilt patterns—for beginners and beyond—click here.
For even MORE blocks to make… 🧩🎨

...visit our Free Quilt Block Pattern Library, with over 260+ blocks to choose from in multiple sizes.
Free downloads are included in all sizes for any blocks require paper piecing patterns or templates.
- Home
- Free Quilt Block Patterns
- Christmas Cactus Quilt Block
