- Home
- Free Quilt Block Patterns
- Autumn Tints Quilt Block
Autumn Tints Quilt Block: Fall Into Perfect Points🍂
Eight HSTs at Once? That's Fall-tastic! 🪄
This post contains affiliate links, for which I receive compensation.
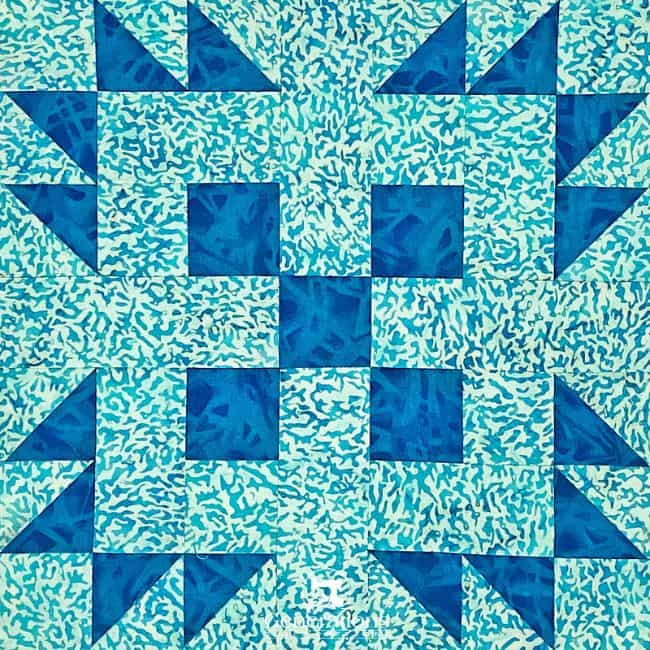
Our Autumn Tints quilt block uses traditional piecing techniques—including making half square triangles 8-at-a-time—to complete this rather modern-looking patchwork design.
Lots of negative space to play with!
🧭Let's help you fall right where you need to be!
These quick links are like perfectly placed autumn leaves—each one leading to quilting treasure! 🍁 Jump to any section and watch the magic unfold! ✨
- Cutting directions for multiple sizes: 7", 10-1/2" and 14" finished
- A coloring/fabric planning page to print
- Step-by-step instructions to make the block. Pressing directions are always included to make construction as foolproof as possible.
To spark your creativity, you'll also find:
- A cutting chart for stitching up this design into a bonus quilt for all the scrap lovers
It's time to cut up and sew!
📋 General Instructions
Several abbreviations are used in this lesson. They are:
- SA - seam allowance
- RST - right sides together
- HST - half square triangles
1/4" SAs are used throughout this tutorial.
When instructed to press, press the patches in the closed position first—just as they came off your sewing machine. This sets the seam, melding the fibers of the thread into the fibers of the fabric.
Then press the SA to the dark unless otherwise noted.
Starch makes everything easier—in my opinion. A 50/50 mix of StaFlo Liquid Starch concentrate to water is my favorite recipe for truly stable patches.
Other quilters prefer Best Press. Use whichever works best for YOU.
The newest quilt fabrics to tickle your fancy...
Click the images below to see the full collection. We share any commercial and/or free patterns that showcase them, too. (For inspiration, of course!)
✂️ Cut fabric for your Autumn Tints quilt block
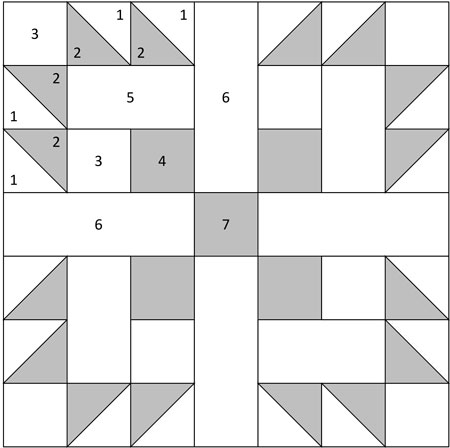
Sample Block Size: 10½" finished / 11" unfinished
Grid: 7x7
Attribution: Nancy Cabot
Brackman ID: 1886
Design Type: Uneven 9-patch, small center
Two fabrics are all you'll need.
To ensure that all your sharp points show after piecing, choose fabrics with high contrast.
While the fabrics used in the sample are pretty together (the block is more vibrant in person), a couple of points aren't as pointy looking as they could be. That's because the same color in the same value is in both the light and dark fabrics in our Autumn Tints block.
It's always a good idea to make a sample block to test your choices!
Take a minute to label each patch—your future self will thank you profusely.
 | Cutting Chart for an~ Traditional Piecing ~ | ||||
|---|---|---|---|---|---|
| Patch | Fabric | Qty | Finished Block Size | ||
| 7'' | 10½'' | 14'' | |||
| 1 | Bac | 2 | 4¼'' x 4¼'' | 5¼'' x 5¼'' | 6¼'' x 6¼'' |
| 2 | A | 2 | 4¼'' x 4¼'' | 5¼'' x 5¼'' | 6¼'' x 6¼'' |
| 3 | Bac | 8 | 1½'' x 1½'' | 2'' x 2'' | 2½'' x 2½'' |
| 4, 7 | A | 5 | 1½'' x 1½'' | 2'' x 2'' | 2½'' x 2½'' |
| 5 | Bac | 4 | 1½'' x 2½'' | 2'' x 3½'' | 2½'' x 4½'' |
| 6 | Bac | 4 | 1½'' x 3½'' | 2'' x 5'' | 2½'' x 6½'' |
| Unfinished Block Size | 7½'' | 11'' | 14½'' | ||
| Grid Size | 1'' | 1½'' | 2'' | ||
Like the block, but not quite sure what to do with it? Click here.
🪡 Assemble the units for your Autumn Tints
HSTs
Make 16
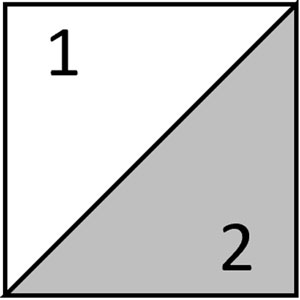
We use the 8-at-a-time method to make the 16 HSTs needed to complete this design. If you're making many blocks, you might want to try triangle paper for even more efficient piecing.
To begin, draw two diagonal lines on the back of either the large #1 or #2 squares.
Below you can see that I've marked the darker of the two. This is because my chalk markings are easier to see. (I've used my Bohin Mechanical chalk pencil for this—my personal favorite.)
Stitch a 1/4" from both sides of both lines for both pairs of patches. (That's a mouthful! :D )
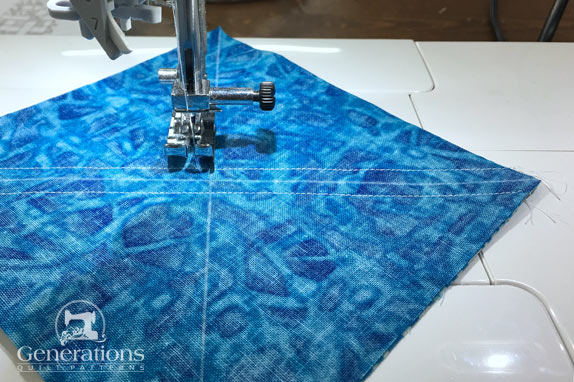 You can barely make out the chalked diagonal lines. They only need to be as dark as YOU need to see them.
After stitching, give your sewn pairs a good press, then move to your cutting mat.
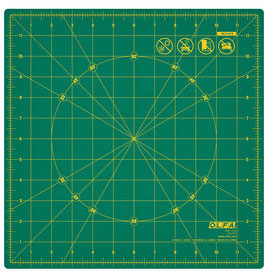
I use a rotating mat for easier trimming. Just load it up with HSTs and trim away.
Using the chart below, find the finished size of your block and the corresponding Center or Midpoint Measurement.
For our 10-1/2" sample that measurement is 2-5/8".
HST Dimensions | ||
|---|---|---|
| Finished Block Size | Center/Midpoint Measurement | Trim HST to… |
| 7" | 2-1/8" | 1-1/2" |
| 10-1/2" | 2-5/8" | 2" |
| 14" | 3-1/8" | 2-1/2" |
Find that measurement on your ruler and align that line with one edge of one sewn pair (red arrow). The edge of your ruler should be in the middle of the block. Cut through the center.
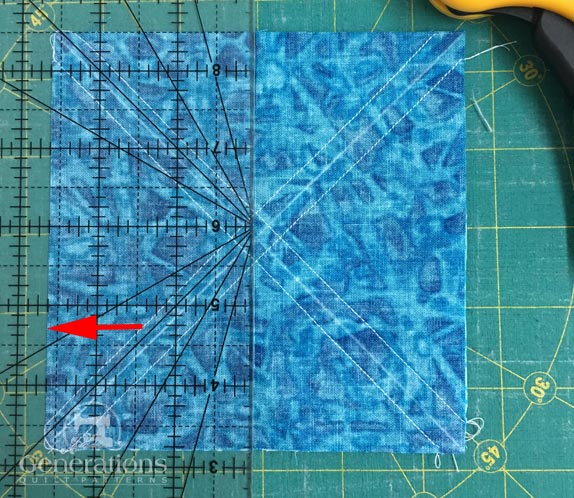
Turn the mat a quarter turn (this is where the rotating mat is so nice—there's much less disturbance of your patches.
Align the Center measurement with the edge of your pair of patches and cut through the center again. You now have four equal squares.
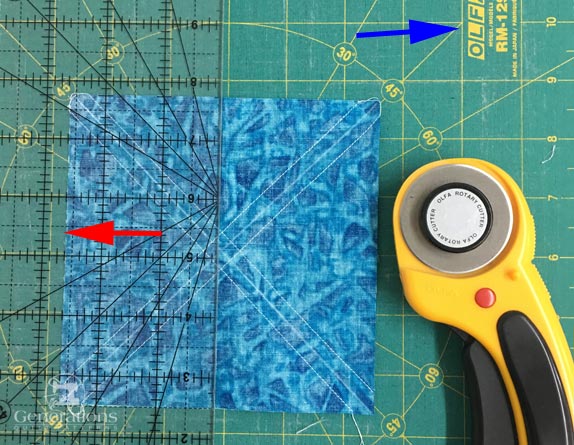 The blue arrow shows that the orientation of the mat changed when you rotated a 1/4 turn.
Cut the square apart on the diagonal lines to form the HST. Because your squares haven't moved these cuts are quick to make.
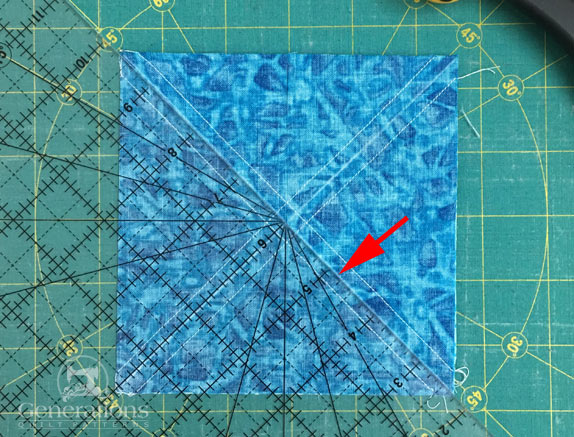 If you've not disturbed your patches, you'll be able to use your rotary cutter for these last two cuts.
Repeat for the second sewn #1/#2 pairing.
Press your HST with SAs towards the dark.
Referring to the chart, find the 'Trim to...' size that corresponds to your block and trim your 16 HSTs to perfection.
For our 10-1/2" sample, the HSTs are trimmed to 2"x2".
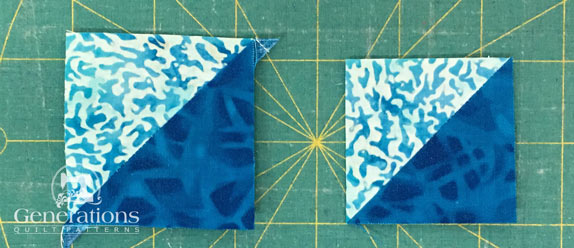 Before (left) and after (right) trimming to size.
HST units
Make 4 of each
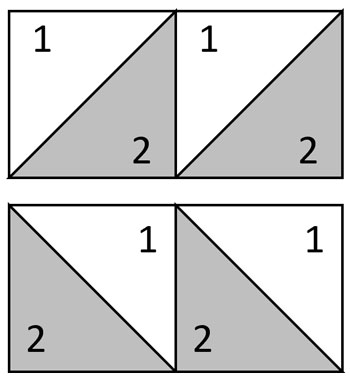
To complete our Autumn Tints block, you'll need four pairs each of mirror imaged HST duos.
With RST, stitch pairs of HST together so that 4 pairs have dark HSTs that slope down to the right and 4 pair that slope down to the left.
For the pinners out there...
...yes, I pin these so that the edges stay even.
SA are pressed toward the dark fabric as shown below (red arrow).
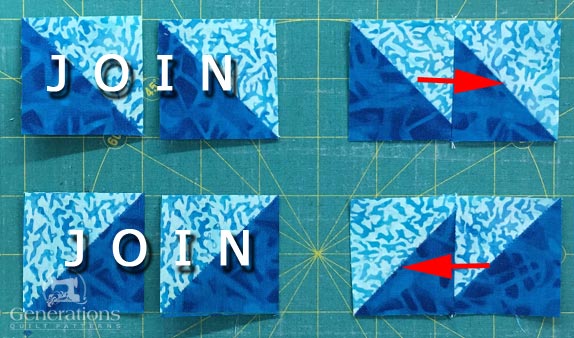 Make 4 of each
Corners
Make 4
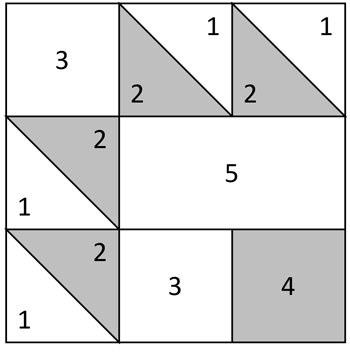
You'll need 4 each of #3, #4 and #5—it's a good thing you labeled your patches.
With RST, join four #3s and #4s together. Press the SA toward #4.
With RST, join the #5 to the pair. Use the picture below to make sure that the patches are joined exactly the same manner. You'll want the #5 on the left side with #4 in the upper right corner after sewing.
Press the SA in the direction of the red arrows.
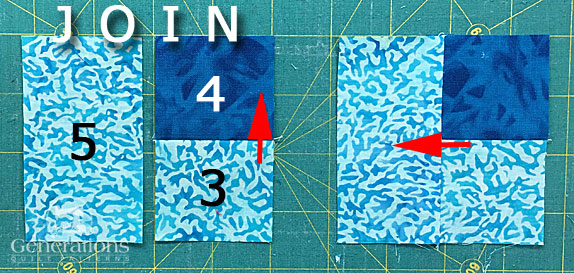
Compare the dimensions of your units at this point to the chart below. Make any needed adjustments.
#3/#4/#5 Dimensions | |
|---|---|
| Finished Block Size | Edge-to-Edge Measurement |
| 7" | 2-1/2" x 2-1/2" |
| 10-1/2" | 3-1/2" x 3-1/2" |
| 14" | 4-1/2" x 4-1/2" |
To complete the corners, arrange the sewn HSTs, a #3 patch and a #3/#4/#5 unit as shown below.
With RST, join the units, pressing SAs in the direction of the red arrows after each seam is complete.
Repeat for a total of four.
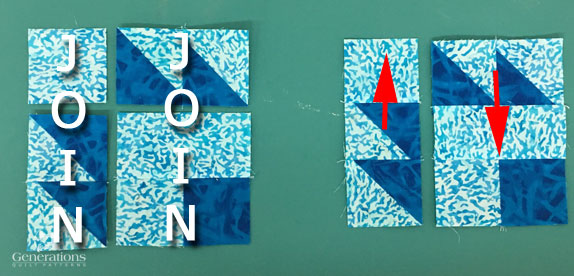
Check your dimensions against the chart below, adjusting if necessary.
Corner Dimensions | |
|---|---|
| Finished Block Size | Edge-to-Edge Measurement |
| 7" | 3-1/2" x 3-1/2" |
| 10-1/2" | 5" x 5" |
| 14" | 6-1/2" x 6-1/2" |
🧩 Assemble your Autumn Tints quilt block
Arrange the pieced corners and cut rectangles and square into the Autumn Tints design. The corners are positioned with the dark square towards the center of the block.
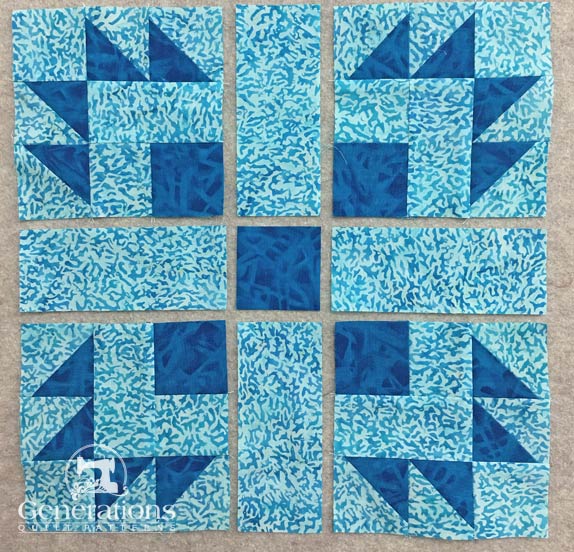
With RST stitch the units together in each row. After sewing, press the SA in the direction of the arrows.
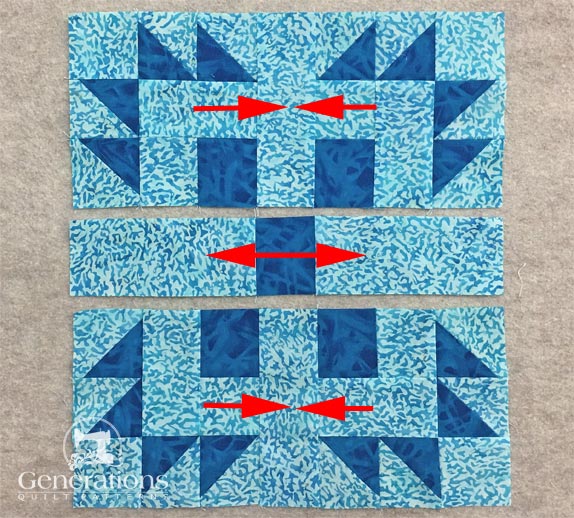
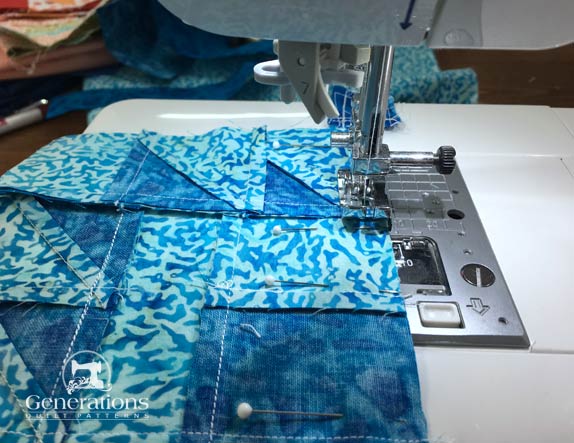
With RST, sew the rows together. Here I'ved pinned to help keep all the edges even. It's easier that way to pay attention to your quarter inch seam at the points of the HSTs.
Note, too, that the side with the most piecing is on top to minimize Twisted Sister seam allowances.
After sewing and pressing, this is the finished block—loving all the extra negative space in this design.
If your block doesn't want to submit in pressing, try my favorite pressing technique for impeccably flat finished patchwork!
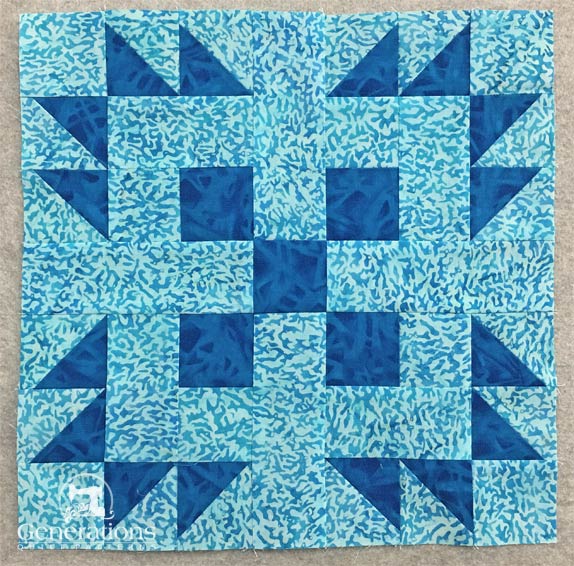 Our finished Autumn Tints block—front side
To reduce bulk, these last two SAs are pressed toward the center.
After that final press, this is the Autumn Tints from the backside.
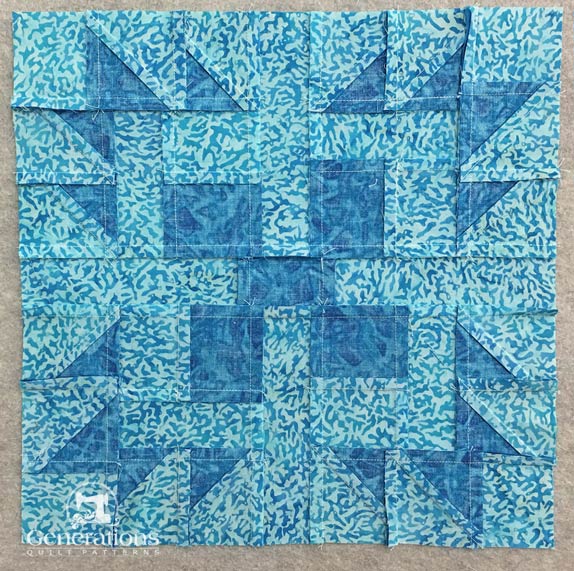 Our finished Autumn Tints block—back side
You've mastered Fall's perfect points! 🍂
The Autumn Tints quilt block brings together traditional techniques with a modern flair 🍁, creating a design that's perfect for showcasing your favorite fabrics! ✨
With its mix of pointy-points and generous negative space, each block becomes a unique celebration of the season. 🎯 💫
Remember, every quilter started somewhere, and with each block you make, your confidence will grow like leaves unfurling in the autumn breeze. 🪄
Your Autumn Tints journey~just the beginning! 🍁
Ready to turn your blocks into something spectacular? 🎯
We've gathered some stunning layout ideas that'll make your quilting heart flutter! Click here to check out the design ideas.
Scrap quilters, we've got you covered too—click here for our bonus cutting chart and let those fabric treasures shine! ✨
📌Don't let this tutorial fall through the cracks
Pin it for your next quilting adventure! 🎯
For even MORE blocks to make… 🧩🎨

...visit our Free Quilt Block Pattern Library, with over 260+ blocks to choose from in multiple sizes.
Free downloads are included in all sizes for any blocks require paper piecing patterns or templates.
- Home
- Free Quilt Block Patterns
- Autumn Tints Quilt Block

