- Home
- Free Quilt Block Patterns
- Aunt Kates Choice Quilt Block
Sew an Aunt Kate's Choice Quilt Block
From our Free Quilt Block Patterns Library
This post contains affiliate links, for which I receive compensation.
The Aunt Kate's Choice quilt block is made from Birds in the Air units and a smidgen of extra piecing.
My favorite technique is to paperpiece this block. With little effort, points just come out so-o-o-o pointy.
Nothing gets cut off.
Simply by stitching on a line.
But if you despise paper piecing, don't worry.
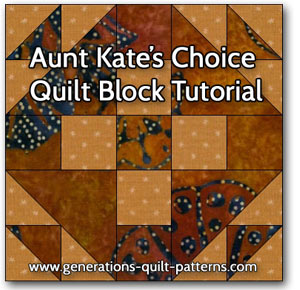
Instructions are also included for traditional patchwork, too.
There's always more than one way to put a block together. The trick is to find out what works best for YOU!
Is Aunt Kate's Choice not ringing a bell? You might also know it as a 'Duck and Ducklings'. (We've got instructions for that block variation here.)
There's lots to do. Let's get started!
General Instructions
Several abbreviations are used in this tutorial:
- SA - seam allowance
- RST - right sides together
- HST - half square triangle
When you are instructed to press, first press the pieced unit flat to set the seam. Then open the patch, pressing from the front. Seam allowances are pressed toward the darker fabric unless otherwise noted.
For exquisitely flat blocks, take a minute to review our favorite pressing technique. It works even with foundation paper attached.
Now that's sweet!
Step 1: Choose your technique, a size, then cut your patches
 Aunt Kate's Choice design
Sample Size: 6&188;" finished / 6¾" unfinished
Grid: 5x5
Attribution: Needle Craft Supply
AKA: Duck and Ducklings (Ladies Art Company)
Design Type: Uneven 9-patch, small center
We've got two cutting charts for two different techniques. Choose one or the other.
In both charts the dimensions represent squares unless otherwise written.
To translate from our charts, for a paperpieced 5" block for Patch #1 from Fabric A cut two 1-7/8" x 1-7/8" squares. Then subcut each once on the diagonal.
For the sample Aunt Kate's Choice in this tutorial, our Fabric 'A' is a dark and 'B' is a light.
Option #1: Paperpiecing
To print the foundation patterns, click on the size listed in the 'Finished Block' column, i.e. for a 5" finished Aunt Kate's Choice, print 2" Birds in the Air units.
You'll need the most current version of Adobe installed on your computer to download the pattern.
On the Adobe Print Menu page, under 'Page Size and Handling' set 'Custom Scale' to 100% before printing for accurate results. Click here to see what it looks like on the Print Menu page.
After printing, use the 1" square graphic on the printed pages to confirm they are printed accurately.
The patches are cut bigger to make positioning them a breeze! I suggest making a block or two as instructed.
Decide if you need to adjust the patch size to accommodate YOUR preferences.
Note any changes you make for future reference. Store with printed copies of the paper pieced patterns.
Remember to subcut Patches #1-#5.
| Finished Block Size | |||||||
|---|---|---|---|---|---|---|---|
| Patch # | Fabric | Qty | 5” | 6¼" | 7½" | 10” | Sub Cut |
| 1 | A | 2 | 1-7/8” | 2-1/8” | 2-3/8” | 2-7/8” | |
| 2, 3, 4 | B | 6 | 2-3/8” | 2-5/8” | 2-7/8” | 3-3/8” | |
| 5 | A | 2 | 3-3/8” | 3-7/8” | 4-3/8” | 5-3/8” | |
| 6 | B | 4 | 1-1/2” | 1-3/4” | 2” | 2-1/2” | -- |
| 7 | A | 4 | 1-1/2” | 1-3/4” | 2” | 2-1/2” | -- |
| 8 | A | 1 | 1-1/2” | 1-3/4” | 2” | 2-1/2” | -- |
| PRINT Birds in the Air unit | 2" | 2-1/2" | 3" | 4"** | -- | ||
| Trimmed Birds in the Air unit measures... | 2-1/2” | 3” | 3-1/2” | 4-1/2” | -- | ||
| Grid Size | 1” | 1-1/4” | 1-1/2” | 2” | -- | ||
| Unfinished Aunt Kate's Choice measures... | 5-1/2" | 6-3/4” | 8” | 10-1/2” | -- | ||
**You'll need to print two pages for a total of four units
Option #2: Traditional Piecing
There are no patterns to print for traditional piecing. Just remember to subcut Patches #1-#5 as directed (see far right column).
| Finished Block Size | |||||||
|---|---|---|---|---|---|---|---|
| Patch # | Fabric | Qty | 5” | 6-1/4” | 7½" | 10” | Sub Cut |
| 1 | A | 2 | 1-7/8” | 2-1/8” | 2-3/8” | 2-7/8” | |
| 2, 3, 4 | B | 6 | 1-7/8” | 2-1/8” | 2-3/8” | 2-7/8” | |
| 5 | A | 2 | 2-7/8” | 3-3/8” | 3-7/8” | 4-7/8” | |
| 6 | B | 4 | 1-1/2” | 1-3/4” | 2” | 2-1/2” | -- |
| 7 | A | 4 | 1-1/2” | 1-3/4” | 2” | 2-1/2” | -- |
| 8 | A | 1 | 1-1/2” | 1-3/4” | 2” | 2-1/2” | -- |
| Trim small HST to... | 1-1/2” | 1-3/4” | 2” | 2-1/2” | -- | ||
| Trim Birds in the Air unit to... | 2-1/2” | 3” | 3-1/2” | 4-1/2” | -- | ||
| Grid Size | 1” | 1-1/4” | 1-1/2” | 2” | -- | ||
| Unfinished Aunt Kate's Choice measures... | 5-1/2” | 6-3/4” | 8” | 10-1/2” | -- | ||
Step 2: Assemble the units
Birds in the Air
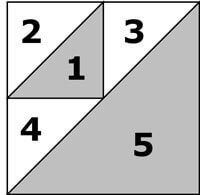
Make 4
For detailed instructions, click the link below that corresponds to the type of patches you cut in Step 1 for:
After stitching, trimming and removing the paper, you'll have four units that look like this.
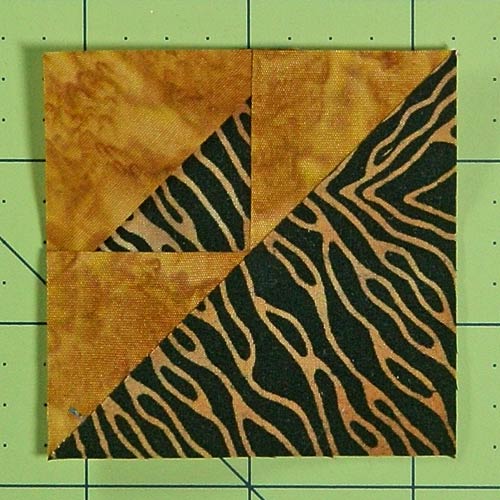 The SAs looker larger than 1/4" because this patch is shown larger than life.
The paper piecing is complete. From this point forward, return your stitch length to the one you regularly use for piecing and install your favorite 1/4" presser foot.
Joined Squares
Make 4
With RST, layer a #6 and a #7 square, stitch with a 1/4" seam. Press towards the dark.
Make four like this.
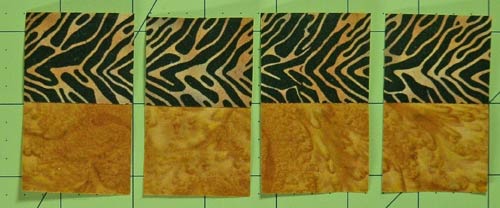
Step 3: Assemble your Aunt Kate's Choice quilt block
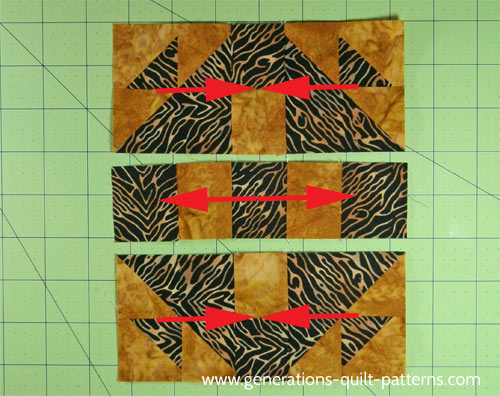
Lay out your finished units and center square into rows.
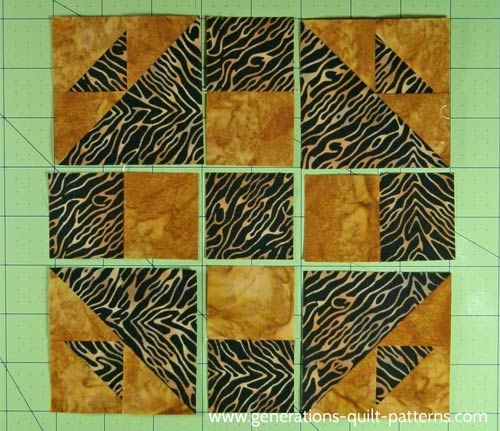
Stitch the rows together with a 1/4" seam. Press with the SAs in the direction of the arrows shown below.
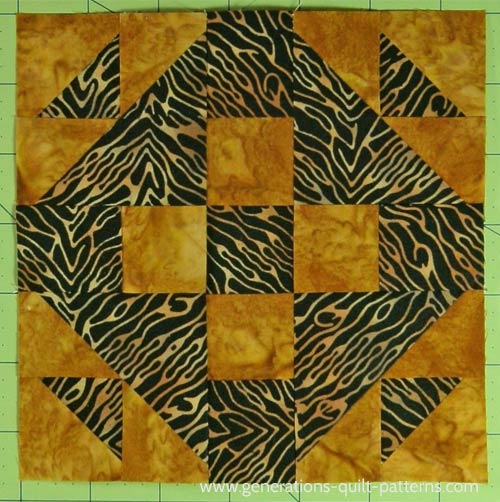
At last, your Aunt's Kate Choice quilt block is finished!
So many choices...So little time!
Make it easy on yourself and check out our Free Quilt Block Patterns Library. Lots of blocks with illustrated instructions to choose from!
What about a different quilt block?
For a list of all the 220+ quilt block patterns on this site, start here.
If you know the name of the block, shorten your search by using these links:
Click here if you're looking for blocks with at least some paper piecing.
Click here if you're looking for the basic building blocks of quilting, i.e., Flying Geese, half square triangles, quarter square triangles, etc., along with several techniques to make each.
And finally, use these links to find blocks in these finished sizes:
