- Home
- Machine Applique (Invisible)
- Applique Templates
Preparing Applique Templates
Lesson 2: How to turn seam allowances to create the perfect applique templates
This post contains affiliate links, for which I receive compensation.
The next step in preparing templates is to trim and turn the seam allowance. I'll use the abbreviations SA throughout the rest of these instructions.
There are several techniques for creating flat, smooth templates. They are all used in our basket block example are shown below.
Trim Seam Allowances
Trim around the template, leaving a SA less than a 1/4 inch and greater than a 1/8 inch.
You may also want to trim the tips of the points to reduce bulk.
Clip Concave Curves and Inner Corners
Concave curves, like the inside of the letter "C", are the only curves that need clipping to lay flat.
Tighter curves need more clips that are close to the Rinsaway template. Gentle curves will need fewer and shallower clips to turn nicely.
As you gain experience with clipping, you'll instinctively recognize how close you need to cut to the edge of the applique templates.
That being said, do end your clip at least a couple of threads away from the template to avoid getting bumps and pokies on the front of your applique piece.
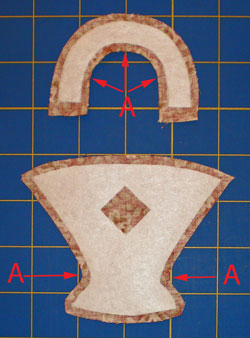
Some areas need clipping to turn properly
Concave curves like the inside of the basket handle or the curves at the base of the basket ("A") are clipped to within a couple threads of the Rinsaway template.
After clipping, these SAs turn smoothly and easily. Outer or convex curves like the tops of the basket handle or basket itself need no clipping to turn smoothly.
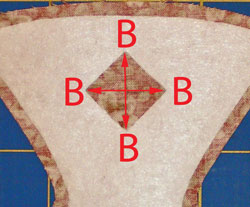
"Reverse applique" is used for the square cutout in the basket to reveal
the background fabric behind the applique shape. Make a clip diagonally
into each inner corner ("B") to within a thread or two of the template.
Glue and Fold SAs
Elmer's Glue Stick remains moist, so if you aren't pleased with the smoothness of any edge, lift up the SA and try again. You've got time to work.
Again remember, an edge with a dashed line is not turned. It will tuck under another shape.
Working with edges
You use your thumb and index finger to fold the SAs over the template. Use just enough pressure to turn the edge, but not so much that you distort the template.
As with all things "quilting", this motion will become second nature with practice.
A cuticle or orange stick is the perfect tool to use to get rid of pokies or smooth an edge. The wood just seems to grab the fabric better.
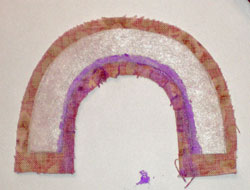
Inner edge of the handle
Apply glue stick to the edge of the template and the SA. Using your thumb and index finger, roll it to the template side of the unit.
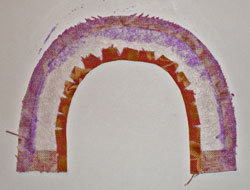
Outer curve of the handle
Apply glue stick to the edge of the template and the SA. Again with your thumb and index finger, roll it over the template.

Glue Basket Sides
Glue the template edge and SA on one side of the basket. I start with the inner curve and turn the it; then finish the long straight edge.
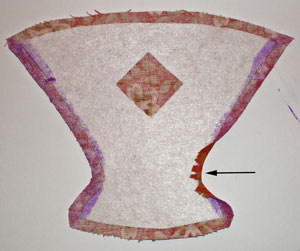
Turn Side SA
Start with the inner curve and turn the fabric; then finish the long straight edge. Repeat for the opposite side.

Glue Top and Bottom SAs
Now glue the basket's top and bottom seam allowances. Apply glue to both the seam allowance and the edge of the template.

Apply glue to the cutout square area and template edge
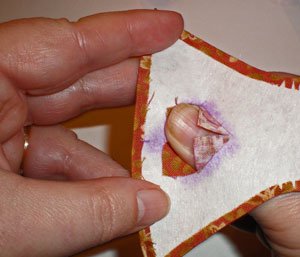
Turn the Cutout Square
Use your finger to smooth the seam allowances into place.
Evaluate Your Work
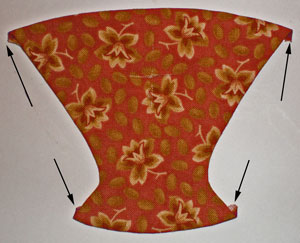
Place your applique templates on something with high contrast. Here, I've used a piece of white paper. It's easier to see your work.
With the outside edges turned, take a minute to evaluate. Are the edges smooth with no pokies?
If not, lift up the fabric and try again. You do have a few minutes to work with the Elmer's Glue Stick.
We'll tackle those "flags" highlighted by the arrows in the next step.
Working with Points
Our basket has four outside corner—two at the top and two at the bottom of the basket. Turning the seam allowances has resulted in little flags that stick out past the template.
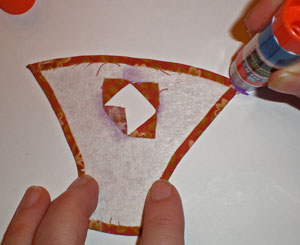
Apply glue stick to the back side of the flag

Turn the flag back on itself
Using your thumbnail as a guide, turn the excess seam allowance back over onto itself.
Any seam allowance that sticks out now can be trimmed off with a small scissor.
As you work, you'll find your "point" comfort zone. There will be points you turn with ease. Others, because the angle is more acute, will be harder to get really "pointy".
It's important for you to remember that YOU are in charge. You can always redraw a point that you are uncomfortable turning. No one will hold up the pattern next to your finished quilt and notice you've changed the design.
DO NOT SKIP THIS NEXT STEP!
Press the Completed Applique Templates
Once all the edges and points/corners are turned and you are satisfied with the final shape it's time to press to dry the glue.
Cover and protect the ironing board.
Lay the prepared shape fabric side up. Cover it with parchment paper or an applique pressing sheet to protect your iron.
Press until the glue is dry. Check frequently so you don't accidentally burn the shape.
Once it's dry, inspect it. Are you happy with the turned edges and points of your applique templates?
If not, start again, making another shape to replace it.
Once you're satisfied with your applique templates, it's time to place the templates onto your background fabric. We'll discuss that next...


