Setting Triangles for an On-Point Quilts
Learn how to calculate the size you need or simply use the free cutting chart!
This post contains affiliate links, for which I receive compensation.
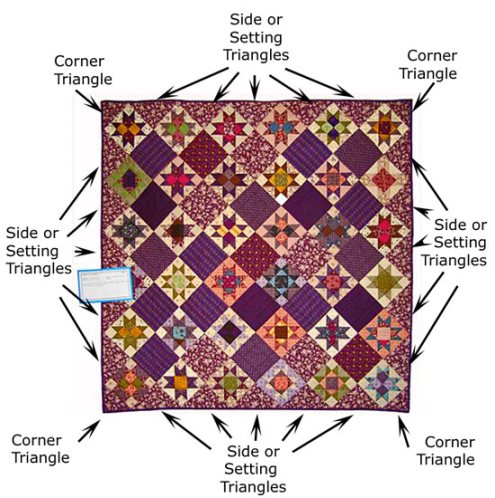
Setting triangles are the triangles used to fill in the spaces on the outside edges of a quilt that is set on point like "Lovely in Lavender" (shown below). While they might look the same, setting and corner triangles are very different.
On this page you'll learn to identify the correct triangle for the space to insure that you'll have a stable, straight of grain edge around the outside of your top.
You'll also learn how to calculate and cut setting and corner triangles.
And finally, if math just isn't your thing, there's a chart at the bottom of this page where the math is done for you.
Download, print and keep a copy at your cutting table for easy reference.
Where to Use Setting Triangles
Finishing an on point setting requires four corner triangles and as many quarter square triangles as there are open spaces on the sides, top and bottom of your design.
Do the Math Yourself
The math is straight forward, but for the calculations below, use a calculator.
It's easier, of course!
At the end, remember to round up to the nearest 1/8" because you'll do all the cutting with your rotary cutter and ruler.
Rotary Cut Corner Triangles
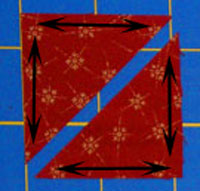
shown with black arrows.
These are actually half square triangles so that the straight grain is on what will be the two outside edges. This helps stabilize the outside edges of your patchwork.
Use this formula to determine size of squares you'll need...
- Finished block size divided by 1.414
- Add 7/8" for seam allowances
- Round up to the nearest 1/8" (because you'll use a rotary ruler).
Cut two squares equal to this last measurement. Then subcut once on one of the diagonals.
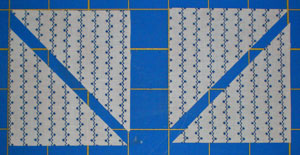
If you have a directional print, you may need to cut one square from upper left to lower right and the other from lower left to upper right...
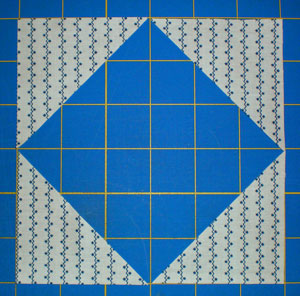
...so that the fabric design runs in the same direction for all four corners.

Patterns frequently use this symbol (pictured left) to denote cutting half square triangles or corner triangles.
Rotary Cut Side, Top and Bottom Setting Triangles
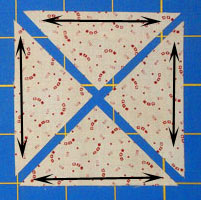
shown with black arrows.
These triangle have a single straight grain edge and two, equal bias edges.
The bias edges are sewn to your blocks so that the stronger, more stable straight grain is on the outside edge of your finished quilt. (Remember, straight grain edges have less stretch to them than bias edges.)
Use this formula to determine the size of squares you'll need...
- Finished block size times 1.414
- Add 1-1/4" to this result for seam allowance
- Round up to the nearest 1/8" (because you'll use a rotary ruler)
Each square gives you two side setting triangles AND one for both the top and bottom. You'll need as many squares as there are spaces on the longest side of your quilt. Then cut each square in half twice, once on each diagonal.

Patterns will frequently use this symbol (pictured left) to denote cutting setting or quarter square triangles.
The Math is Done for You!
Sometimes when you just want to finish your quilt, the last thing you want to do is a bunch of math. We've created this handy table with the math already done for several common block sizes.
[Click here to download and print a copy to keep at your cutting table.]
Helpful Hint
Many quilters like to cut over-sized setting triangles so that the quilt top can be squared up after it is completely sewn. If you belong to this group, then use the results from the calculations and charts below as the minimum size to cut your squares.
| Finished Block Size | Corner Triangles Cut once on the diagonal | Side Triangles Cut twice on the diagonal |
|---|---|---|
| 1 1/2" | 2" | 3 3/8" |
| 2" | 2 3/8" | 4 1/8" |
| 2 1/2" | 2 3/4" | 4 7/8" |
| 3" | 3" | 5 1/2" |
| 3 1/2" | 3 3/8" | 6 1/4" |
| 4" | 3 3/4" | 7" |
| 4 1/2" | 4 1/8" | 7 5/8" |
| 5" | 4 1/2" | 8 3/8" |
| 5 1/2" | 4 7/8" | 9 1/8" |
| 6" | 5 1/8" | 9 3/4" |
| 6 1/2" | 5 1/2" | 10 1/2" |
| 7" | 5 7/8" | 11 1/4" |
| 8" | 6 5/8" | 12 5/8" |
| 9" | 7 1/4" | 14" |
| 10" | 8" | 15 1/2" |
| 11" | 8 3/4" | 16 7/8" |
| 12" | 9 3/8" | 18 1/4" |
| 13" | 10 1/8" | 19 3/4" |
| 14" | 10 7/8" | 21 1/8" |
| 15" | 11 1/2" | 22 1/2" |
| 16" | 12 1/4" | 23 7/8" |
| 17" | 13" | 25 3/8" |
| 18" | 13 5/8" | 26 3/4" |
| 19" | 14 3/8" | 28 1/4" |
| 20" | 15 1/8" | 29 5/8" |
If you choose to use over-sized setting triangles, remember to use the measurements above as your minimum size. Once your quilt top is pieced, then square it up to remove the excess fabric.
Quickly find a block to make
Whether you're looking for traditional quilt patterns or modern or paper pieced, you'll find all kinds here.
