- Home
- Free Motion Quilting 101
- Quilting Feathers w/Spaces
Quilting Feathers with Spaces
The perfect technique for all those luscious, thick, glitzy, marvelous threads!
This post contains affiliate links for which I receive compensation.
Quilting feathers with a space between each is perfect for when you are free motion machine quilting with variegated or heavy decorative threads.
Follow along to learn this technique.
What Are Feathers with Spaces?
Quilting a feathered design by intentionally leaving a space between each individual feather is easier to do than backtracking.
You don't worry about quilting directly on top of a previous line of stitching.
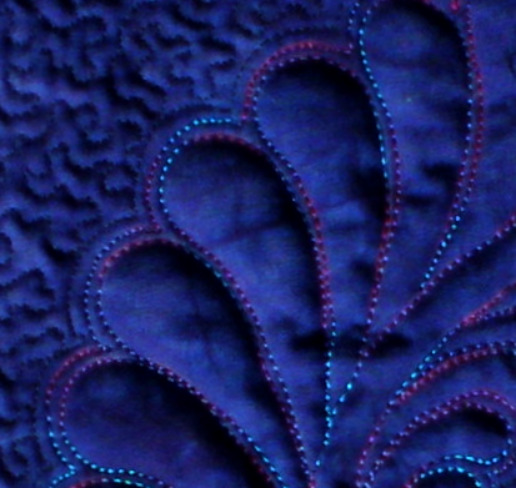 This example of quilting feathers with spaces uses variegated thread.
Both
sides of each feather are stitched, so there are more stitches to
compact the batting around the feather. This method naturally produces a
wee bit more dimension in the final quilt.
Shown above is a section from a Generations Quilt Pattern B116 called "Wreath with Borders".
It is quilted on hand dyed pima cotton with 'Rainbows', a variegated thread by Superior Threads, for the feathers and YLI 100 wt silk thread for the stippling.
Marking the Quilt Top
Marking the top for this method of quilting feathers is the same as for any marked design.
Trace the feathered design onto the top as before. Then simply follow the inside of the drawn marking line for each feather. Your feathers will automatically end up a marking pen or chalk line's width away from each other.
Keep in mind that the traced design lines are merely guides for your stitching. You will travel off the line occasionally.
This is normal for everyone.
Thread Choices
Unlike quilting feathers by backtracking , quilting feathers with spaces between allows you to use any type of thread.
Because there is no backtracking, there is no unsightly thread buildup, no matter what the type or weight of the thread.
For the needle...
Wonderful variegated threads are available today that are perfect for quilting feathers.
Each line of stitching shows. The color of variegated thread looks “muddy” when its stitched one line on top of another. When the feathers are spaced, there is no double stitching or backtracking.
Variegated threads have changed over the past several years.
It used to be that the repeat of a color in the variegation was long. From a distance it looked like blobs of color.
Now many of the thread companies produce thread with one to two inch changes.
This spreads the color over the top and produces stunning results.
Several of the quilts in our Generations Quilt Patterns line use variegated thread by Superior Threads. We love it!
Yes, monofilament thread is also a choice when you are quilting feathers. My favorite brand is YLI Wonder Invisible Thread.
And, of course, 100 wt silk thread. Lusterous and fine.
Perfect for stitching the smallest of elements in your feathered designs. YLI's 100 wt silk thread is my go-to brand.
For the bobbin...
...we suggest a solid color of either Superior Threads Bottom Line, a 60 weight polyester, or Aurifil, a 50 weight cotton. The bobbin color should blend or have a very low contrast with the color of your needle thread.
Using variegated in the bobbin and needle can produce a “striped” look to the stitching if your tension isn't perfectly balanced. Imbalanced tension can cause the bobbin thread to loop up and over the needle thread and show on the top of your quilt.
As always, make a small practice sandwich out of scrap materials from the quilt you'll be quilting to test your thread choices and tension adjustments first.
Though this is an extra step, it can save you lots of ripping time if you're not happy with your choices.
Just a couple of thread guidelines...
- Smaller feathers look better with finer thread; larger feathers look good with many weights of thread.
- Finer threads such as YLI 100 weight silk look better with a smaller stitch length.
- Larger threads require a longer stitch length so that the stitches don't look “packed” or "stuffed" together.
Order of Quilting the Feathers
Stitch the spine and first feather...
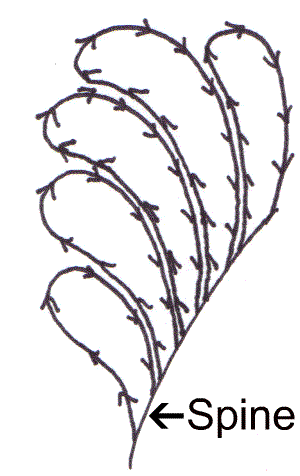
Stitch the spine so that when it's complete your needle is in the spine at its root where the first feather begins.
You will swoop out and away from the spine, first quilting the underside of the feather, then curving around to stitch the upper side ending with your needle in the fabric at the spine.
If you need to stop to adjust your hand position this is the place to do it.
Don't stop in the middle of a feather if you can help it. It's hard to get started again without leaving a telltale sign or bump in the line of quilting.
Try hard not to cross the spine line. This will look messy. If you are having trouble ending at the spine then stitch almost to it before you begin your backtracking.
Now angle up to add a space...
When the needle hits the spine after completing the first feather, stop.
Either take a stitch up along the stitched spine and then swoop out and away for the next feather, or just swoop out and away from the spine angling up a couple of threads away from the stitched upper side of the first feather.
And repeat...
Continue in this manner until you reach the feather at the very tip or end of this spine. After completing this top feather your needle should be just touching the tip of the spine.
Echo quilt to return to the root...
Now echo quilt along the outside edge of this line of feathers to return to the root of the design.
Echo quilting is accomplished by stitching a uniform distance away from a previously quilted line. At Generations Quilt Patterns, the echo quilting in our samples is stitched about 1/8“ away from the feather itself.
Repeat to fill the other side of the spine with feathers. And again, after the last stitch of the last feather at the tip, echo your way back to the root of the design.
Echo quilting emphasizes feathers by adding more contrast between the puff in the feathers to the stitched (echo quilted) area immediately surrounding the feather. Use a wool batt (we recommend Hobbs 100% Wool) to further enhance the contrast.
My feathers are quilted, now what?
One you have finished quilting the feathers, spritz the sandwich lightly with water to remove the quilting design lines to see how your quilting looks.
Let the piece dry.
Then complete your background stitching. Stitching the background fill is just plain easier when your quilting is clearly visible.
***Remember to completely remove the markings by washing your quilt***
Follow the manufacturer's directions after the quilting is finished to completely remove the washout marker's chemicals from your quilt.
That spritzing only made the marks disappear...it did not remove the chemicals from your quilt.
DO NOT SKIP THIS STEP.
Just a Reminder...
Practice, practice and practice again.
The more you quilt feathers, the more you understand how they flow in a design. The better able you'll be to edit while quilting, or better yet, save yourself ripping, when you've strayed from the marked line.
Enjoy the quilting and remember to breathe!
There's more.
There's always more than one way to get things done in quilting. And feather quilting is no exception.


