- Home
- Free Quilt Block Patterns
- Nell's Star Quilt Block
Charleston Quilt Block
© Judy Martin, 1990
This post contains affiliate links, for which I receive compensation.
UPDATE: February, 2014
If you have previously visited this page, you may recall this block was previously published as 'Nell's Star' in reference to the gal who asked the original question.
I believe it's important to properly attribute original work to it's source and designer.
I am happy to let you know that I have received confirmation that this quilt block is, indeed, 'Charleston Quilt' designed by Judy Martin © 1990, from her book Scraps, Blocks and Quilts: Patterns and Techniques (Judy Martin's ultimate series) . Used with permission.
I am a huge fan of Judy's and enthusiastically own and recommend two of her most recent books, Judy Martin's Log Cabin Quilt Book and Stellar Quilts. Wonderfully written patterns and sources for inspiration!
Skill Level: Confident beginner with some paper piecing experience
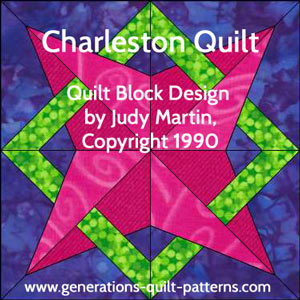
A reader wrote in with a quilt block pattern question.
She had purchased the blocks (one is shown below, left) and was looking for a pattern to re-create them.
The block is based on a 4x4 grid and requires four fabrics.
As with all stars, make sure there is enough contrast between the star point and background fabrics so that your pointy points don't get lost.
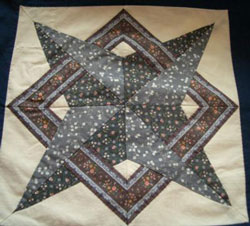
This quilt block is intended for a quilter with some previous paper piecing experience because:
1) The units are constructed in Sections that must be assembled, and...
2) There are match points between both the sections and the units. Not hard to do with a couple of pins, but you will need to pin.
📋 General Instructions
These instructions are for your own personal use. If you'd like to share them with a friend, please send them back to this website to print them so they have access to these instructions.
You'll notice that these quilt block patterns are the 'reverse' of the finished block shown further down the page.
Don't worry!
That is because the blocks are asymmetrical. The printed side is actually the backside of the block!
If you have questions as you create this block, please use either the FB comments below or Contact Us. (Please include the name of the quilt block.) Your input will help us refine this page and formulate others like it. (A big "Thank You!" in advance for that!)
Now let's get this show on the road!
Download/Print the paperpiecing pattern
You'll need the most current version of Adobe installed on your computer to download the pattern.
On the Adobe Print Menu page, under 'Page Size and Handling' set 'Custom Scale' to 100% before printing for accurate results. Click here to see what it looks like on the Print Menu page.
Below are the links to the downloads.

Not sure which paper to use?
Take a look at my review of several of the most popular brands available to us quilters on the market.
You want a super-easy paper to tear away—less stress on the stitches.
Patches, Sections, Units and Blocks
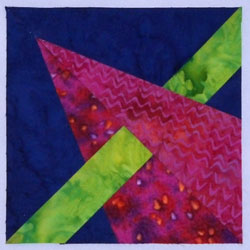
A 'patch' is the piece of fabric that you cut.
It is stitched to a pattern 'Section'. This block contains 4 each of Sections A, B and C.
After stitching them together, Sections A, B and C form a 'Unit'. One finished unit is shown to the right.
Units look like small quilt blocks, but it takes four units to create the finished quilt block.
Numbering System
To provide as much piecing information on the pattern, itself, the paper patterns are numbered as follows...
Section.Order of Piecing.Fabric Choice ...so "A.1.Bac" refers to Section A, the first patch, using the background fabric.
Fabric Choices
For this block, you'll need a background (Bac), two star fabrics--one light (S1), one dark (S2)--and a band fabric (Band). Our choices are:
 Background
(Bac)
 Star-Light
(S1)
 Star-Dark
(S2)
 Band
Band(Band)
Cutting Chart
Usually when you're paper piecing, you whack off a hunk of fabric and work from it.
However, when making several of the same block with the same fabric layout, I find it faster to pre-cut my fabric patches. I suggest you make one unit as directed to confirm that the suggested sizes below work for you.
My preference is to work with generously over-sized patches to minimize ripping out stitches from pieces that weren't aligned quite right.
If you find any that are too big or too small for the way you
work, note your changes, make another Unit to confirm and then cut the
rest of your patches.
| Fabric | Patch | Cut for each block |
8" Finished Block | 12" Finished Block |
|---|---|---|---|---|
| Background (Bac) | A.1.Bac | 4 | 4-3/4" x 2" | 7" x 2-3/4" |
| A.3.Bac | 4 | 1-3/4" x 1-1/4" | 1-7/8" x 1-1/2" | |
| B.1.Bac | 4 | 4-3/4" x 2" | 7" x 2-3/4" | |
| C.2.Bac | 4 | 1-1/2" squares | 1-3/4" squares | |
| Band (Band) | A.2.Band | 4 | 2-3/4" x 1-1/2" | 3-3/4" x 1-3/4" |
| B.3.Band | 4 | 3-3/4" x 1-1/2" | 5-1/4" x 1-7/8" | |
| Star – light (S1) | A.4.S1 | 4 | 6" x 2-7/8" | 8" x 4" |
| Star – dark (S2) | B.2.S2 | 4 | 3-3/4" x 1-3/4" | 5" x 2" |
| C.1.S2 | 1 | 4-3/8" square Subcut  |
6-1/2" square Subcut  |
Construction Tips
While there's no need for any special fabric preparation, personally, I love heavily starched fabric for paper piecing. Finger pressing is easier and 'holds' better. I find I have fewer 'fabric malfunctions' where the fabric has folded over on itself and I've stitched it 'wonky'.
I like to leave the paper on until the block is assembled, but if you like to remove paper as you go, the starch will definitely help stabilize those long bias edges in the star fabrics. Just remember that if you use starch you are going to have to wash it out at the end. Plan accordingly!
Once all the Sections are complete, stitch Section B to Section C. You can press the seam allowance either open or closed.
Join Section BC to Section A using pins to help match the edges of the blocks, the star points and the inner and outer edges of the band. Press this seam allowance towards Section A. This makes it easier to join the units together because the seams will nest.
The Finished Quilt Block!
And this is what our Charleston Quilt (formerly Nell's Star quilt block) looks like when all the sections and units are stitched together.
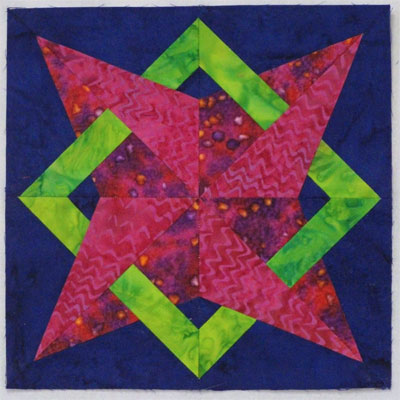 Nell's Star quilt block
Notice pink/fuchsia star points do not touch the edge of the block. The points of the green band will be at the edge of a block once it is sewn into a quilt.
If I was making a quilt from this pattern, I would choose star fabrics with a bit more contrast than those I chose for this example. This is one of the benefits of making a sample block first. Sometimes you just can't quite envision what you've got until it's in a block.
If you need a refresher on how to paper piece, go to our page Foundation Paper Piecing Instructions.
🔭 Looking for something truly stellar?
You've finished your star quilt block, and you're ready for more!
Browse our collection of 60 stellar star quilt block patterns. All have instructions and cutting charts in multiple sizes. If templates or paper piecing is used in the tutorial, there's a free download for you of those materials.

Eeny. Meenie. Miney. Moe.
Which star quilt block will you sew?
For a star-studded quilting experience, choose from 100+ bedazzling star quilt patterns—for beginners and beyond—click here.
For even MORE blocks to make... 🧩🎨

...visit our Free Quilt Block Pattern Library, with over 230+ blocks to choose from in multiple sizes.
Free downloads are included in all sizes for any blocks require paper piecing patterns or templates.
What about a different quilt block?
For a list of all the 220+ quilt block patterns on this site, start here.
If you know the name of the block, shorten your search by using these links:
Click here if you're looking for blocks with at least some paper piecing.
Click here if you're looking for the basic building blocks of quilting, i.e., Flying Geese, half square triangles, quarter square triangles, etc., along with several techniques to make each.
And finally, use these links to find blocks in these finished sizes:
- Home
- Free Quilt Block Patterns
- Nell's Star Quilt Block


