This post contains affiliate links for which I receive compensation
Machine quilting diagonal lines
by Hunter
(MA)
I'm confused as to where to start quilting (on a home machine, with a walking foot) a series of single diagonal lines across a (pieced) quilt top, spaced 1.5" apart.
Some say start in the middle of the quilt and work to the outer edge of the border; others recommend starting at the outer edge of the border and quilting the entire line to the opposite edge.
There are also differing opinions as to whether the quilt should be rotated when each line is finished. Some say, because the bias is being quilted, you must do this to avoid distortion, others say because it is on the bias there will be less distortion so this is not necessary(!)
In either case, should the quilting be accomplished in sections, or is it OK to start at the smallest diagonal across the quilt and continue in one direction until the entire surface is quilted?
Thanks!
Reply
Excellent question! There are a lot of divergent opinions on how to machine quilt a quilt. I will tell you what I do and why I do it this way.The first few lines of quilting should...
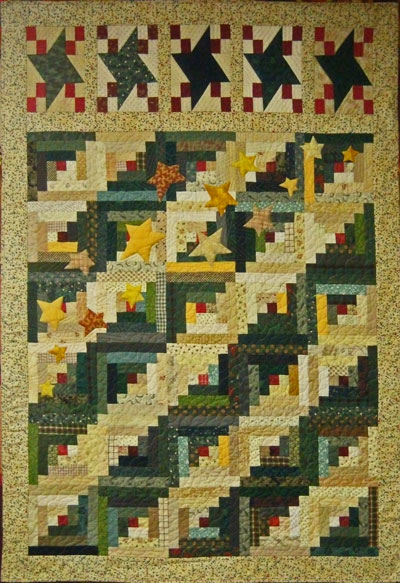
...help stabilize the quilt top and keep the layers aligned. Ideally, this stitching will be 'in the ditch' and not show. But that not always the case.On this log cabin quilt below, the blocks are set in straight rows and columns.

All the quilting in the center of the quilt is either on the diagonal or is decorative (outlining and echoing the trapuntoed stars).
To stabilize it, I stitched in the ditch closest to the center lines, both vertically and horizontally with water soluble thread. (This stitching was then washed out after the quilt was finished.)
If the quilt had been much bigger, I'd have added another couple of rows of vertical and horizontal ditch quilting to hold the layers securely in place.
Next came ditch quilting between the center blocks and the border. This was done with monofilament in the needle and cotton in the bobbin. I didn't want this stitching to show, but it was permanent quilting, no need to wash it out.
These first lines of quilting keep the layers of the quilt sandwich aligned, allow you to start removing some of your pin basting to make the quilting easier and create a framework on which to build the rest of your quilting stitches.
The ditch quilting starts at the top and center of the log cabin blocks in the ditch where the blocks and border meet. If there had been no border on this quilt, the quilting would have started at the outer edge.
To start ditch quilting from the very center of your quilt, in my humble opinion, is a time waster...you have to start and stop twice as many times; tie off and bury stitches or micro stitch twice as many times. I think that manipulation distorts the center. If you've done a good job pin basting I just don't see any advantage to starting there, just a lot of extra work.
If the blocks are set in an on-point layout, and there are no convenient center seams to quilt in (both horizontal and vertical), I would still stitch through the horizontal and vertical centers with water soluble thread to stabilize the quilt sandwich.
Yes it's extra work. But I want my quilt to retain it's shape and not skew because of all the diagonal stitching. Water soluble thread makes the stitching easy to remove...just remember to follow the manufacturer's instructions.
Now for the diagonal machine quilting
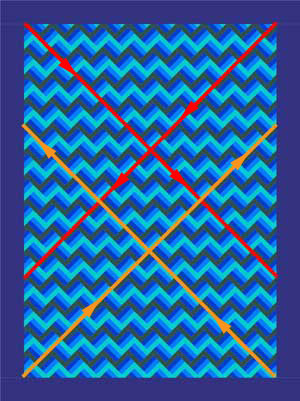
Start in the upper left corner and stitch your diagonal line down to the lower right. You'll start and stop either at the outside edge of the quilt just off the quilt edge (in the batting) or where the innermost border and center field of blocks meet. If you start at the latter, you'll need to either tie off or use micro stitching to secure both ends of the line of quilting.Next turn your quilt and stitch from the upper right corner down to the lower left in the same manner. Take care as you cross lines of quilting to prevent tucks from forming. If your quilt is square, these first lines of diagonal stabilizing is done.
If your quilt is rectangular, flip your quilt 180 degrees and repeat for that the first four lines of diagonal stitching look like that in the diagram below. (The arrows on the lines show the direction of the stitching.)

Now your quilt is fully stabilized. These stitching lines help minimize any distortion that may occur due to all the remaining diagonal quilting.
Stitch the diagonal quilting lines
Choose one of your diagonal lines.As your quilt is positioned under the needle, stitch the next diagonal line to the right of it from edge to edge or border to border. Knot and bury your thread tails or mircostitch to secure your thread tails. Do this as you go so you don't accidentally stitch through them as you are quilting.
Now stitch the next line to the right. I do not turn the quilt to alternate the stitching direction for every line, but stitch out from that first center line of quilting. By stitching in this manner, there's less and less quilt sandwich under the arm of your machine for each successive line of quilting. The work gets easier as you move out to the edge...with a minimal struggle moving the quilt around.
I have tried the 'flip the quilt after each line of stitching', but did not find any benefit from doing so. I honestly believe that a good basting job will do more for you then rotating the quilt sandwich.
You can read more here on the page How to Machine Quilt Your First Quilt. While this probably isn't your first quilt, there are more diagrams showing stitching out from the center line of quilting.
Wrapping it Up
The purpose of the first lines of quilting are to hold the layers of your quilt sandwich together and minimizing shifting.I know that all my quilts aren't perfectly square. I also know that once in awhile
The stabilizing stitching, along with a good pin basting job, helps contain the excess fabric to the area where it's at, instead of spreading my 'whoops' across the quilt top. That way I deal with it once and move on.
I hope this has addressed your question fully. There are probably as many variations on how to quilt a quilt as there are quilters.
Just remember, what works for YOU is the best way.
Piecefully,
Julie Baird
Editor
Comments for Machine quilting diagonal lines
|
||
|
||
|
||
|
||
|
||
|
||


