Fabric Grain Explained
Learn to take advantage of grain to improve your piecing!
This post contains affiliate links, for which I receive compensation.
Fabric grain is discussed early in clothing construction because it's important to the drape of the clothing.
But quilts are flat.
It's not often discussed in beginning quilting, but the proper use of grain lines affects all aspects of the quilting process.
Understanding and using the different grains helps:
- Improve the precision of your piecing
- Create quilts that hang even and straight
- Minimizes distortion
Let's find out what it is and learn how to use it to our advantage!
What is selvedge?
 The selvedge on this fat quarter is white.
The selvedge (sometimes spelled selvage) is the self finished edge of your quilt fabric. It is tightly woven, and for that reason, do not use the selvedge in your piecing and don't use it in your quilt backs.
Just cut it off.
In fact, when you hear the term 'usable width of fabric', that means the width of your fabric minus its selvedges.
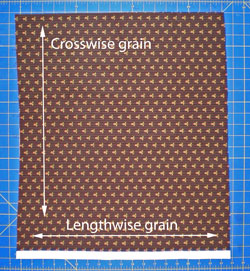
Fabric grain is described in relation to the selvedges of your yardage.
Lengthwise grain
Lengthwise grain runs parallel to the selvedge of your fabric. It has the least amount of stretch—virtually none.
Use lengthwise grain to your advantage
You can minimize sagging in your quilts by cutting your fabric in ways that take advantage of the stability of lengthwise grain.
Backs
Cut the backing so the lengthwise grain runs from top to bottom on your quilt as it will be hung.
Borders
For borders to have the lengthwise fabric grain running from top to bottom on all sides:
- Cut the long left and right borders of your quilt on the lengthwise grain.
- Cut the top and bottom borders on the crosswise grain.
Applique Blocks
Cut applique background fabric with the lengthwise fabric grain running top to bottom (unless the pattern of the fabric dictates otherwise i.e. a stripe). Since most blocks are cut square, this is easy to do.
This same idea applies to sashing strips and hanging sleeves that are used on your quilts.
Lengthwise grain can change fabric requirements
Cutting pieces specifically to use the lengthwise grain takes more fabric.
Quilt patterns are usually written with cross grain (selvedge-to-selvedge) cutting instructions. Review and double check before buying or cutting into your fabric.
Crosswise grain
This fabric grain has more stretch than lengthwise and less than bias.
It runs perpendicular to the selvedge. Most quilt patterns instruct you to cut cross grain strips and then sub-cut them into patches.
If the quilt will not be hung, quilt backs can be made with the cross grain running from side to side to economize on fabric.
Cross grain binding can be used for binding quilts with straight outside edges. However, if the edges are curved or you wish to take advantage of a plaid or stripe, bias binding is needed.
Bias
There are two definitions of bias. Each has a different amount of stretch.
True bias

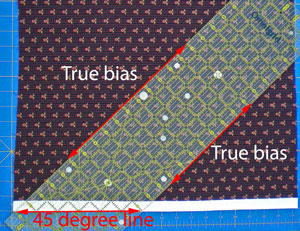
True bias is the line that runs through your fabric at a 45 degree angle from the selvedge. It has the most stretch of any grain.
To find it, lay the 45 degree line of your ruler even with the selvedge.
Each long side of the ruler in the picture is on the true bias of this fat quarter.
Or not...
Bias, cut on something other than a 45 degree angle from the selvedge, is stretchy, too.
You may need to cut on "a bias line" to capture a consistent pattern from your fabric for binding strips (think plaids or stripes). It works because it has more stretch than either cross or lengthwise-grain.
So if it's so touchy, what's it good for?
- Bias binding must be used for quilts with curved edges so that the binding lays flat as it curves around the outer edges.
- Bias strips are used to cover piping for embellishing quilts. The stretch helps the strips curve smoothly around the inner core of the piping. The larger the core, the more important the stretch is.
- Bias strips used in applique are easily curved into shape.
- Bias cuts are used for chenille quilts. The edges fray nicely without fraying away.
- Applique pieces are cut with as may edges as possible on the bias because they turn easier.
- Quilting lines stitched on the bias have fewer puckers.
Taming the Beast
Care must be taken with bias cut fabric.
Just handling the cut pieces can cause the edges to stretch IF you're not careful.
Remember, though, that this is JUST fabric. There's really nothing scary about it once you know how to handle it.
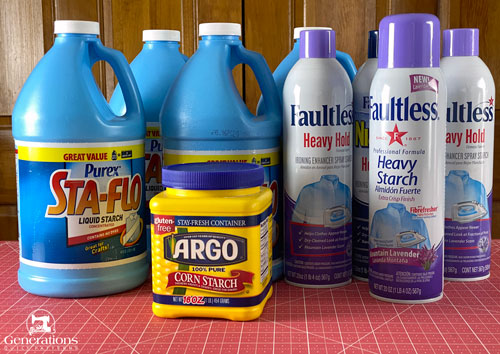
Starching your fabric before cutting helps control bias edges. I like to use a heavy application of starch on all my fabrics before cutting—a 1:1 of StaFlo Liquid Starch Concentrate to water.
 Starch Stash. Yeah! It's a thing.
To avoid handing the bias cut patches too much use your rotary ruler to move the patches from your cutting table to your sewing machine.
If you're stitching a bias to a straight of grain edge, place the bias edge closest to your feed dogs. The feed dogs will help control the stretch.
Using what you've learned about fabric grain in your quilt blocks
Ideally, all of the outside edges of a quilt block are on the straight of grain, either a lengthwise or crosswise grain line. This prevents distortion during piecing and pressing, helping to keep the block square.
To keep those bias edges inside the block, certain piecing "units" are cut very specifically.
- Cut a square once, diagonally from corner to corner to get units for half square triangles and/or setting triangles. The bias remains on the inside.
- Cut a square twice diagonally from corner to corner to get units for quarter square triangles and/or setting triangles. Again, the bias edge will remain on the inside of the block.
- You'll find using the lengthwise grain is one of the best ways to 'foolproof' the piecing of a Log Cabin block. [Click here to learn more.]


